Lomography Diana Manuel utilisateur

Manual


[9]
[12]
[7]
[11]
[4]
[10]
H
a
l
f
-
F
r
a
m
e
m
o
d
e
Square
[2]
[4]
[3]
[2]

[16]
[11]
[10]
[4]
[14]
[13] [1] [6]
[8]

[15]
[20]
[17]
[18]
[19]
ISO 100
ISO 400 NNN
N
N
N
B "
B15
"B 15
"B1"
EXPOSURE GUIDE

7 / ENGLISH
MINIInstructions
Hooray! You are now the proud owner of a Diana Mini – our favorite little analogue
princess! Take a moment to run through these instructions to make sure you get
the best out of this brilliant box of magic and fabulous ash.
Choosing Your Film
The Diana Mini will take any type of standard 35 mm lm, from black and white to
color negative and slide lm. There are dierent “speeds” of lm known as fast and
slow, this is dened by an ISO number. The most common are ISO 50, ISO 100, ISO
200, ISO 400, ISO 800, ISO 1600 and ISO 3200. On a sunny day, slow lms such as
ISO 100 and ISO 200 are good for the Diana Mini. On a grey day, fast lms such as
ISO 400 or ISO 800 would work best.
Choosing Your Format
The Diana Mini can shoot two dierent frame formats – rectangular ‘half-frame’
format (which is 17 × 24 mm) and square format (which is 24 × 24 mm). Half-frame
will produce 72 shots on a single roll of 35 mm lm while the square format will
produce a standard 36 shots. When shooting half-frames, the rectangular frame
takes a portrait shot when the camera is held normally. If you want to take a land-
scape shot when shooting half-frame, then just turn the camera 90 degrees.

Switching Between Formats
You can switch between frame formats on the same roll of lm – just remember
to take a blank shot (keep your lens cap on) between shots when switching from
half-frame to square format to avoid accidentally double exposing the same bit of
lm. Alternatively, you could throw caution to the wind and embrace those sorts
of happy accidents!
When to Use Each Format
This is entirely up to you! If you’re in a situation where you need to t more into
the shot, then make it square as that gives you a wider eld of view. If you want to
maximize how many shots you get on a roll, then use half-frame. You can also use
half-frame if you want to produce two shots on one frame.
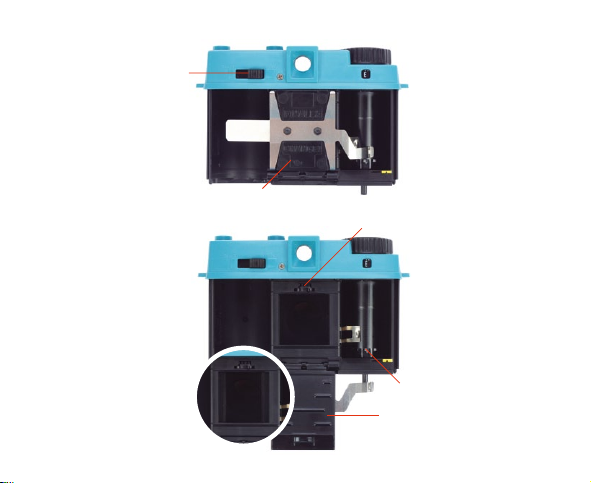
Loading Your Film
Before you start, take a blank shot by pressing the shutter release [11]. Do not
wind the advance wheel [4] forward yet. Turn the rear door switch [1] to open and
slide the rear door o. Move the pressure plate [2] down and put the new 35 mm
lm into the left-hand side. Pull the lm towards the clip on the take–up spool [3]
clip it on. Turn the advance wheel [4] anticlockwise a little to move the lm up to
the yellow mark. Check that the lm sprockets are aligned with the sprocket gear
spool [5] then close the movable lm plate [2]. Slide the rear door back on. You
may need to move the rewind lever [6] left and right a little to ensure it aligns with
8 / ENGLISH

the lm to allow the rear door to lock properly. Turn the rear door switch [1] to
close and wind the advance wheel [4] anticlockwise until it stops. Make sure you
don’t force the advance wheel [4] forward after you feel it has stopped naturally to
avoid snapping the lm.
Before Taking a Photo
The Diana Mini has four focus settings: 0.6 m, 1–2 m, 2–4 m and innity. You can
choose your setting by turning the lens [7] clockwise or anticlockwise to match the
marker of your desired focal length. Depending on the weather, set the aperture
switch [8] to either sunny (F/11) or cloudy (F/8). Make sure the shutter switch [9]
is set to the correct position. For daytime shots, position the switch to ‘N’. For long
exposures or nighttime shots, position the switch to ‘B’. Lastly, it’s time to choose
your frame format. Slide the frame switch [10] to either rectangular half-frame
format (72 photos on one roll) or square format (36 photos on one roll).
Shoot Some Blanks Before You Start!
Now that the focus, aperture, shutter speed and frame format are all set, you are
almost ready to go! Just one thing left to do – keep the lens cap on and shoot three
or four blank shots, this way the photo lab will know when the rst frame starts.
Now you are good to go! Frame your shot, compose it or just point the camera
without looking through the viewnder and push down on the shutter release [11].
After each photo, turn the advance wheel [4] anticlockwise until it stops. You will
9 / ENGLISH

need to turn it more in the square mode than in the rectangular half–frame mode.
In square mode it’s 1⁄2 a turn and in half–frame it’s about 1⁄4 turn. Make sure you do
not accidentally hold the rewind spool [6] with your thumb on the left while trying
to turn the advance wheel [4] on the right. Now you are ready to take another shot!
Rewinding the Film
When you have nished the lm you will not be able to turn the advance wheel [4] any
further. Hold down the rewind button [14], release the arm from the rewind spool [6]
and turn it in the direction of the arrow until the lm is fully rewound (you should hear
it unclip from the sprocket gear spool). Finally, unlock the rear door switch [1] and slide
the rear door o. Remove the lm and head to the processing lab! Load a new lm
and take your Diana Mini with you – you never know what you might see on your way!
Long Exposures
If you’re out in the evening don’t leave your Diana Mini at home. You can take
shots at nighttime by setting the shutter switch [9] to ‘B’. When you take a photo in
‘B’ mode you can hold down the shutter release [11] for as long as it takes to get
enough light onto the lm – take a look at the exposure guide at the end of these
instructions for recommended times. You can also screw a cable release into the
lens [12] and use that. Using a cable release will help you to avoid camera shake,
especially if the Diana Mini is xed onto a tripod thanks to the tripod mount [13].
10 / ENGLISH
Table des matières
Langues :
Autres manuels Lomography Appareil photo numérique


