
LG DHA1260HL Manuel utilisateur

Dehumidifier
SERVICE MANUAL
MODEL: DHA1260HR/HL
DHA1660HR/HL
CAUTION
- BEFORE SERVICING THE UNIT,
READ THE SAFETY PRECAUTIONS IN THIS MANUAL.
- ONLY FOR AUTHORIZED SERVICE.
website http://www.lgservice.com
e-mail http://www.lgeservice.com/techsup.html

—2—
1. PREFACE
1.1 SAFETY PRECAUTIONS...........................................................................................................................3
1.2 FEATURES.................................................................................................................................................3
1.3 DIMENSIONS.............................................................................................................................................3
1.4 SPECIFICATIONS......................................................................................................................................4
1.5 CONTROL ..................................................................................................................................................6
1.6 HOW TO OPERATE DEHUMIDIFIER........................................................................................................6
1.6.1 HOW DOES THE DEHUMIDIFIER WORK? .....................................................................................6
1.6.2 LOCATION FOR THE DEHUMIDIFIER.............................................................................................6
1.6.3 SWITCH ASSEMBLY, MICRO..........................................................................................................7
1.6.4 THERMOSTAT AND SOLENOID VALVE(Hot gas defrost) ..............................................................7
1.6.5 HUMIDISTAT.....................................................................................................................................7
1.6.6 DRYER ASSEMBLY..........................................................................................................................7
2. CIRCUIT DIAGRAM............................................................................................................................8
3.
DISASSEMBLY INSTRUCTIONS
3.1 MECHANICAL PARTS ...............................................................................................................................9
3.1.1 BUCKET AND AIR FILTER...............................................................................................................9
3.1.2 FRONT GRILLE.................................................................................................................................9
3.1.3 CONTROL PANEL AND CABINET...................................................................................................9
3.2 CONTROL PARTS AND CYCLE PARTS.................................................................................................10
3.2.1 ROTARY SWITCH AND HUMIDISTAT...........................................................................................10
3.2.2 NEON LAMP....................................................................................................................................10
3.2.3 FAN AND MOTOR...........................................................................................................................10
3.2.4 SHROUD.........................................................................................................................................10
3.2.5 DRAIN PAN.....................................................................................................................................11
3.2.6 TERMINAL BLOCK .........................................................................................................................11
3.2.7 MICRO SWICH ASSEMBLY ...........................................................................................................11
3.2.8 THERMOSTAT................................................................................................................................11
3.2.9 P.T.C. ASSEMBLY OR OVERLOAD PROTECTOR (O.L.P.) .........................................................12
3.2.10 COMPRESSOR ............................................................................................................................12
3.2.11 POWER CORD ASSEMBLY.........................................................................................................12
3.3 REFRIGERATING CYCLE .......................................................................................................................13
3.3.1 CONDENSER ASSEMBLY AND EVAPORATOR ASSEMBLY
(HEAT EXCHANGE ASSEMBLY)...................................................................................................13
3.3.2 CAPILLARY TUBE ASSEMBLY......................................................................................................13
3.4 HOW TO REPLACE REFRIGERATION SYSTEM...................................................................................14
4. TROUBLESHOOTING GUIDE...................................................................................................16
5. EXPLODED VIEW - INTRODUCTION..................................................................................19
6. REPLACEMENT PARTS LIST...................................................................................................23
CONTENTS
—3—
1. PREFACE
This Service Manual provides various service information, containing the mechanical and electrical parts etc.
This dehumidifier was manufactured and assembled under the strict quality control system.
The refrigerant is charged at the factory. Be sure to read the safety precaution prior to servicing the unit.
1.1 SAFETY PRECAUTIONS
• Disconnect power supply before servicing or replacing any electrical or non-electrical component.
• Do not, under any circumstances, cut off the grounding prong or alter the plug in any manner.
1.2 FEATURES
• High efficiency
• Quiet
• Adjustable humidistat
• Hot gas defrost
• Automatic shut-off
• Water-full indicator light
• Easy roll casters
• Removable & large capacity bucket
• Washable air filter
• Fan speed: High/Low 2 fan speeds
• Drain hose connection.
• Power ON/OFF indicator light.
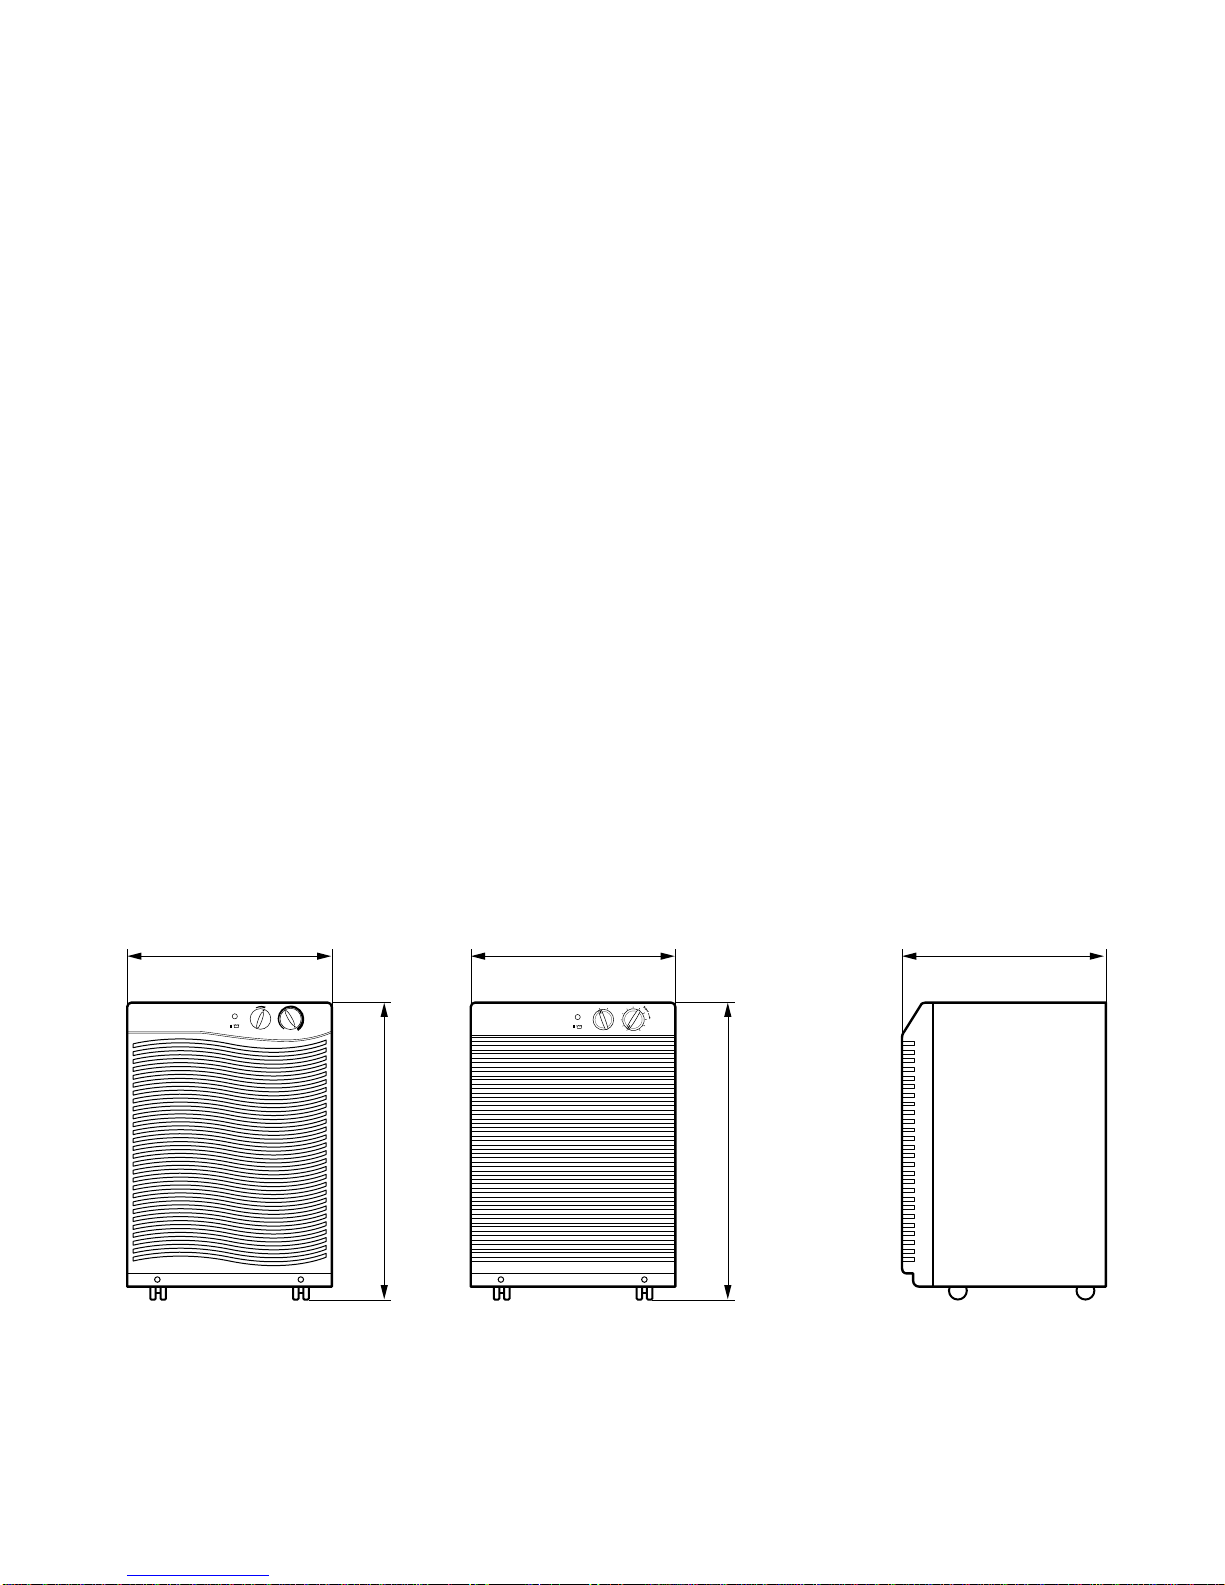
1.3 DIMENSIONS (mm/in)
320 (12 9/16) 340 (13 3/8)
530 (20 13/16)
320 (12 9/16)
530 (20 13/16)
HighLow
8
Humidity Control
Fan Speed O
1
2
3
456
7
9
Max.
L
o
w
H
i
g
h
Fan Speed
Dryness Control
N
o
r
m
a
l
D
r
y
n
e
s
s
MaxO
• DHA1260HR • DHA1260HL
• DHA1660HR • DHA1660HL
—4—
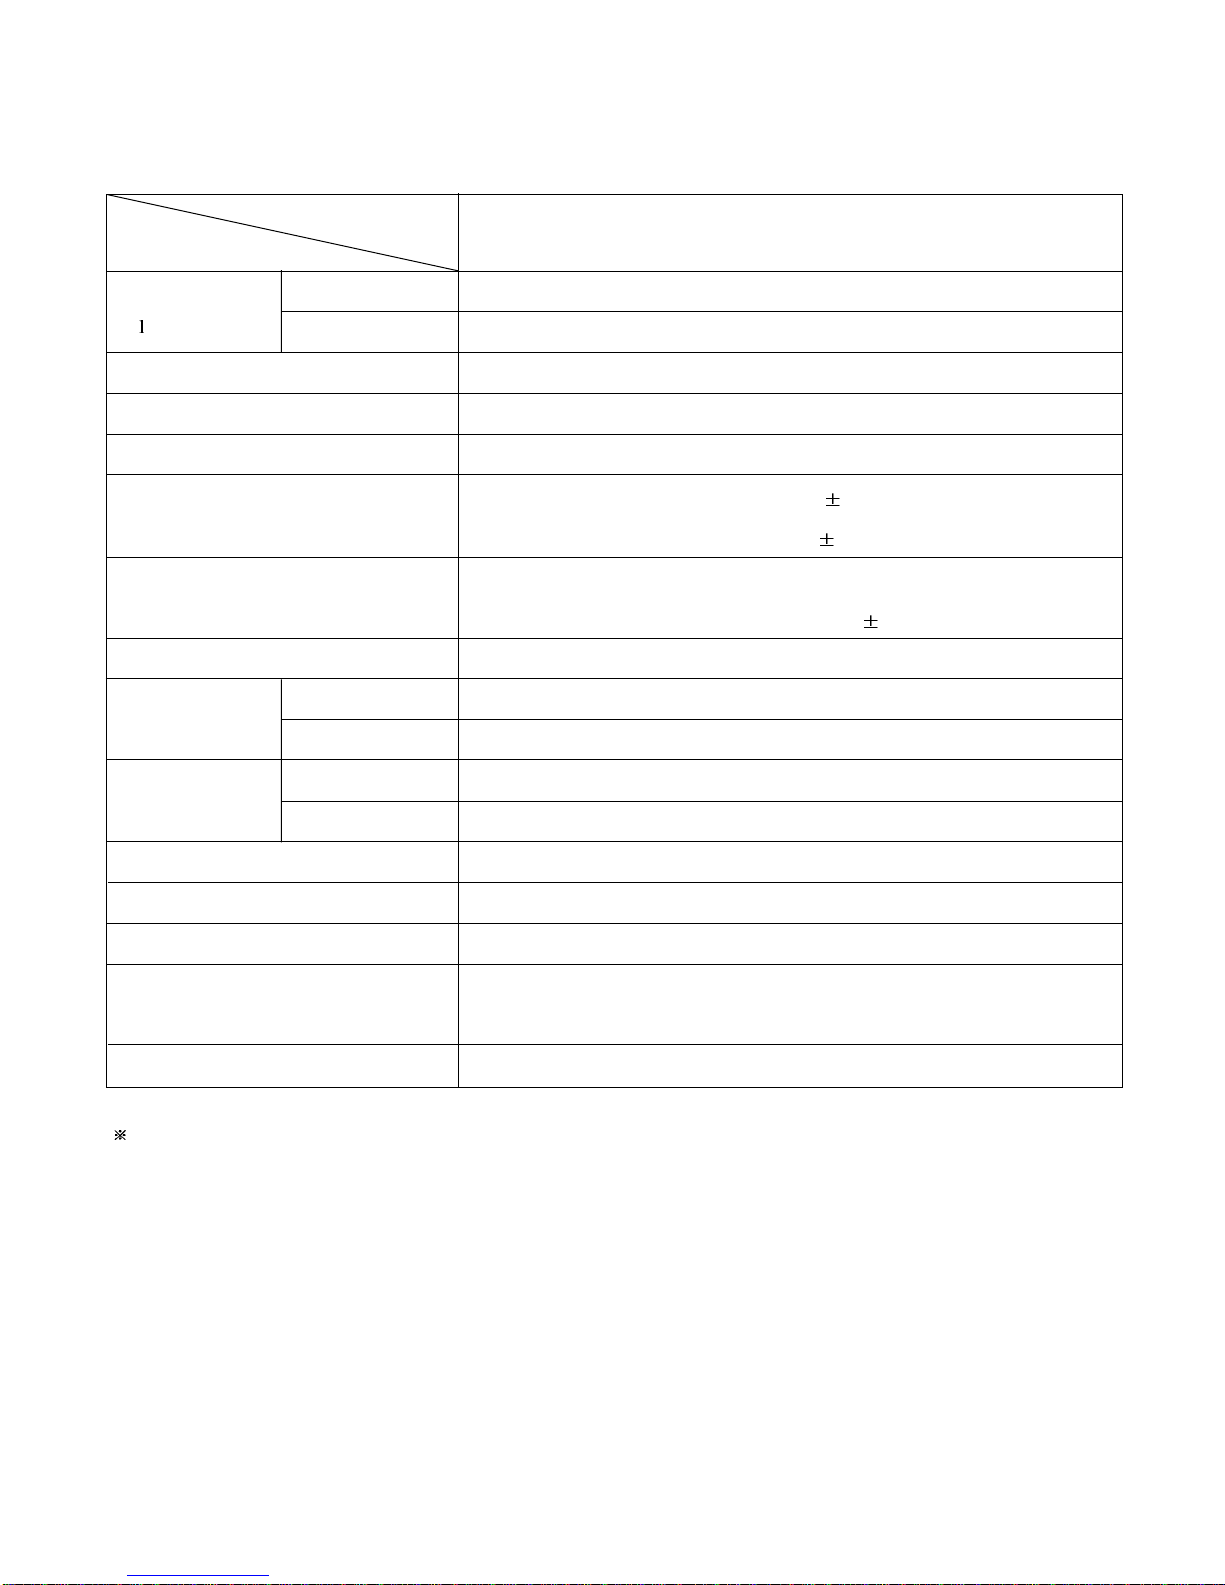
1.4 SPECIFICATIONS
DHA1260HL/HR
CAPACITY 32˚C 80% RH
(/Day) 27˚C 60% RH
POWER SUPPLY (Phase, V, Hz)
REFRIGERANT
REFRIGERANT CHARGE, g
THERMOSTAT
HUMIDISTAT
COMPRESSOR MODEL NO.
TYPE
RESISTANCE(at 25˚C)
TYPE
SWITCH, ROTARY
MOTOR ASSEMBLY, SINGLE
SWITCH ASSEMBLY, MICRO
NET WEIGHT, kg
MODELS
ITEMS
P.T.C.
ASSEMBLY
OUTSIDE DIMENSIONS
W x H x D, mm(in)
OVERLOAD
PROTECTOR
NOTE : Specifications are subject to minor change without notice for further improvement.
12
6
1ø, 220~240V, 50Hz
R134a
170
OPEN : -8˚C 1.5˚C
CLOSE : 3˚C 1.5˚C
CONTROL RANGE : 20% ~ 80% RH
NORMAL SETTING : 42 5% RH
NR45HAEG
P330MC/ MRA12091-9010
33 Ω
TI. No 4TM213SFB
OPENING TEMP.: 135˚C CLOSING TEMP.: 61˚C TRIP CURRENT: (60˚C) 1.7 ~ 2.1A
20A, 125/250VAC
4P, 19~23W, 0.11~0.13A, T.P: 17AM033A5-4(266°F/130°C)
6A, 250VAC
320 x 530 x 340 (12 9/16 x 20 13/16 x 13 3/8)
19

—5—
DHA1660HL/HR
CAPACITY 32˚C 80% RH
(/Day) 27˚C 60% RH
POWER SUPPLY (Phase, V, Hz)
REFRIGERANT
REFRIGERANT CHARGE, g
THERMOSTAT
HUMIDISTAT
COMPRESSOR MODEL NO.
TYPE
RESISTANCE
TYPE
SWITCH, ROTARY
MOTOR ASSEMBLY, SINGLE
SWITCH ASSEMBLY, MICRO
NET WEIGHT, kg
MODELS
ITEMS
P.T.C.
ASSEMBLY
OUTSIDE DIMENSIONS
W x H x D, mm(in)
OVERLOAD
PROTECTOR
NOTE : Specifications are subject to minor change without notice for further improvement.
16
8
1ø, 220~240V, 50Hz
R134a
190
OPEN : -10˚C 2˚C
CLOSE : 5˚C 2˚C
CONTROL RANGE : 20% ~ 80% RH
NORMAL SETTING : 42 5% RH
NR62HAEG
P330MC / MRA12091-9010
33 Ω
TI.NO. 4TM232VFB
OPENING TEMP.: 120˚C CLOSING TEMP.: 61˚C TRIP CURRENT: (70˚C) 2.3A
20A, 125/250VAC
4P, 19~23W, 0.11~0.13A, T.P: 17AM033A5(266°F/130°C)
6A, 250VAC
320 x 530 x 340 (12 9/16 x 20 13/16 x 13 3/8)
20
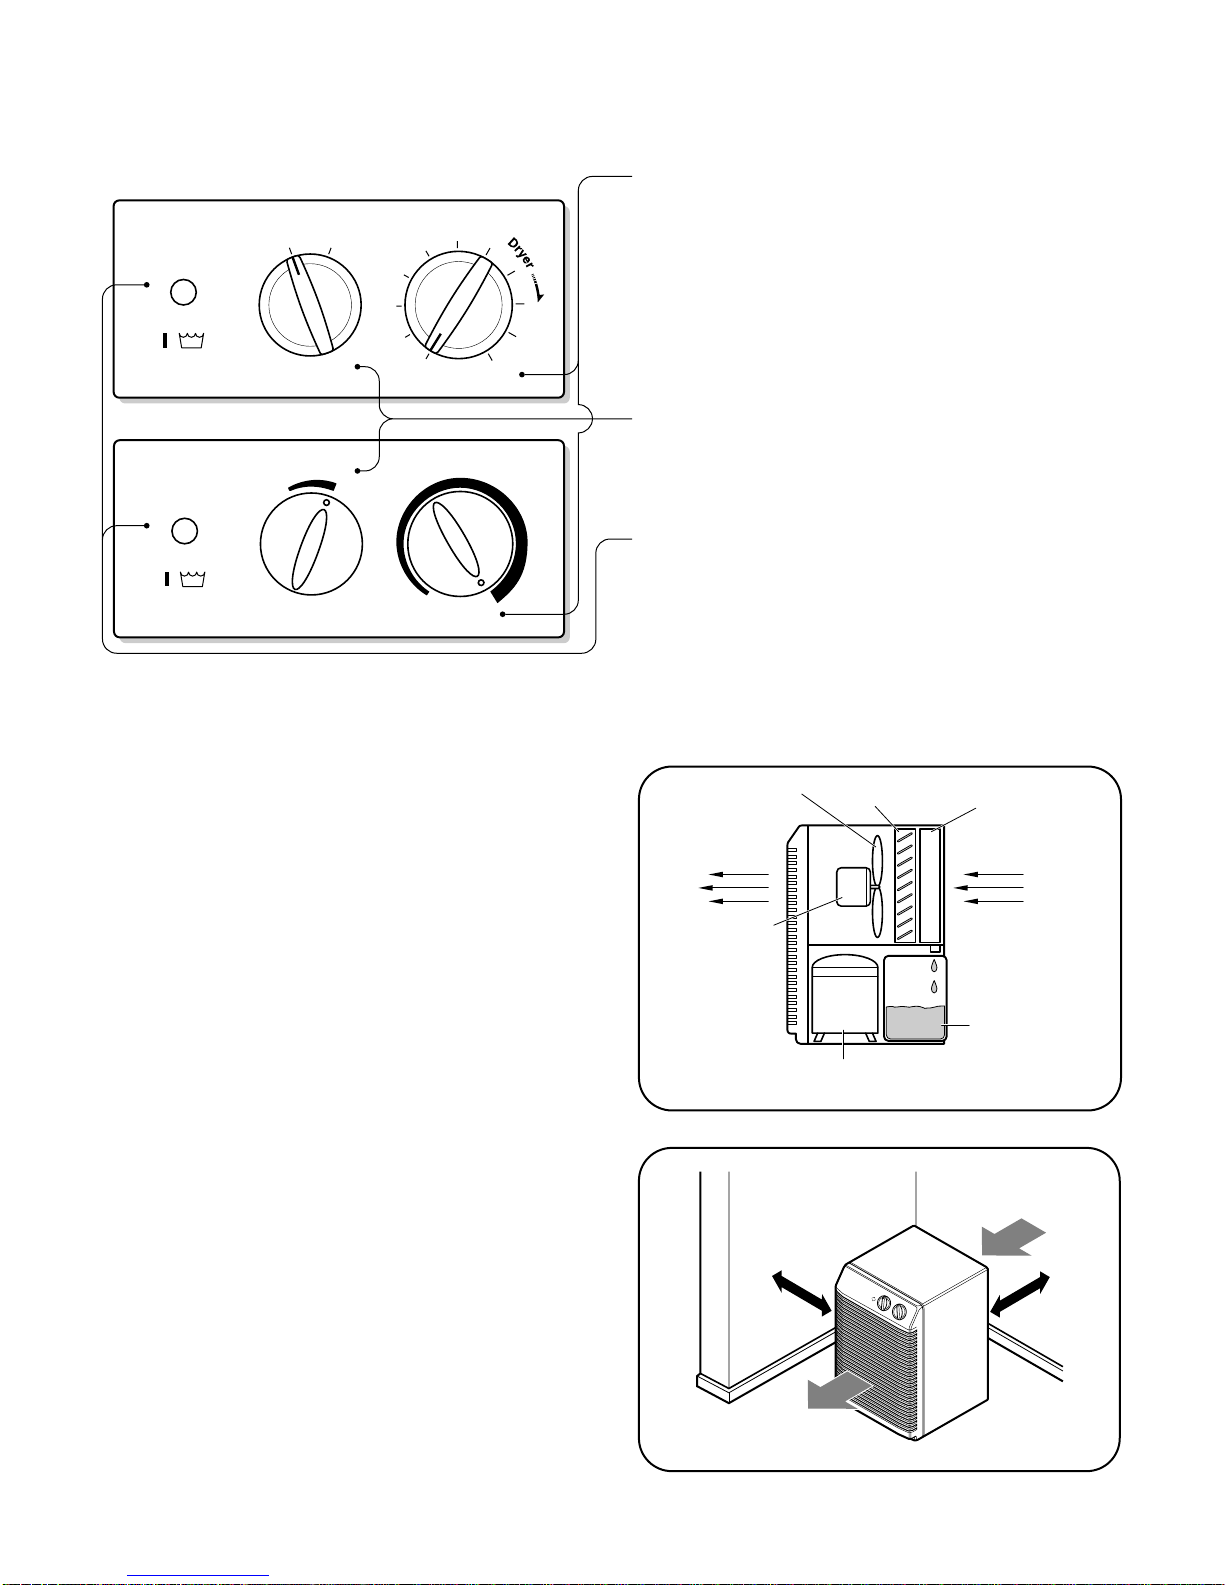
1.6.1 HOW DOES THE DEHUMIDIFIER WORK?
The dehumidifier, as shown in Figure 1, consists of a
small refrigerant system and a fan. The fan pulls
humid air from the room, across the cold evaporator
coil where the water drips off into a bucket or drain
hose.
1.6.2 LOCATION FOR THE DEHUMIDIFIER
1. In order for the unit to operate effectively, all doors,
windows and other openings should be closed.
Moisture-laden outdoor air will only add to the
dehumidifier's operating load.
2. Allow at least 12 inches of space on all sides of the
unit for good air circulation.
3. Install your dehumidifier on a floor, table, or shelf.
When installing the dehumidifier on a table or shelf,
make sure the table or shelf is strong enough to
support the weight of the dehumidifier with a full
bucket. Do not sit or stand on the dehumidifier.
NOTE: The height of a table or shelf might provide
a better position from which to handle the
bucket and help prevent icing of the coils
due to colder air near the floor (such as in a
basement).
Humidity Control
•The Humidity Control can be set anywhere between
Off and Max for normal operation. If you need more
dehumidification, turn the Humidity Control toward
Max. If you need less dehumidification, turn the
Humidity Control toward Off.
•Turn the Humidity Control to Off to stop the unit
manually.
Fan Speed
•If you want to control the speed of air flow, turn the
Fan Speed toward Low or High.
Auto Shut-Off
RED : BUCKET IS FULL, POWER OFF
GREEN : OPERATING
•When the bucket is full, operation automatically shuts
down and the lamp light changes too.
—6—
HighLow
8
Humidity Control
Fan Speed O
1
2
3
456
7
9
Max.
L
o
w
H
i
g
h
Fan Speed
Dryness Control
N
o
r
m
a
l
D
r
y
n
e
s
s
MaxO
Dry
Air Out Humid
Air In
Fan
Compressor
Side View
Bucket
Condenser
Assembly Evaporator
Assembly
Motor
Assembly
12"
Air In
Air Out
12"
Figure 1
Figure 2
1.6 HOW TO OPERATE DEHUMIDIFIER
1.5 CONTROL
•DHA1260HL, DHA1660HL
•DHA1260HR, DHA1660HR
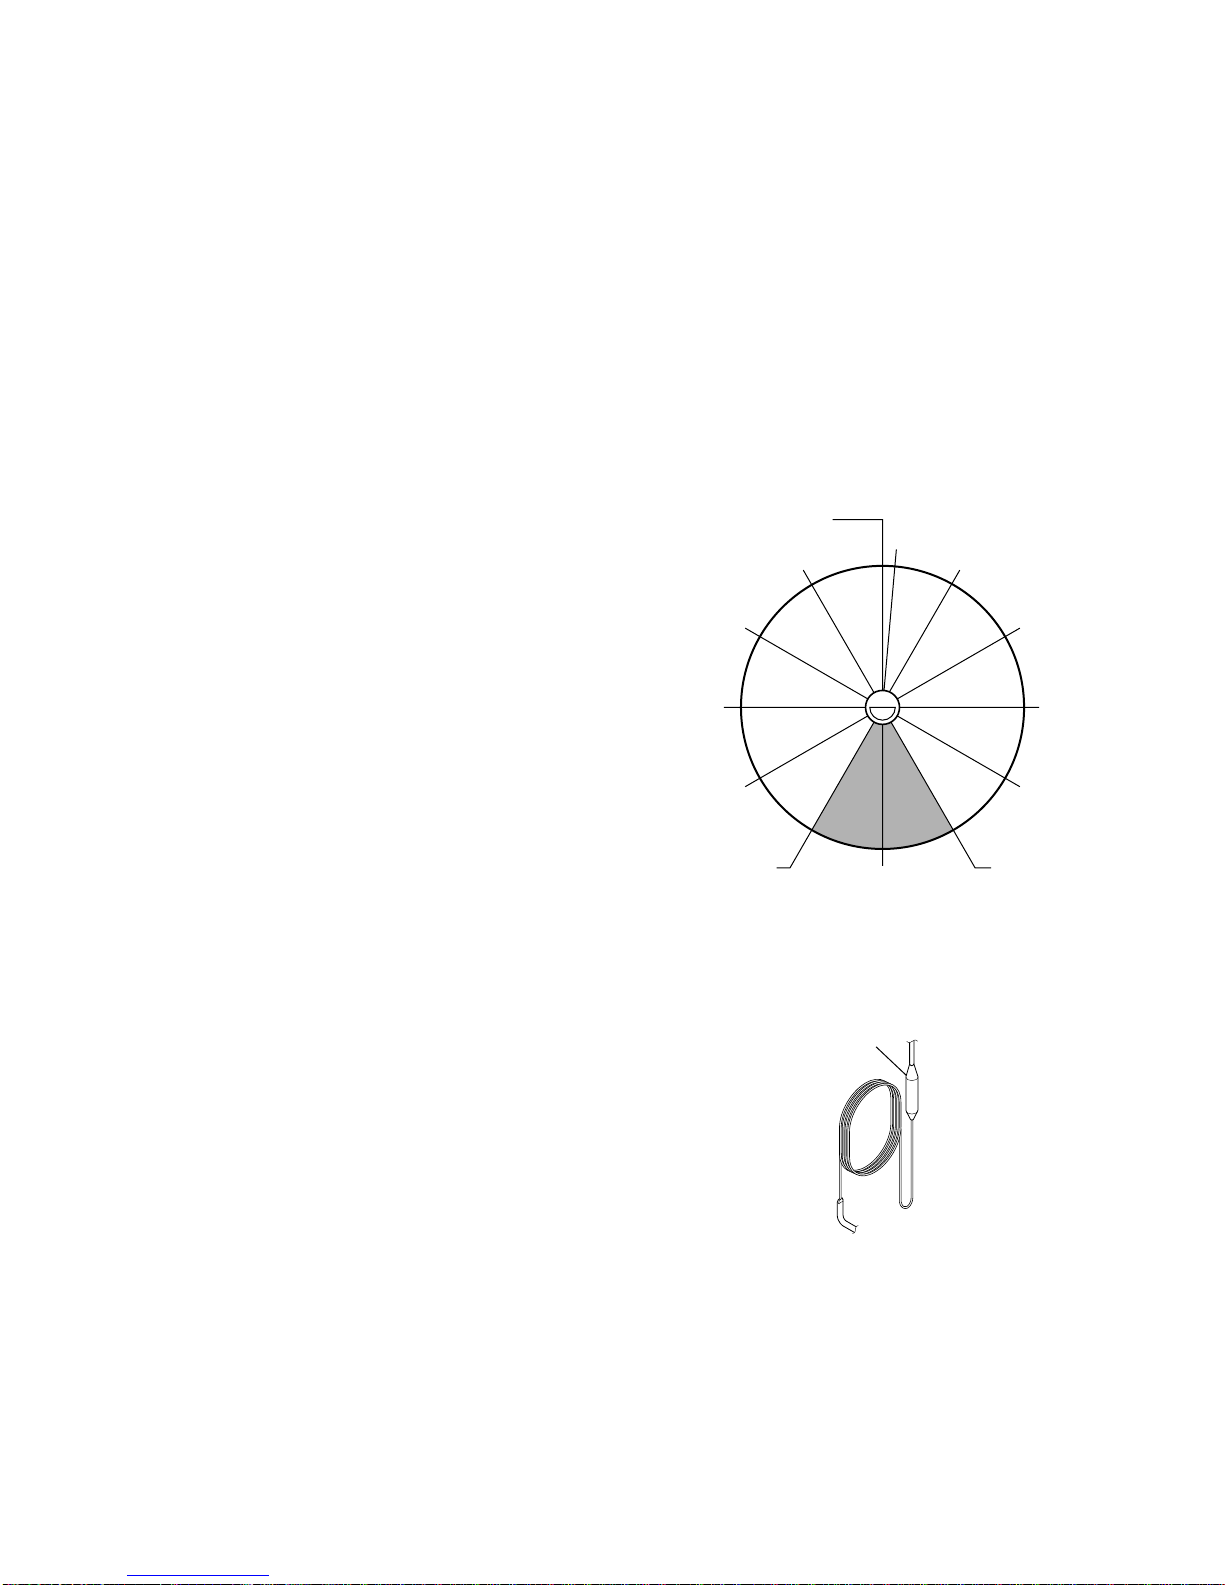
1.6.5 HUMIDISTAT
Humidistat maintains the constant relative humidity in the
room automatically to satisfy particular need.
(When the relative humidity in the room increases to the
selected level, the dehumidifier starts automatically.) Once
the relative humidity drops to the selected level, the
dehumidifier stops automatically.
When first using the dehumidifier, it is recommended, for
the first three or four days, to operate the unit with the
humidistat control set at the MAX. At this setting, the unit
will run continuously.
When the sweating has stopped and the dampness odors
have gone, it is preferable to select the humidistat position
that will best suit local conditions.
The relative humidity range it can control is from 20 % to
80%. (See Figure 3)
NOTE: The relative humidity at the number is the
approximate value.
1.6.6 DRYER ASSEMBLY
Dryer is used to prevent water from overflowing in all tubes
and H/E assembly-condenser assembly and evaporator
assembly-and an acid, water and bad material from heating
oil. Also, dryer is used to remove corrosion of the
components.
NOTE: When dryer is replaced, proper injection to
capillary is needed. On opening the dryer, it
should be welded instantly. The oxidization of
dryer inside and all tubes inside after welding
can be prevented.
—7—
42% R.H 40%
7(30%)
6(35%)4(50%)
3(60%)
2(70%)
1(80%)
5(42%)
8(25%)
9(20%)
Max.ODEAD DIAL
Dryer
Figure 4
Figure 3
MODEL: DHA1260HL/HR, DHA1660HL/HR
1.6.3 SWITCH ASSEMBLY, MICRO
The micro switch assembly, which is located on the back of the unit, automatically shuts off the dehumidifier when the bucket is
full (note, the Auto Shut Off lights, to indicate bucket must be emptied). Once the bucket has been emptied and replaced, the
unit once again turns itself on.
1.6.4 THERMOSTAT AND SOLENOID VALVE (Hot gas defrost)
The THERMOSTAT senses frost build-up on the evaporator coil and automatically shuts off the fan. The compressor continues
to run, hot gas(solenoid valve is open) is supplied through the coil and melting the frost. When the coil is defrosted, the fan
automatically restarts, and hot gas valve is closed, and dehumidifying resumes.

—8—
2. CIRCUIT DIAGRAM
•MODEL : DHA1260HL/HR, DHA1660HL/HR
LAMP,
NEON
SOLENOID
VALVE
TERMINAL
BLOCK
P.T.C.
WIRING DIAGRAM
3854A20005A
O.L.P.
SWITCH,
ROTARY
SWITCH,
LAMP
C
YL
BL
BR
6
4
1
1
2
HUMIDISTAT
THERMOSTAT
1
2
SC
M
COMP.
RD
RD(BL)
BK
BK
BK RD
BR(L)BL(N)
GR/YL
BK
WH
WH
LH
C
BL
BL
N.O N.C
MOTOR
Q'TY
PER SET
1
1
1
1
1
1
1
1
1
1
1
1
RE-
MARKS
S
S
S
S
S
S
S
S
S
S
S
S
LOCATION
NO.
1
2
3
4
5
6
7
8
9
10
11
12
DESCRIPTION
POWER CORD ASSEMBLY
SWITCH, ROTARY
MOTOR ASSEMBLY, SINGLE
P.T.C. ASSEMBLY
COMPRESSOR
O.L.P.
LAMP, NEON
THERMOSTAT
HUMIDISTAT
SWITCH ASSEMBLY, MICRO
TERMINAL BLOCK
SOLENOID, COIL
DHA1260HL/HR DHA1660HL/HR
2H01159Y/ 6411A20001B
6600A20001A
4681A20002D
6748C-0003C
5416A20009A 5416A20009B
6750C-0005M
6912A30001B
2H01127E 2H01127F
5216A20001A
6600A30003B
3H00390A
6421A90001C
PART NO.
S: SERVICE PARTS A: ALTERNATE PARTS N: NOT SERVICE PARTS
2H01159Y/ 6411A20001B
3H01652Q(For H.K)
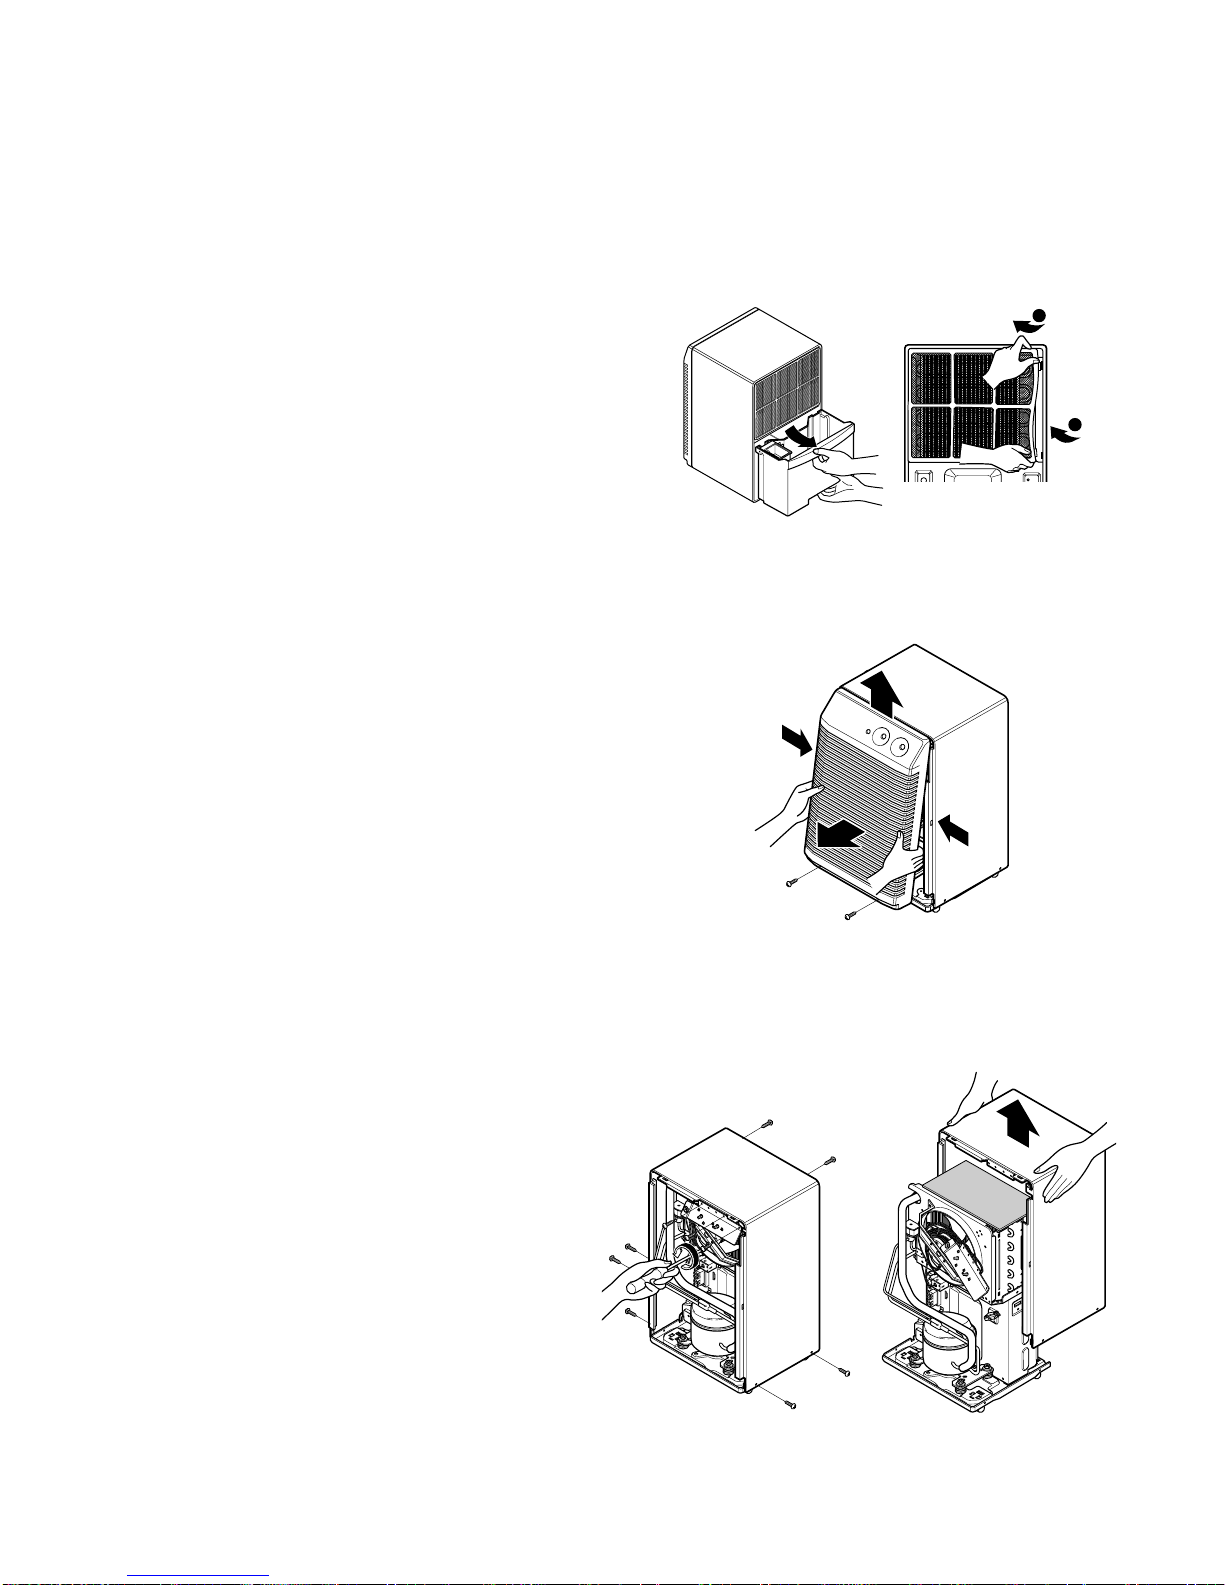
3.1 MECHANICAL PARTS
3.1.1 BUCKET AND AIR FILTER
1. Disconnect the power supply.
2. Turn the Humidity Control off.
3. Remove the bucket (See Figure 5)
4. Flex the filter at the lower right corner and take it
off. (See Figure 5)
5. Replace the filter by referring to the removal
procedure above.
3.1.2 FRONT GRILLE
1. Remove 2 screws which fasten the front grille.
2. By pushing both sides front grille, pull the front grille
forward and upward. (See Figure 6)
3. Replace the front grille by referring to the removal
procedure above.
3.1.3. CONTROL PANEL AND CABINET
1. Remove the bucket, air filter, and front grille
according to the procedure above.
(Refer to 3.1.1/ 3.1.2)
2. Remove control panel by removing 3 screws.
(See Figure 7)
3. Remove 7 screws on all sides of the cabinet.
(See Figure 7)
4. Lift the cabinet from the base. (See Figure 8)
5. Replace the component by referring to the removal
procedure above.
—9—
3. DISASSEMBLY INSTRUCTIONS
1
2
Push
Push
Figure 5
Figure 6
Figure 7 Figure 8
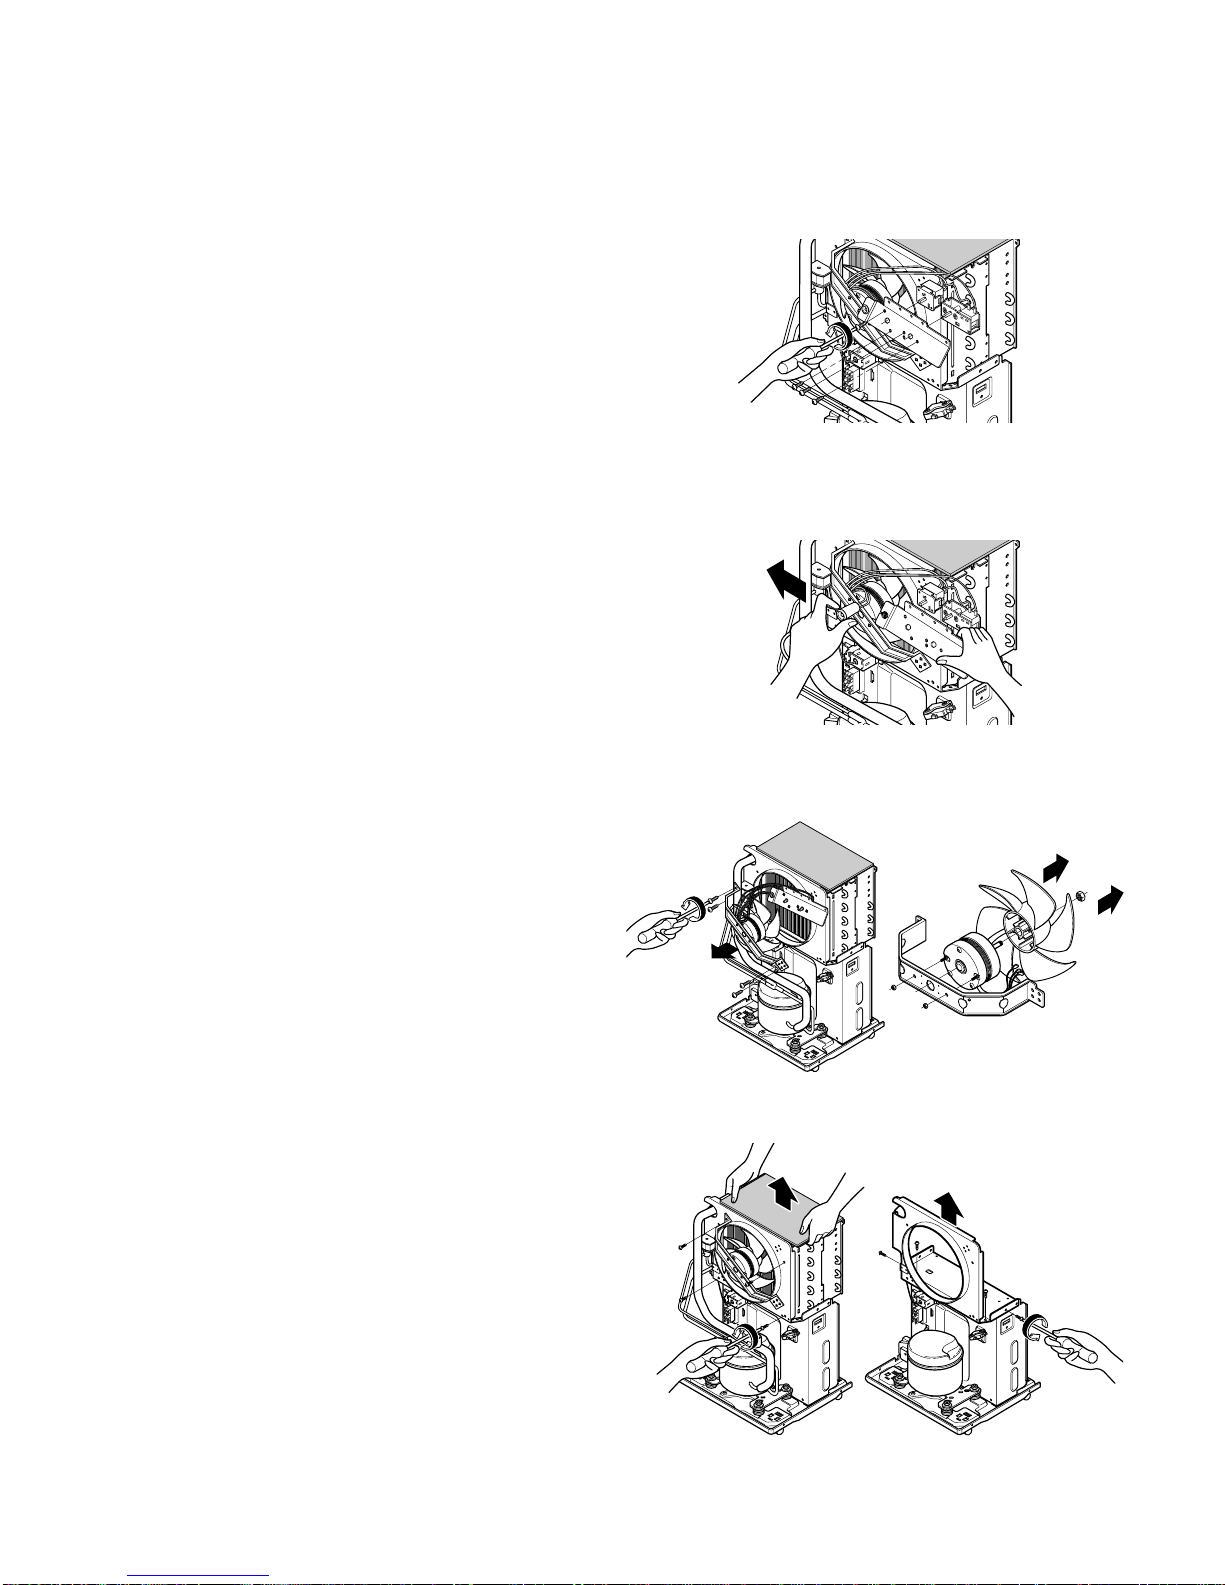
3.2.1 ROTARY SWITCH AND HUMIDISTAT
1. Remove the cabinet (Refer to section 3.1.3)
2. Disconnect all leads of rotary switch and
humidistat.
3. Remove 4 screws which fasten the rotary switch
and humidistat. (See Figure 9)
4. Replace the components by referring to the
removal procedure above.
3.2.2 NEON LAMP
1. Remove the cabinet (Refer to section 3.1.3)
2. Disconnect two leads.
3. Pull neon lamp out. (See Figure 10)
4. Replace the cabinet by referring to the removal
procedure above.
3.2.3 FAN AND MOTOR
1. Remove the cabinet. (Refer to section 3.1.3)
2. Disconnect all the leads of control panel assembly.
3. Remove 4 screws which fasten the motor mount.
(See Figure 11)
4. Remove 2 nuts which secure the motor.
(See Figure 11)
5. Remove one nut which fastens the fan.
(See Figure 11)
6. Remove the fan forward carefully like, as shown by
the arrow. (See Figure 11)
7. Replace the components by referring to the
removal procedure above.
3.2.4 SHROUD
1. Remove the motor mount. (Refer to section 3.2.3)
2. Remove 4 screws which fasten the H/E assembly.
(See Figure 12)
3. Remove discharge and suction tube assembly.
4. Remove 4 screws which fasten the shroud.
(See Figure 12)
5. Remove the shroud from barrier. (See Figure 12)
6. Replace the component by referring to the removal
procedure above.
—10—
3.2 CONTROL PARTS AND CYCLE PARTS
Figure 9
Figure 10
Figure 11
Figure 12
Ce manuel convient aux modèles suivants
3
Table des matières
Autres manuels LG Autre

LG
LG 360 VR LG-R100 Manuel utilisateur

LG
LG 360 VR Manuel utilisateur

LG
LG HPS-B090 Series Manuel utilisateur

LG
LG KG375 Manuel utilisateur

LG
LG S5200 Manuel utilisateur

LG
LG GB108 Manuel utilisateur

LG
LG Optimus Dynamic L38C Manuel utilisateur

LG
LG U990 Manuel utilisateur

LG
LG 55LA6970 Manuel utilisateur

LG
LG 360 VR Manuel utilisateur


