
LENSHOOKE X1 PRO Manuel utilisateur

Semen Quality Analyzer
X1 PRO
User Manual
Rev.29-0X10801 20200302X1B005

Symbols
Please read this user manual carefully first, to ensure proper use of the product. This user manual is
also available at www.LENSHOOKE.com.
The following icons may appear in the content of this user manual.
The package includes
LensHooke™ X1 PRO
Semen Quality Analyzer
Power Adaptor (for analyzer) User Manual
Semen Quality Analyzer
X1 PRO
User Manual
Rev.29-0X10003 20190909X1D003
Symbol for “The intended use of a prescription IVD product”
Symbol for “NOTICE”
Symbol for “CAUTION”
Symbol for “PAGE NUMBER”
Symbol for “DO NOT REUSE”
Symbol for “USE BY”
Symbol for “BATCH CODE”
Symbol for “SERIAL NUMBER”
Symbol for “DATE OF MANUFACTURE”
Symbol for “MANUFACTURER”
Symbol for “AUTHORIZED REPRESENTATIVE IN THE EUROPEAN COMMUNITY”
Symbol for “IN VITRO DIAGNOSTIC DEVICE”
Symbol for “TEMPERATURE LIMITATION”
Symbol for “CONSULT INSTRUCTIONS FOR USE”
Symbol for “WEEE WASTE RECYCLING”
CE mark
Symbol for “FOLLOW INSTRUCTIONS FOR USE”

Table of Contents
I.
II.
III.
IV.
V.
VI.
VII.
VIII.
IX.
X.
XI.
XII.
XIII.
XIV.
Introduction
Intended Use
Product Overview
Consumables
Major Functions
Accessories
Getting Started
Cleaning & Maintenance
Error Message
Analyzer Specifications
Reference
Statement
Warnings and Precautions
Warranty
1
1
2
4
5
20
23
25
27
28
28
29
29
30
..........................................................................................................................................
........................................................................................................................................
.................................................................................................................................
.......................................................................................................................................
...................................................................................................................................
..........................................................................................................................................
.....................................................................................................................................
......................................................................................................................
......................................................................................................................................
.......................................................................................................................
.............................................................................................................................................
............................................................................................................................................
..................................................................................................................
...............................................................................................................................................

(1)
(2)
(3)
(4)
I. Introduction
Sperm concentration (106per ml)
Total motility (PR+NP, %)
Progressive motility (%)
Non-Progressive motility (%)
Sperm morphology (normal forms, %)
pH value
LensHookeTM X1 PRO Semen Quality Analyzer is for in vitro diagnostic only. The user should read this
User Manual first, to get familiar with the device and its proper operation procedure prior to use the
analyzer.
II. Intended use
The LensHookeTM X1 PRO Semen Quality Analyzer used with LensHookeTM Semen Test Cassette is an
optical device for human semen analysis which provides direct and calculated quantitative measure-
ments for:
The LensHookeTM X1 PRO Semen Quality Analyzer does not provide a comprehensive evaluation of a
male’s fertility status.
It is an in-vitro diagnostic system intended for human semen analysis of individuals in healthcare
professional setting to evaluate male fertility.
1

NOTE
Touch Screen
Test Cassette Insert Slot
Power Button
Reset Button
AC Plug
Power Adaptor Plug
Power Adaptor LensHookeTM Semen Test Cassette
III. Product Overview
USB Port : USB 2.0
Reset Button : If the analyzer crashes, please use a pin to press the reset button.
HDMI Port : The analyzer allows a HDMI cable connection to a high definition monitor to review the
images and data.
LensHookeTM X1 PRO Semen Quality Analyzer
Accessories
1
1
2
2
3
4
USB Port
USB Port
HDMI Port
Power Adaptor Port
5
6
7
8
Dongguan Shilong Fuhua Electronic Co., Ltd;
UES12LCP-050200SPA ※Sold separately
2
1
2
3
Top View
Front View Rear View
70.00mm
140.00mm
71.20mm
6 7 84 5

NOTE
Touch Screen Icon
The icons below are functional
HDMI connection icon: This analyzer is connected to monitor by a HDMI port.
USB connection icon: This analyzer is connected to a USB Drive.
Thermal Receipt Printer connection icon: This analyzer is connected to a Thermal Receipt Printer.
Power Adaptor connection icon: This analyzer is connected to a power adaptor.
Battery icon: It shows the battery status.
1
1 2 3 4 5
6
7
8
2
3
4
5
Utilities icon: Functions include:
-Quality Control: To check the quality of the analyzer/device.
-Backup All Records: To backup the data for all results.
-System Update: To update the system.
-About: To get the informations of the analyzer/device.
-Delete All Records: To remove/delete all results.
Settings icon: Functions include:
- WHO Standard: To select WHO edition of 4th or 5th.
- Date & Time: To set up the Date and Time.
- Language: To select the language preference.
- Access Password:
To get or change the LAN Password to access the analyzer/device through
network.
- Brightness: To adjust the brightness of the screen.
Recent Tests icon: To review the previous test results.
New Test icon: To start testing.
6
7
8
9
9
3
USB connection icon: If you insert any other USB devices, such as a keyboard, mouse, dongle...etc,
this icon will not appear on the screen.
New
Test
2019/11/01 21:42
Recent
Tests Utilities
Settings

NOTE
IV. Consumables
The consumables for LensHookeTM X1 PRO Semen Quality Analyzer are as below:
The result will be inaccurate, if you DO NOT use a LensHookeTM Semen Test Cassette.
LensHookeTM
X QC Beads (For Semen)
Product picture is for reference only. Actual product may vary.
C-KUPTM Liquefaction Test Cup is for semen sample collection.
LensHookeTM Semen Test Cassette is used to hold semen sample for analysis with the analyzer.
LensHookeTM Cleaning Wipe is used to clean the test cassette insert slot.
LensHookeTM X QC Beads (For Semen) is used for quality control of the analyzer.
LensHookeTM X QC Reticle (For Semen) is used for quality control of the analyzer.
C-KUPTM
Liquefaction Test Cup
4
LensHookeTM
Cleaning Wipe
LensHookeTM
Semen Test Cassette
LensHookeTM
X QC Reticle (For Semen)

5
Turning off the analyzer:
Hold down power button for 10 seconds to directly turn off the analyzer, or you can also push the
power button for 2 seconds until the touch screen shows “Power Off” and select the icon to turn it
off.
2
Insert / Remove the Test Cassette
Insert the Test Cassette:
Insert the cassette into the slot and push it
to the end.
1Remove the Test Cassette:
After the test, remove the test cassette in the
opposite direction of the “arrow”.
2
V. Major Function
LensHookeTM X1 PRO Semen Quality Analyzer
Turn on / off
Turning on the analyzer:
Push the power button down for 2 seconds to turn on the analyzer (as Image 1).
When the touch screen lights up (as Image 2), the analyzer is ready to operate.
1
Charging the battery
When the battery power is low, the “Low Battery” message will show on the screen (Image 3). Use
the power adaptor to charge the battery immediately. The “plug” symbol will appear on the touch
screen (as the of Image 4) during charging. If the “plug” symbol fails to show on the screen,
check to make sure the adaptor is properly connected to the analyzer and socket.
1
Image 1 Image 2
New
Test
2019/11/01 21:42
Recent
Tests Utilities
Settings

6
Low Battery
Device will shut down in 5:00 minutes.
Image 3 Image 4
Analyzer is equipped with a built-in 2500 mA Lithium-ion polymer battery.
The battery can not be removed or changed. If you have battery related problems, please contact us.
If you want to enter power saving mode, please press the power button. If you want to wake up the
analyzer, please press the power button again.
If the device had idled for 10 minutes, the system will automatically enter power saving mode.
* Power Saving Mode: Turns off the touch screen to reduce battery consumption.
For the purpose of extending the built-in Lithium-ion polymer battery life, please keep the adaptor
plugged in even while not using the analyzer.
If the analyzer has not been used for over 3 months, please charge before using.
If the analyzer runs out of battery, the date and time indicator might be reset to the default settings.
Please check and set up the date & time properly (refer to Page 16).
If the warning messages “Battery overheating” or “Battery Temperature is too Low” show on the
screen, the analyzer will shut down automatically within 5 minutes to protect itself. When you see
this warning message, please turn off the analyzer, connect the power adaptor to the analyzer and
resume using after 10 minutes.
NOTE
Prepare the Test Analyzer
1. Please put the analyzer on a flat surface.
2. Check if the analyzer is under the normal operating environment.
3. Check battery status. If the battery is low, connect the power adaptor before testing.
1. Refer to the C-KUPTM Liquefaction Test Cup user manual for details.
2. Refer to the LensHookeTM Semen Test Cassette user manual for details, but also following the
Semen sample collection
indication on the screen.
New
Test
2019/11/01 21:42
Recent
Tests Utilities
Settings
7
NOTE
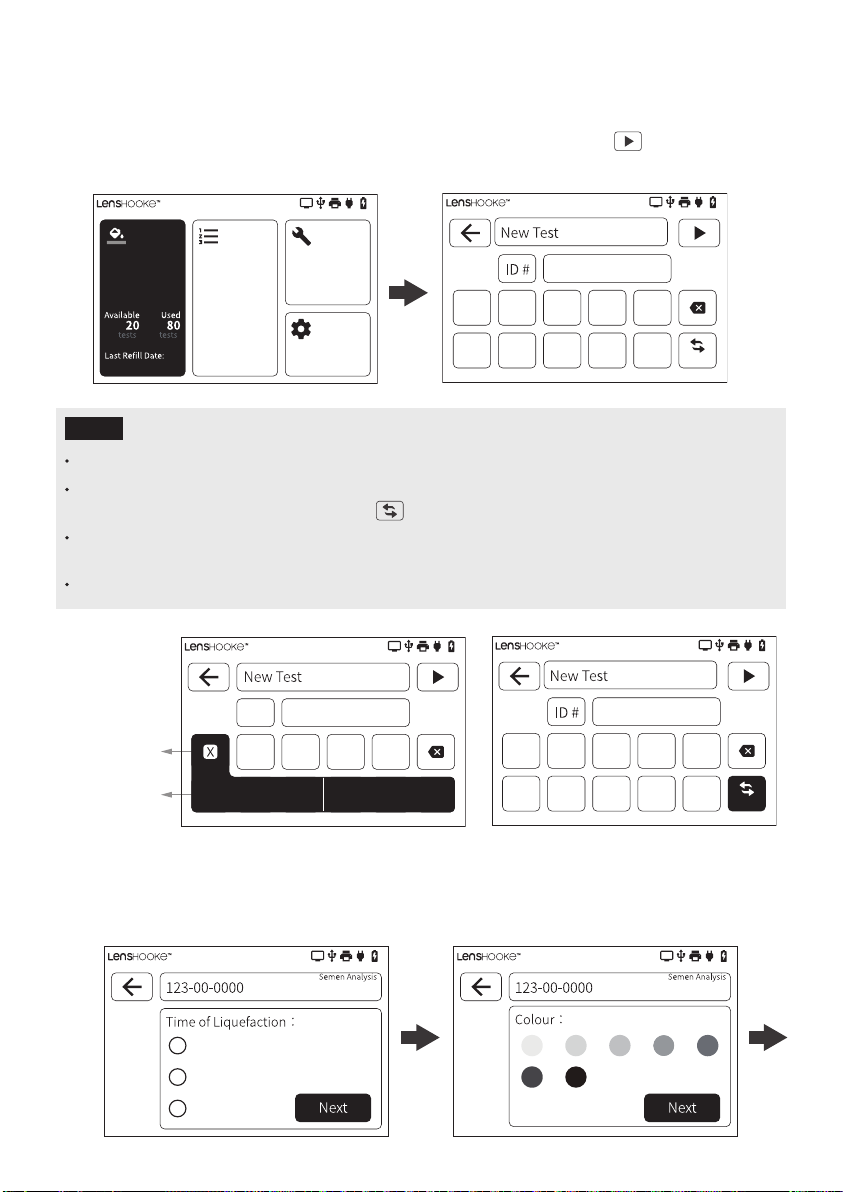
DO NOT exceed 20 characters and symbols for the patient ID#.
If you want to input a letter, please hold the icon for 0.5 to 1 seconds and select the letter. If you
want to input a symbol, please select the “ ” icon to switch the keyboard.
You can also use a barcode scanner to scan the bar or QR code of patient ID#. (Plese refer to page
24 to connect the barcode scanner to the analyzer.)
Please refer to Page 20 in this user manual for refill, if it is the first time you use.
New Test
1
Test the Sample
Step 1. Select the “New Test” icon. Step 2. Please input the patient ID number
and select the “ ” icon to go to
the next step.
Cancel
Select a letter
Please select the Liquefaction Time, Semen Colour, Semen Volume after semen sample is
completely liquefied, and then select “Next” to go to the next step. Select the “OK” icon if
the information you inputed is correct.
Step 3.
2019/11/01 21:42
New
Test
2019/3/16
Recent
Tests Utilities
Settings
2019/11/01 21:42
ID # 123-00-0000
ABC
1
DEF
2
GHI
3
JKL
4
MNO
5
PQR
6
STU
7
VWX
8
YZ
9
0
#+=
A B C a b c
2019/11/01 21:42
123-00-0000
ABC
1
DEF
2
GHI
3
JKL
4
MNO
5
PQR
6
STU
7
VWX
8
YZ
9
0
#+=
2019/11/01 21:42
N/A
< 30 min
> 60 min
30 ~ 60 min
2019/11/01 21:42
N/A
2019/11/01 21:42
123-00-0000
ABC
1
DEF
2
GHI
3
JKL
4
MNO
5
PQR
6
STU
7
VWX
8
YZ
9
0
#+=
Autres manuels pour X1 PRO
2
Table des matières
Autres manuels LENSHOOKE Instrument de mesure


Manuels Instrument de mesure populaires d'autres marques


Endress+Hauser
Endress+Hauser Proline Promag 50 Caractéristiques techniques

Siemens
Siemens SITRANS F Coriolis FCT030 Manuel de la liste des pièces

KLINGER
KLINGER CMF V Series Manuel utilisateur

EXFO
EXFO FTB-2 Manuel d'exploitation et d'entretien

Keysight
Keysight M8290A Manuel utilisateur

ADTEK
ADTEK MW-5 Manuel utilisateur