Leiyon LY-BX30 Manuel utilisateur

LY-BX30


This device complies with part 15 of the FCC Rules. Operation is
subject to the following two conditions: (1) this device may not cause
harmful interference, and (2) this device must accept any interference
received, including interference that may cause undesired operation.
Changes or Modifications not expressly approved by the party
responsible could void the user’s authority to operate this device.
“The normal function of the product may be disturbed by strong
Electro-Magnetic Interference. If so, simply reset the product to
resume normal operation by following the instruction manual. In
case the function could not resume, please use the product in
other location.”
This equipment has been tested and found to comply with the limits
for a Class B digital device, pursuant to Part 15 of the FCC Rules.
These limits are designed to provide reasonable protection against
harmful interference in a residential installation. This equipment
generates, uses and can radiate radio frequency energy and, if not
installed and used in accordance with the instructions, may cause
harmful interference to radio communications. However, there is no
guarantee that interference will not occur in a particular installation.
If this equipment does cause harmful interference to radio or
television reception, which can be determined by turning the
equipment off and on, the user is encouraged to try to correct the
interference by one or more of the following measures:
-- Reorient or relocate the receiving antenna.
-- Increase the separation between the equipment and receiver.
-- Connect the equipment into an outlet on a circuit different from
that to which the receiver is connected.
-- Consult the dealer or an experienced radio/TV technician for help.
This equipment complies with the FCC RF radiation exposure limits
set forth for an uncontrolled environment. This equipment should be
installed and operated with a minimum distance of 20 centimeters
between the radiator and your body.

This symbol means that this unit is double insulated. An earth connection is
not required.
• The appliance must be connected to a 110-240 volt 50/60Hz AC supply by
means of a three pin socket.
• Unplug this apparatus during lightning storms or when unused for long
periods of time - to prevent damage to this product.
• Opening or removing covers may expose you to dangerous voltages or other
hazards.
• To prevent risk of fire or electric shock, avoid overloading wall outlets,
extension cords, or integral convenience receptacles.
• Use suitable power sources - Plug the product into a suitable power source, as
described in the operating instructions or as marked on the product.
• The supply voltage should be the same as that indicated in the technical
specifications and the appliance rating plate.
• If the socket outlets in your home are not suitable for the plug supplied with
this unit check with a qualified electrician for replacement.
• In order to disconnect the apparatus from the mains completely, switch off
the outlet and remove the mains plug completely.
• Do not bend, stretch or pull the supply cable in order to avoid electric shock.
• When installed, the power socket must be within easy reach.
Moisture and water
Do not use this apparatus near water or moisture.
• Do not use this product near a bathtub, washbowl, kitchen sink, and laundry tub, in
a wet basement, near a swimming pool, or anywhere else that water or moisture is present.
Batteries shall not be exposed to excessive heat such as sun, fire or the like
• To prevent risk of fire or electric shock, avoid overloading wall outlets,
Refer all servicing to qualified service personnel
• Servicing is required when the apparatus has been damaged in any way: such as liquid
has been spilled or objects have fallen into the apparatus; the apparatus has been
exposed to rain or moisture, does not operate normally, or has been dropped
•
•
•
extension cords, or integral convenience receptacles.
1
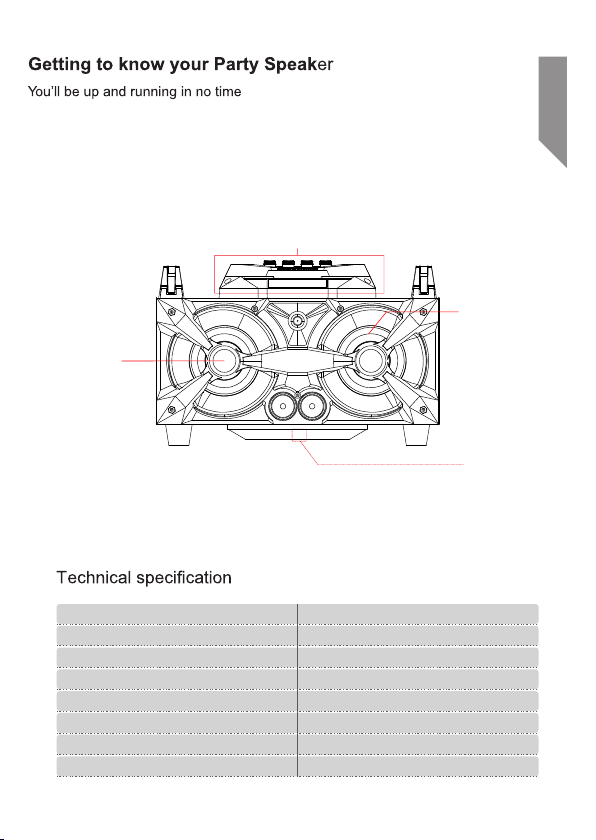
Specification Rating
Supply voltage 110-240V~50/60Hz
Max. power consumption 60W
Speaker power 2 x 15W + 30W
FM 87.5-108 MHz
Bluetooth compatibility EDR, A2DP, AVRCP
Bluetooth version V3.0
Unit dimensions 380 x 300 x 245 mm
Extendible Carry handle
Tweeter speakers
Light effects
Woofer speaker
2

14. LED display
17. PREVIOUS track button
10.PLAY/ PAUSE button
9. SOURCE button
7. TREBLE control knob
8. BASS control knob 18. STANDBY button
4. LINE-IN 3.5mm socket
1. MIC input volume level knob
2/3. MIC 1/4” input socket
5. TF card input slot
6. USB card input slot
11.LIGHT effect button
16. NEXT track button
19. ECHO control knob
15. MASTER volume level knob
12. Flashing Light
1. 3Remote control receiving
3
MIC VOL BASS
LIGHT
/CH-
SOURCE
MIC 1
ECHO TREBLE
MIC 2
LINE MICRO SD
/CH+
1 2 34567
8
9
10
11
12
13
14
15
16
17
18
19

Note: Before first use, please put the insulation piece out,
the remote control can be normal use.
switch to standby mode.
Remote Control Use Ready
+
Lithium Battery
CR2025
3V
Within approximately
8Meter(25 feet)
Receive window
PAIR
STANDBY
Skip to the previous track
Fast Rewind button
Press for Bluetooth mode
Press to switch modes
Press to mute audio playback
Fast Forward button
ress to decrease the
volume level
Skip to the next track
Press to increase the
volume level
Press for play,
and pause functions
Press to switch between
USB and SD card inputs
Press to unpair a
connected Bluetooth device
MODE
EQ
BT U/SD
Press to switch EQ modes
4
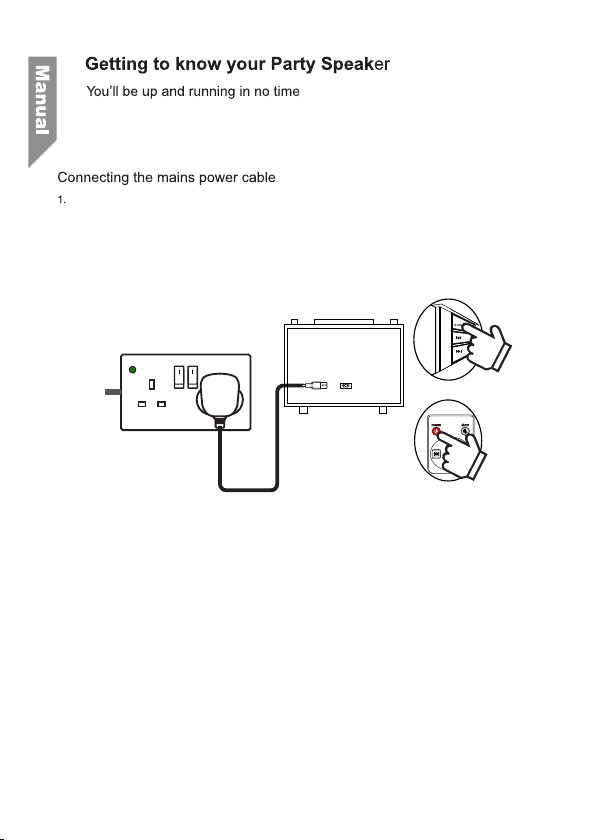
Insert the shaped plug into the mains socket on the rear of the unit.
2. Connect the mains plug to a wall outlet and switch on.
3. Set the POWER switch to the ‘1’ ON position. The LED display will illuminate.
4. Press the STANDBY button on the main unit or remote control to wake from standby.
Press the button on top of the handle and pull the handle
Switching input modes
Follow the below instructions to switch between Bluetooth, FM radio and LINE in input modes.
1. Press the SOURCE button on the main unit or remote repeatedly to cycle between
Bluetooth, FM radio and LINE in input modes.
2. Alternatively press the BT button on the remote for direct access to Bluetooth. And the
U/SD button to switch between USB and SD card inputs.
AC 110~2 4 0 V
/CH-
/CH+
5
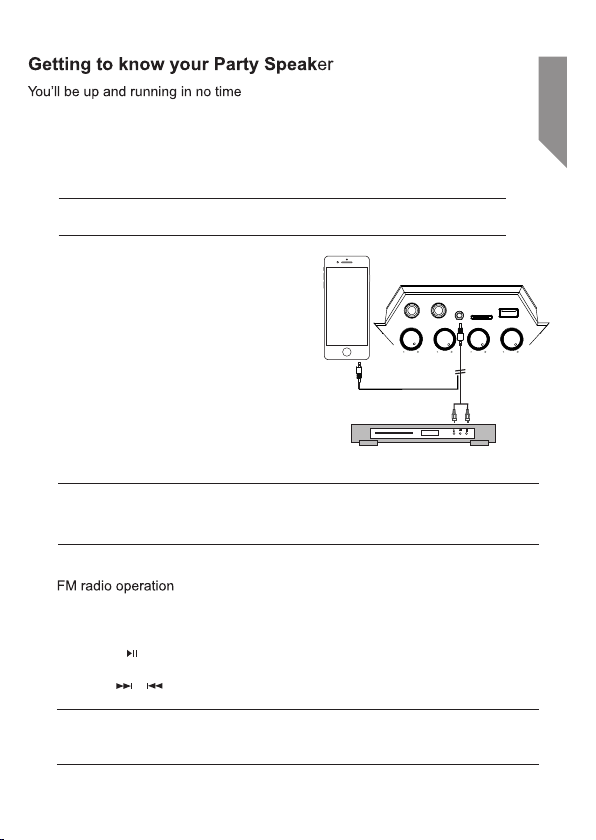
Follow the steps below to connect an external audio source (such as a smartphone) for
playback through the party speaker..
You will need a 3.5mm audio cable or a 3.5mm to RCA cable (not supplied) to connect
a device to the LINE IN input socket.
1. Connect one end of the 3.5mm audio
cable to the LINE IN input socket or
RCA sockets on top of the unit.
Connect the other end to an earphone or
line-out socket on the audio device
( such as a smartphone).
2. Switch to LINE IN input.
pressing the MODE button on the main unit
or remote repeatedly until you see LINE
on the display.
3. Press PLAY on the audio device.
4. Adjust the volume to your desired level.
When connecting via the headphone output the volume of the mini system is affected
by the volume control on the player. Ensure that the audio source (such as an MP3
player) is set to about 70-80% to avoid distortion.
Press the MODE button on the main unit or remote until you reach the FM radio
mode. The display will show ‘Fn’ momentarily then change to an FM frequency.
2. Press the button on the main unit or remote control to begin an auto scan of the
Fm band. Every station that is detected is saved to a preset location.
3. Use the / buttons to cycle between the saved station presets.
The position of the party speaker is important for a good FM reception. If you cannt
receive a station you know you should be able to; move the party speaker to a different
1.
location and try the scan again.
6
Line-in input connection
MIC VOL BASS
MIC 1
ECHO TREBLE
MIC 2
LINE MICRO SD

and play mp3 files.
1. Insert a compatible USB flash drive or SD card into the USB
input socket or SD card input slot on top of the unit.
2. The device will be automatically detected and the first
track in folder 01 or the root of the USB/SD card will begin
playback automatically.
3. To pause playback press the button on the main unit
(11) or remote control during playback. To resume playback
press once more.
4. To skip to the next or previous track use the / buttons.
USB/ MP3 information
• Do not remove the USB/SD card device during playback.
• Max 999 tracks and 99 folders can be recognised
• FAT 16, 32 formats only. Up to 64GB in size.
Follow the steps below to connect a USB flash drive or SD card
Mic connection
Follow the steps below to connect a microphone with a 1/4” jack plug.
1. Connect the 1/4” (6.3mm) plug to the MIC input on top of the unit.
2. Once connected the volume is adjusted with the MIC volume control knob .
3. The mic input also as an ECHO control. Rotate the ECHO control knob to adjust
the amount of echo on the mic output.
to begin the light show.
2. Press the LIGHT button to change the lighting effect. Up to 8 preset styles.
3. The 9th press of the LIGHT button will turn off the light effect.
Press the LIGHT effect button
7
BASS
ECHO TREBLE
MIC 2
LINE MICRO SD
SD
Table des matières
Autres manuels Leiyon Système de karaoké

Manuels Système de karaoké populaires d'autres marques


Karaoke Warehouse
Karaoke Warehouse Player 2000 Manuel utilisateur

VocoPro
VocoPro DVG-888K II Manuel utilisateur

ION
ION DISCOVER KEYBOARD USB Manuel utilisateur

The Singing Machine
The Singing Machine SMVG-620 Manuel utilisateur

Singsation
Singsation CENTER STAGE FREESTYLE Manuel utilisateur

RSQ
RSQ NEO K-2 Manuel utilisateur


