Lanberg FF01 12U Manuel utilisateur

Lanberg © 2015-2023
2EN
1. Important introductory recommendations and usage information
1.1 Introduction
Manual also contains logistic and technical data, instructions, and regulations that must be observed and complied with during
transport, assembly, use, and potential maintenance of the products. Under no circumstances should you use the device before
carefullyreadingandfully adapting toall informationin the user’s manual.Keep this manual forfuturereference.Allphotos,illustrations
contained in the instructions are for reference only. The information contained in this manual has been veried and is considered
sucient.The supplier is not responsible for any inaccuracies that may be included in this document, nor is he responsible for updating
or keeping the current information in this manual, nor for notifying its users or organization about the updates. In particular, Lanberg
owners are not responsible for any equipment, software, or data stored/used with the product, including maintenance, replacement,
integration, installation, or recovery of hardware, software, or data in the event of misuse of the product or its components.
Lanberg brand owners reserve the right to make changes to this manual at any time without notice. The products mentioned in this
manual, including the documentation, are the property of the Lanberg brand owners and its licensors. Any use or reproduction of
these products, including documentation, is prohibited, except as expressly authorized under the appropriate license terms.
NOTE: For the most up-to-date version of this manual, please visit our website at www.lanberg.eu.
1.2 Compliance with legal and regulatory provisions regarding safety and the environment
This product complies with EU safety and environmental regulations.
The products listed in the following instructions have been approved for trading within the EU, by obtaining a European Union
Declaration of Conformity, which contains a declaration with the essential requirements and other relevant provisions of the following
Directives, and that the following harmonized standards have been applied.
Directive: RoHS 2011/65/UE + 2015/863/UE
Standards: IEC 62321-4:2013 + A1:2017; IEC 62321-5:2013;
IEC 62321-6:2015; IEC 62321-7-2:2017; IEC 62321-8:2017;
With the development of products and updates to CE regulations, the declaration may change. The latest declaration of conformity
(CE) can be found at: www.lanberg.eu.
NOTE: The use of the WEEE symbol (crossed-out wheelie bin symbol) means that this product cannot be treated as household waste.
Proper disposal of used equipment avoids risks to human health and the environment, resulting from the possible presence of
hazardous substances, mixtures, and components in the equipment, as well as improper storage and processing of such equipment.
The selective collection also allows you to recover materials and components, from which the device was manufactured. For more
information about the recycling of this product, please contact the retail outlet, where the product was purchased, or request
information from the local authority.
1.3 General safety precautions
• The device specications must be strictly observed when using the product and connecting it to any external products. The
specications of the external devices to which this device is to be connected must also be observed.
• The product cannot be used outside of the rated values in its specication. The warranty does not cover any damage caused by
adeviation from these values when using the device.
• All installations, connections, cabling, and circuits in which the product will be used must be made in a manner consistent with
locally applicable electricity regulations and in such a way as to eliminate the risk of people walking or tripping over them. Use
only power cables with VDE and CE certication when connecting them to the device. It is necessary to use the same procedures
mentioned in this section when connecting the cabling to the product or to the external components.
• For external devices connected to this product, the operating instructions supplied by their manufacturer must be strictly observed.
• To ensure safety and compliance of the device, use only components or parts that meet the specications or are recommended by
the manufacturer.
• During the warranty period, it is forbidden to replace any elements of the product by its users. Maintenance should be entrusted
only to qualied technical personnel, such as the manufacturer’s technical department or an authorized importer.
• If it is necessary to perform maintenance of the device, it should be carried out or supervised by a person having appropriate
qualications and technical knowledge about the device, while maintaining proper precautions. All this under the local regulations
in force.
• If it is necessary to perform maintenance of the equipment or similar activities that will require opening the device or contact with
elements that may be under potential voltage, the following safety rules should be observed before carrying out these activities:
remove all bracelets, necklaces, rings, watches or other metal hand and neck objects and use tools with insulated handles.
• Always before performing the equipment maintenance, there should be a person nearby who would react and take appropriate
steps to assist the person in charge of the device maintenance in the event of an accident. A person undertaking the maintenance
should always wash hands after nishing his / her work.
• NEVER allow a situation where sparks or ames could occur near the device. The aftermath of such a situation could have very
negative consequences for people and things in the vicinity.
• In the event of a re, immediately and (without unnecessary delay) disconnect the power supply and notify the re department of
the situation by dialing their assigned emergency number in the country of your stay.
• The product is intended for indoor use. Do not rebuild and/or modify the products and/or their components.
• Under no circumstances, other external products are to be introduced (connected to the device), that are non-compliant with the

Lanberg © 2015-2023 3
EN
intended use of that device and/or not intended for that purpose.
• The manufacturer and distributor are not responsible for any damages resulting from improper use and improper handling of the
product (not in accordance with this manual).
• Before attempting to attach or disconnect a device, connect or disconnect cables to it in a 19” wall-mount cabinet, please rstly
connect all components to a veried and ecient grounding.
• Make sure that all parts assembled from the beginning in 19” wall-mount cabinet, as well as equipment assembled by the user, are
properly screwed or unscrewed when disassembly is carried out. It is unacceptable that any elements of the product or constituting
its coherence are not correctly fastened/applied or pose a threat by their incorrect isolation from other functioning factors that in
contact would cause danger.
1.4 Guidelines for ESD security principles
To prevent damage to the product, system, or electrical components by electrostatic discharge (ESD), it is vital to be properly prepared
and to handle device(s) with care. The following measures are generally sucient to protect the product against ESD:
• Do not use metal straps or wristbands on your hands to prevent static discharge.
• Touch a grounded metal object rst before using/performing the maintenance (if possible) of the device.
• When handling electrical equipment, avoid contact with pins, connectors, and any energy relays.
• When moving electronic components, it is recommended to grab only their (isolated) edges, where there is no current ow. Do not
touch components, integrated circuits, memory modules, contacts, etc.
• All electronic devices should be placed back into antistatic bags (if possible) when they are not in use.
1.5 Transport
During transport, store the product only in the original packaging to protect against shocks and bumps. Do not throw the packaging in
the trash. When shipping a product under warranty, the product must be in its original shipping box.
1.6 Warranty
The warranty does not apply in the event of product failures and defects resulting from improper use and handling of the device
(not under this user manual). Mechanical damage is the basis for rejecting a complaint. To correctly submit a warranty claim, contact
yourretailer.
1.7 Unpacking and examination
In the presence of the carrier, carefully unpack the product from the shipping box and make sure to check whether:
• Contents of the package include all the elements listed in point 1.3.
• All items are undamaged.
In case of absence, damage, discrepancies in the elements contained in point 1.3, a damage report has to be drawn up (if any occurred),
and the matter has to be submitted to the seller. The following are required: photographs, batch number, and description of the problem.
Indicated actions should be carried out on the same day as the date of product delivery.
1.8 Storage and ventilation
• The product should be installed only in locations with limited access (separate rooms for equipment, etc.).
• Do not install and store the device in places with water (still or running), humidity, or any other liquid substances being present.
• Avoid exposing the product to direct sunlight sources.
• Place the device on a stable, dry surface in a well-ventilated place. Leave at least 100 mm of free space around it to ensure
adequateventilation.
• The device is designed to work only in a controlled environment (controlled temperature and humidity according to the data in the
specication, indoors, without conductive pollution present [dust, ammable gases, corrosive substances, etc.]).
Lanberg © 2015-2023
4EN
2. Assembly
Be sure to strictly follow the instructions in this manual.
2.1 Preparations
Prepare the appropriate amount of free space on the surface on which the assembly will take place. Carefully remove all elements from
the transport box. Further assembly instructions will be based on the diagram provided
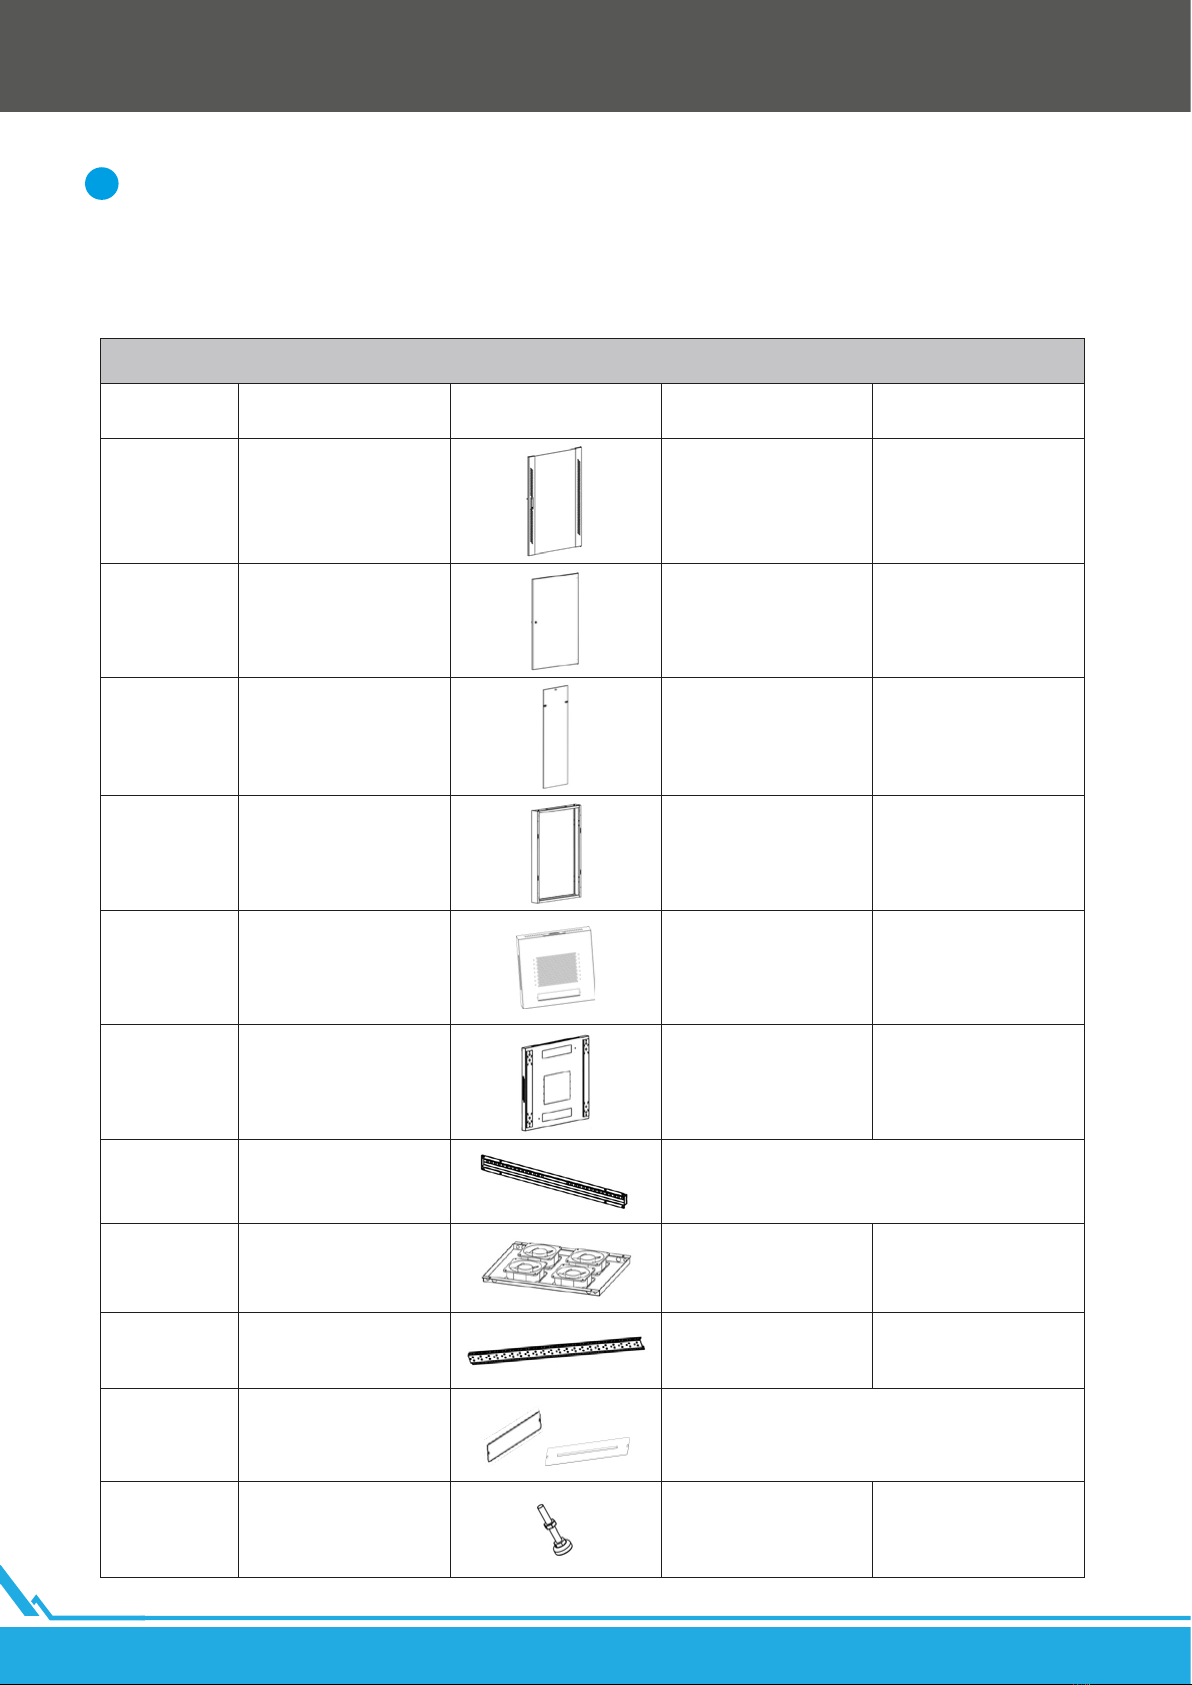
2.1.1. Table of components
Cabinet items
Item No. Name Drawing Required ammount Supplied ammount
Item A Front glass door 1 pc. 1 pc.
Item B Rear door 1 pc. 1 pc.
Item C Side panel 2 pcs 2 pcs
Item D Frame 2 pcs 2 pcs
Item E Top cover 1 pc. 1 pc.
Item F Bottom cover 1 pc. 1 pc.
Item G Connect Bar 15U~27U 4pcs
32U~42U 6 pcs
Item H Fan cover 1 pc. 1 pc.
Item I Mounting rail 4 pcs 4 pcs
Item J Entry panel Flat 3 pcs
With a groove 4 pcs
Item K Adjustable feet 4 pcs 4 pcs
i

Lanberg © 2015-2023 5
EN
Item L Castors with breaker 4 pcs 4 pcs
Item M Door stopper 15U~ 27U 8 pcs
32U~42U 12 pcs
Item N Swing handle lock 1 pc. 1 pc.
Item O Small round lock 3 pcs 3 pcs
Item W Front door spacers 2 pcs 4 pcs
Screws
Item No. Name Drawing Required ammount Supplied ammount
Item P M8 Flange nut 8 pcs 9 pcs
Item Q M8 Allen head bolt 16 pcs 17 pcs
Item R M5*10 Self-tapping screw
12U-27U - 20 pcs 12U-27U - 24 pcs
32U-47U - 28 pcs 32U-47U - 34 pcs
Item S M4*8 Self-tapping screw 12U-27U - 20 pcs 12U-27U - 23 pcs
32U-47U - 26 pcs 32U-47U - 30 pcs
Item T M6 Snap nut
12U-27U - 32 pcs 12U-27U - 35 pcs
32U-47U - 48 pcs 32U-47U - 50 pcs
Item U M6x12 Allen Head Bolt
12U-27U - 32 pcs 12U-27U - 35 pcs
32U-47U - 48 pcs 32U-47U - 52 pcs
Item V M6 Accessory screw
andnuts 20 pcs 20 pcs
Item V2 M6 Screw with washer 16 pcs 17 pcs
Lanberg © 2015-2023
6EN
3. Installation steps
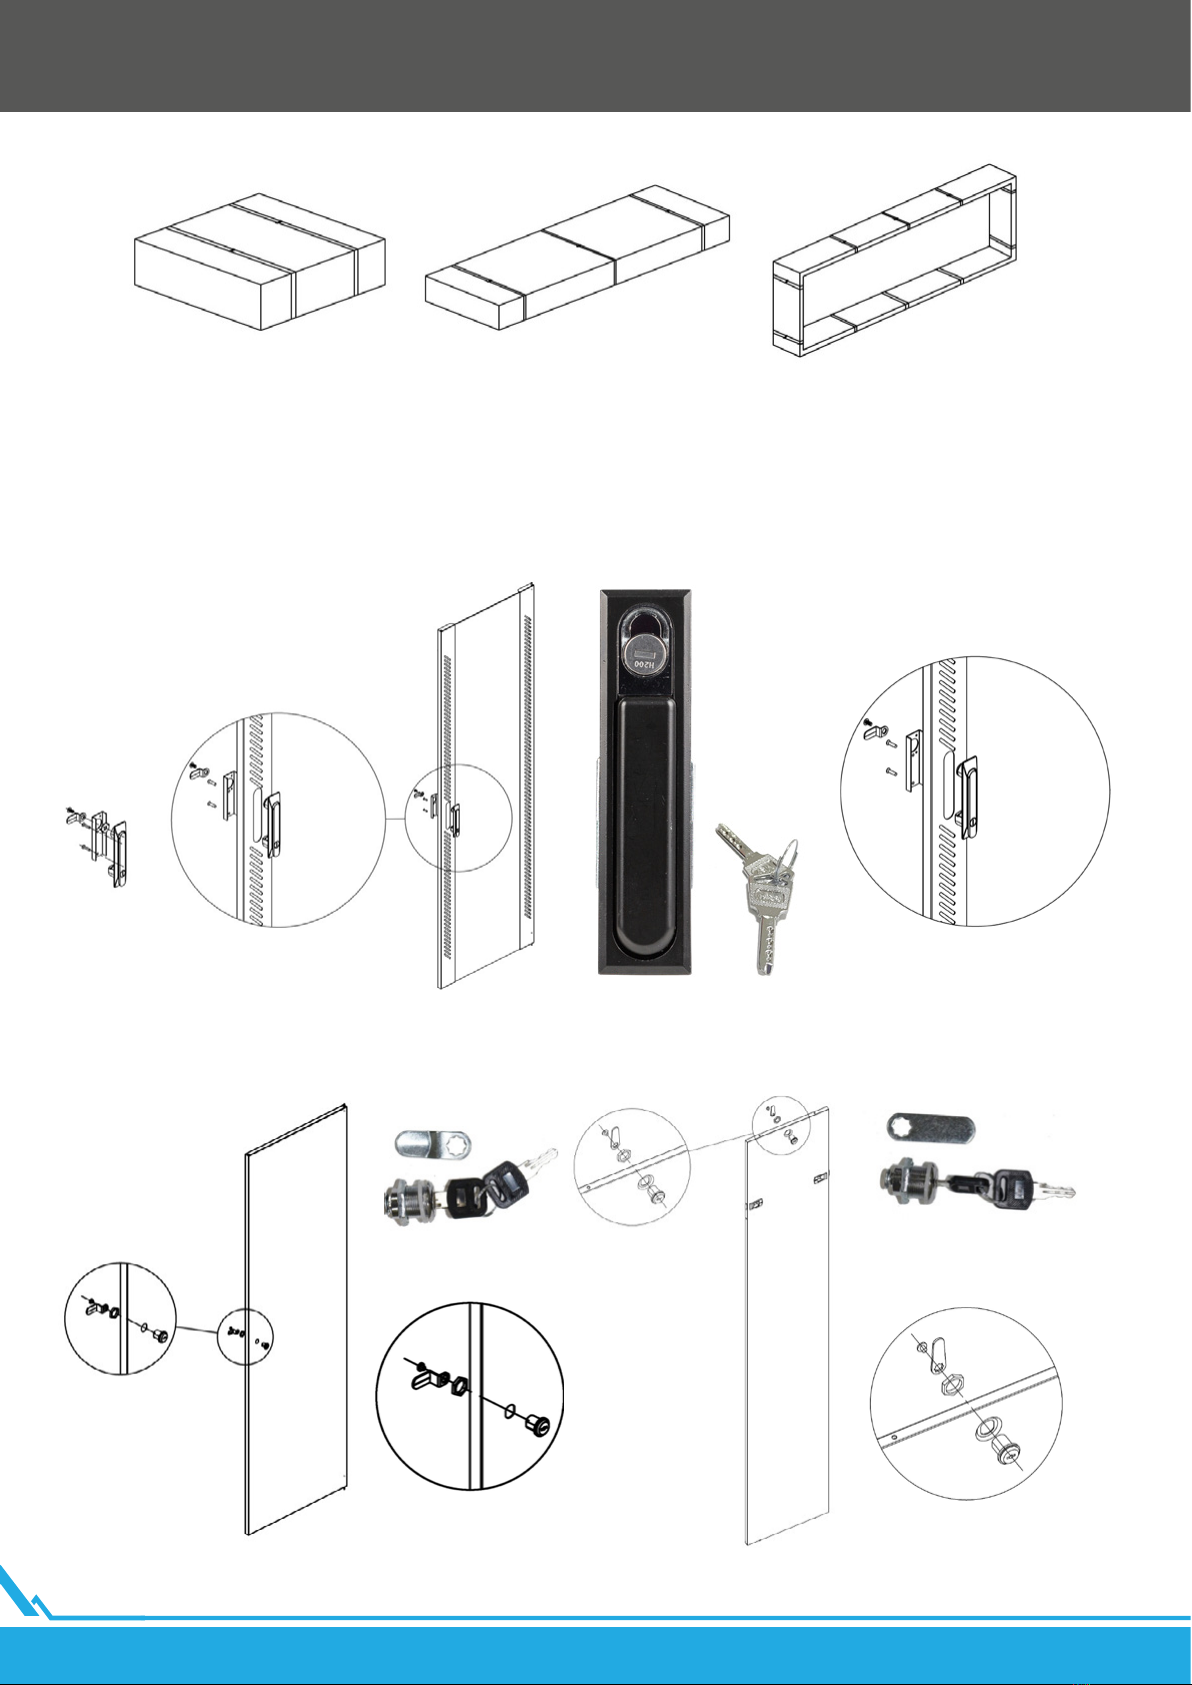
Step 1. Remove the front door lock (item N), the side panel locks and the rear panel lock (item O), the components are in pack
1/3. Then remove the front glass door (item A), back panel (item B) and side panels (item C) from pack 2/3. At this stage we start
by tting locks to the above components.
TOP & BOTTOM PACKAGE 1/3 FRONT, REAR & SIDE DOORS
PACKAGE 2/3 FRAME PACKAGE 3/3
Lanberg © 2015-2023 7
EN
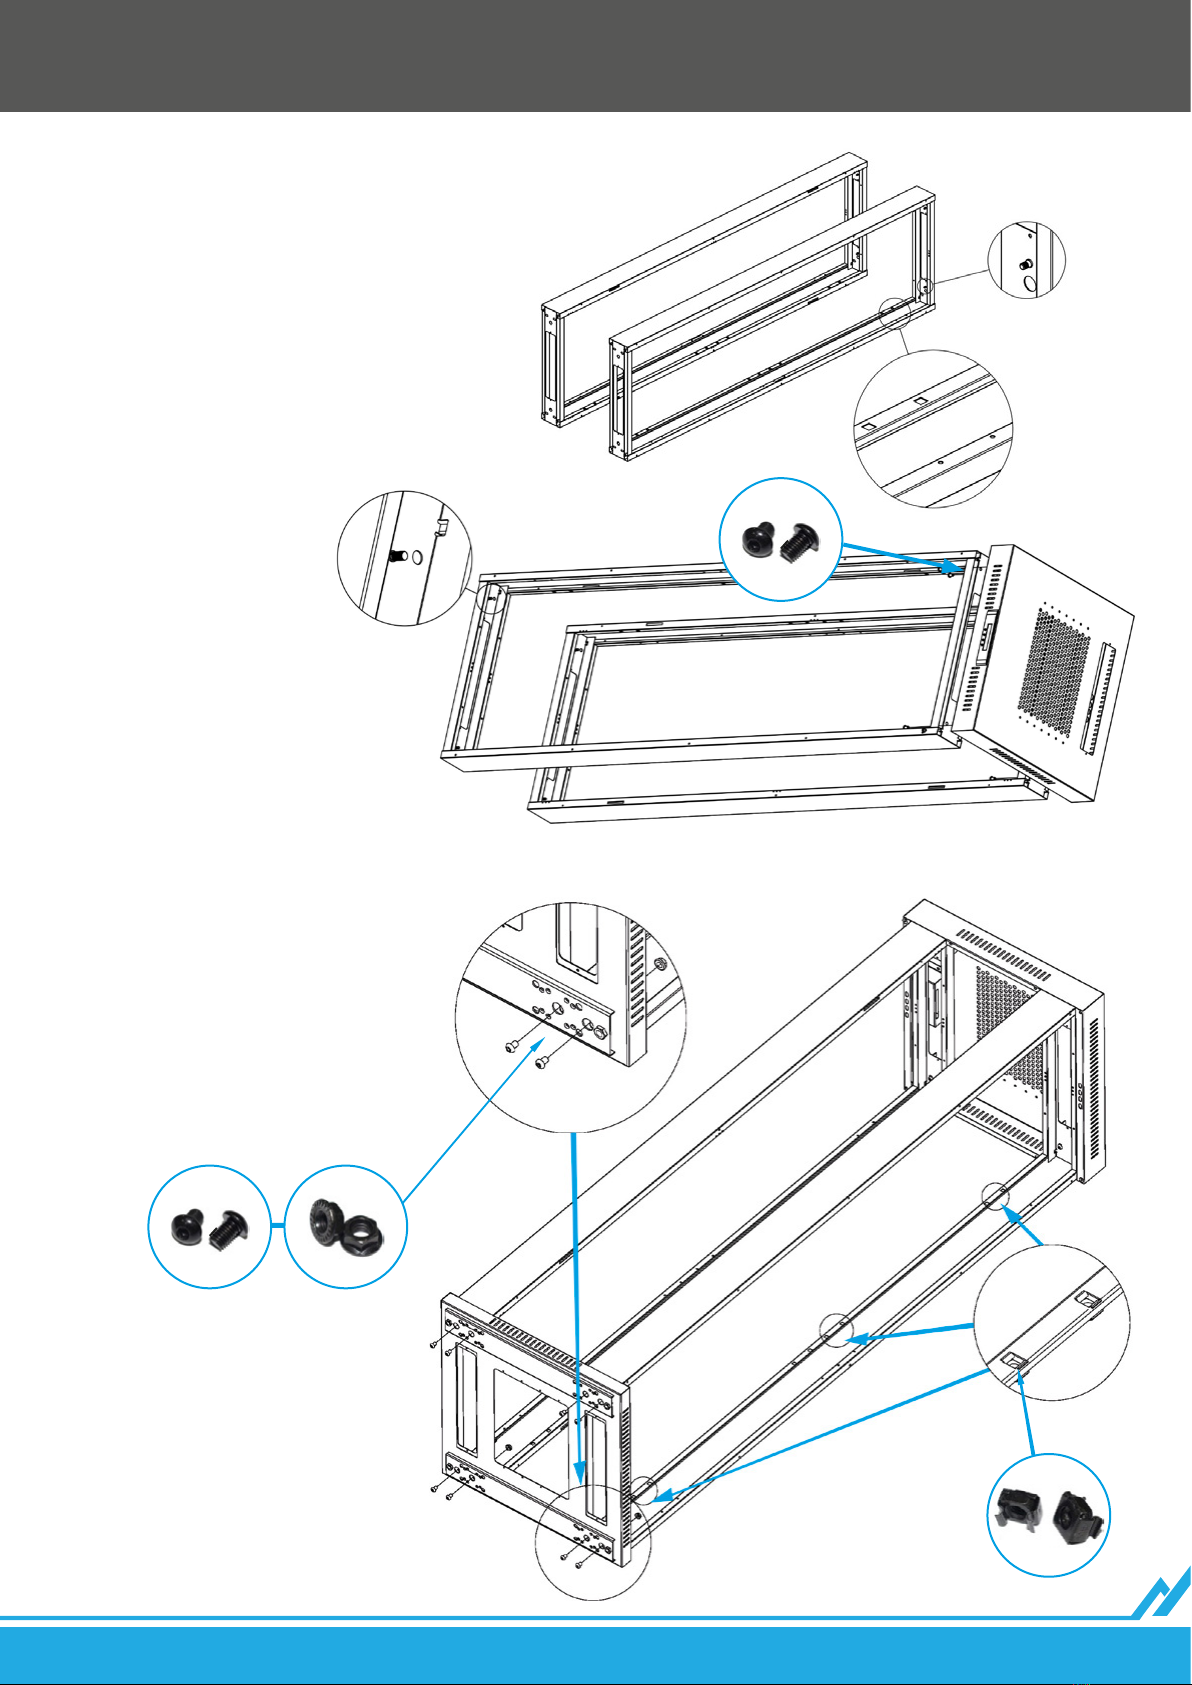
Step 3. Fit the top cover
(item E) onto the top parts
of the frame (item D), then
use an M8 Allen screw
(item Q) to assemble them
together.
Step 4. Fit the lower cover (item F)
onto the lower part of the frame (item
D) and then use an M8 Allen screw
(item Q) and M8 ange nuts (item P)
to join them together.
Step 4a. Fit an M6 snap nut (item T)
in the square hole in the frame (indi-
cated in the gure).
Earth nut
(Bottom)
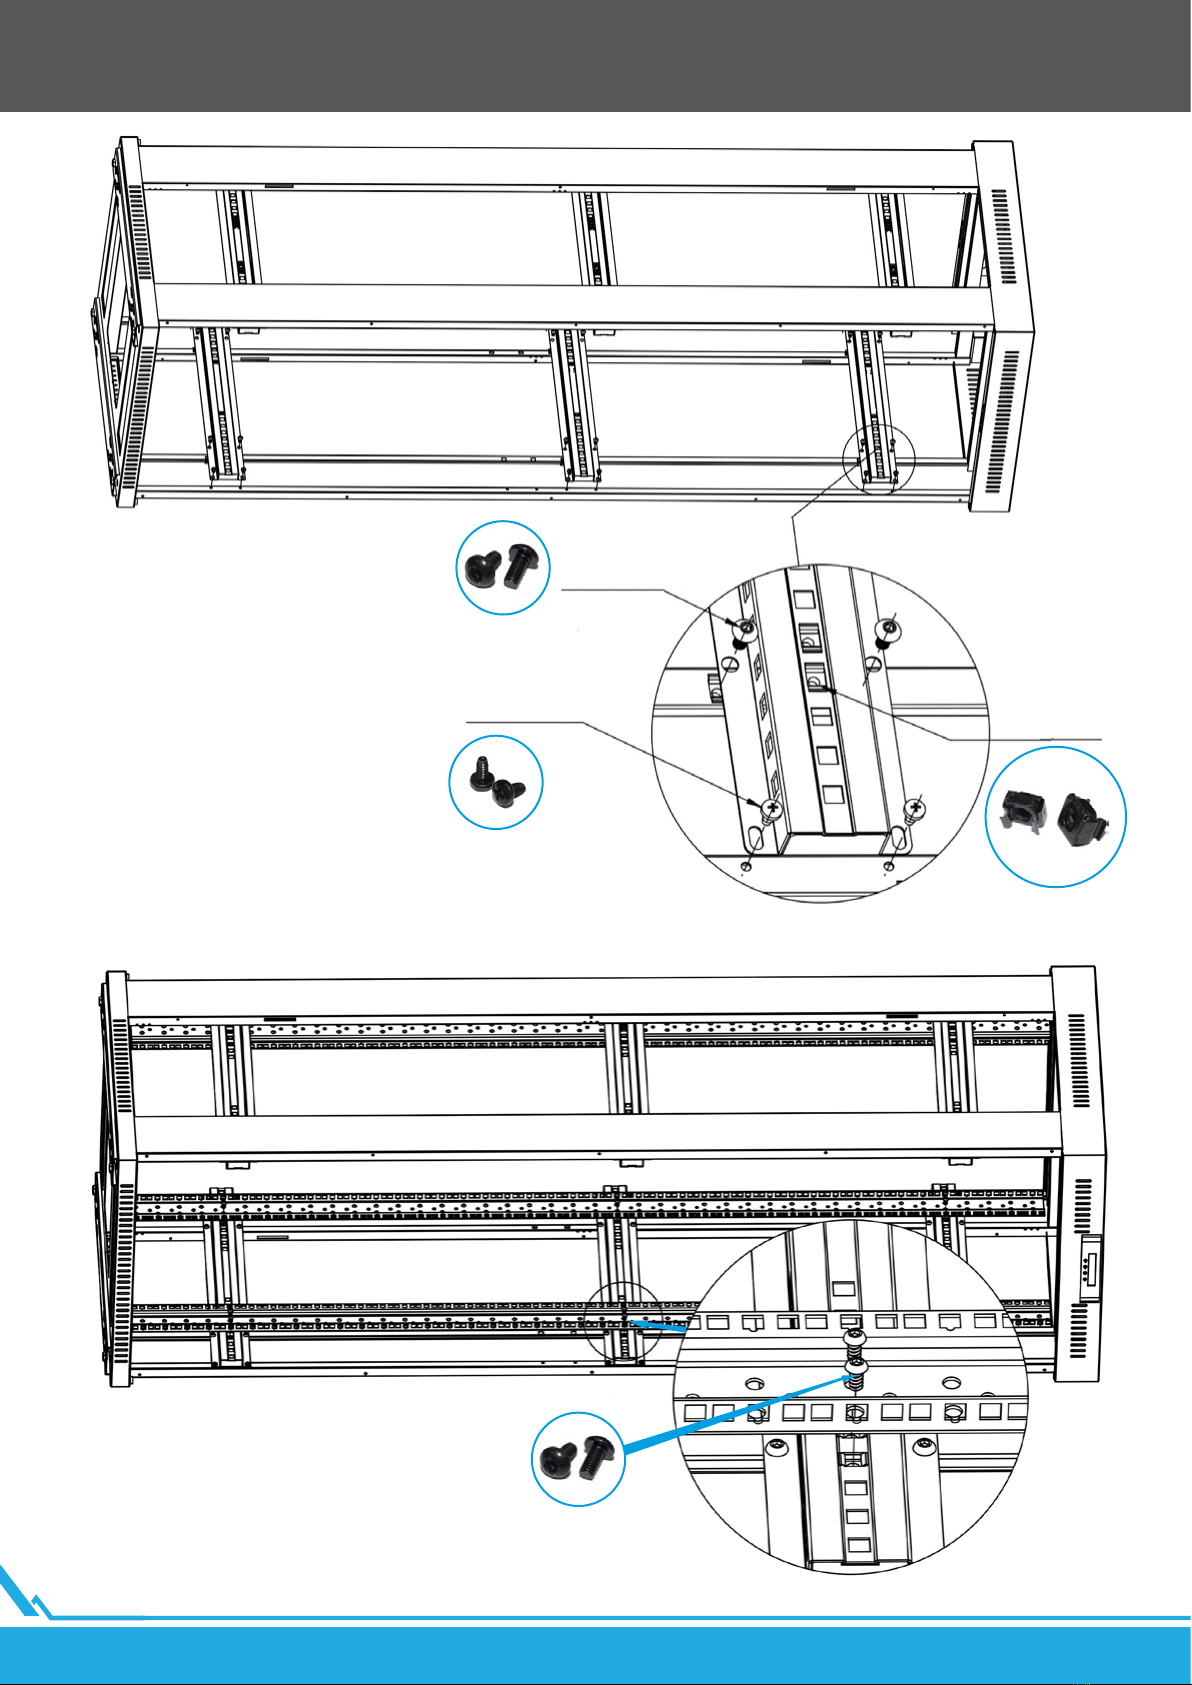
Step 2. Unpack the frame parts (item D)
from pack 3/3. Then arrange the frames
parallel to each other, with the square holes
facing inwards. You can recognize the
lower part of the frame by the element for
installing the earthing. Earth nut
Bottom part
Top part
Snap nut M6
(part T)
Lanberg © 2015-2023
8EN
Step 5. Prepare M6 snap nuts (item T)
and x them on the crossbar (item G),
then place the crossbar on the frame
(item D) avoiding the locking hole in the
frame. Use an M6 Allen screw (item U)
and an M5 self-tapping screw (item R) to
x the crossbar.
Allen head bolt M6
(part U)
Allen head bolt M6
(part U)
Self-tapping screw M5
(part R) Snap nut M6
(part T)
Step 6. Prepare M6 mounting screws
(item U). Use screws to x the vertical
mounting rails (item I) to the horizontal
crossbars (item G).
Lanberg © 2015-2023 9
EN
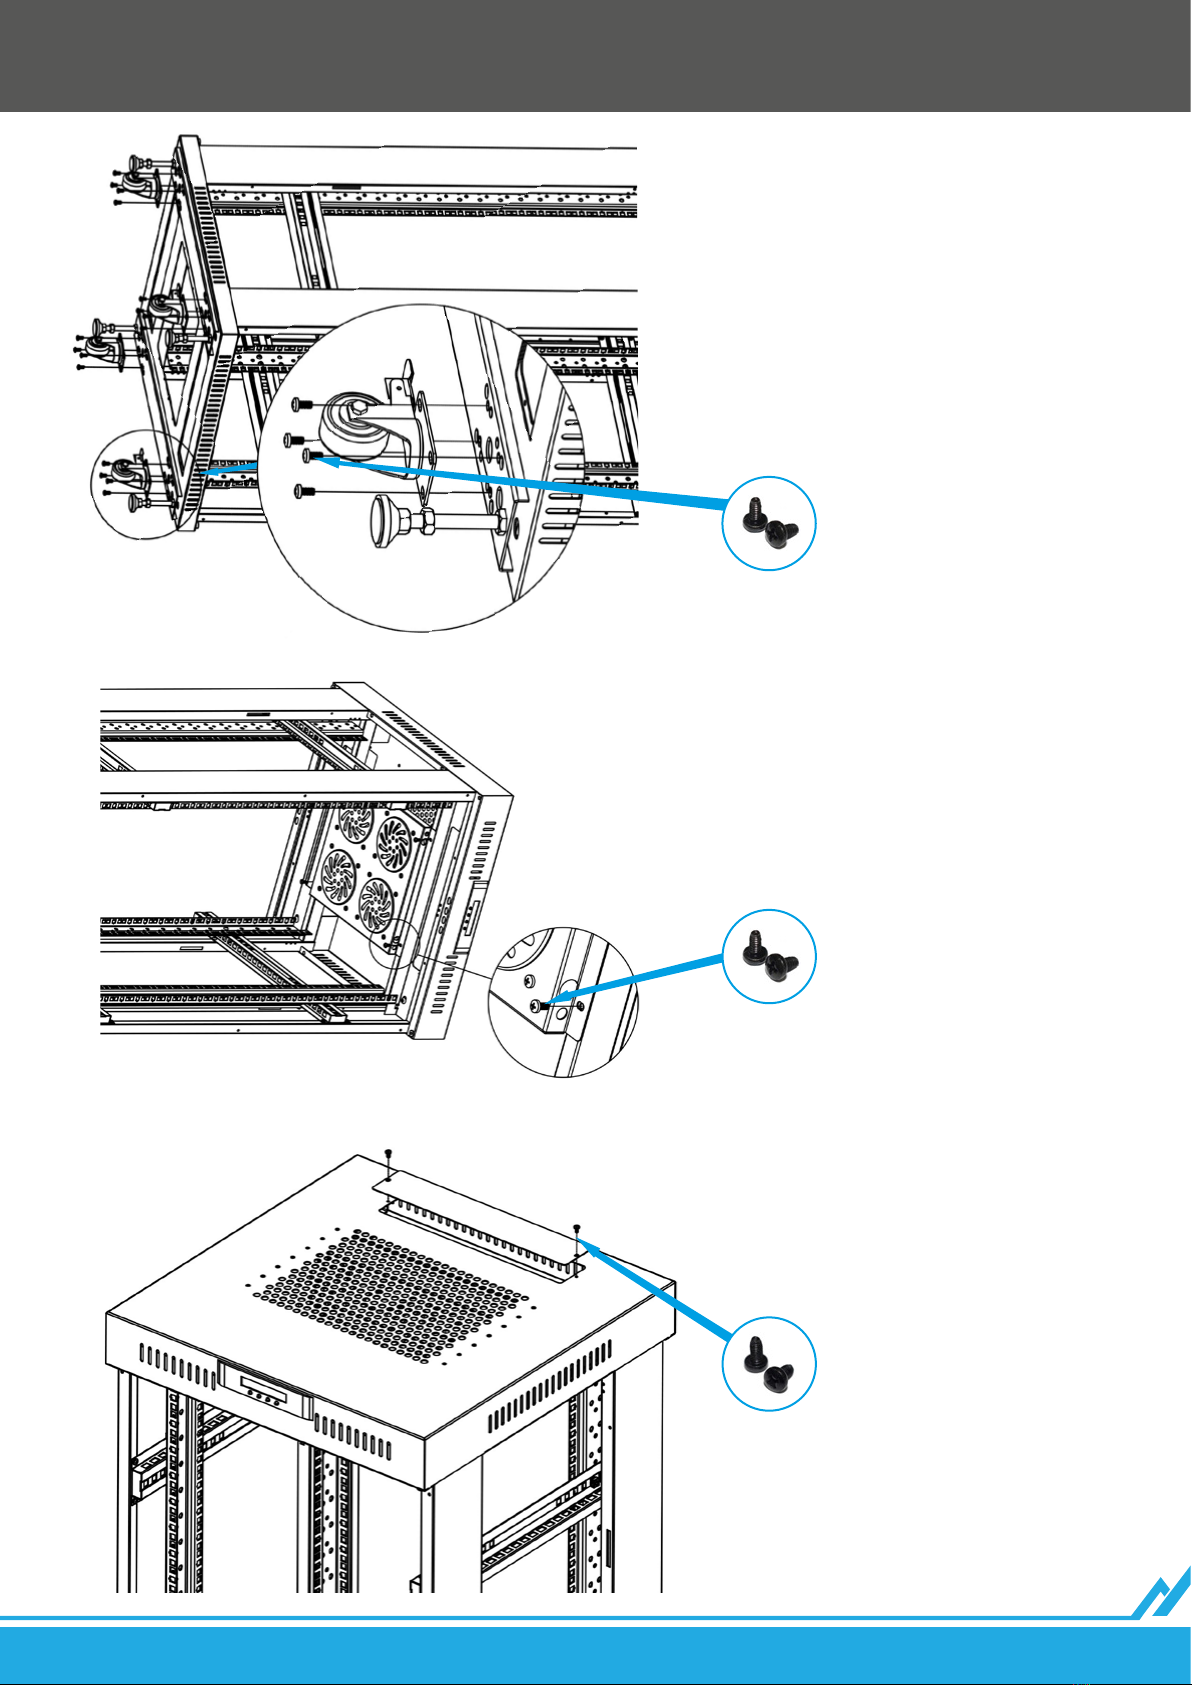
Step 7. Prepare bolts with washer (item V2)
to attach four casters (item L) to the bottom
cover (item F). Alternatively, feet (element K),
which are included in the kit, can be attached
to the lid instead of the casters.
Step 8. Prepare M5 self-tapping screws
(item R), then use them to attach the fan
shelf (item H) to the RACK frame (item D).
Step 9. Prepare and use an M4 self-
tapping screw (item S) to x the top
panel cap (item J).
Self tapping screw M5
(item V2)
Self tapping screw M5
(part R)
Self-tapping screw M4
(part S)
Lanberg © 2015-2023
10 EN
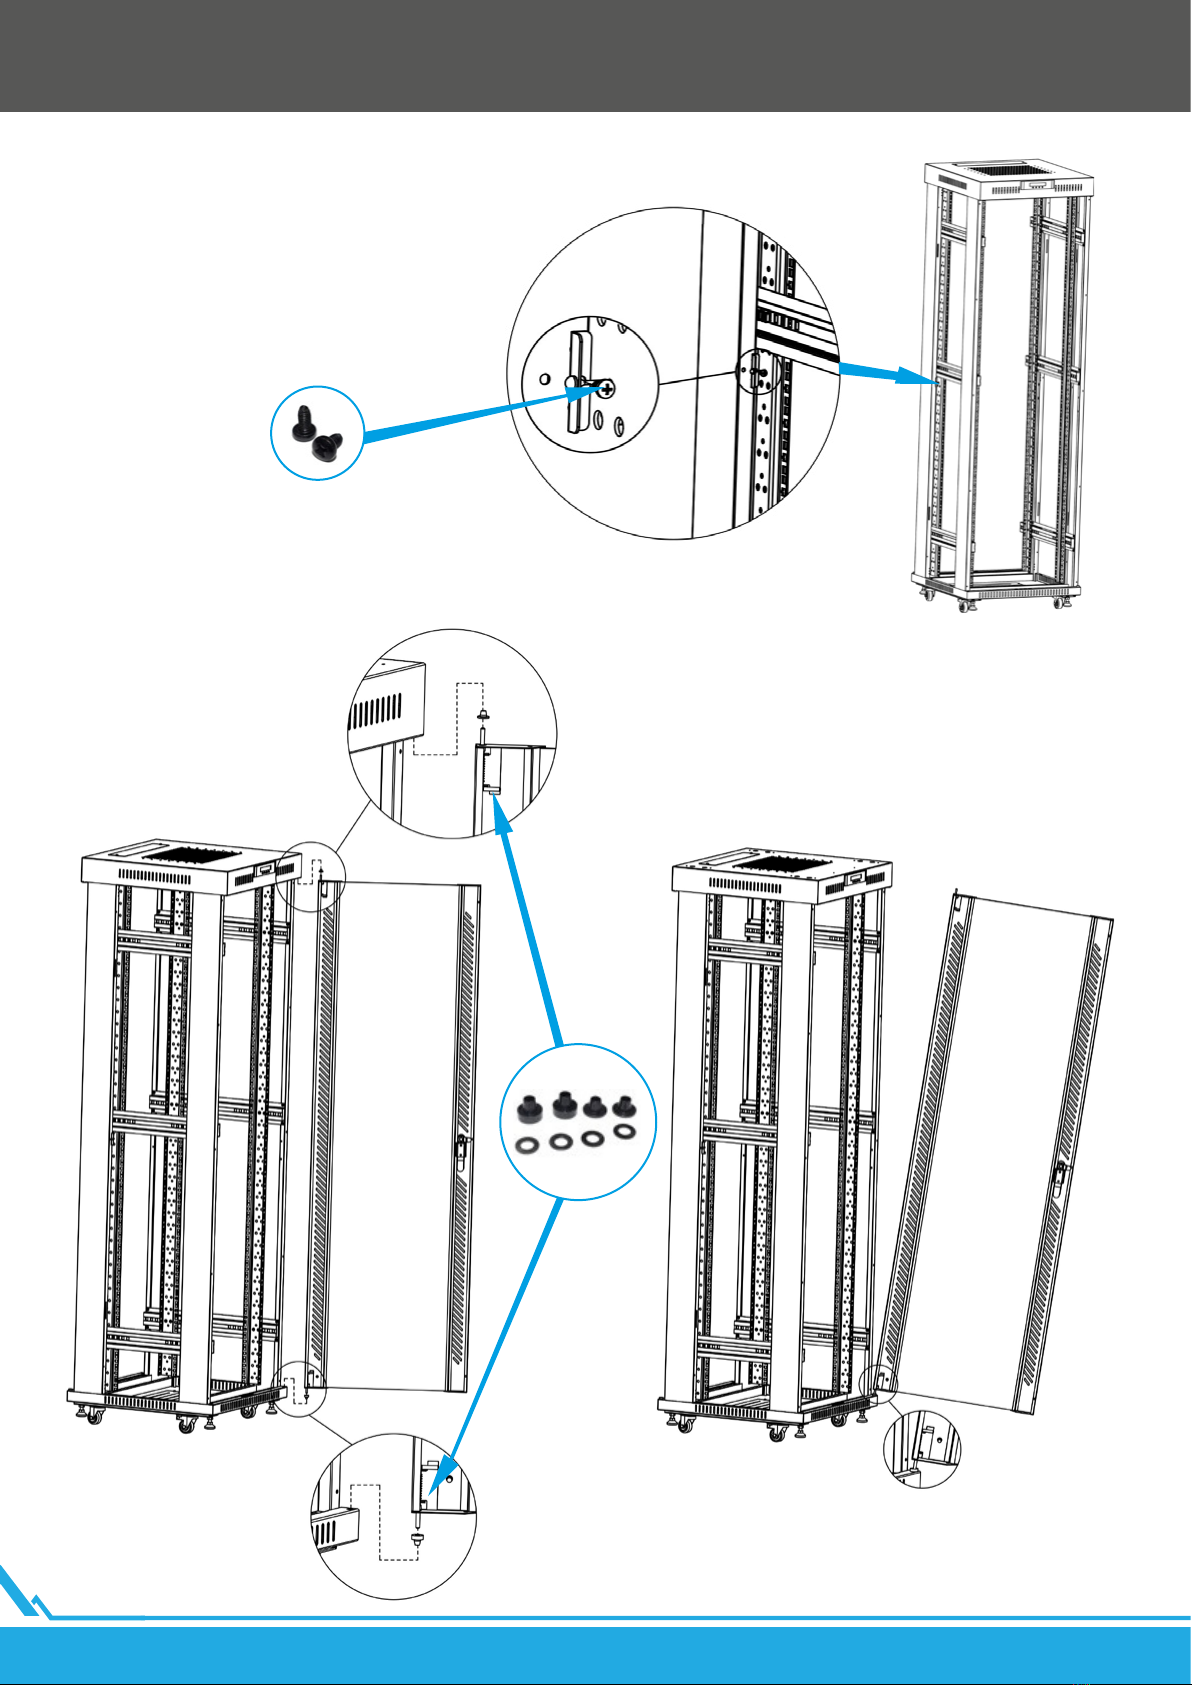
Step 10. Prepare and use M4 self-tapping
screws (item S) to x the door stops (item
M),12U~27U(8pcs), 32U~47U(12pcs)
Self-tapping screw M4
(part S)
Step 11. Prepare and place the door spacers
(item W) for the front door and rear panel (items
A and B) in the appropriate places. Fit the side
panels (item C) at the very end.
Ce manuel convient aux modèles suivants
7
Table des matières
Langues :
Autres manuels Lanberg Support et étagère


Manuels Support et étagère populaires d'autres marques

Salamander
Salamander Acadia AC/W/L400/WH Manuel utilisateur

Fohhn
Fohhn VAT-09 Guide de l'utilisateur

ricoo
ricoo FS0522 Manuel utilisateur

AMSOIL
AMSOIL BMK-22 Guide rapide

Kargo Master
Kargo Master 48220 Manuel utilisateur

Milestone AV Technologies
Milestone AV Technologies SIMPLICITY SLF2 Manuel utilisateur


