KitchenAid KICA0WH Manuel utilisateur

KICA0WH
INSTRUCTIONS
INSTRUCTIONS
INSTRUCCIONES

2
ICE CREAM MAKER INSTRUCTIONS
PROOF OF PURCHASE & PRODUCT REGISTRATION
USA: 1.800.541.6390
Canada: 1.800.807.6777
WelCome to tHe World of KItCHenAId.
We’re committed to helping you
create a lifetime of delicious meals for
family and friends. To help ensure the
longevity and performance of your
appliance, keep this guide handy. It will
empower you with the best way to
use and care for your product. Your
satisfaction is our #1 goal. Remember
to register your product online at
www.kitchenaid.com, or by mail using
the attached Product Registration Card.
KitchenAid.com
KitchenAid.ca
Join us in the kitchen at www.kitchenaid.com.
Scan with your mobile device for recipes, tips, and more.

3
English
ICE CREAM MAKER INSTRUCTIONS
ICE CREAM MAKER ATTACHMENT SAFETY
Important safeguards.........................................................................................4
PARTS AND FEATURES
Parts and accessories.........................................................................................5
ASSEMBLING THE ICE CREAM MAKER
Attaching the Ice Cream Maker for Tilt-Head Mixers ......................................6
Attaching the drive assembly to a Tilt-Head Mixer...........................................7
Attaching the Ice Cream Maker for Bowl-Lift Mixers.......................................8
Attaching the drive assembly to a Bowl-Lift Mixer..........................................10
USING THE ICE CREAM MAKER
Making Ice Cream ...........................................................................................11
TIPS FOR GREAT RESULTS ..............................................................................12
CARE AND CLEANING......................................................................................13
RECIPES
Caramel Pecan Ice Cream...............................................................................14
French Vanilla Ice Cream.................................................................................15
Triple Chocolate Ice Cream ............................................................................16
Pumpkin Ice Cream.........................................................................................17
Creamy Lemon-Orange Gelato ......................................................................17
Fresh Raspberry Sorbet...................................................................................18
Other Sorbets..................................................................................................18
Minted Mango Sherbet....................................................................................19
WARRANTY .........................................................................................................20
Table of ConTenTs
PROOF OF PURCHASE & PRODUCT REGISTRATION
Model Number _______________________________________________________________________
Serial Number _______________________________________________________________________
Date Purchased ______________________________________________________________________
Store Name _________________________________________________________________________
Always keep a copy of the itemized sales receipt showing the date of purchase of your Stand
Mixer Attachment. Proof of purchase will assure you of in-warranty service. Before you use
your Stand Mixer Attachment, please ll out and mail your product registration card packed
with the unit, or register on-line at www.kitchenaid.com. This card will enable us to contact
you in the unlikely event of a product safety notication and assist us in complying with the
provisions of the Consumer Product Safety Act. This card does not verify your warranty.
Please complete the following for your personal records:

4
PARTS AND FEATURESICE CREAM MAKER ATTACHMENT SAFETY
IMPORTANT SAFEGUARDS
When using electrical appliances, basic safety precautions should always be
followed including the following:
1. Read all instructions.
2. To protect against risk of electrical shock, do not put Stand Mixer in water or other liquid.
3. Close supervision is necessary when this or any appliance is used near children.
4. Unplug Stand Mixer from outlet when not in use, before putting on or taking off parts
and before cleaning.
5. Avoid contacting moving parts. Keep ngers out of hopper inlet and discharge opening.
6. Do not operate the Stand Mixer with a damaged cord or plug or after the mixer malfunctions,
or is dropped or damaged in any manner. Return the Stand Mixer to the nearest Authorized
Service Center for examination, repair or electrical or mechanical adjustment.
7. The use of attachments not recommended or sold by KitchenAid may cause re,
electric shock or injury.
8. Do not use the Stand Mixer outdoors.
9. Do not let the cord hang over the edge of table or counter.
10. Do not let the cord contact hot surfaces, including the stove.
11. This product is designed for household use only.
SAVE THESE INSTRUCTIONS

5
English
PARTS AND FEATURESICE CREAM MAKER ATTACHMENT SAFETY
Parts and accessories
Freeze bowl
Dasher
Drive assembly
NOTE: The freeze bowl must be completely frozen to make ice cream.
IMPORTANT: The freeze bowl is not dishwasher safe. Hand wash only.

6
ASSEMBLING THE ICE CREAM MAKERASSEMBLING THE ICE CREAM MAKER
IMPORTANT: Do not pour ice cream batter into the freeze bowl until all parts are assembled
and the mixer is running.
NOTE: Use the freeze bowl immediately upon removal from freezer, as it begins to thaw
once removed.
Attaching the Ice Cream Maker for Tilt-Head Mixers
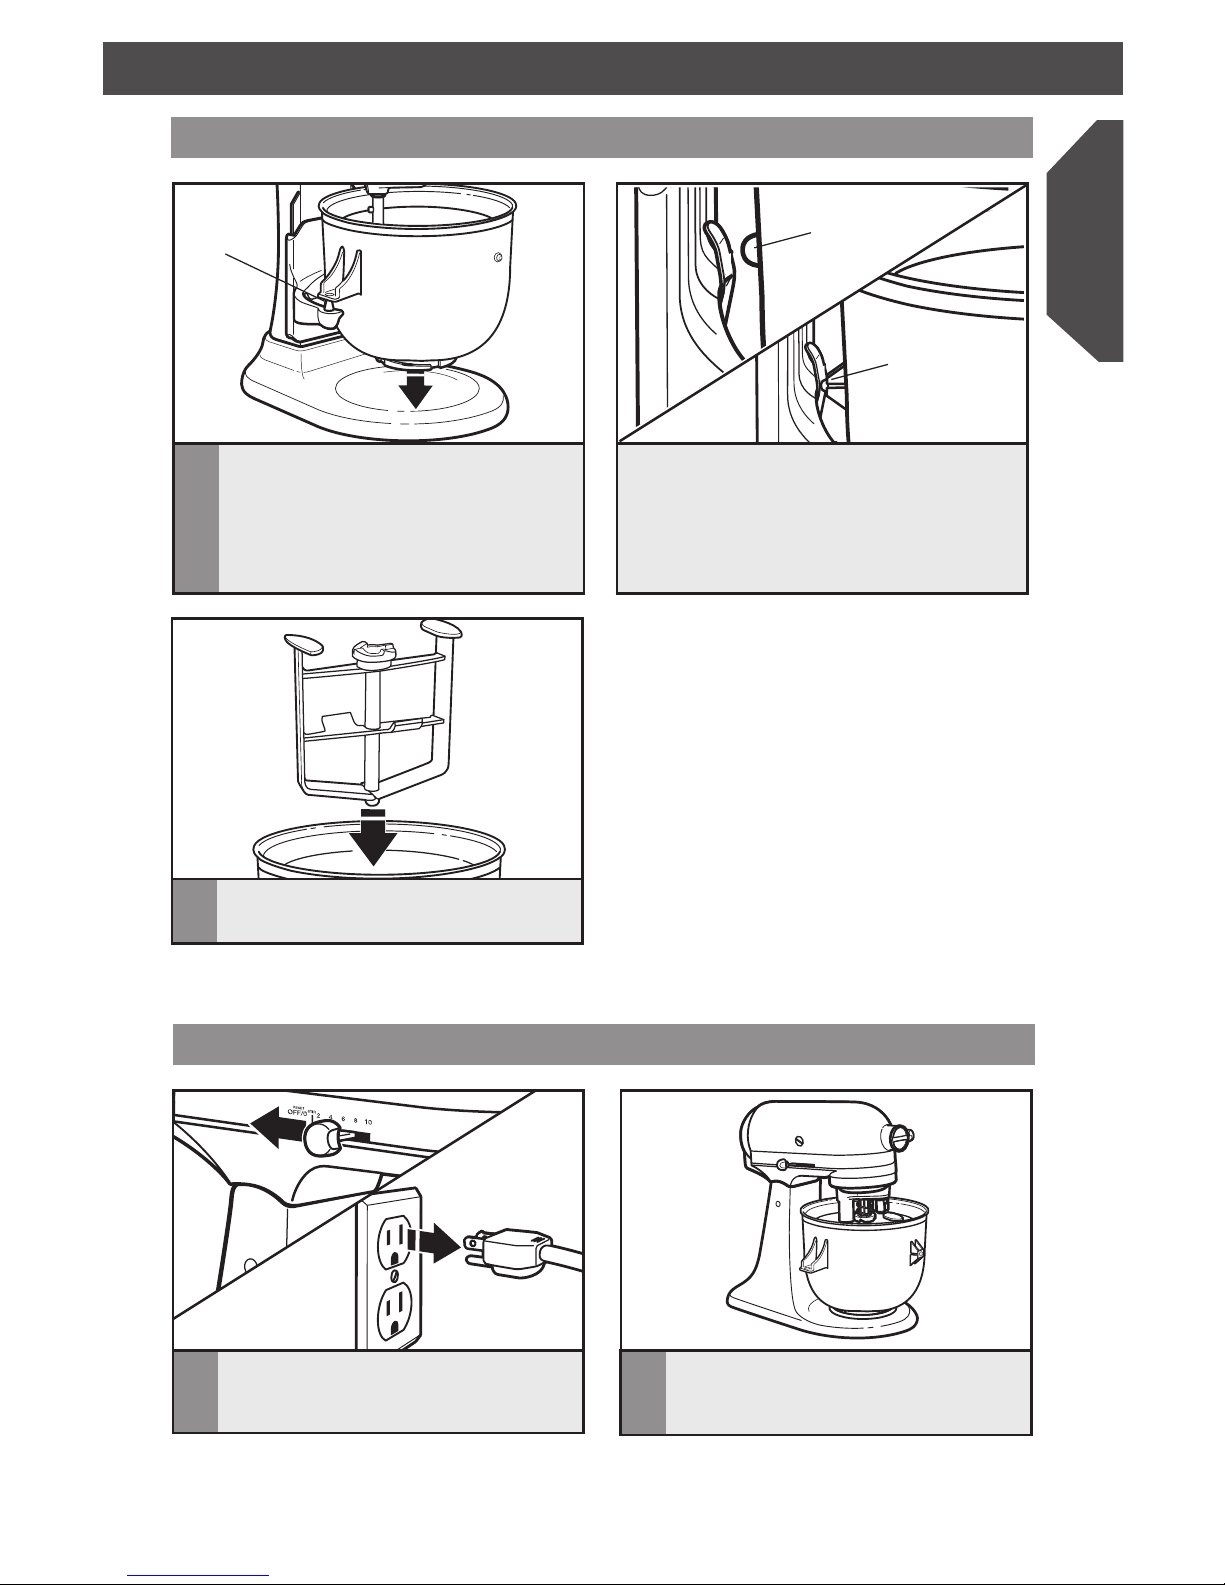
2Tilt motor head back and remove the
mixing bowl.
4Place the freeze bowl on bowl-clamping
plate.
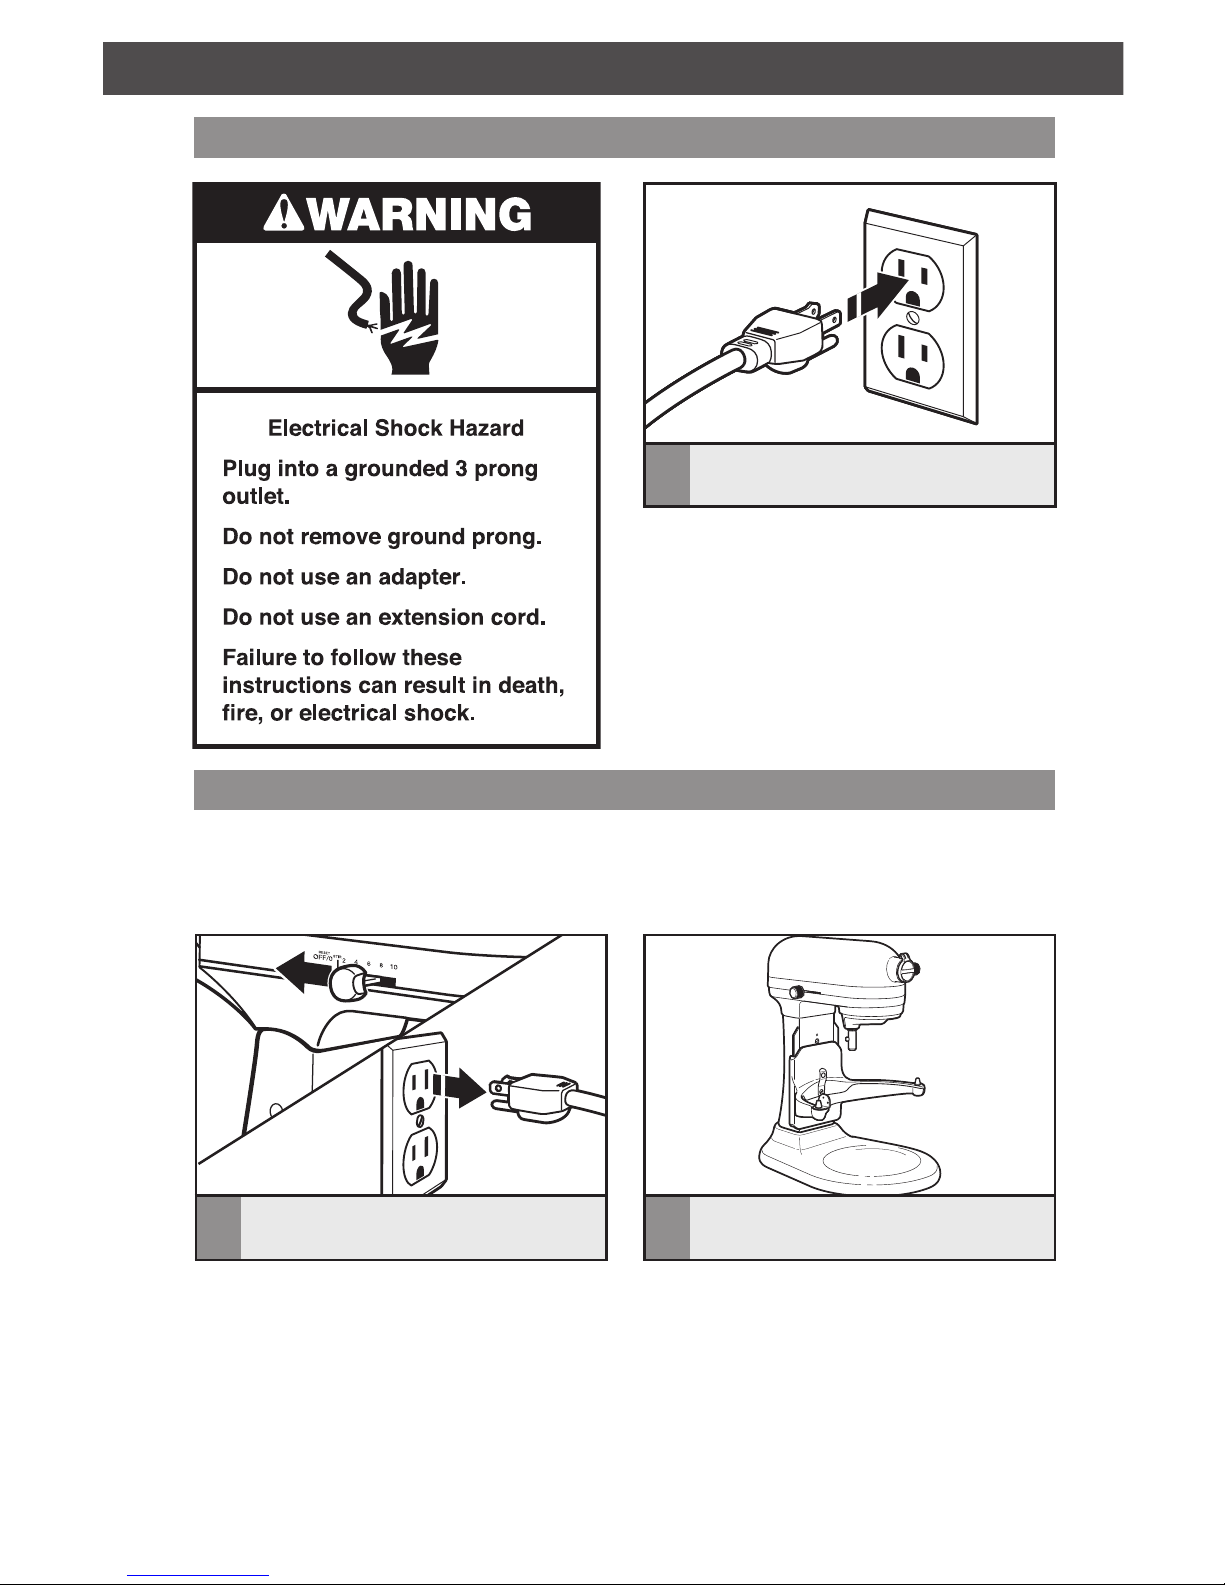
1Turn Stand Mixer OFF and unplug.
Before First Use
Before using your attachment, remove the “Do not immerse in water” label. Never immerse
attachments in water or other liquid. Never wash in dishwasher.
Bowl-clamping
plate
3Place dasher inside the freeze bowl.

7
English
ASSEMBLING THE ICE CREAM MAKERASSEMBLING THE ICE CREAM MAKER
Attaching the drive assembly for Tilt-Head Mixers
5Make sure the motor head is down
completely.
3Slide drive assembly onto the motor
head until it will not slide any further.
When properly assembled, the outer
curved edges of the drive assembly
should center on the motor head. If
they are not centered, slide the drive
assembly either back or forward until it
is centered on the motor head. Make
sure the drive assembly is securely in
place by pressing upward.
1Be sure the Stand Mixer is still OFF and
unplugged. Keep the motor head tilted
back and put the dasher and freeze bowl
into place.
4Lower the motor head to engage the
drive assembly with the dasher. If the
drive assembly doesn’t engage the
dasher, slide the drive assembly either
back or forward until it does engage
the dasher properly.
No Spring
Step
Spring
No Step
2Determine your mixer model by
checking for a spring on the beater shaft,
and then position the drive assembly as
illustrated for proper placement.
6Place locking lever in the LOCK
position. Before mixing, test the lock by
attempting to raise the motor head.
8
ASSEMBLING THE ICE CREAM MAKERASSEMBLING THE ICE CREAM MAKER
Attaching the drive assembly for Tilt-Head Mixers
Attaching the Ice Cream Maker for Bowl-Lift Mixers
7Plug the mixer into a grounded 3-prong
outlet.
IMPORTANT: Do not pour ice cream batter into the freeze bowl until all parts are assembled
and the mixer is running.
NOTE: Use the freeze bowl immediately upon removal from freezer, as it begins to thaw
once removed.
2Place bowl-lift handle in down position
and remove mixing bowl.
1Turn Stand Mixer OFF and unplug.
Before First Use
Before using your attachment, remove the “Do not immerse in water” label. Never immerse
attachments in water or other liquid. Never wash in dishwasher.
9
English
ASSEMBLING THE ICE CREAM MAKERASSEMBLING THE ICE CREAM MAKER
Attaching the Ice Cream Maker for Bowl-Lift Mixers
4Place the dasher inside the freeze bowl.
3Fit the freeze bowl into place over the
locating pins. Press down on the back of
the freeze bowl until the bowl pin snaps
into the spring latch.
Locating
pins
Pin too short
Correct
pin fit
NOTE: The freeze bowl is designed to fit all
bowl-lift mixers. If the bowl pin at the back
of the bowl is too short or too long to snap
into the spring latch, remove and rotate the
bowl so the opposite bowl pin faces the
spring latch. Repeat step 3.
Attaching the drive assembly for Bowl-Lift Mixers
1Be sure the Stand Mixer is still OFF and
unplugged. 2Make sure the bowl-lift handle is still in
the down position, and the freeze bowl
and dasher are in place.

10
USING THE ICE CREAM MAKERASSEMBLING THE ICE CREAM MAKER
4Slide drive assembly onto the motor
head until it will not slide any further.
When properly assembled, the outer
curved edges of the drive assembly
should center on the motor head. If
they are not centered, slide the drive
assembly either back or forward until it
is centered on the motor head. Make
sure the drive assembly is securely in
place by pressing upward.
5Raise the bowl to engage the dasher
with the drive assembly before mixing.
If the drive assembly doesn’t engage the
dasher, slide the drive assembly either
back or forward until it does engage the
dasher properly.
No Spring
Step
Spring
No Step
3Determine your mixer model by
checking for a spring on the beater shaft,
and then position the drive assembly as
illustrated for proper placement.
6Plug the mixer into a grounded 3-prong
outlet.
Autres manuels pour KICA0WH
1
Ce manuel convient aux modèles suivants
1
Table des matières
Langues :
Autres manuels KitchenAid sorbetière

KitchenAid
KitchenAid KPFD200 Manuel utilisateur

KitchenAid
KitchenAid 5KICA0WH Manuel utilisateur

KitchenAid
KitchenAid 5KSMICM Manuel utilisateur

KitchenAid
KitchenAid KSMICM Manuel utilisateur

KitchenAid
KitchenAid 5KICA0WH Guide rapide

KitchenAid
KitchenAid KICA Manuel utilisateur

KitchenAid
KitchenAid KICA Manuel utilisateur

KitchenAid
KitchenAid KICA0WH Manuel utilisateur


