Kino Flo FreeStyle 4 Manuel utilisateur

Quick Start Guide
FreeStyle 4 LED
Part No. 3100117 Rev A 11-05-2018
LED-140X
CFX-F484
FS-48

FreeStyle 4 System Components
LED-140X-120U
FreeStyle 140 LED DMX Controller, Univ 120U
LED-140X-230U
FreeStyle 140 LED DMX Controller, Univ 230U
CFX-F484 FreeStyle T44 Fixture
MTP-KG41 KinoGrip 41K Mount w/ 3/8” Pin
(10mm)
X12-25 FreeStyle Extension, 25ft
2
FreeStyle 4 System
SYS-F484U
FreeStyle T44 LED DMX System, Univ
FreeStyle 4 LED System consists of:
1 FreeStyle 4 Fixture
1 Mounting Plate
1 Extension Cable
1 LED Controller
4 FreeStyle 4ft LED Tubes
FS-48 FreeStyle 4ft LED Tube

3
Power
DC Input
The FreeStyle 140 LED DMX can also
be operated on 24VDC (input range
18-36VDC) through a 3-Pin XLR.
The pin polarity is:
Pin # 1 – Ground
Pin # 2 + 18-36VDC
Pin # 3 not used
AC Input
The FreeStyle 140 LED DMX
Controller is powered AC and includes
an IEC connection. It also includes a
12ft power cord with a locking IEC
connector.
The FreeStyle 140 LED DMX has a
built-in power supply with universal
input from 100-240VAC.
Ambient Operating Temperature
The FreeStyle 140 LED DMX is designed
to operate at temperatures from
14°F to 104°F (-10°C to 40°C).
Note:
A low voltage warning will display
if input DC voltage is under 18VDC.
Photo example: LOW VDC: 16

FreeStyle Fixture Assembly
4
Rotate the ¼ turn fastener
clockwise to release harness.
To Release the Tube Harness
Remove the harness from
the Velcro located under the
relector.
The FreeStyle T44 ixture is
comprised of a Louver,
Relector and Tube Harness.
The Louver and Relector
are held in place with Velcro
fasteners. The Tube Harness
is secured by means of a
¼ turn fastener and Velcro.

5
FreeStyle Harness
FreeStyle Harness:
Align arrows on harness connector
with tube. Push and click into place.
To remove harness connector, turn
locking ring to the left and pull.
Push tubes into the ixture’s tube
holder clips. The tubes can operate
independent of the ixture allowing
them to be built into sets or custom
soft boxes or hand-held as a single
tube for an eye-light.
The FreeStyle Relector (REF-F484)
has a unique design to accommodate
the aluminum channel on the back of
the FreeStyle tube. It provides even
light distribution and maximizes
light output. In addition, it acts as
a heatsink and allows the FreeStyle
Tubes to run cooler.

Mounting the Fixture
The standard mount (MTP-KG41) comes with a
3/8” Lollipop that clamps into a grip head. The ball
and socket mount allows the xture to be oriented in
a broad range of angles.
Align the center pin of the mounting plate to the
center hole on the mating plate.
Rotate plate clockwise until the four shoulder rivets
drop into the receptacle. A locking pin will snap into
place when the plate is properly seated.
The yellow wire loops provide attachment points for
a safety chain.
To remove the plate, pull up on the locking pin and
reverse the mounting procedure.
Lollipops are interchangeable.
MTP-L Kino 41 Lollipop w/ 3/8” Pin (10mm)
MTP-LBC Kino 41 Lollipop w/ Baby Rcvr Curve
(16mm)
MTP-LBS Kino 41 Lollipop w/ Baby Rcvr Short
(16mm)
Turn the knob to loosen or tighten the mount.
6

7
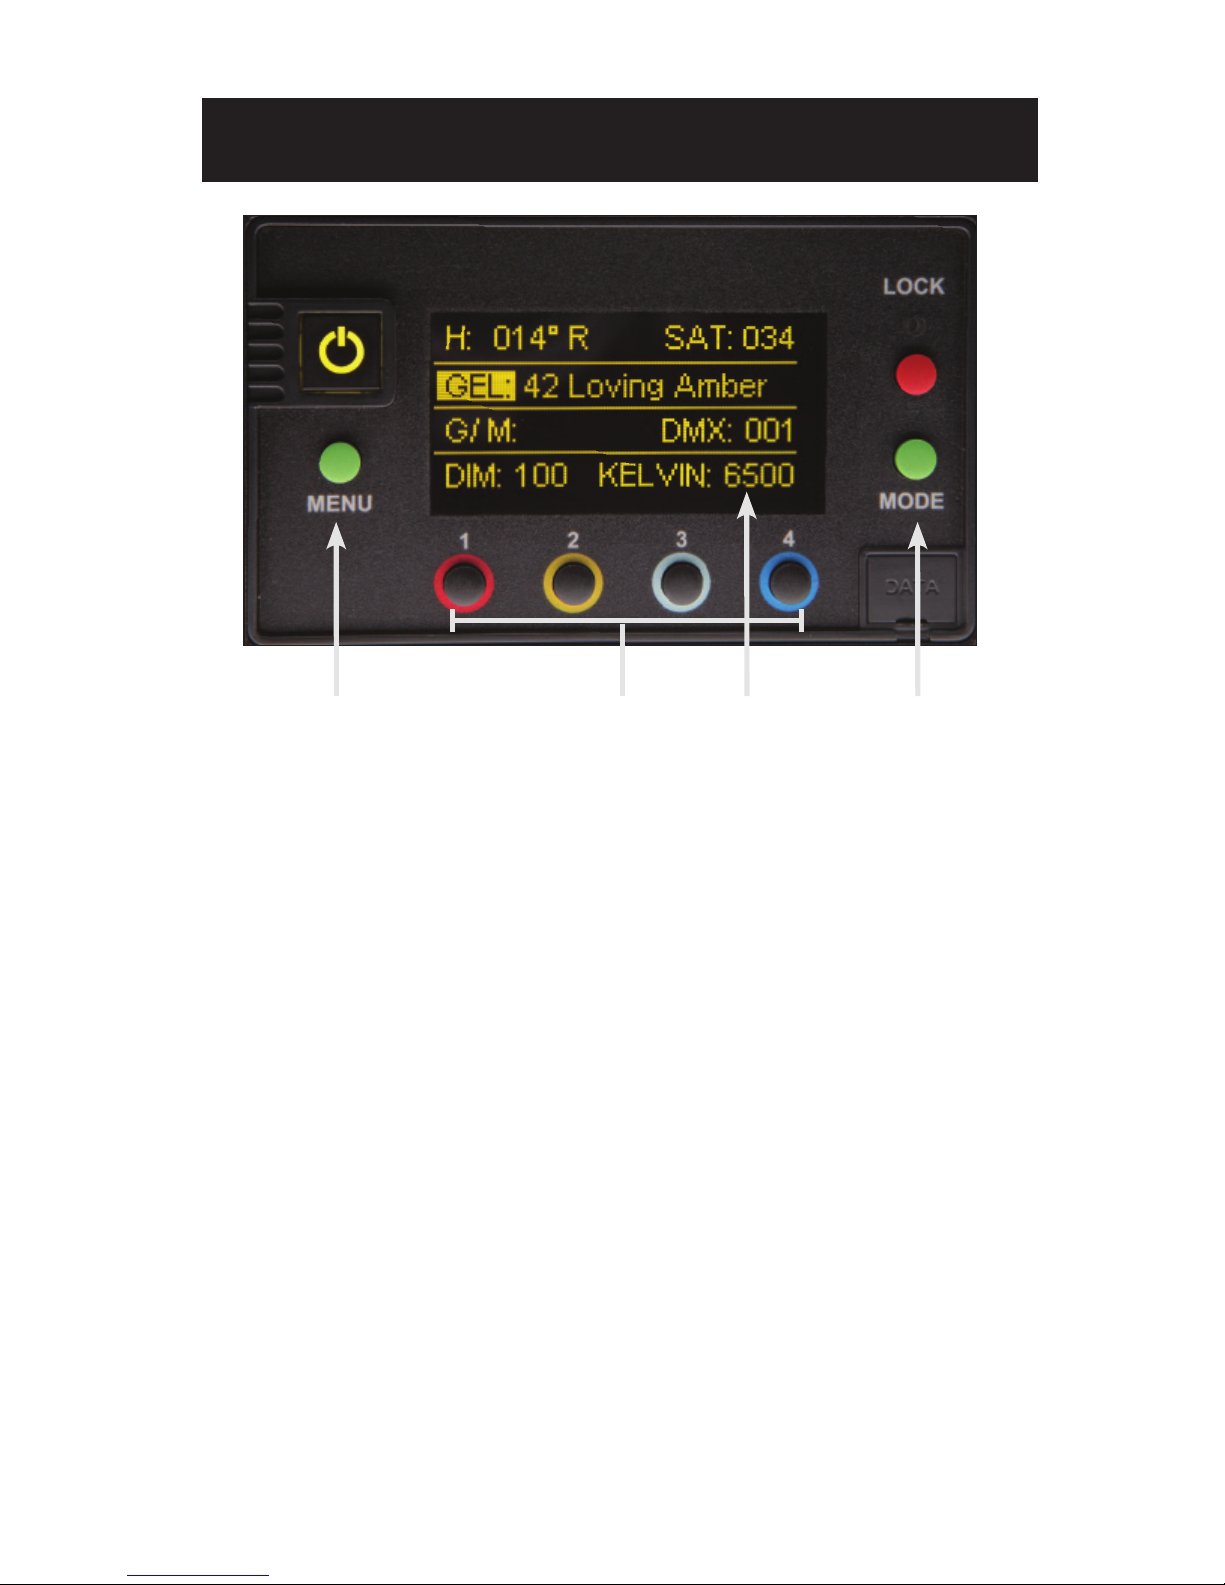
A) On /Off: On = Green light displayed. Off = Red light displayed. The display and
all menu settings can be operated while the power button is in the Off position,
as long as power is applied to the controller. The On /Off button only controls
the light source.
B) Menu: Provides access to menu options such as General settings, Reset,
DMX and DMX Wireless settings. Shortcut: While on control screen,
press and hold for 3 seconds to switch through menus (White, Gels &
Hue, RGB, FX).
C) Preset Buttons: Factory defaults left to right are: 2700K, 3200K, 5000K and
6500K. G/M default value is 000. User can also use these preset buttons to
store custom Kelvin and G/M settings.
D) Display: Provides access to Dim, Kelvin, G/M, and DMX channel.
Factory reset will show: Dim = 10%, Kelvin = 2700K, G/M = 000, DMX = 001.
E) Lock: Press the Lock button to disable all buttons and Control knob.
Press for 3 seconds to restore displayed presets to default factory settings.
F) Mode: Press to navigate from Dim to Kelvin and G/M settings.
When in sub-menus, pressing Mode always returns you to main display.
When DMX is applied, use Mode to access DMX channel on main display.
Shortcut: Long press will bring you back one step.
G) Data Port: Mini B USB for irmware updates.
H) Control Knob: Manually adjusts Dim, Kelvin, G/M levels and DMX address.
Press the Control knob to toggle between Fine and Coarse increments or
when selecting options within menus.
DMX Note: The LED-140X has an “AUTO TERMINATE” feature.
The last ixture that does not have an XLR cable attached to the DMX “Out” port
will automatically terminate.
Control Panel - White Mode
ABCEFGH

8
Control Panel - Gels/Hue Mode
A DCB
A) Menu:
Provides access to menu options such as General settings (Gels/Hue Mode),
Reset, DMX and DMX Wireless settings. Shortcut: While on control screen,
press and hold for 3 seconds to switch through menus (White, Gels & Hue,
RGB, FX).
B) Preset Buttons:
Factory defaults left to right are: 2700K, 3200K, 5000K and 6500K.
G/M default value is 000. User can also use these preset buttons to store
custom Kelvin between 2500K and 9900K and custom G/M, Gel, Hue and
Saturation settings.
C) Display:
Provides access to Dim, Kelvin, G/M, Gel, Hue/Saturation and
DMX channel. Factory reset will show: Dim = 10%, Kelvin = 2700K,
G/M = 000, DMX = 001.
D) Mode:
Press to navigate from Dim to Kelvin, G/M, Gel, Hue and Saturation settings.
When on the Gel function, pushing the Control knob in/out will apply the gel or
remove the gel. When in sub-menus, pressing Mode always returns you to
main display. When DMX is applied, use Mode to access DMX channel on
main display. Shortcut Tip: Long press will bring you back one step.
Gels/Hue Mode

9
A DCB
Control Panel - RGB Mode
A) Menu:
Provides access to menu options such as General settings (RGB Mode),
Reset, DMX and DMX Wireless settings. Shortcut: While on control screen,
press and hold for 3 seconds to switch through menus (White, Gels & Hue,
RGB, FX).
B) Preset Buttons:
Factory defaults left to right are: 2700K, 3200K, 5000K and 6500K.
G/M default value is 000. User can also use these preset buttons to
store custom Kelvin between 2500K and 9900K and custom G/M, and
RGB settings.
C) Display:
Provides access to Dim, Kelvin, G/M, RGB and DMX channel.
Factory reset will show: Dim = 10%, Kelvin = 2700K, G/M = 000, DMX = 001.
D) Mode:
Press to navigate from Dim to Kelvin, G/M, RGB settings.
When in sub-menus, pressing Mode always returns you to main display.
When DMX is applied, use Mode to access DMX channel on main display.
Shortcut: Long press will bring you back one step.
RGB Mode

10
FX (Effects) Mode
Control Panel - FX (Effects)
FX mode provides access to effects including Candle, Fire, TV, Police, Lightning,
Paparazzi, Pulse and Scroll. Candle mode used as an example:
A) FX Option:
Choose the desired FX Mode by rotating the control knob. When on the
desired effect, there will be several pre-programmed effects as well as control
parameters that can be altered.
B) Preset Buttons:
In FX Mode, Kelvin custom settings and any control functions displayed such
as Rate and Amplitude (Ampl) can be saved as a preset. Chosen values can
be assigned to any preset button by holding down the desired button for
3 seconds. The Kelvin display will lash once the setting is registered.
To restore presets to default factory settings, choose Reset under General
settings and Clear Presets. This method will reset all buttons in all Modes.
Shortcut: If only want to clear presets for Candle Mode, hold Lock button
for 3 seconds while Candle mode is displayed.
C) Mode:
Press to navigate from Dim to Kelvin and FX settings.
Shortcut: Long press will bring you back one step.
A C
B
Table des matières
Autres manuels Kino Flo Lampe de travail
Manuels Lampe de travail populaires d'autres marques

PowerSmith
PowerSmith PWLD080T Manuel utilisateur

MaxLite
MaxLite 73683 Manuel utilisateur

Heitronic
Heitronic Trend 27867 Manuel utilisateur

Monzana
Monzana Gore MZCL10 Manuel utilisateur

EINHELL
EINHELL TE-CL 18/2000 LiAC Manuel utilisateur

Bayco
Bayco NIGHTSTICK Dual-Light Xtreme Lumens... Manuel utilisateur


