KIDOMO F02 Manuel utilisateur

Quick Start Guide
F02 FOLDABLE DRONE
V1.2

CONTENTS
01 - 04English
05 - 08Deutsch
09 - 12Español
13 - 16Français
17 - 20Italiano
21 - 24日本語

1
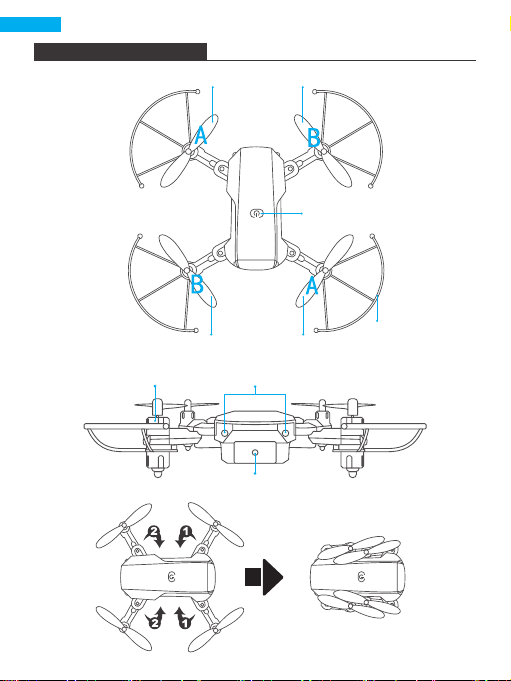
DRONE DIAGRAM
LED
Motor
Wifi Camera
Power Switch
Propeller
Protective Cover
Propeller A Propeller B
Propeller B Propeller A

2
Power ON/OFF
Left Joystick
Right Joystick
Headless Mode
One-key Return
One-key Landing
One-key Takeoff
Fast/Slow Switch
Right Trimming
Left Trimming
Backward Trimming
Forward Trimming
Roll
Phone Clamps
1
2
3
4
5
6
7
8
9
10
11
12
13
14
14
2
4
5
9
101
8 13
7
6
3
12
11
REMOTE CONTROL DIAGRAM
INSTALLING BATTERIES
3×1.5V AAA batteries for the remote control (not included)
MADE IN CHINA
1.5V AAA
1.5V AAA
1.5V AAA

3
Insert the battery into the drone (3.7V 650mAh Li-Po battery included)
RECHARGING DRONE BATTERY
First, take the battery out of the drone and connect one end
of the USB charging cable to the USB interface of the
computer (or USB power adapter) and the other end to the
battery charging jack. The USB light will be on when charging
and off when fully charged, and the charging time will be
about 40 minutes.
NOTE: Only use the provided charging cable. Do
not use the provided charging cable to charge
other products.
READY TO FLY
Step1 Step2 Step3
HOW TO SET THE FREQUENCY
Step1: Turn on the power of the fuselage and place the drone on a level surface.
Step2: Turn on the power switch of the remote control.
Step3: The two LED lights at the front of the drone will flash. Push the left joystick
of the remote control to its highest point, then pull it to its lowest point. The
controller will "beep", indicating that frequency setting is complete. After
completion, the LED light at the front of the drone will be steadily lit.

4
CONNECTING YOUR MOBILE DEVICE
1. Download the "WiFi_CAM" app on your mobile device from the App Store/
Google Play or by scanning the QR code below.
2. Power on the drone and the LED lights will flash. Go to Wifi settings on your
mobile device and connect to the network (KIDOMO___xxxxxx).
Download on the
App Store
GET IT ON
Google Play
For any inquiries about KIDOMO products, please feel free to contact us. We will
respond within 24 hours.
Email: [email protected]
Tel: 301-670-7335 (US) Mon-Fri 9am-5pm (EST)
Official website: www.kidomo.net
CONTACT US
USER MANUAL
Scan the QR code or visit the following website to
download the detailed user manual.
https://www.kidomo.net/manual/kidomoF02.pdf

FCC Statement
Changes or modifications not expressly approved by the party responsible for
compliance could void the user's authority to operate the equipment.
This equipment has been tested and found to comply with the limits for a Class B
digital device, pursuant to Part 15 of the FCC Rules. These limits are designed to
provide reasonable protection against harmful interference in a residential
installation. This equipment generates uses and can radiate radio frequency
energy and, if not installed and used in accordance with the instructions, may
cause harmful interference to radio communications. However, there is no
guarantee that interference will not occur in a particular installation. If this
equipment does cause harmful interference to radio or television reception, which
can be determined by turning the equipment off and on, the user is encouraged to
try to correct the interference by one or more of the following measures:
-- Reorient or relocate the receiving antenna.
-- Increase the separation between the equipment and receiver.
-- Connect the equipment into an outlet on a circuit different from that to which
the receiver is connected.
-- Consult the dealer or an experienced radio/TV technician for help
This device complies with part 15 of the FCC rules. Operation is subject to the
following two conditions (1)this device may not cause harmful interference, and (2)
this device must accept any interference received, including interference that may
cause undesired operation.
This equipment complies with FCC radiation exposure limits set forth for an
uncontrolled environment. This equipment should be installed and operated with
minimum distance 20cm between the radiator & your body
IC Statement
This device contains licence-exempt transmitter(s)/receiver(s) that comply with
Innovation, Science and Economic Development Canada’s licence-exempt
RSS(s). Operation is subject to the following two conditions:
(1) This device may not cause interference; and
(2) This device must accept any interference, including interference that may
cause undesired operation of the device.
The term “IC: “ before the certification/registration number only signifies that the
Industry Canada technical specifications were met. This product meets the
applicable Industry Canada technical specifications.
Cet appareil contient des émetteurs / récepteurs exemptés de licence conformes
aux RSS (RSS) d'Innovation, Sciences et Développement économique Canada.
L'exploitation est autorisée aux deux conditions suivantes : (1) l'appareil ne doit
pas produire de brouillage,
et (2) l'utilisateur de l'appareil doit accepter tout brouillage radioélectrique subi,
même si le brouillage est susceptible d'en compromettre le fonctionnement.
The antenna(s) used for this transmitter must be installed to provide a separation
distance of at least 20 cm from all persons and must not be co-located or
operating in conjunction with any other antenna transmitter. End-user must be
provided with transmitter operating conditions for satisfying RF exposure
compliance.
L'antenne ou les antennes utilisées pour cet émetteur doivent être installées de
manière à assurer une distance de séparation d'au moins 20 cm vis-à-vis de
toutes les personnes et ne doivent pas être co-localisées ni utilisées
conjointement avec un autre émetteur d'antenne. Conditions de fonctionnement
pour satisfaire à la conformité d'exposition RF.
5
Deutsch
DRONEN-DIAGRAMM
Stromschalter
Propeller-
Schutzabdeckung
Propeller A Propeller B
Propeller B Propeller A
LED
Motor
WLAN-Kamera

6
Ein/Ausschalten
Linker Joystick
Rechter Joystick
Kopfloser Modus
Ein-Tasten-Rückkehr
Ein-Tasten-Landung
Ein-Tasten-Start
Schnell/Langsam-
Schalter
Rechte trimmen
Linke trimmen
Rückwärts trimmen
Vorwärts trimmen
Rollen
Telefonklemmen
1
2
3
4
5
6
7
8
9
10
11
12
13
14
14
2
4
5
9
101
8 13
7
6
3
12
11
DIAGRAMM DER FERNBEDIENUNG
INSTALLIEREN DER BATTERIEN
3×1,5V AAA Batterien für die Fernbedienung (nicht enthalten)
MADE IN CHINA
1.5V AAA
1.5V AAA
1.5V AAA

7
AUFLADEN DES DROHNENAKKUS
Nehmen Sie zuerst den Akku aus der Drohne und
schließen Sie ein Ende des USB-Ladekabels an die
USB-Schnittstelle des Computers (oder USB-Netzadapters)
und das andere Ende an die Ladebuchse des Akkus an.
Das USB-Licht leuchtet beim Laden auf und erlischt, wenn
der Akku vollständig geladen ist.
HINWEIS: Verwenden Sie nur das mitgelieferte
Ladekabel und laden Sie keine anderen Produkte auf.
Setzen Sie den Akku in die Drohne ein (3,7 V 650 mAh Li-Po-Akku im
Lieferumfang enthalten)
BEREIT ZUM FLIEGEN
EINSTELLEN DER FREQUENZ
Schritt 1: Schalten Sie den Strom des Rumpfes ein und stellen Sie die Drohne auf
eine ebene Fläche.
Step2: Schalten Sie den Netzschalter der Fernbedienung ein.
Step3: Die beiden LED-Leuchten an der Vorderseite der Drohne blinken. Drücken
Sie den linken Joystick der Fernsteuerung auf den höchsten Punkt und ziehen Sie
ihn dann auf den niedrigsten Punkt. Die Steuerung gibt einen Piepton ab, der
anzeigt, dass die Frequenzeinstellung abgeschlossen ist. Nach Abschluss der
Einstellung leuchtet die LED-Leuchte an der Vorderseite der Drohne konstant.
Schritt 1 Schritt 2 Schritt 3
Table des matières
Langues :


 Manuel utilisateur")


