Kaya Instruments JetCam Manuel utilisateur

JetCam
High Speed Camera Quick Start Guide
(Part-No. KY-JetCam)
9201January
Sky Blue Microsystems GmbH
Geisenhausenerstr. 18
81379 Munich, Germany
www.skyblue.de
In Great Britain:
Zerif Technologies Ltd.
Winnington House, 2 Woodberry Grove
Finchley, London N12 0DR
www.zerif.co.uk
International Distributors

High Speed Camera Quick Start Guide
1
Contents........................................................................................................................................1
Figures and Tables........................................................................................................................2
Introduction ..................................................................................................................................3
3.1 Safety Precautions ...............................................................................................................3
3.2 Disclaimer............................................................................................................................4
System Description.......................................................................................................................6
4.1 System Components............................................................................................................6
Installation and Connectivity.......................................................................................................8
5.1 Essentials to get started................................................................................................................ 8
5.2 Komodo board installation .......................................................................................................... 8
5.3 QSFP+ installation and connectivity.......................................................................................... 9
5.4 JetCam installation and connectivity.......................................................................................... 9
5.5 Vision Point Application installation....................................................................................... 10
Using JetCam Camera...............................................................................................................11
6.1 Selecting a Grabber board.......................................................................................................... 11
6.2 Detecting the JetCam camera.................................................................................................... 11
6.3 Starting and controlling acquisition.......................................................................................... 12
Contents
Sky Blue Microsystems GmbH
Geisenhausenerstr. 18
81379 Munich, Germany
www.skyblue.de
In Great Britain:
Zerif Technologies Ltd.
Winnington House, 2 Woodberry Grove
Finchley, London N12 0DR
www.zerif.co.uk
International Distributors

High Speed Camera Quick Start Guide
2
Figures
FIGURE 1:JETCAM CAMERA SYSTEM STRUCTURE DIAGRAM................................................................7
FIGURE 2:QSFP+ MODULE .................................................................................................................9
FIGURE 3:QSFP+ MODULE WITH FIBER CABLE INSERTED ..................................................................9
FIGURE 4:JETCAM CAMERA POWER CONNECTOR.................................................................................9
FIGURE 5:JETCAM CAMERA SYSTEM CONNECTION DIAGRAM............................................................10
FIGURE 6:SELECTING A FRAME GRABBER.........................................................................................11
FIGURE 7:JETCAM DESCRIPTION PARAMETERS..................................................................................12
FIGURE 8:VISION POINT APP MAIN WINDOW .....................................................................................13
Tables
TABLE 1:JETCAM CAMERA SYSTEM COMPONENTS..............................................................................7
Revision History
Version
Date
Notes
1.0
25/07/17
Initial Release
2.0
09/05/18
Minor corrections
2.1
08/01/19
Minor corrections
Figures and Tables

High Speed Camera Quick Start Guide
3
3.1 Safety Precautions
With your JetCam camera in hand, please take a minute to read carefully the precautions
listed below in order to prevent unnecessary injuries to you or other personnel or cause
damage to property.
Before using the product, read these safety precautions carefully to assure correct
use.
These precautions contain serious safety instructions that must be observed.
After reading through this manual, be sure to act upon it to prevent misuse of
product.
Caution
In the event of a failure, disconnect the power supply.
If the product is used as is, a fire or electric shock may occur. Disconnect the power supply
immediately and contact our sales personnel for repair.
If an unpleasant smell or smoking occurs, disconnect the power supply.
If the product is used as is, a fire or electric shock may occur. Disconnect the power supply
immediately. After verifying that no smoking is observed, contact our sales personnel for repair.
Do not disassemble, repair or modify the product.
Otherwise, a fire or electric shock may occur due to a short circuit or heat generation. For
inspection, modification or repair, contact our sales personnel.
Do not touch a cooling fan.
As a cooling fan rotates in high speed, do not put your hand close to it. Otherwise, it may cause
injury to persons. Never touch a rotating cooling fan.
Do not place the product on unstable locations.
Otherwise, it may drop or fall, resulting in injury to persons or failure.
If the product is dropped or damaged, do not use it as is.
Otherwise, a fire or electric shock may occur.
Do not touch the product with a metallic object.
Otherwise, a fire or electric shock may occur.
Do not place the product in dusty or humid locations or where water may splash.
Otherwise, a fire or electric shock may occur.
Do not get the product wet or touch it with a wet hand.
Otherwise, the product may break down or it may cause a fire, smoking or electric shock.
Do not touch a connector on the product (gold-plated portion).
Introduction

High Speed Camera Quick Start Guide
4
Otherwise, the surface of a connector may be contaminated with sweat or skin oil, resulting in
contact failure of a connector or it may cause a malfunction, fire or electric shock due to static
electricity.
Do not use or place the product in the following locations.
● Humid and dusty locations
● Airless locations such as closet or bookshelf
● Locations which receive oily smoke or steam
● Locations close to heating equipment
● Closed inside of a car where the temperature becomes high
● Static electricity replete locations
● Locations close to water or chemicals
Otherwise, a fire, electric shock, accident or deformation may occur due to a short circuit or heat
generation.
Do not place heavy things on the product.
Otherwise, the product may be damaged.
Be sure to drain static electricity from body before you touch any electronics component
The electronic circuits in your computer and the circuits on Komodo board are sensitive to static
electricity and surges. Improper handling can seriously damage the circuits. In addition, do not let
your clothing come in contact with the circuit boards or components.
Otherwise, the product may be damaged.
3.2 Disclaimer
This product should be used for capturing and processing images. KAYA Instruments
assumes no responsibility for any damages resulting from the use of this product for purposes
other than those stated.
Even if the product is used properly, KAYA Instruments assumes no responsibility for any
damages caused by the following:
- Earthquake, thunder, natural disaster or fire resulting from the use beyond our
responsibility, acts caused by a third party or other accidents, the customer’s willful or
accidental misuse or use under other abnormal conditions.
- Secondary impact arising from use of this product or its unusable state (business
interruption or others).
- Use of this product against the instructions given in this manual or malfunctions due to
connection to other devices.
Introduction

High Speed Camera Quick Start Guide
5
KAYA Instruments assumes no responsibility or liability for:
- Erasure or corruption of data arising from use of this product.
- Any consequences or other abnormalities arising from use of this product, or damage of
this product not due to our responsibility or failure due to modification.
Repair of this product is carried out by replacing it on a chargeable basis, not repairing the
faulty devices. However, non-chargeable replacement is offered for initial failure if such
notification is received within two weeks after delivery of the product.
Introduction

High Speed Camera Quick Start Guide
6
4.1 System Components
The JetCam system configuration includes the following parts:
JetCam Camera
Integrated lens
3G SDI output for local monitor
Komodo Fiber Frame Grabber
12V Power Supply
QSFP+ Modules
System Description


High Speed Camera Quick Start Guide
8
The following steps will guide you through the system installation and configuration.
5.1 Essentials to get started
To begin using your JetCam system, you must have the following:
A computer with the following:
Processor with an Intel 64-bit architecture, or equivalent.
An availably x8 (or x16) PCIe slot. Gen 3 support is recommended for faster data
transfer.
Vision Point Application installation
JetCam camera
Komodo Fiber board
Fiber QSFP+ Modules
Fiber optic cable
NOTE: KAYA Instruments doesn’t guarantee compatibility with all computers that have the above
specifications. Please, consult KAYA representative for any specific issue.
5.2 Komodo board installation
1. Before installing the Komodo Board, turn off the power ofthe computer and its peripherals.
2. Firmly insert the Komodo board to PCIe connector of the motherboard, using the
motherboard’s 8 lanes and up PCIe connector.
3. Verify the Komodo board inserted correctly to the PCIe slot.
4. Anchor the PCIe bracket to the computer chassis using M3 screw.
NOTE: The Frame Grabber should be installed before you install your software.
For more detailed information please refer to Komodo Fiber Reference Guide documentation.
Installation and Connectivity
High Speed Camera Quick Start Guide
9
5.3 QSFP+ installation and connectivity
1. Before connecting the QSFP+ module, make sure there is no dirt inside the QSFP+ module,
or any other foreign matter blocking any of the connectors.
2. Make sure that the male connectors on the QSFP+ module will align with the female
connectors inside the cage.
3. Insert the QSFP+ modules into the JetCam Camera and Komodo Fiber board.
4. Insert the fiber cables into the QSFP+ modules as described in Figure 2 and Figure 3.
For detailed information about QSFP+ installation please refer to JetCam User Guide documentation.
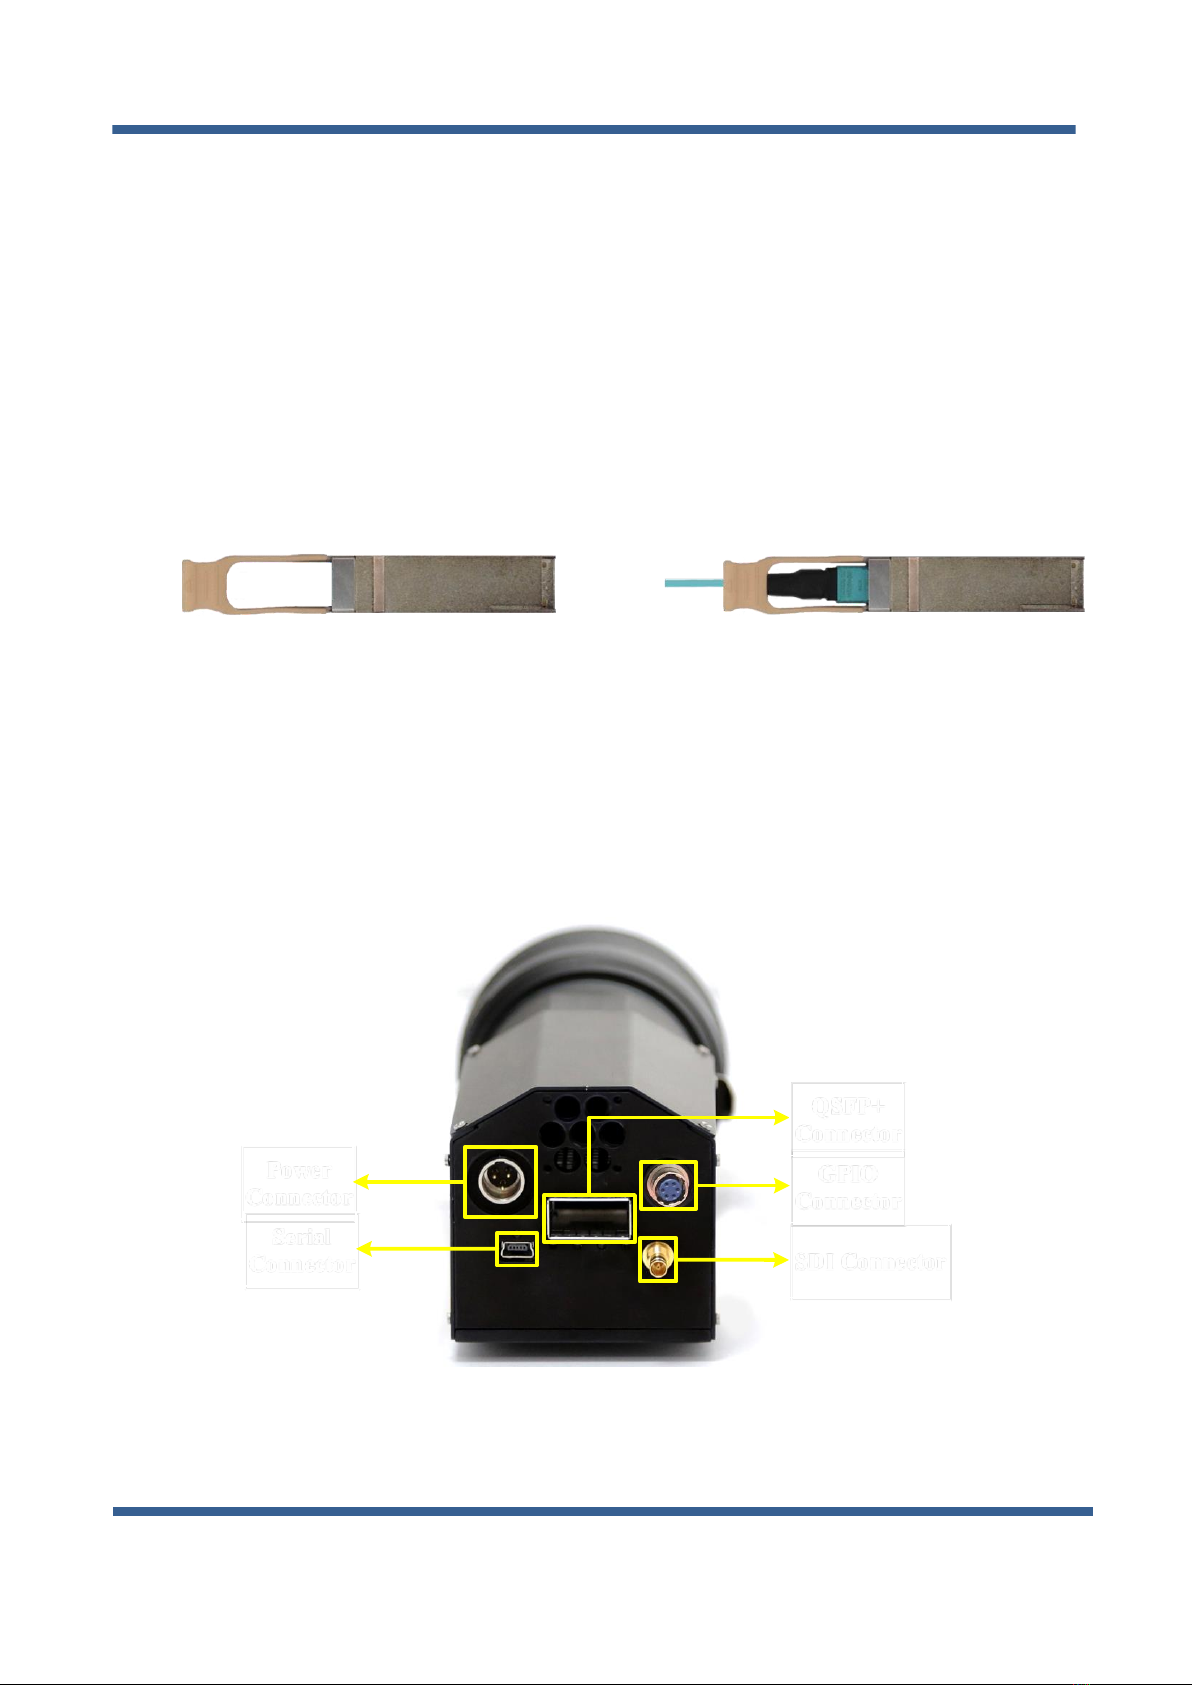
5.4 JetCam installation and connectivity
Connect the Power Adaptor to the JetCam power supply connector as shown in Figure 4.
NC GND
Power
Connector
SDI Connector
Serial
Connector
GPIO
Connector
QSFP+
Connector
12V
Figure 4 : JetCam camera power connector
Figure 2 : QSFP+ Module
Figure 3 : QSFP+ Module with
fiber cable inserted
Installation and Connectivity
Autres manuels pour JetCam
3
Ce manuel convient aux modèles suivants
1
Table des matières
Autres manuels Kaya Instruments Appareil photo numérique

Kaya Instruments
Kaya Instruments JetCam Manuel utilisateur

Kaya Instruments
Kaya Instruments IRON CoaXPress Manuel utilisateur

Kaya Instruments
Kaya Instruments IRON SDI Manuel utilisateur

Kaya Instruments
Kaya Instruments JetCam Manuel utilisateur

Kaya Instruments
Kaya Instruments JetCam Manuel utilisateur

Kaya Instruments
Kaya Instruments IRON SDI Series Manuel utilisateur


