John Josi-access Manuel utilisateur

Rev: 01/06.2023 AL-JPA22-EN
© John GmbH
Instructions for use
for specialised trade and users
JOSI-access
&
JOSI-pro
Rehab buggy
Size
JOSI
-
access
JOSI
-
pro
Size S
JA
-
30002
JP
-
30002
Size M
JA
-
30003
JP
-
30003
Size L
JA
-
30004
JP
-
30004
John GmbH
Ziddelrasen 1b
D-99830 Treffurt
Phone: +49 36923 8388-0
Fax: +49 36923 8388-10
E-mail: info@johngmbh.com
Internet: www.johngmbh.com
WE MANUFACTURE IN GERMANY

© John GmbH Page 2/24
Table of contents
Introduction ...................................................................................................................................... 2
Instructions for use for blind and visually impaired people ................................................................. 2
Intended use ..................................................................................................................................... 3
CE conformity .................................................................................................................................... 3
Locations for use ............................................................................................................................... 3
Contraindications .............................................................................................................................. 3
Safety instructions and application risks ............................................................................................. 3
Transport in vehicles.......................................................................................................................... 4
Building up ........................................................................................................................................ 4
Folding .............................................................................................................................................. 8
Chassis settings ................................................................................................................................. 8
Anti-tip and tipping lever ................................................................................................................... 9
Front wheel ....................................................................................................................................... 9
Front wheel adapter and wheel change (optional) ............................................................................ 10
Footrest .......................................................................................................................................... 10
Tilt-in-space .................................................................................................................................... 11
Back adjustment (optional) .............................................................................................................. 11
Adjusting the seat and backrest cover .............................................................................................. 12
Seating system ................................................................................................................................ 13
Belt systems .................................................................................................................................... 14
Brakes and parking brakes ............................................................................................................... 18
Wrist safety line .............................................................................................................................. 18
Sun canopy with extension zips ........................................................................................................ 19
Bag.................................................................................................................................................. 19
Combination with other medical products........................................................................................ 20
Maintenance and care ..................................................................................................................... 20
Useful life and long-term durability .................................................................................................. 21
Re-use ............................................................................................................................................. 21
Disposal .......................................................................................................................................... 22
Warranty, liability and guarantee ..................................................................................................... 22
Reporting of serious incidents .......................................................................................................... 22
Technical data ................................................................................................................................. 22
Type label ....................................................................................................................................... 24
Introduction
JOSI-access/JOSI-pro rehab buggy is a quality product from John GmbH. It is equipped with an integrated seat
unit (upholstered cover), tilt-in-space and an optional back adjustment. Seat depth and lower leg length are
infinitely adjustable. Furthermore, the seating system can be equipped with additional components (thoracic
pads, headrest, seat cushion, etc.). The additional options can also be infinitely adjusted.
JOSI-access/JOSI-pro is ideally suited to ensure mobility outdoor and indoor, in urban and rural areas. Different
front and rear wheels can be optimally adapted to individual requirements, also when preparing the product for
re-use.
Before using JOSI-access/JOSI-pro please be sure to read this instruction manual with all notes. In this way,
damage due to operating errors can be avoided and optimum use of JOSI-access/JOSI-pro can be achieved.
We reserve the right of error and technical changes.
Pictures in this manual may differ in detail.
Instructions for use for blind and visually impaired people
These instructions for use can be provided as a PDF on request.

© John GmbH Page 3/24
Intended use
JOSI-access/JOSI-pro is a rehab buggy with rigid or swivelling front wheels, suitable for children and adolescents
(persons with a body height of up to approx. 185 cm) with a severe walking disability or inability to walk. The
seat positioning is made through a flexibly adjustable seat positioning system and is suitable for reuse.
JOSI-access/JOSI-pro is suitable for indoor and outdoor use, both in urban and rural areas. The variety of
equipment options as well as the modular design enable use, among others, in case of:
High or low muscle tone,
Limb loss,
Limb defect and / or deformity,
Joint contractures,
Joint damage.
CE conformity
As the manufacturer, John GmbH declares under its sole responsibility that the JOSI-access/JOSI-pro is a medical
device and complies with the applicable requirements of Regulation (EU) 2017/745 of the European Parliament
and of the Council.
Locations for use
JOSI-access/JOSI-pro is, depending on its configuration, suitable for outdoor and indoor use, in urban and/or
rural areas on paved and unpaved roads.
Contraindications
The maximum user weight of max. 50 kg (size S), 70 kg (size M) or 90 kg (size L) (see technical data), must not be
exceeded.
Safety instructions and application risks
Before using the product, it is essential that a qualified person gives instructions on the safe and proper
use of the product.
All safety instructions must be followed in order to minimise safety risks.
Caution, common sense and prudence are necessary to exclude unpredictable situations or similar.
Make sure you familiarise yourself with JOSI-access/JOSI-pro before your first trip - driving characteristics
and size
(length, height and width).
Be sure to observe the technical data (including the permissible user weight and payload).
Follow the tyre pressure specifications (see chapter Technical data).
Make sure that all screw connections, locks and fasteners are tight.
Only operate the tilt-in-space when there is no person in the buggy.
When adjusting the tilt-in-space, always sit next to the buggy and always hold the upper edge of the back
arch at the same time as you turn the lock open.
JOSI-access/JOSI-pro is only approved for the transport of one person.
The option of an anti-tip device is strongly recommended (see chapter Anti-tip and tipping lever).
For the transfer of the person transported, place the buggy in the upper position and lock the parking brake.
The person transported must always be secured with a best system (see chapter Belt systems).
Never leave the person transported unattended, even if he or she is secured by the belt system and the
brakes are locked.
Always use the anti-tip device when using the JOSI-access/JOSI-pro.
A second anti-tip device is recommended in case of increased risk of tipping (e.g. on inclines and uneven
paths).
Always park JOSI-access/JOSI-pro on horizontal surfaces and firmly apply the parking brake.
Make sure that the person transported does not lean out of the JOSI-access/JOSI-pro. There is a risk of
tipping or flipping over. If necessary, arms and legs must be positioned additionally.
The use of spoke protectors is recommended.
Be sure to use the rigid 12.5" front wheel or the 12.5" front wheel Pro for uneven paths.
When driving on inclines or uneven paths, pay attention to the driving stability and do not drive against
obstacles.
Only lift JOSI-access/JOSI-pro by the frame. JOSI-access/JOSI-pro must not be lifted by the push handle!
© John GmbH Page 4/24
Pay attention to the weight distribution and do not hang heavy objects on the push handle that influence
the centre of gravity.
Use ramps or lifts. Stairs can only be climbed with the help of another person.
Watch your fingers during adjustment and assembly work.
Make sure that no parts hang out of the JOSI-access/JOSI-pro during transport.
Be sure to use the wrist safety line (see chapter Wrist safety line).
All adjustments and readjustments - brakes, centre of gravity, belt adjustment, etc. - must be carried out
by a specialist dealer.
The drum brakes must be serviced annually by a specialist dealer (see section 27.2).
All accessories that are not fitted must be fitted by a specialist dealer.
If there is a defect or a malfunction of the product or if you have any questions about the proper and safe
use of the product, contact your specialist dealer as soon as possible.
Do not make any changes to the product.
7.1 Version with back adjustment
Always use two anti-tippers, left and right, for the backrest adjustment and lying position (see chapter Anti-
tipper and tipping lever).
Transport in vehicles
JOSI-access/JOSI-pro is not approved for user transport in vehicles (except public transport).
JOSI-access/JOSI-pro is not approved for the attachment of a fastening kit.
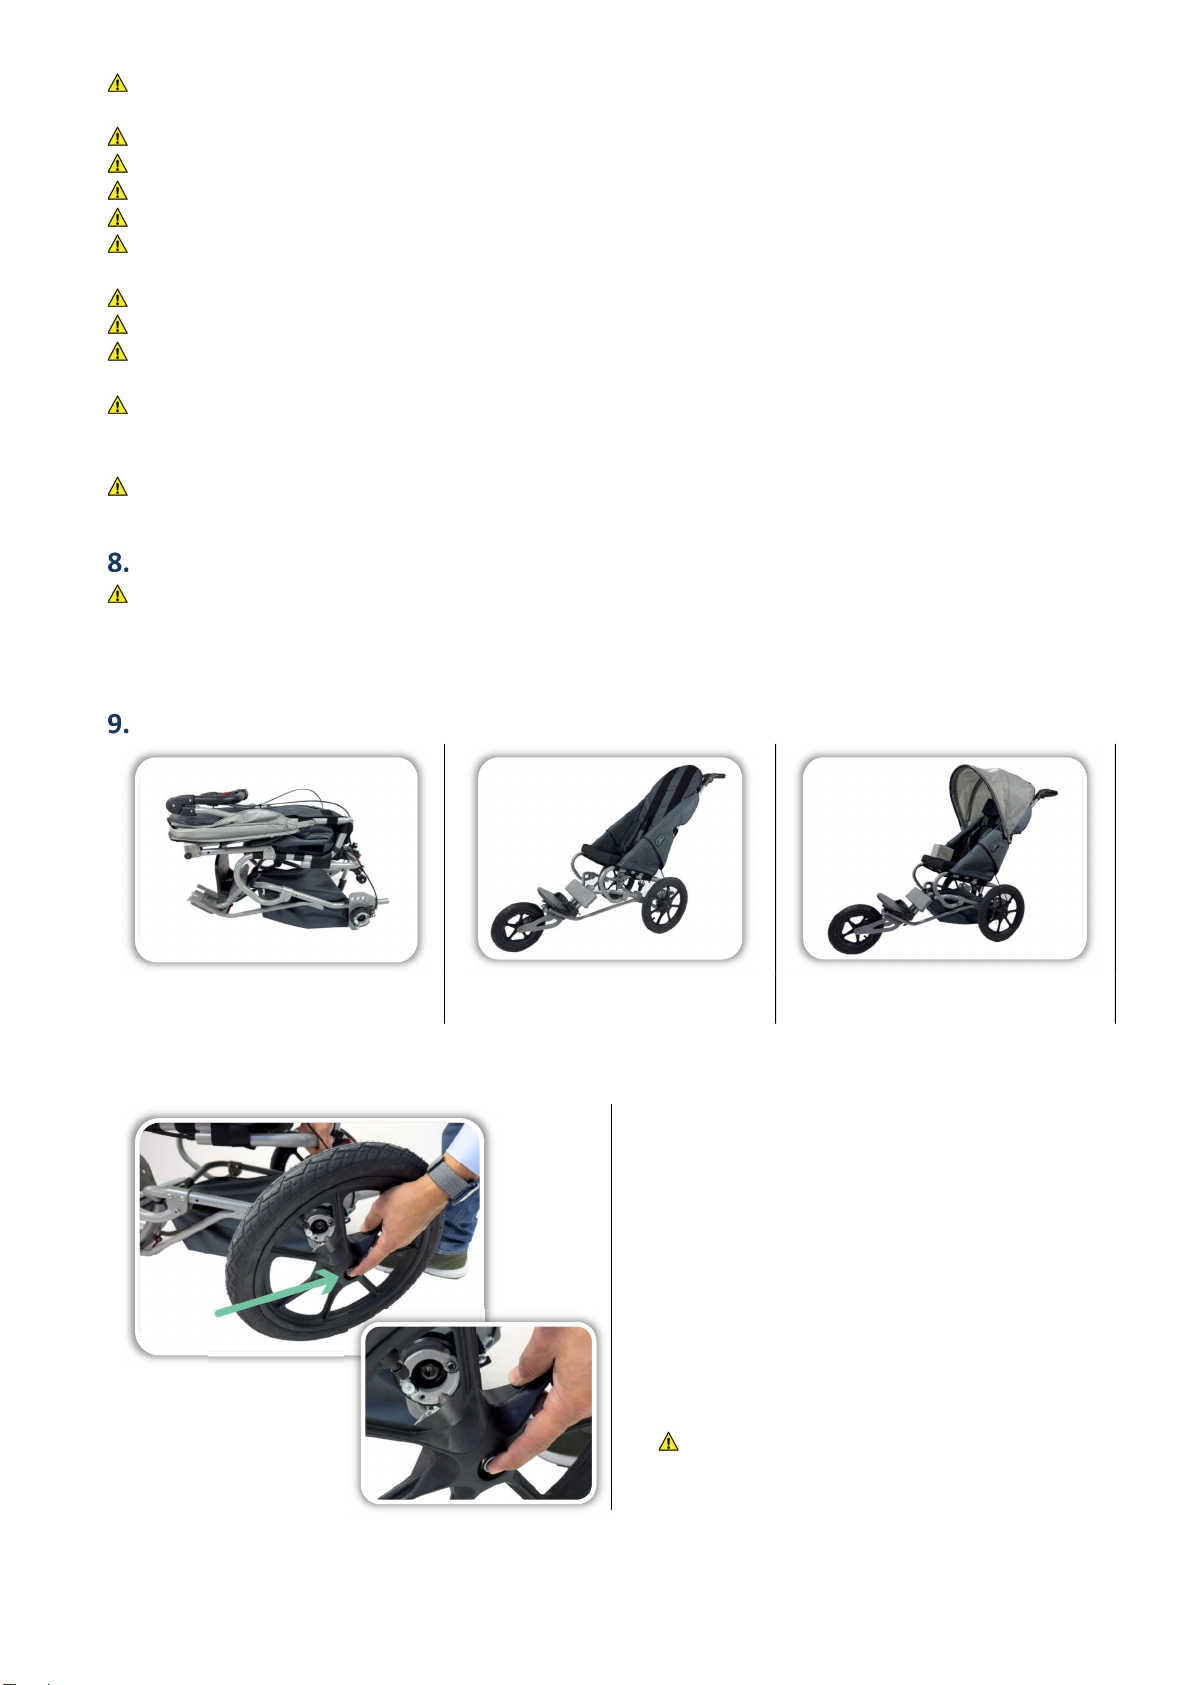
Building up
JOSI-
access
JOSI-
pro
9.1 Rear wheels
1) Attach rear wheels
A. Hold down the release button of the quick-
release axle and insert the axle into the axle
holder.
B. After you have completely inserted the quick-
release axle, the release button can be
loosened.
Please note:
Make sure that no foreign substances or dirt get
on the axle and the axle support!
Attention:
Check that the quick release axle is correctly
fitted. It must not be possible to remove the
rear wheel without pressing the release.
© John GmbH Page 5/24
2) Locking the parking brakes
Lock the parking brakes.
See chapter Brakes and parking brakes for
instructions.
9.2 Anti-tip (optional)
1) Set anti-tip device (if equipped)
Adjust the anti-tip device.
See chapter Anti-tip with tipping lever.
9.3 Front wheel with adapter (optional)
1) Mount front wheel with adapter
Mount the front wheel.
See chapter Front wheel adapter for assembly
instructions.
Attention:
Always place the buggy in the upper position
when mounting the front wheel to avoid the
risk of tipping over during assembly.
9.4 Lowering (optional)
The lowering is optional and allows the buggy to be folded more compactly. The lowering can be retrofitted.
1) Raise seat frame
Loosen the quick release.
Lift the seat frame forward and push it all the way
back to the stop (1-2-3-4).
Attention:
Lock the parking brakes when operating the
lowering (See chapter Brakes and parking
brakes for instructions).
1
2
3
4

© John GmbH Page 6/24
2) Insert safety bolt
Insert the safety bolt through the hole (A) and
fold the securing bracket (B) backwards.
Attention:
Do not lock the quick release yet so that the
safety bolt does not jam.
3) Close quick release
Close the quick release (C).
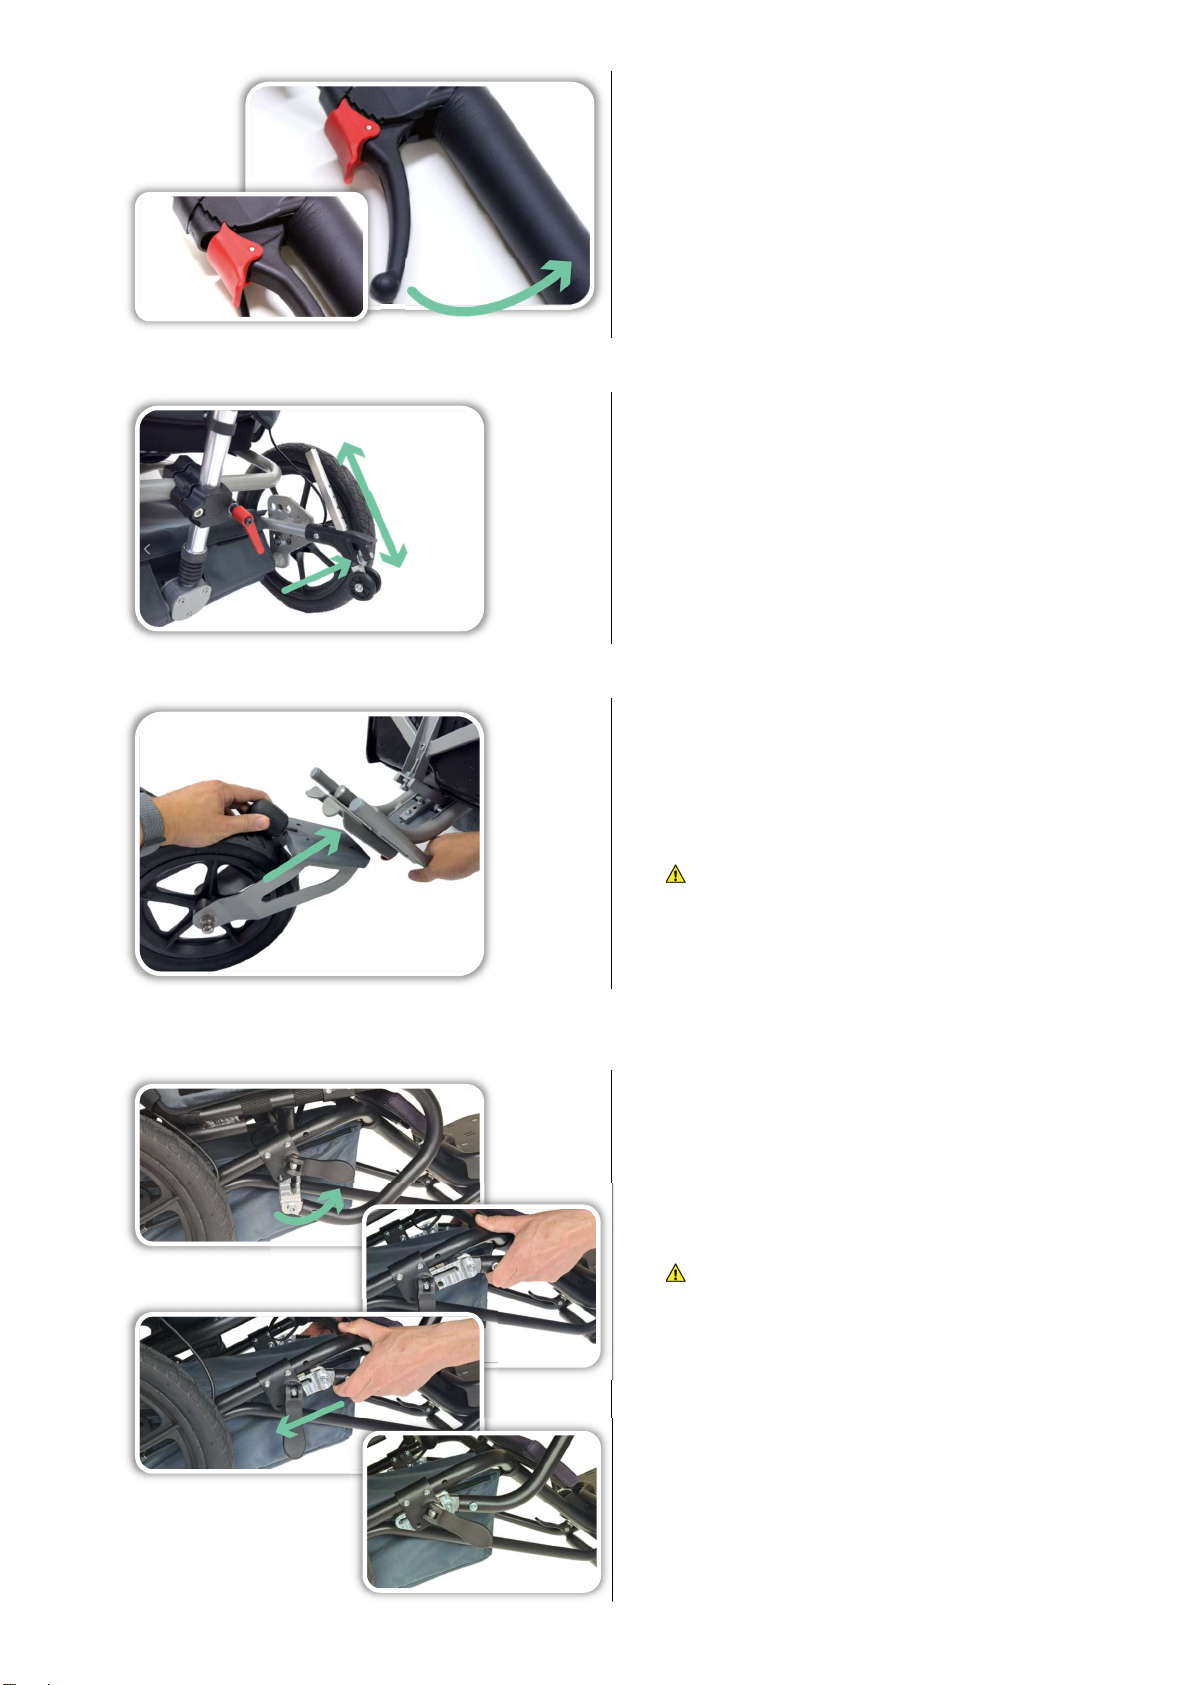
9.5 Back arch
1) Unfold back arch
Unfold the back.
Please note:
If equipped, the backrest adjustment may have to
be unlocked in order to be able to fold up the
backrest.
Attention!
Danger of jamming back adjustment (A)!
The back adjustment (if equipped) moves
when the back is folded out.
2) Locking
Unfold the back completely and lock it by
pressing lightly in the direction of the arrow.
Attention!
Make sure that the lock is fully engaged.
3) Lower cover folding mechanism
Close the lower covers for the folding mechanism
using the Velcro fastener.
A
A
B
C
© John GmbH Page 7/24
4) Upper cover folding mechanism
Close the upper covers for the folding mechanism
using the Velcro fastener.
5) Lock the back adjustment (if equipped)
Lock the back adjustment into the desired
position.
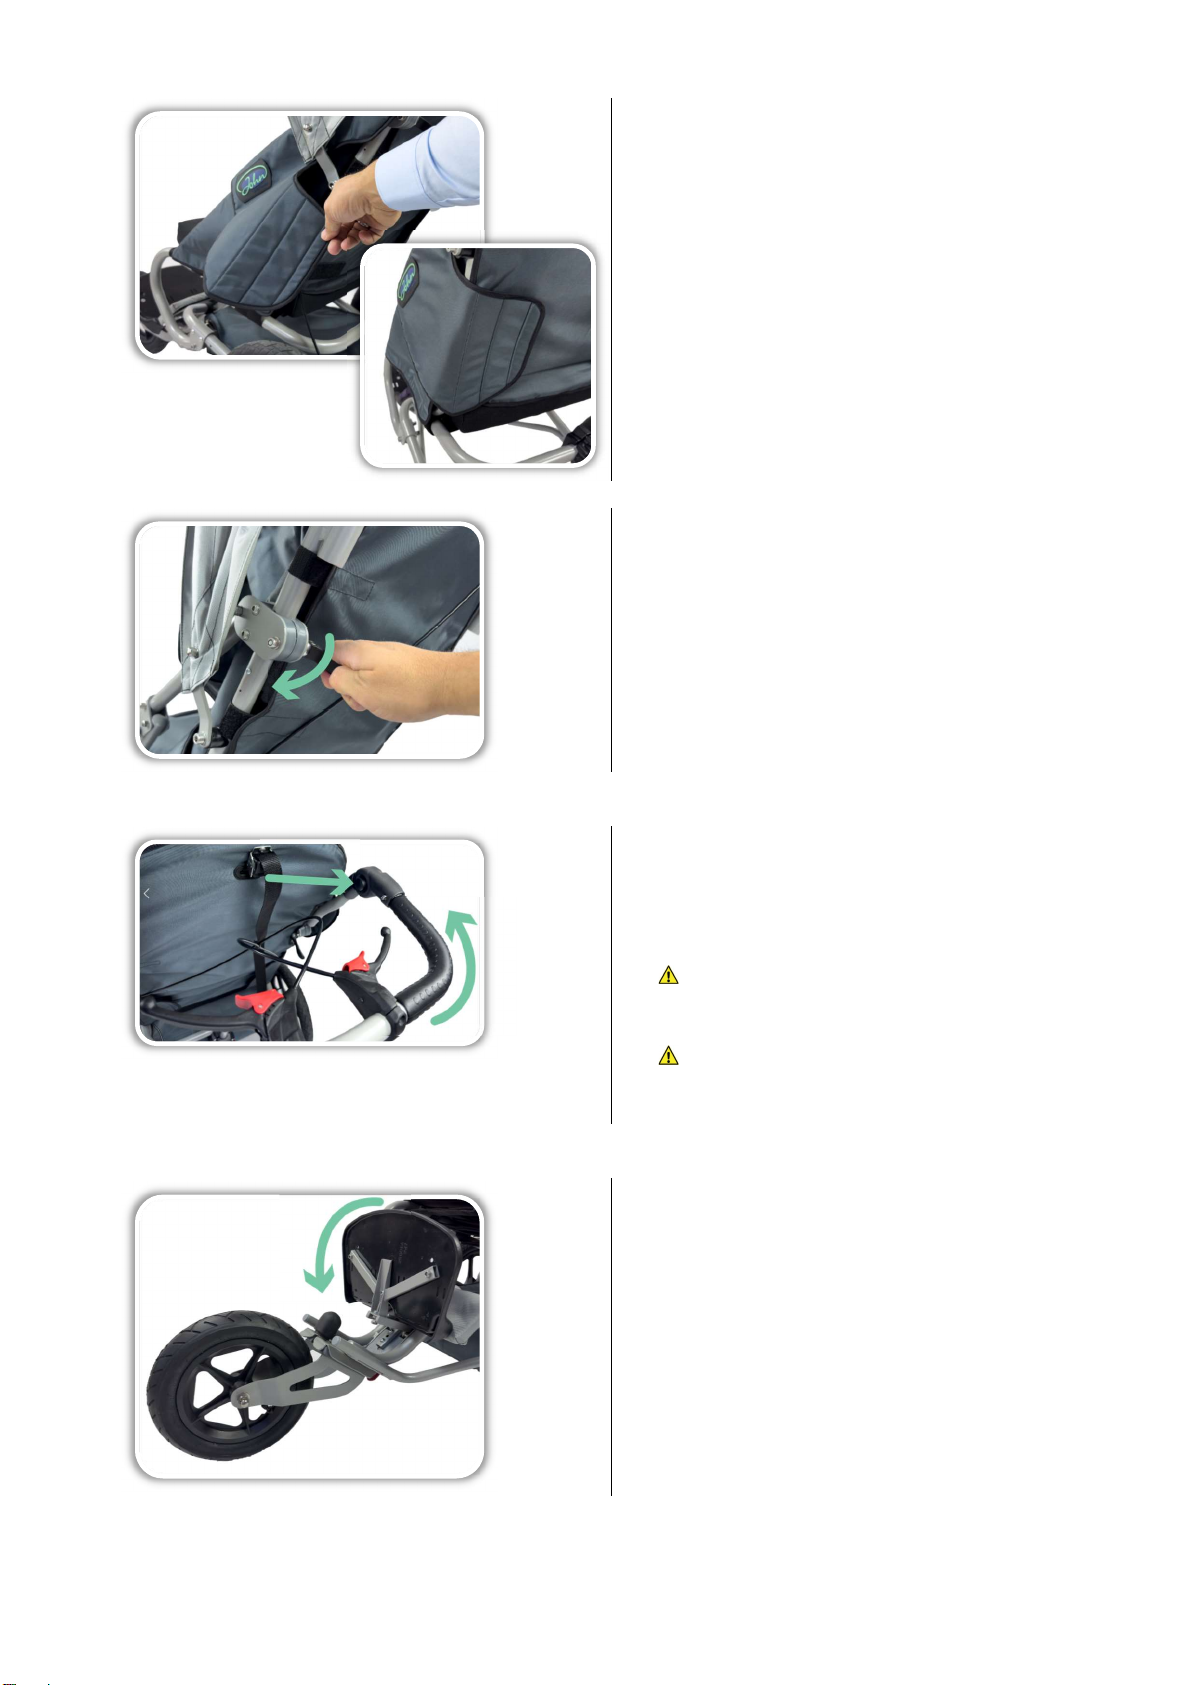
9.6 Push handle
1) Adjustment of the push handle
You can adjust the ergonomic push handle using
the push buttons (A).
Attention!
Lift JOSI-access/JOSI-pro only by the frame.
JOSI-access/JOSI-pro must not be lifted by the
push handle!
Pay attention to the weight balance and do
not hang heavy objects on the push handle
that influence the centre of gravity.
9.7 Folding out / adjusting Footrest
1) Fold out footrest
Fold out the footrest.
Please note:
For the adjustment of the footrest, see chapter
Footrest.
A

© John GmbH Page 8/24
Folding
1) Fold
Fold the Buggy in the following order:
A. Lock the parking brakes
(see chapter Brakes and parking brakes)
B. Place the seat tilt in the upper position
C. Fold in the footrest
D. Fold in the push handle (push buttons)
E. Unlock the backrest adjustment (if equipped)
F. Open upper cover of the folding mechanism
G. Open lower cover of the folding mechanism
H. Fold in the back (pull the tension-snapper)
I. Drop down the lowering (if equipped)
J. Remove front wheel
K. Push up the anti-tip device
L. Release parking brakes
(see chapter Brakes and parking brakes)
M. Remove the rear wheels
Chassis settings
1) Centre of gravity
The centre of gravity can be adjusted via various
mounting points on the axle. For this purpose,
screw A and nut B must be removed. Make sure
that all screws are correctly refitted!
Please note:
The axle plate is also designed for mounting 20"
rear wheels (C).
Attention!
An incorrectly adjusted centre of gravity can
have a negative influence on the driving
behaviour. Tipping backwards due to an
incorrectly adjusted centre of gravity must be
avoided.
2) Suspension
The chassis can be adjusted to the user's weight.
Use an Allen key, 6 mm, to adjust the spring
stiffness A.
By tensioning (turning clockwise) the spring, a
higher preload is achieved for a higher body
weight. For a lower preload, the spring stiffness
can be loosened (turn anticlockwise).
Please note:
For correct suspension, the double suspension (A)
(art. no. JP-12810) is recommended from a user
weight of 55 kg.
Attention!
The suspension must be adjusted in such a
way that the spring is only slightly
compressed (10 - 20%) when the user is at
rest.
The adjusting screw B must not be turned
beyond the thread (C).
A
B
C
B
C
A

© John GmbH Page 9/24
Anti-tip and tipping lever
12.1 Tipping lever (basic configuration)
3) Tilting the buggy
The buggy can be tilted at the lower extended
frame tube.
12.2 Anti-tip device with tipping lever (optional)
1) Setting
JOSI-access/JOSI-pro is optionally equipped with
a combined adjustable anti-tip device (A) with an
integrated tipping lever (B) (Replacement for
tipping lever section 13.1).
Please note:
The anti-tip device can be adjusted by pulling
lock C.
Attention!
Always use the anti-tip device when using
JOSI-access/JOSI-pro.
Always use two anti-tippers for the backrest
adjustment (if equipped) and the reclining
position.
A second anti-tip device is recommended in
case of increased danger of tipping over.
(e.g. on inclines and uneven paths).
Front wheel
1) Available front wheels
JOSI-access/JOSI-pro can optionally be equipped
with the following pneumatic wheels:
A. 12.5" rigid front wheel
B. 8" swivel wheel
C. 8" swivel wheel Duo
D. 12.5" Front wheel Pro
Swivel wheel with locking function:
1. Press the red button E to switch on the
locking function.
2. Press the red button E and pull the black
lever F at the same time to switch on the
swivel function.
A
A
B
C
B
C
E
F
D
© John GmbH Page 10/24
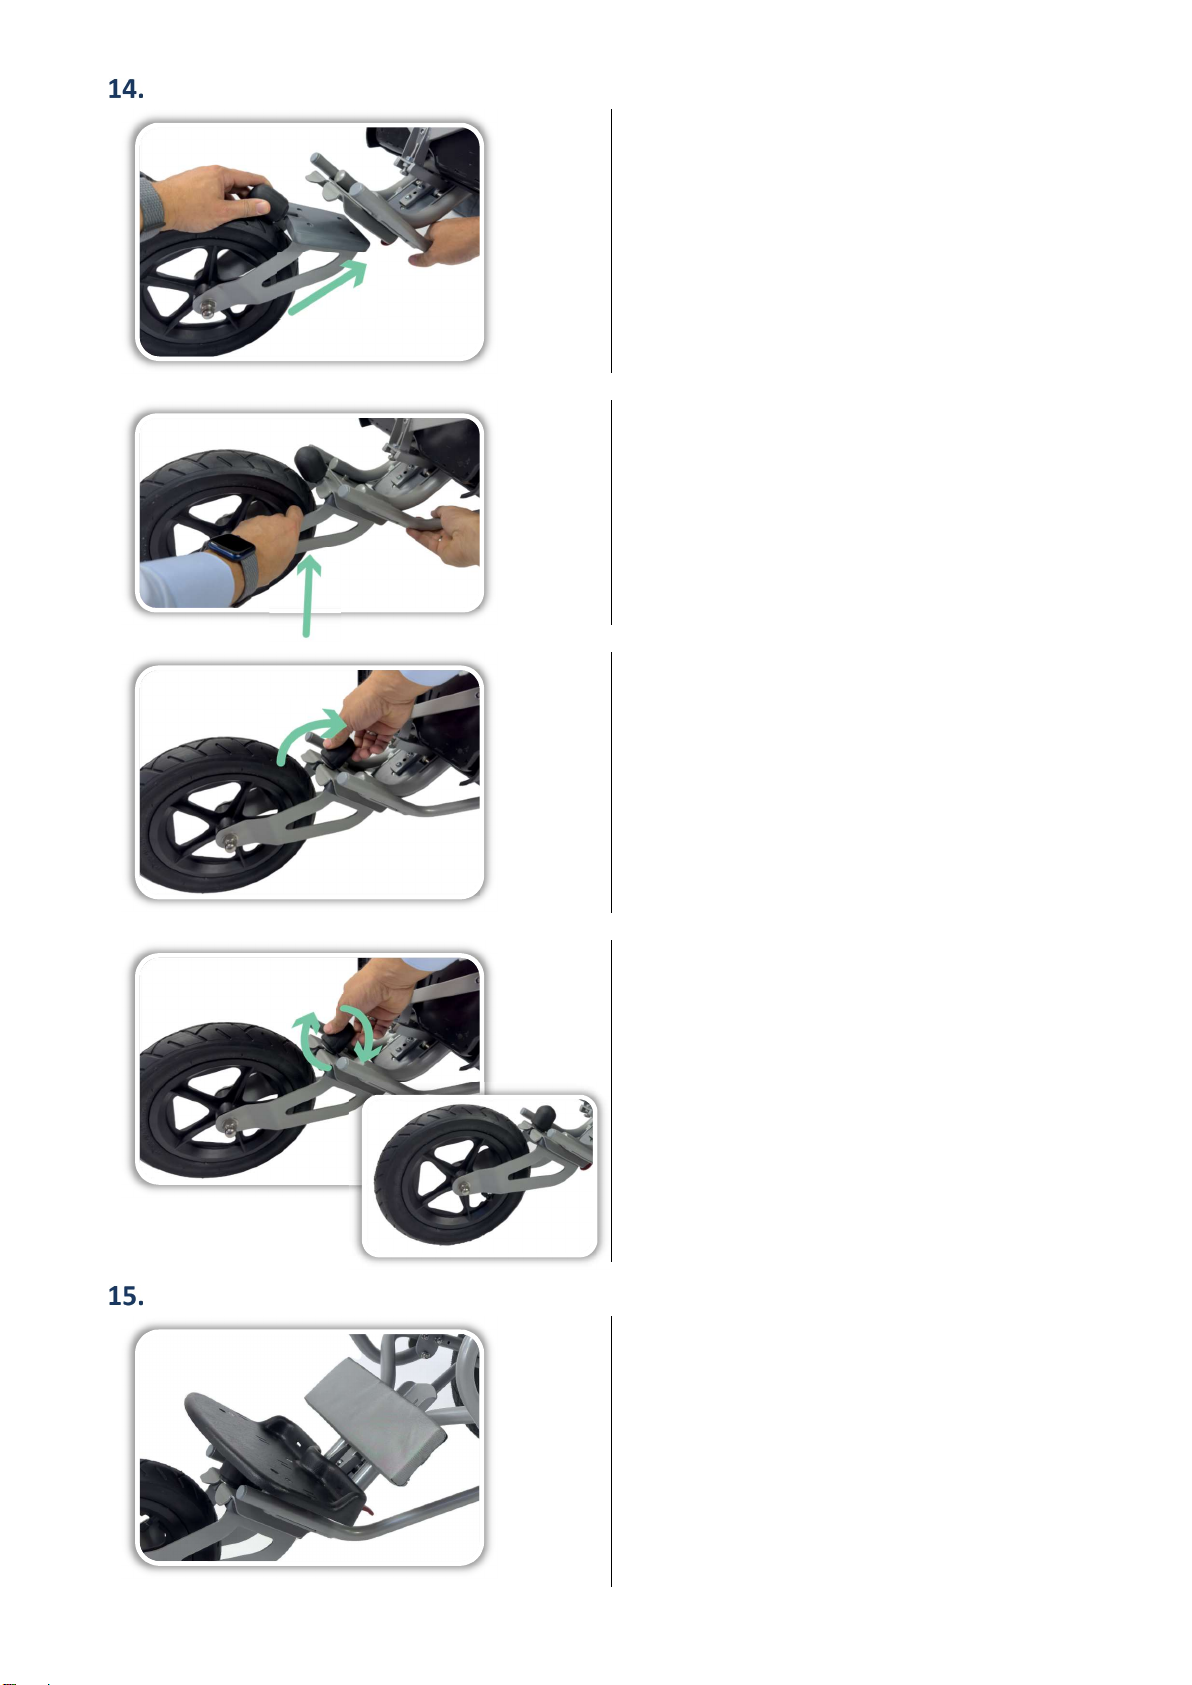
Front wheel adapter and wheel change (optional)
1) Insert
Insert the adapter on the lower side of the
receptacle
2) Placing
Place the adapter against the receptacle so that
the locking screw A falls into the slot.
3) Locking screw
Fold up the locking screw.
4) Tighten the locking screw
Tighten the locking screw.
Footrest
1) Setting options
The footrest has the following options as
standard:
1. Heel / calf plate
2. Height adjustment,
adjustable to lower leg length
3. Tilt adjustment
4. Preparation for foot fixation
A
Ce manuel convient aux modèles suivants
7
Table des matières


