JetNet 3008 Series Manuel utilisateur

Tel:+886-2-82193000
Fax:+886-2-82193300
CPQ000N3008000
V0.2
JetNet 3008 / 3008f Series
www.korenix.com
Quick Installation Guide
Industrial Ethernet Switch
2. ܝ㑪ප䗷(JetNet 3008f) : ᇛܝ㑪㎮ϔッ䗷JetNet 3008f ܝ㑪පˈϔッ䗷䳔ܹⱘܝ
㑪ප䀁٭ˈབϟ೪᠔⼎DŽ䤃䁸ⱘ䗷㎮᳗ᇢ㟈ܝ㑪ප⛵⊩ᎹDŽ
Korenix ଂᕠ᳡ࢭ
KoreCAREᰃᚴ䗮⾥ᡔܼ⧗ᅶ᠊᳡ࢭЁᖗˈ䊛⏅ᡔ㸧Ҏવ䱼ᰖ⚎ᙼᦤկᇜὁⱘᡔ㸧ᬃᣕDŽ
DIP ℶ᩹䭟䮰䀁ᅮ
Ǽ
䗭ᰃϔℒClass 1 䨇ᇘ/LED ⫶કDŽ
ߛ࣓Ⳉ㽪䨇ᇘܝᴳDŽ
⊼ᛣ
RX
TX
RX
TX
Cable Wiring(SC to SC)
RX A TX B
TX A RX B
P1 to P8
(Pin1 ~ 8)
P9
Pin No. # ⢔ᜟ ᦣ䗄
ON ଳࢩ䁆ッষⱘᮋ㎮ฅ䄺ࡳ㛑
ON ଳࢩᮋ䳏ฅ䄺ࡳ㛑
Off 䮰䭝䁆ッষⱘᮋ㎮ฅ䄺ࡳ㛑
Off 䮰䭝ᮋ䳏ฅ䄺ࡳ㛑
JetNet 3008/3008f Industrial Ethernet Switch, conforming IEEE 802.3 and 802.3u standard,
supports 8 10/100Base TX (JetNet 3008) or 6 10/100TX plus two 100FX Fast Ethernet fiber
ports in either multi-mode type (JetNet 3008f-m) or single-mode type (JetNet 3008f-s).
The JetNet3008/3008f adopts rugged metal case design to operate in harsh environments
(-25oC~70oC); It also provides IP-30 standard protection. It features one relay output to alarm
users if a port link fails or with the power fails. Alarms can be enabled/disabled by a 9-pin dip
switch. JetNet 3008/3008f is recommended to be powered by DC 24V with 12~48V range
from the 6-pin removable terminal block.
Introduction
Box contents
�
JetNet 3008/3008f Switch
�
Quick Installation Guide
�
CD User Manual
Mounting the Unit
�
Din-Rail mount: Mount the din-rail clip
screwed on the rear of JetNet 3008/3008f on the DIN rail.
About the DIN Rail installation, please refer
user’s manual.
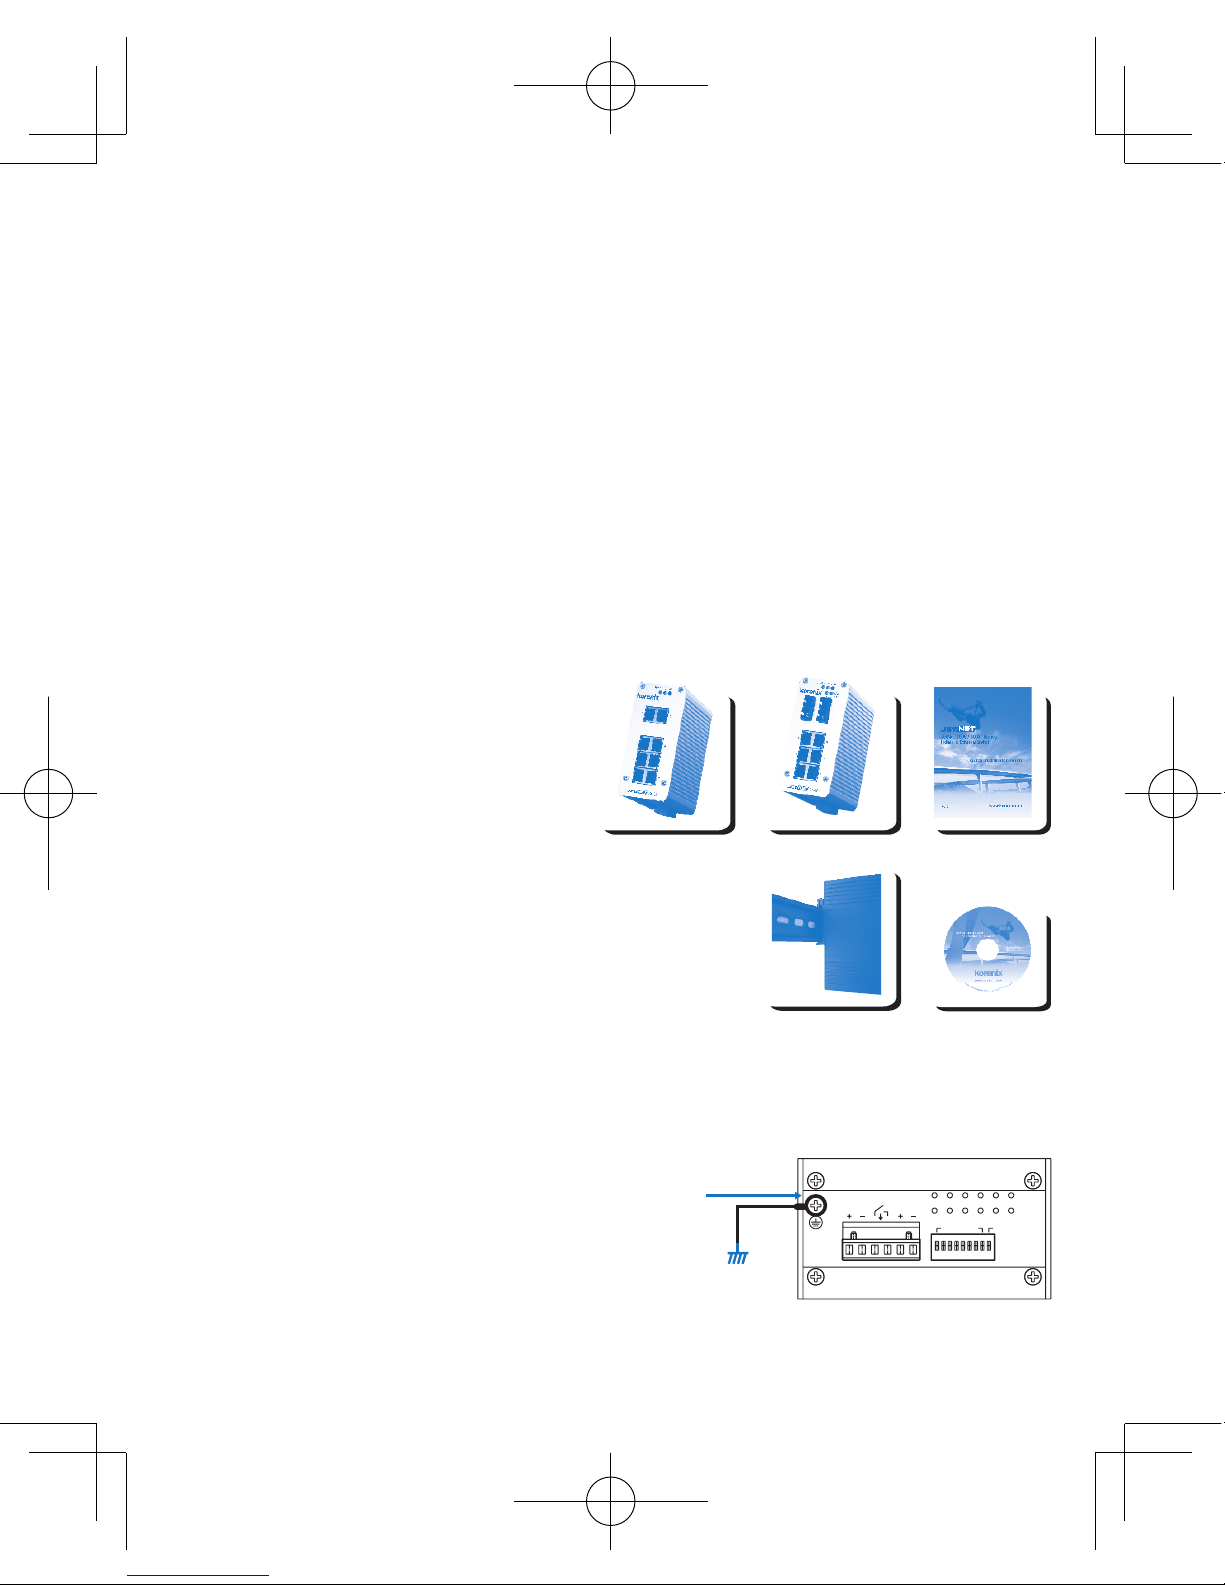
Grounding JetNet 3008 / 3008f Switch
There is one grounding screw on the bottom side
of JetNet 3008/3008f. Connect the earth ground
screw of switch to the grounding surface to ensure
safety and prevent noise. See, Figure-1
Package contents Check List
PW1
Alm
PW2
Alarm Control
port 1~8 power
Earth Ground
Screw
Earth Ground
Warning: Do not connect to AC line-Natural
Figure-1

Wiring the Power Inputs
1. Insert the positive and negative wires into the
V+ and V- contact on the terminal block connector.
2. Tighten the wire-clamp screws to prevent the DC
wires from being loosened. See Figure-2
Notes: The recommended working voltage is DC24V (DC12~ 48V).
The relay output alarm contacts are in the middle
of the terminal block connector as shown in the
figure below.
By inserting the wires and set the DIP switch of the
respective Port Alarm to “ON”, relay output alarm will
detect any port failures, and form a short circuit.
The alarm relay output is “Normal Open”. See, Figure -3.
Wiring the Earth Ground
In an industrial environment, there might have
a lot of devices that generate electromagnetic
noise, such as AC motors, electric welding
machine, power generator. These devices will
generate electric noise or surges that might
disturb communications. To prevent those noises,
the switch should be well earthed.
In the figure- shows how to make connection. See, Figure -4.
Wiring the Relay Output
Maximum 1A current / DC 24V
Figure-3
PW1
Alm
PW2
Alarm Control
port 1~8power
Alarm
System
Extra Power
System
PW1
Alm
PW2
Alarm Control
port 1~8power
Earth Ground
Screw
Earth Ground
Warning: Do not connect to AC line-Natural
Figure-4
Figure-2

Connecting to Network
1. Connecting the Ethernet Ports: Connect one end of an Ethernet cable into the UTP port of
JetNet 3008/3008f, while the other end is connected to the attached networking device. All
UTP ports support auto MDI/MDIX function. The Speed LED will turn on for 100M link and
turn off for 10Mbps link, the LNK/ACT LED will turn on for link up and blinking for packet
transmit and receive. The fiber port only support 1 LED for Link and Activity.
2. Connecting the Fiber Port (JetNet 3008f) : Connect the fiber port on your JetNet 3008f to
another Fiber Ethernet device, by following the figure below. Wrong connection will cause the
fiber port not working properly
.
Korenix Customer Service
KoreCARE is Korenix Technology’s global service center, where our professional staff are
ready to solve your problems at any time
DIP Switch Settings for Alarm Relay Output
Ǽ
This is a Class 1 Laser/LED product.
Don't stare into the Laser/LED Beam.
ATTENTION
RX
TX
RX
TX
Cable Wiring(SC to SC)
RX A TX B
TX A RX B
P1 to P8
(Pin1 ~ 8)
P9
Pin No. # StatusDescription
ON To enable port link down alarm at this port.
ON To enable power failure alarm.
Off To disable port link down alarm at this port.
Off To disable power failure alarm.

JetNet 3008/3008f ᎹϮҹ㔥Ѹᤶᴎˈヺড়IEEE 802.3802.3uޚˈᬃᣕ8Ͼ10/100Base
TXッষ(JetNet 3008)6Ͼ10/100TXッষࡴ2Ͼ100FX ᖿ䗳ҹ㔥ܝষˈᑊᦤկܝষൟো
(JetNet 3008f-m)ܝষൟো(JetNet 3008f-s)ৃ䗝DŽJetNet 3008/3008f Ѹᤶᴎ䞛⫼മⱘ
䪱ড়䞥㒧ᵘ䆒䅵ˈ㛑ᙊࡷⱘᎹϮ⦃๗(-25~70oC)〇ᅮᎹˈヺড়IP31ᎹϮ䰆ᡸޚDŽ
ᅗ䖬ᬃᣕϔ䏃㒻⬉఼䄺䕧ߎˈৃ䩜ᇍᮁ㒓/ᮁ⬉⢊ᗕᦤկ⦄എ䄺᳡ࡵDŽℸ㒻⬉఼䄺ࡳ㛑ৃ
䗮䖛Ѹᤶᴎࠡ䴶ᵓⱘDipᢼⷕᓔ݇ࡼ݇䯁DŽJetNet 3008/3008f ᴎ䑿ᑩ䚼㺙᳝ৃᢚ⬉⑤
㒓ῑˈ݊䕧ܹ⬉⑤㣗ೈᰃ12~48V ˈᓎ䆂䞛⫼〇ᅮⱘ24VⳈ⌕⬉Ў䆒կ⬉DŽ
ὖ䗄
ࣙ
�
JetNet 3008/3008f Ѹᤶᴎ
�
ᖿ䗳ᅝ㺙ᇐ
�
⫼᠋ݠCDⲬ
ᅝ㺙䜡ӊ
�
ᇐ䔼ᅝ㺙˖⫼㶎ϱᇚᇐ䔼།ᅮJetNet 3008/3008f
ᴎ䑿㚠䴶ˈ✊ৢᇚᇐ䔼།Ϟᇐ䔼DŽ
ᇐ䔼ᅝ㺙䆺ᚙˈ䇋খⳟ⫼᠋᪡ݠ
JetNet 3008 / 3008f ഄ㒓䖲
JetNet 3008/3008fᴎ䑿ᑩ䚼᳝ϔϾഄ㒓䖲㶎↡DŽ
ᇚѸᤶᴎⱘഄ㒓㶎↡ഄˈৃ⹂ֱ䆒Փ⫼ᅝܼˈ
ᡫᴖ䆃ᑆᡄDŽখⳟ-1
ѻક䚼ӊ⏙
PW1
Alm
PW2
Alarm Control
port 1~8 power
Earth Ground
Screw
Earth Ground
Warning: Do not connect to AC line-Natural
-1

⬉⑤䖲
1. ᇚ⬉⑤ⱘℷ䋳ᵕᇐ㒓ߚ߿ᦦܹᴎ䑿ᑩ䚼⬉⑤㒓ῑ
ⱘV+ V- 㛮DŽ
2. ᇚ㒓།ᢻ㋻ˈ䰆ℶDC⬉⑤㒓ᤃࡼ㜅㨑DŽখⳟ-2
⊼⬉㣗ೈ(DC12~ 48V)ˈᓎ䆂⬉DC24VDŽ
㒻⬉఼䄺䕧ߎ䖲⚍ᰃ⬉⑤㒓ῑⱘЁ䭧ⱘϔᇍ
㛮ˈ བЁ᠔⼎ԡ㕂DŽ
䖲ᇐ㒓ˈᑊᇚᇍᑨッষⱘDIPᢼⷕᓔ݇㕂“ON”ˈ
㒻⬉఼䄺ࡳ㛑֓ৃҹẔ⌟ࠄッষᮁ䖲ˈᑊᔶ៤ϔ
Ͼ⬉⑤ಲ䏃DŽℷᐌᚙމϟˈ㒻⬉఼䄺㒓䏃ᰃᓔ䏃
⢊ᗕDŽখⳟ-3.
ഄ㒓䖲
ᎹϮ⦄എ⦃๗Ёˈৃ㛑Ӯ᳝䞣ѻ⫳⬉⺕ᑆᡄ
ⱘ䆒ᄬˈབѸ⌕⬉ࡼᴎˈ⬉⛞ᴎˈথ⬉ᴎDŽ
䖭ѯ䆒ѻ⫳ⱘ⬉⺕ᑆᡄ⌾⍠ᑆᡄഛৃ㛑ഛㅨ
ӷℷᐌ䗮䆃DŽЎ䰆ℶᑆᡄᕅડˈ䇋ᇚѸᤶᴎℷ⹂
ഄDŽ4ᦤկℷ⹂䖲㒓⼎՟DŽ
㔥㒓䖲
1. ҹ㔥䖲˖ᇚUTPঠ㒲㒓ⱘϔッ䖲JetNet 3008/3008fҹ㔥⬉ষˈϔッ䖲ࠄ䳔ܹ
ⱘ㔥㒰䆒DŽ᠔᳝UTPッষᬃᣕ㞾䗖ᑨMDI/MDIXDŽᔧЎ100M䖲㒓ᯊˈ䗳⥛LEDᣛ⼎♃Ӯ҂䍋
ˈᔧЎ10M䖲㒓ᯊˈᣛ⼎♃Ӯ❘♁DŽLNK/ACT LEDᣛ⼎♃҂䍋㸼⼎ッষᏆ㒣䖲㒓ˈֵো♃䮾⚕
㸼⼎䆹ッষℷᬊথ᭄DŽܝষLEDᣛ⼎♃া᳝ϔϾˈᰒ⼎䖲㒓⢊ᗕ⌏ࡼ⢊ᗕDŽ
㒻⬉఼䄺䕧ߎ䖲㒓
Maximum 1A current / DC 24V
PW1
Alm
PW2
Alarm Control
port 1~8 power
Alarm
System
Extra Power
System
PW1
Alm
PW2
Alarm Control
port 1~8 power
Earth Ground
Screw
Earth Ground
Warning: Do not connect to AC line-Natural
-2
-3
-4

2. ܝষ䖲(JetNet 3008f) : ᇚܝ㑸㒓ϔッ䖲JetNet 3008f ܝষˈϔッ䖲䳔ܹⱘܝষ䆒
ˈབϟ᠔⼎DŽ䫭䇃ⱘ䖲㒓Ӯᇐ㟈ܝষ᮴⊩ᎹDŽ
Korenix ଂৢ᳡ࡵ
KoreCAREᰃ㢃ᚴ䗮⾥ᡔܼ⧗ᅶ᠋᳡ࡵЁᖗˈ䌘⏅ᡔᴃҎ䱣ᯊЎᙼᦤկϧϮⱘᡔᴃᬃᣕDŽ
Korenix㢃ᚴ䗮ܼ⧗ଂৢ᳡ࡵЁᖗ⬉ᄤ䚂ӊ˖[email protected]
DIP ᢼⷕᓔ݇䆒ᅮ
Ǽ
䖭ᰃϔℒClass 1 ▔ܝ/LED ѻકDŽ
ߛ࣓ޱ㾚▔ܝܝᴳDŽ
⊼ᛣ
RX
TX
RX
TX
Cable Wiring(SC to SC)
RX A TX B
TX A RX B
P1 to P8
(Pin1 ~ 8)
P9
Pin No. # ⢊ᗕ ᦣ䗄
ON ࡼ䆹ッষⱘᮁ㒓䄺ࡳ㛑
ON ࡼᮁ⬉䄺ࡳ㛑
Off ݇䯁䆹ッষⱘᮁ㒓䄺ࡳ㛑
Off ݇䯁ᮁ⬉䄺ࡳ㛑

JetNet 3008/3008f ᎹὁЭ㎆Ѹ఼ˈヺড়IEEE 802.3802.3u῭⑪ˈᬃᣕ8ן10/100Base
TXප(JetNet 3008)6ן10/100TXපࡴ2ן100FX ᖿ䗳Э㎆ܝ㑪පˈϺᦤկܝ㑪පൟ㰳
(JetNet 3008f-m)ஂܝ㑪පൟ㰳(JetNet 3008f-s)ৃ䙌DŽJetNet 3008/3008f Ѹ఼⫼ෙ
ⱘ䢕ড়䞥←ᶊᾟ䀁㿜ˈ㛑ᚵࡷⱘᎹὁ⪄๗(-25~70OC)〽ᅮᎹˈヺড়IP31Ꮉὁ䰆䅋῭⑪
DŽᅗ䙘ᬃᣕϔ䏃㑐䳏఼ฅ䄺䔌ߎˈৃ䞱ᇡᮋ㎮/ᮋ䳏⢔ᜟᦤկ⧒จฅ䄺᳡ࢭDŽℸ㑐䳏఼ฅ䄺ࡳ㛑
ৃ䗣䘢Ѹ఼ࠡ䴶ᵓⱘDip止᩹䭟䮰ଳࢩ䮰䭝DŽJetNet 3008/3008f ″䑿ᑩ䚼㺱᳝ৃᢚ䳏
⑤㎮ῑˈ݊䔌ܹ䳏⑤㆘ೡᰃ12~48V ˈᓎ䅄⫼〽ᅮⱘ24VⳈ⌕䳏⚎䀁٭կ䳏DŽ
ὖ䗄
ࣙ
�
JetNet 3008/3008f Ѹ఼
�
ᖿ䗳ᅝ㺱ݞ
�
Փ⫼ݞCD
ᅝ㺱䜡ӊ
�
ᇢ䒠ᅝ㺱Ή⫼㶎㍆ᇛᇢ䒠༒ᅮJetNet 3008/3008f
″䑿㚠䴶ˈ✊ᕠᇛᇢ䒠༒Ϟᇢ䒠DŽ
ᇢ䒠ᅝ㺱䁇ᚙˈ䂟গⳟՓ⫼᪡ݞ
JetNet 3008 / 3008f ഄ㎮䗷
JetNet 3008/3008f″䑿ᑩ䚼᳝ϔןഄ㎮䗷㶎↡DŽ
ᇛѸ఼ⱘഄ㎮㶎↡ഄˈৃ⺎ֱ䀁٭Փ⫼ᅝܼˈ
ᡫ䲰㿞ᑆDŽগⳟ೪
⫶ક䚼ӊ⏙ஂ
PW1
Alm
PW2
Alarm Control
port 1~8 power
Earth Ground
Screw
Earth Ground
Warning: Do not connect to AC line-Natural
೪-1

䳏⑤䗷
1. ᇛ䳏⑤ⱘℷ䉴Ὁᇢ㎮ߚ߹ᦦܹ″䑿ᑩ䚼䳏⑤㎮ῑ
ⱘV+ V- 㝇DŽ
2. ᇛ㎮༒㎞ˈ䰆ℶDC䳏⑤㎮ᤃࢩ㛿㨑DŽগⳟ೪-2
٭⊼: 䳏ວ㆘ೡ(DC12~ 48V)ˈᓎ䅄䳏ວDC24VDŽ
㑐䳏఼ฅ䄺䔌ߎ䗷咲ᰃ䳏⑤㎮ῑЁ䭧ⱘϔᇡ
㝇ˈབ೪Ё᠔⼎ԡ㕂DŽ
䗷ᇢ㎮ˈϺᇛᇡឝッষⱘ',3ℶ᩹䭟䮰㕂“ON”ˈ
㑐䳏఼ฅ䄺ࡳ㛑֓ৃҹ⁶␀ࠄッষᮋ䗷ˈϺᔶ៤ϔ
ן䳏⑤ಲ䏃DŽℷᐌᚙ⊕ϟˈ㑐䳏఼ฅ䄺㎮䏃ᰃ䭟䏃
⢔ᜟDŽগⳟ೪-3DŽ
ഄ㎮䗷
Ꮉὁ⧒จ⪄๗Ёˈৃ㛑᳗᳝䞣⫶⫳䳏⺕ᑆⱘ
䀁٭ᄬˈབѸ⌕侀䘨ˈ䳏⛞″ˈⱐ䳏″DŽ䗭ѯ
䀁٭⫶⫳ⱘ䳏⺕ᑆさ⊶ᑆഛৃ㛑ᑆࠄℷᐌ
䗮㿞DŽ⚎䰆ℶᑆᕅ䷓ˈ䂟ᇛѸ఼ℷ⺎ഄDŽ
೪4ᦤկℷ⺎䗷㎮⼎՟DŽ
㎆㎮䗷
1. Э㎆䗷ΉᇛUTP䲭㌲㎮ⱘϔッ䗷JetNet 3008/3008fЭ㎆䳏ষˈϔッ䗷ࠄ䳔ܹ
ⱘ㎆䏃䀁٭DŽ᠔᳝UTPッষᬃᣕMDI/MDIXDŽ⭊⚎100M䗷㎮ᰖˈ䗳⥛LEDᣛ⼎➜᳗҂䍋ˈ⭊⚎
10M䗷㎮ᰖˈᣛ⼎➜᳗❘⒙DŽLNK/ACT LEDᣛ⼎➜҂䍋㸼⼎ッষᏆ㍧䗷㎮ˈֵ㰳➜䭗⟡㸼⼎䁆
ッষℷᬊⱐᭌDŽܝ㑪පLEDᣛ⼎➜া᳝ϔןˈ乃⼎䗷㎮⢔ᜟ⌏ࢩ⢔ᜟDŽ
㑐䳏఼ฅ䄺䔌ߎ䗷㎮
Maximum 1A current / DC 24V
PW1
Alm
PW2
Alarm Control
port 1~8 power
Alarm
System
Extra Power
System
PW1
Alm
PW2
Alarm Control
port 1~8 power
Earth Ground
Screw
Earth Ground
Warning: Do not connect to AC line-Natural
೪-2
೪-3
೪-4

2. ܝ㑪ප䗷(JetNet 3008f) : ᇛܝ㑪㎮ϔッ䗷JetNet 3008f ܝ㑪පˈϔッ䗷䳔ܹⱘܝ
㑪ප䀁٭ˈབϟ೪᠔⼎DŽ䤃䁸ⱘ䗷㎮᳗ᇢ㟈ܝ㑪ප⛵⊩ᎹDŽ
Korenix ଂᕠ᳡ࢭ
KoreCAREᰃᚴ䗮⾥ᡔܼ⧗ᅶ᠊᳡ࢭЁᖗˈ䊛⏅ᡔ㸧Ҏવ䱼ᰖ⚎ᙼᦤկᇜὁⱘᡔ㸧ᬃᣕDŽ
Korenixᚴ䗮ܼ⧗ଂᕠ᳡ࢭЁᖗ䳏ᄤ䛉ӊΉ[email protected]
DIP ℶ᩹䭟䮰䀁ᅮ
Ǽ
䗭ᰃϔℒClass 1 䨇ᇘ/LED ⫶કDŽ
ߛ࣓Ⳉ㽪䨇ᇘܝᴳDŽ
⊼ᛣ
RX
TX
RX
TX
Cable Wiring(SC to SC)
RX A TX B
TX A RX B
P1 to P8
(Pin1 ~ 8)
P9
Pin No. # ⢔ᜟ ᦣ䗄
ON ଳࢩ䁆ッষⱘᮋ㎮ฅ䄺ࡳ㛑
ON ଳࢩᮋ䳏ฅ䄺ࡳ㛑
Off 䮰䭝䁆ッষⱘᮋ㎮ฅ䄺ࡳ㛑
Off 䮰䭝ᮋ䳏ฅ䄺ࡳ㛑
Ce manuel convient aux modèles suivants
1
Table des matières
Langues :
Autres manuels JetNet Changer


