JC LAB Bimc-12N1000 Manuel utilisateur

Biological microscope
Bimc-12N1000
OPERATION MANUAL
GUIDA UTENTE
MANUAL DE INSTRUCCIONES
MANUEL D’INSTRUCTIONS
BEDIENUNGSANLEITUNG
取扱説明書
產品說明書
Ver.1.4.0
®
I N T E R N A T I O N A L
JC LAB Microscope - JAPAN
www.jc-lab.jp - info@jc-lab.jp
(Solo versione PDF)
(Nur PDF-Version)
(Solo versió n PDF)
(Version PDF uniquement)
(PDF版のみ)
(只提供pdf版本)

1.0 Copyright Page 1 - 3
2.0 Microscope at a Glance Page 4
3.0 Introducon Page 5
4.0 Unpacking and Assembly Page 5
5.0 Microscope Accessories Page 6 - 7
6.0 Using the Microscope Page 8 - 9
7.0 Maintenance Page 10
8.0 Troubleshoong Page 11
9.0 Electrics Page 12
10.0 Recycling and Recovery Page 12
INDEX

Copyright
© 2012 by JC LAB Corporaon. All rights reserved. Under the copyright law,
this manual cannot be reproduced in any form without the prior wrien
permission of JC LAB. No patent liability is assumed, with respect to the use of
the informaon contained herein.
First edion Feb. 2012
Disclaimer
This manual has been validated and reviewed of accuracy. The instrucons
and descripons it contains are accurate for your wi-microscope at the me
of this manual’s producon. However, succeeding wi-microscope and
manuals are subject to change without noce. JC LAB assumes no lability for
damages incurred directly or indirectly from error, omissions or discrepancies
between the wi-microscope and the manual.
Trademarks
◆JC CAM logo are registered trademarks of JC LAB Corporaon.
◆Wi-Fi is registered trademark of Wi-Fi Alliance.
◆USB, the USB logo and USB interface are trademarks or registered
trademarks of USB Licensing LLC.
Other trademarks are registered trademarks not listed above may be used in
this manual.
EU Declaraon of Conformity
This Product is carrying the CE-Mark in accordance with the related
European Direcves. Responsible for CE-Marking is JC LAB Japan
GmbH, 5 Chome-12-13 Serigaya Kōnan-ku, Yokohama-shi,
Kanagawaken 233-000, Japan. The complete and ocial EU
Declaraon of Conformity can be found on JC LAB website
hp://www.jc-lab.jp on the internet.
1.0 Copyright
Page 1

Disposing of the Microscope and It’s Baeries
◆Discard this Microscope in accordance with applicable laws and
regulaons. For further informaon, contact your government.
◆Some models contains rechargeable baeries. Aer repeated use, the
baeries will nally lose their ability to hold a charge and you will need to
replace them. Under certain applicable laws and regulaon, it may be
illegal to dispose of old baeries by replacing them in the trash.
◆Please be kind to our shared environment. Check with your local
government authority for details regarding where to recycle old baeries
or how to dispose of them properly.
Informaon for Wireless Devices
Page 2
Wireless Devices and your Health
Wireless Products, like other radio devices, emit radio frequency
electromagnec energy. The level of energy emied by Wireless products
however is far much less than the electromagnec energy emied by wire
device like for example mobile phones.
Because Wireless products operate within the guidelines found in radio
frequency safety standards and recommendaons, JC LAB believes Wireless
products is safe for use by consumers. These standards and recommendaons
reect the consensus of scienc community and result from deliberaons of
panels and commiees of sciensts who connually review and interpret the
extensive research literature.
In some situaons or environments, the use of Wireless Products may be
restricted by the proprietor of the building or responsible representaves of
the organizaon. These situaons may for example includes:
◆Using the Wireless products equipment on board of airplanes, or
◆In any other environment where the risk of interference to other devices
or services is perceived or idened as harmful.
If you are uncertain of the policy that applies on the use of wireless devices in
a specic organizaon or environment (e.g. airports), you are encouraged to
ask for authorizaon to use the Wireless device prior turning on the
equipment.
1.0 Copyright

Canada — Industry Canada (IC)
This device complies with RSS 210 of Industry Canada.
Operaon is subject to the following two condions: (1) this device may not
cause interference, and (2) this device must accept any interference, including
interference that may case undesired operaon on this device.
The Term “IC” before the equipment cercaon number only signies that
the Industry Canada technical specicaons were met.
USA-Federal Communicaons Commission (FCC)
Page 3
This equipment has been tested and found to comply with the limits for a
Class B digital device, pursuant to Part of FCC Rules. These limits are designed
to provide reasonable protecon against harmful interference in a residenal
installaon.
JC LAB Support
If you require any addional help your devices or if you are having problems
operang devices, you may need to contact JC LAB for addional technical
assistance.
Before you call
Some problem you experience may be related to soware, apps or the
operang system so it is importance that you invesgate other sources of
assistance rst.
Before contacng JC LAB, try the following:
Review troubleshoong secons in the documentaon supplied withyour
soware and/or peripheral devices.
If problem occurs when you are running in your computer systems, consult the
soware document for troubleshoong suggesons and consider calling the
system company’s technical support department for assistance.
Consult the reseller or dealer from where you purchased your devices and
soware— they are your best resource for current informaon and support.
JC LAB technical support
If you are sll unable to solve the problems and suspect that it is hardware
related, visit JC LAB technical support website
hp://www.jc-lab.jp
1.0 Copyright

Page 4
Note: Microscope features may vary based on your locaon, language,
carrier, and model number. Accessory parts may incur addional fees.
Contact your local distributor to ensure the features.
1. Eyepiece
2. Objecve Lens
3. Binocular Head
4. Fine Adjustment Knob
5. Stage Clip
6. Mechanical Stage
7. Light Intensity Adjust
8. Light Source
9. Fuse Box
10. On/O Switch
11. Power Plug
12. X-axis movement
13. Light Source
14. Coarse Adjustment Knob
15. Y-axis movement
Microscope at a Glance
2.0 Microscope at a Glance
BIMC-12N1000
1
2
3
13
4
5 & 6 & 14
7
8
12 & 15
9, 10, 11
This microscope is a scienc precision instrument designed to last for many
years with a minimum of maintenance. It is built to high opcal and
mechanical standards and to withstand daily classroom and laboratory use.
JC LAB reminds you that this manual contains important informaon on safety
and maintenance, and that it must therefore be made accessible to the
instrument users. JC LAB declines any responsibility deriving from instrument
use that does not comply with this manual.
Page 5
4.1 The microscope is housed in a moulded Styrofoam container. Remove
the tape from the edge of the container and li the top half of the container.
Take some care to avoid that the opcal items (objecves and eyepieces) fall
out and get damaged. Li the microscope from the container and put it on a
stable desk.
4.2 The objecves are located in individual protecve vials. Remove the
objecves from the vials and insert them into the microscope nosepiece in the
order from the lowest magnicaon to the highest, in a clockwise direcon
from the rear.
Do not touch with bare hands opcal surfaces such as lenses, lters or
glasses. Traces of grease or other residuals may deteriorate the nal
image quality and corrode the opcs surface in a short me.
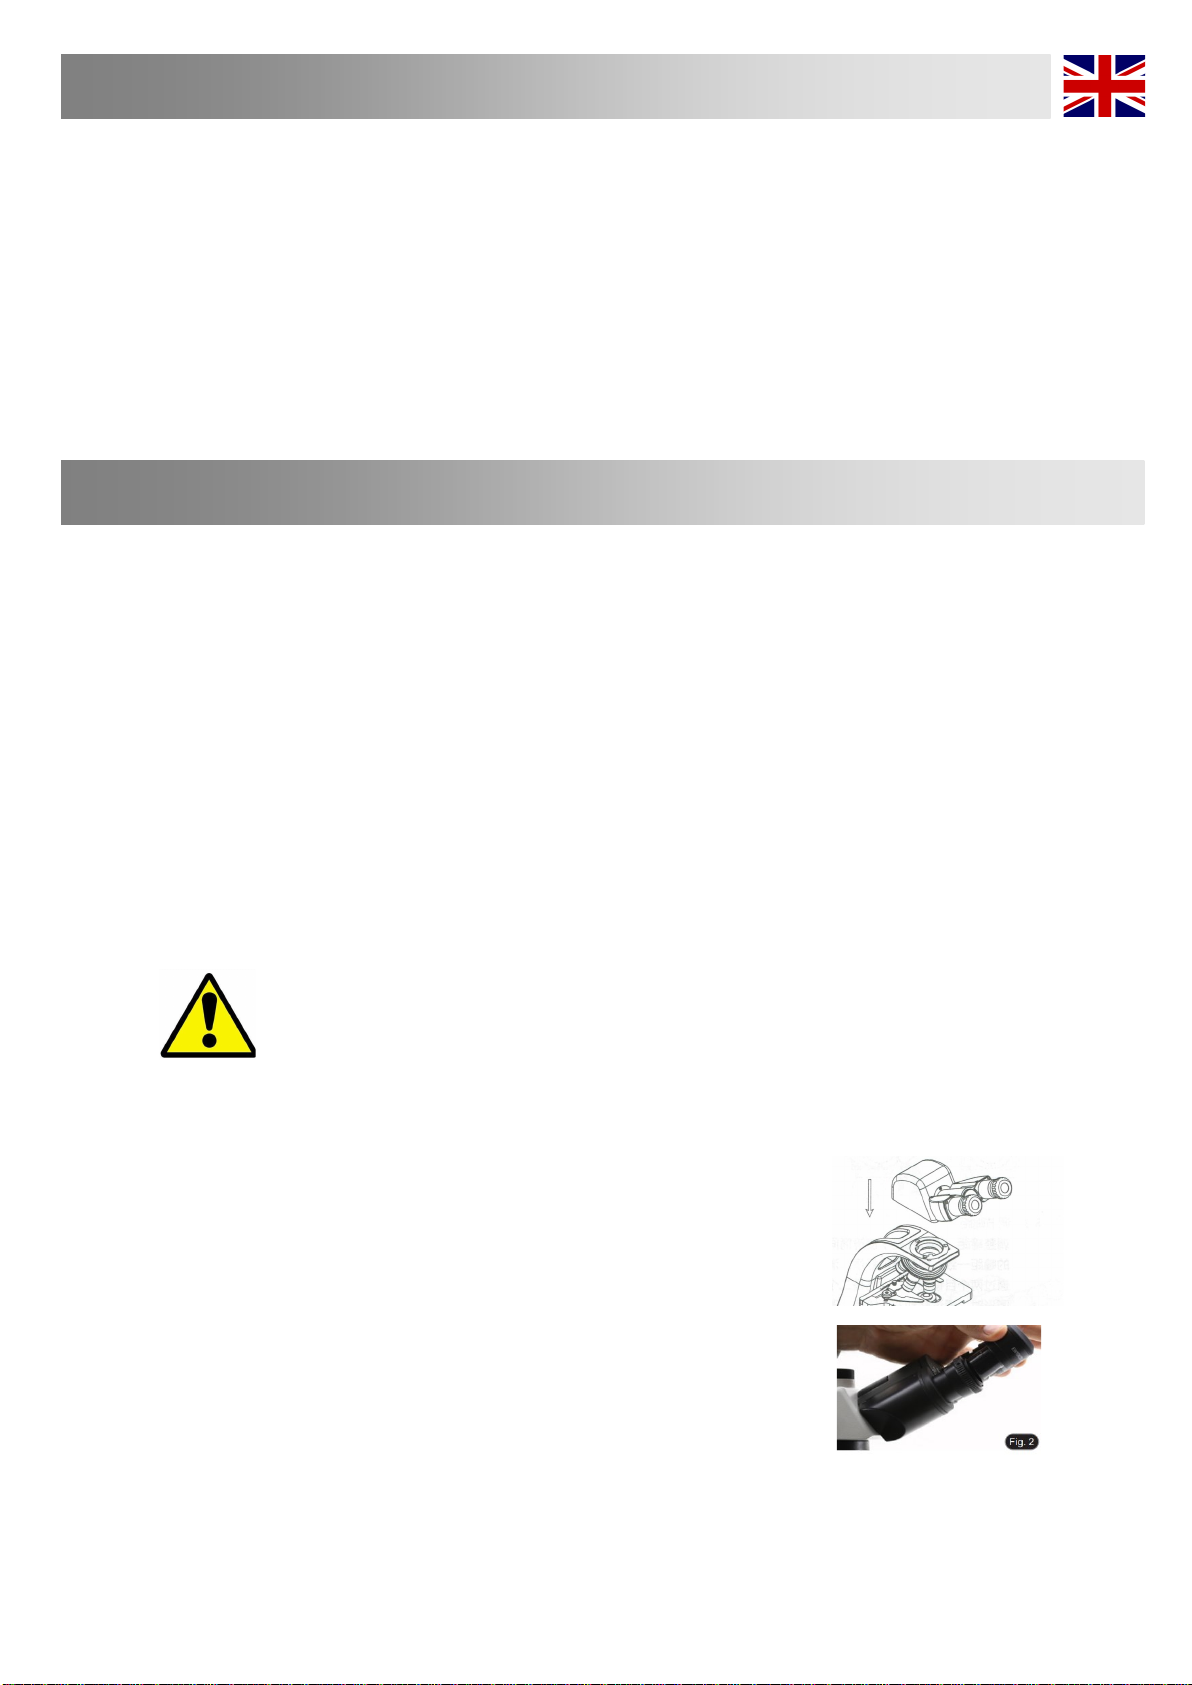
4.3 Assembling the microscope
1. Remove the dust cap from the microscope frame
2. Insert the opcal head above the stand and ghten the screw. (Fig. 1)
• Hold the head with one hand during the locking in order to avoid that the head
falls.
3. Insert both eyepieces into the tubes of the opcal head. (Fig. 2)
3.0 Introducon
4.0 Unpacking and Assembly
Fig. 1

Page 6
5.0 Microscope Accessories
J-Scope 5G Wi-Fi Eyepiece (Digital Camera)-Overview
The BIMC-A03A-W2 is known around the globe for their ease-of-use and adaptability to a number of
applicaons. The JC Cam’s unique “All In One Box” design, assures each user that this camera can t almost any
microscope whether it’s for Educaonal, Industrial or Clinical use. The JC CAM allows you to convert your digital
images into documentaon les for professional prinng. It is equipped with a USB 3.0 and Wi-Fi for data
transfer, ensuring a good response me. Image Sensor:
OnSemi AR0521
Exposure Mode:
Roller shuer exposure
Maximum Resoluon:
2592 x 1944 (5038848 pixels)
Sensor Opcal Format:
1/2.5” [5.90mm x 4.5mm (H x V), Diagonal 7.0mm]
Pixel Size:
2.2μm x 2.2μm
Dynamic Range:
74.3dB
SNRmax:
40dB
Exposure:
3.9ms - 320ms, Automac and Manual
White Balance:
Real-me auto, single auto, manual adjustment
Preview resoluon (USB & 5G Wi-Fi):
30FPS@2592x1944, 1920x1080, 1024x768, 640x480
Spectral Characteriscs:
380 - 650nm
Record Format:
Snapshot
Format: JPG, BMP, PNG, TIFF, PDF
Resoluon: 2592 x 1944, 1920 x 1080, 1024 x 768, 640 x 480
Record
Format: MJPG format AVI le
Resoluon: 30fps@ 1920 x 1080, 1024 x 768, 640 x 480
Supporng protocol:
5G Wi-Fi IEEE 802.11ac
Working frequency range:
5.180 - 5.825GHz
Support System:
Microso® Windows XP/7/8/8.1/10, IOS, Android
Computer Conguraon:
CPU: equal or more than the second generaon Intel core
2.8GHz, Memory: 2GB or more, USB port: USB 2.0 / 3.0 or more,
Displayer: suggest 17” or larger
Live stream with mulple devices

Page 7
Stage Micrometer for Microscope
Calibraon with NIST cercaon Lens Cleaning Tissue for slide cleaning
5.0 Microscope Accessories
BIMC-S09A TOO-155E
MiniPC for JC Cam series Wi
eyepiece to screen on the TV
BIMC-MIPC06
Digital Drying Cabinet, Cap. 60L
CHD-60
Slide Folder, hold 20pcs of slide
MCS-SL01A

Page 8
6.0 Using the Microscope
6.1 Adjusng Interpupillary Distance
The Interpupillary Distance is essentially the distance between
your two pupils expressed in millimeters. When set correctly,
one will see one uniform round field of view or FOV. The
adjustment is made by simply pulling apart or pushing together
the eyetubes until a uniform round field is achieved. Make note
of the number marked on the viewing head so you can repeat
the setting later.
6.2 When you place a specimen on the stage, get it into focus
with the right eye while your left eye is closed. Once the right side
is in focus by using the fine focus knob on the microscope, open
your left eye and use the diopter on the left eyetube to bring the
left side in focus.
Once this is done, the microscope is adjusted to this user. Other
users will have different IP's and different focusing abilities.
6.3 Operaon
Once the microscope has been setup in its working location with all of the
components correctly installed, it is ready for use.
Your BIMC-12N1000 is a precision instrument designed to last a lifetime. always
handle your microscope with care and avoid abrupt motion vibration and hock.
6.4 Basic Set Up For Transmied Light - Brighield.
1. Turn on the microscope power switch which is located on
microscope back. Adjusting the Brightness desired is done with the
variable brightness control knob shown above.
2. We recommend that you initially use a specimen that has areas
of high and low contrast. Place that specimen on the stage.
Caution:
It is recommended to use slides of 1.0 – 1.2 mm thickness in combination with cover
glasses of 0.13 mm or 0.17 mm thickness.
(Fig.4)
Table des matières
Autres manuels JC LAB Microscope


Manuels Microscope populaires d'autres marques


VWR
VWR VisiScope 384 Series Manuel utilisateur

Nikon
Nikon ECLIPSE E200 POL Manuel utilisateur

Leica
Leica DI C800 Manuel

ThermoFisher Scientific
ThermoFisher Scientific Continuµm Manuel utilisateur

ThermoFisher Scientific
ThermoFisher Scientific Continuµm Manuel utilisateur

Olympus
Olympus SZ61 Manuel utilisateur