iVOOMi Speed 600 Manuel utilisateur

User Manual &
Quick Installation Guide
Speed 600 | Speed 300
Please read the user manual for correct & complete usage of the device
For technical support, replacement services, user guides, and other
information, please visit https://www.ivoomi.co/support, or
simply scan the QR code.
If you have any suggestions or needs on the product guides, you
are welcome to email customer[email protected]o
Maximum wireless signal rates are the physical rates derived from IEEE Standard 802.11 specifications. Actual wireless
data throughput and wireless coverage are not guaranteed and will vary as a result of network conditions, client
limitations and environmental factors, including building materials, obstacles, volume and density of traffic and client
locations
NOTE :

1. Get to Know Your Router
1.1 Overview
1.2 Packing List
1.3 System Requirement
1.4 Features
1.5 Appearance
1.5.1 LED Indicators
1.5.2 Button & Ports
1.5.3 Label on the Bottom
2 Quick Setup
2.1 Connecting to Your Router
2.1.1 Connecting to Your Router Through WiFi
2.1.2 Connecting to Your Router Using an Ethernet Cable
2.2 Set the Network Configurations
2.3 Setting up an Internet Connection
2.3.1 Setting up an Internet Connection with PPPoE
2.3.2 Setting up an Internet Connection with a Dynamic IP Address
2.3.3 Setting up an Internet Connection with a Static IP Address
3. Configuring the Router
3.1 Status
3.1.1 Attached Devices and Real-time Statistics
3.1.1 System Info
3.2 Internet Settings
3.2.1 WAN Set up
3.2.2 Router Mode
3.2.3 Access Mode
3.2.4 Range Extender Mode
3.2.5 WISP Mode
3.3 DDNS
3.4 Wireless Setup
3.4.1 Basic
3.4.2 Security
3.4.3 Access
3.4.4 WDS
3.4.5 WPS
3.4.5 Schedule
3.5 Firewall
3.5.1 Forwarding
3.5.2 DMZ
3.5.3 Denial-of-Service
3.6 Security
3.6.1 Port Filtering
3.6.2 IP Filtering
3.6.3 URL Filtering
3.6.4 MAC Filtering
3.7 Qos
1-3
1
1
1
2
2
2
3
3
4-10
4
4
5
5-7
7
8
8-9
9
11-31
11
11
12
12-17
13
13-15
16
16
17
17
18-21
18
18
19
19-20
20
21
21-22
21
22
22
23-25
23
23-24
24
25
25-26
Contents
Subject Page No.

3.8 System
3.8.1 LAN Interface
3.8.2 Static DHCP
3.8.3 DHCP
3.8.4 Time Zone
3.8.5 Upgrade
3.8.6 Save/Reload
3.8.7 Password
3.9 Advanced
3.9.1 Statistics
3.9.2 Log
3.10 Logout
4. FAQ (Frequently Asked Questions)
5. Warranty
5.1 Warranty Terms & Conditions
5.2 Warranty Card
Subject Page No.
26-30
26-27
27
28
28
29
29
30
30-31
30
31
31
32
33-34
33
34

Get to Know Your Router
1.
1.1 Overview
1.2 Packing List
The Wirele s s R ou t e r i s c o mpa t i bl e wi t h
IEEE802.11b/g/n standard, which supports data rate
up to 300Mbps in 2.4GHz band, which is also
compatible with IEEE 802.11g/b wireless devices. The
Wireless router allows multiple users to share one
broadband connection, as well as secures your private
network. With its built-in 4-port switch and wireless AP,
LAN users can share files, and play network games all
at a high speed. This device is also an Access Point. It
has a built-in wireless LAN. Users can connect to
Internet using wireless network interfaces anywhere
within the range of its radio transmission. It's ideal for
SOHO users who require instant and convenient
access to Internet without the restriction of
connecting cables
• Wireless Router - 1U
• Power Adapter - 1U
• Ethernet Cable - 1U
• Quick Installation Guide - 1U
• User Manual - 1U
1.3 System Requirement
• An Ethernet-Based Cable or xDSL modem
• An Ethernet Card on PC
• TCP/IP network protocol for each PC
• RJ45 Twisted-pair
• Microsoft IE or any browser
01

1.4 Features
• Complies with 2.4GHz IEEE802.11n v2.0 and backward compatible with IEEE 802.11b/g standards
• Supports NAT/NAPT IP sharing
• WAN Protocols: PPPoE/Static IP/PPTP/DHCP
• Supports advanced 2T2R MIMO technology to enhance the throughput and coverage range significantly
• High speed data rate - up to 300Mbps
• Supports Virtual Server and DMZ
• Supports Wi-Fi Protected Setup (WPS) with reset button
• Supports 64/128-bit WEP encryption and WPA-PSK, WPA2-PSK security
• Supports WMM function to meet the multimedia transmission requirement
• Supports WDS mode
• Supports Special Applications (Port Triggers)
• Supports DDNS (DynDNS, TZO), and QoS
• Supports MAC/IP filtering and URL blocking
• Supports DHCP server and Anti-Dos firewall
• Web user interface (remote configuration)
• System status and security log
• Firmware upgradeable
1.5 Appearance
1.5.1 LED Indicators
The top panel contains LED indicators that show the status of the unit.
Items Status
OFF
Flashing
Off
ON
OFF
Flashing
Flashing
ON
Indication
Power is OFF
The LED flashes about two minutes during
WPS working.
There is no device linked to the corresponding port.
There is a device linked to the corresponding
port but there is no activity.
The wireless function is disabled.
There is an active device linked to the
corresponding port.
The wireless function is enabled. The router
is working on 2.4GHz radio band.
Power is ON
4 3 2 1
2.4
02

1.5.2 Button & Ports
WAN: 10/100Mbps RJ45 port. The WAN port is where you will connect Cable/xDSL Modem or other LAN.
LAN (1,2,3,4): These four LAN ports are where you will connect networked devices, such as PCs, print servers, remote hard
drives, and anything else you want to put on your network. If you connect this product with the Hub (or Switchboard)
correctly, the router's and hub's (or the switchboard's) corresponding LED must illuminate.
WPS: With the router powered on, press the button about 2 second, it is WPS function and the WPS LED will flash 2
minutes.
RESET: The Reset Button has two functions, WPS and Factory Default. With the router powered on, When selecting the
WPS function, use a pin to press and hold the button about 2 seconds, the WPS LED will flash 2 minutes. For the other one,
use a pin to press and hold the button about 6 seconds, the router will restore to factory default.
POWER: The Power socket is where you will connect the power adapter. Please use the power adapter provided with this
router.
Wireless antenna: To receive and transmit the wireless data.
Description of buttons and ports
The following parts are located on the rear panel.
1 2 3 4 WAN RESET POWER
1.5.3 Label on the Bottom
1. Default IP address of the router. You can use the IP address to access the router web UI.
2. MAC address of the router. Each router has a unique MAC address.
3. The default WiFi name iVOOMi Speed 600
03
Model
Power
Default Access
For support and warranty, please visit: www.ivoomi.co
Customer Care Number : +91-9335828282
Username
Password
FCC ID : 2AA6ZCR2
admin
admin
:
:
Speed 600 (IV-600R)
5V~ 1.0A
192.168.0.1
:
:
:
Serial
Number
MAC
Address
SSID
S/N : XXXXXXXXXXXXXXX
MAC : XXXXXXXXXXXXXXX
SSID : iVOOMi_Speed 600
Password : No Password

Or
Modem
Ethernet jack
4
2
13
1 2 3 4 WAN RESET POWER
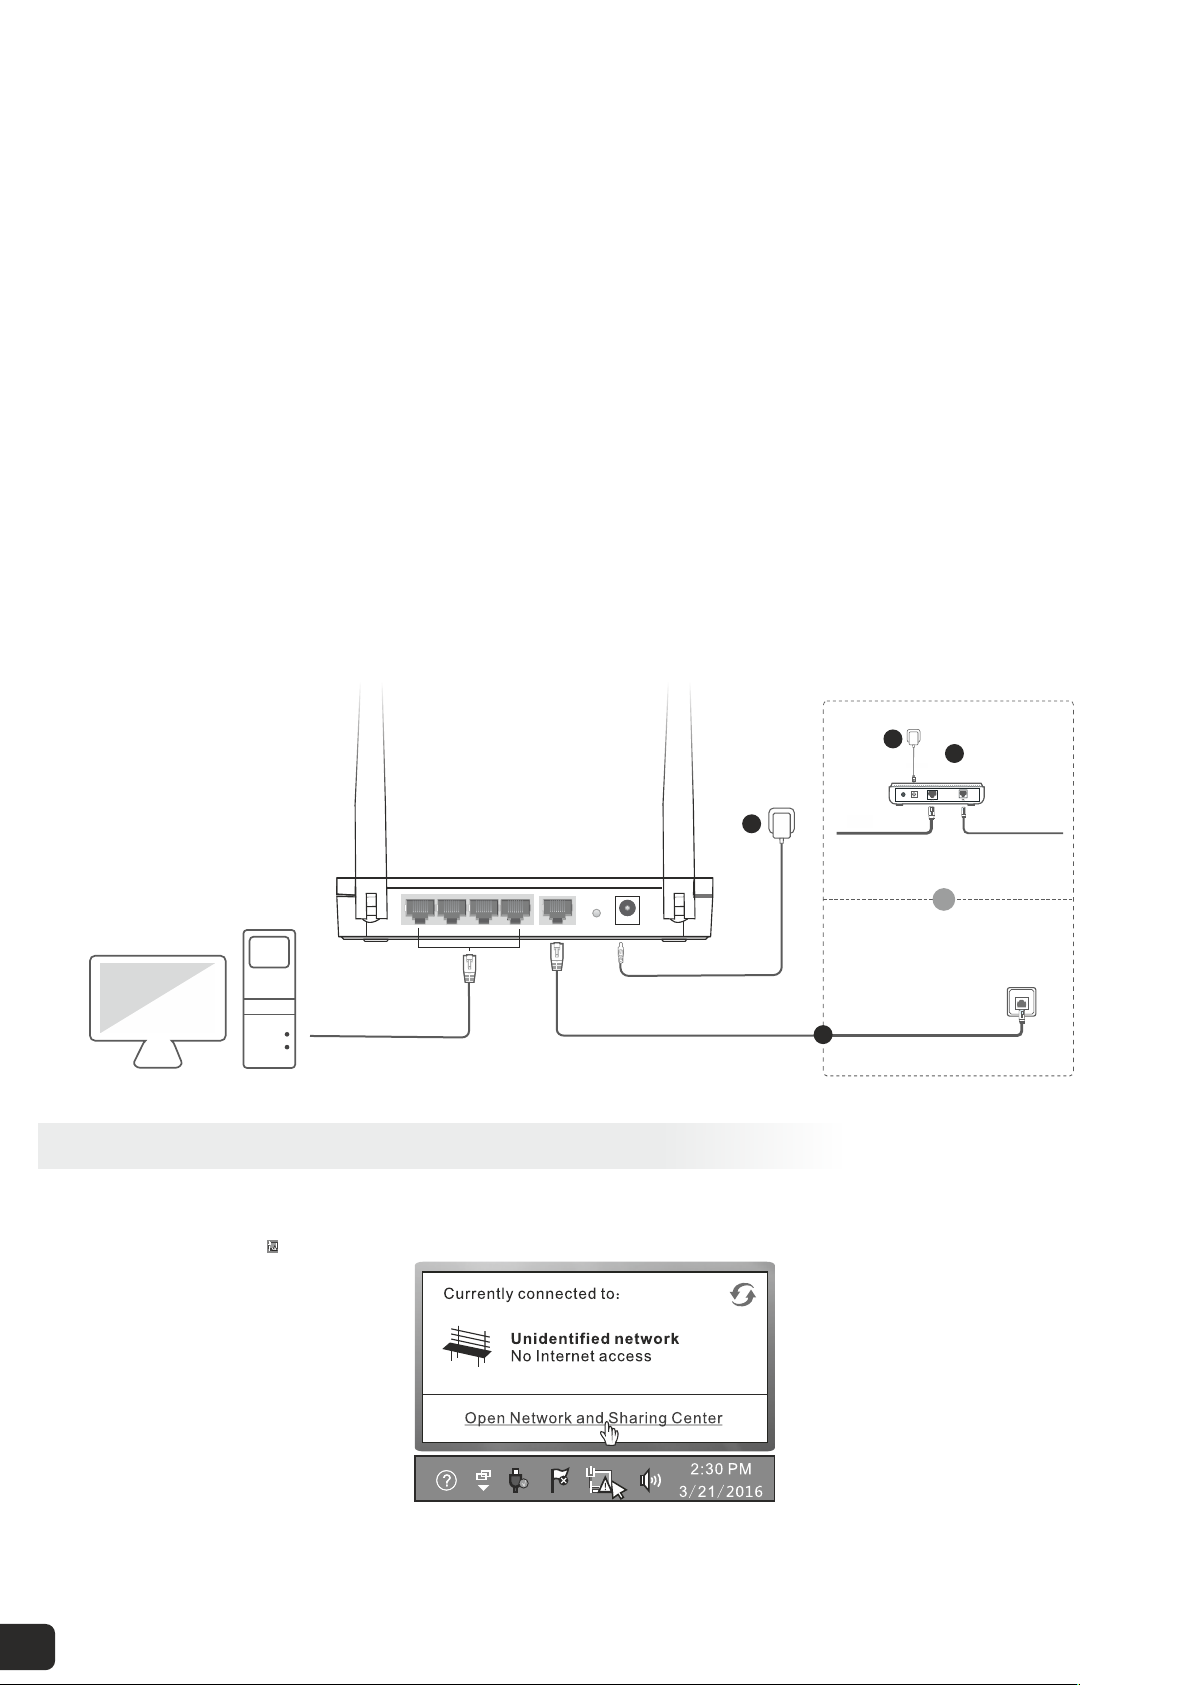
• Connect the WAN port of the router to a LAN port of your modem or to an Ethernet jack.
• Use the included power adapter to connect the router to a power source.
• The LED indicator lights solid on.
• Connect your devices to the router.
Wireless devices:
• Connect the WAN port using any of the methods shown in the following figure depending on your internet connection
means
• Connect wireless devices to the WiFi network of the router using the default WiFi name specified on the product label.
By default, there is no WiFi password.
• After the wireless device is connected to the router, log in to the router web UI on the wireless device and configure an
internet connection. For details, refer to fter changing the WiFi name or password, Setting up an Internet Connection. A
you need to reconnect the wireless device to the router.
Quick Setup
2.
2.1.1 Connecting to Your Router Through WiFi
Before installing the router, make sure your PC is connected to the Internet through the broadband service successfully. If
there is any problem, please contact your ISP. After that, please install the router according to the following steps. Don’t
forget to pull out the power plug and keep your hands dry.
2.1 Connecting to Your Router
04
Or
Modem
Ethernet cable
Ethernet jack
4
2
13
1 2 3 4 WAN RESET POWER
• Connect the WAN port of the router to a LAN port of your modem or to an Ethernet jack.
• Use the included power adapter to connect the router to a power source.
• The LED indicator lights solid on.
• Connect your devices to the router.
Wireless devices:
• Connect the WAN port using any of the methods shown in the following figure depending on your internet connection
means
• Connect your computer to port 1, 2, 3 or 4 of the router using an Ethernet cable.
• After the wireless device is connected to the router, log in to the router web UI on the wireless device and configure an
internet connection. For details, refer to Setting up an Internet Connection.
2.1.2 Connecting to Your Router Using an Ethernet Cable
2.2 Set the Network Configurations
Windows 7
• Step 1 : Click the icon on the bottom right corner of your desktop
• Step 2 : Click Open Network and Sharing Center
05
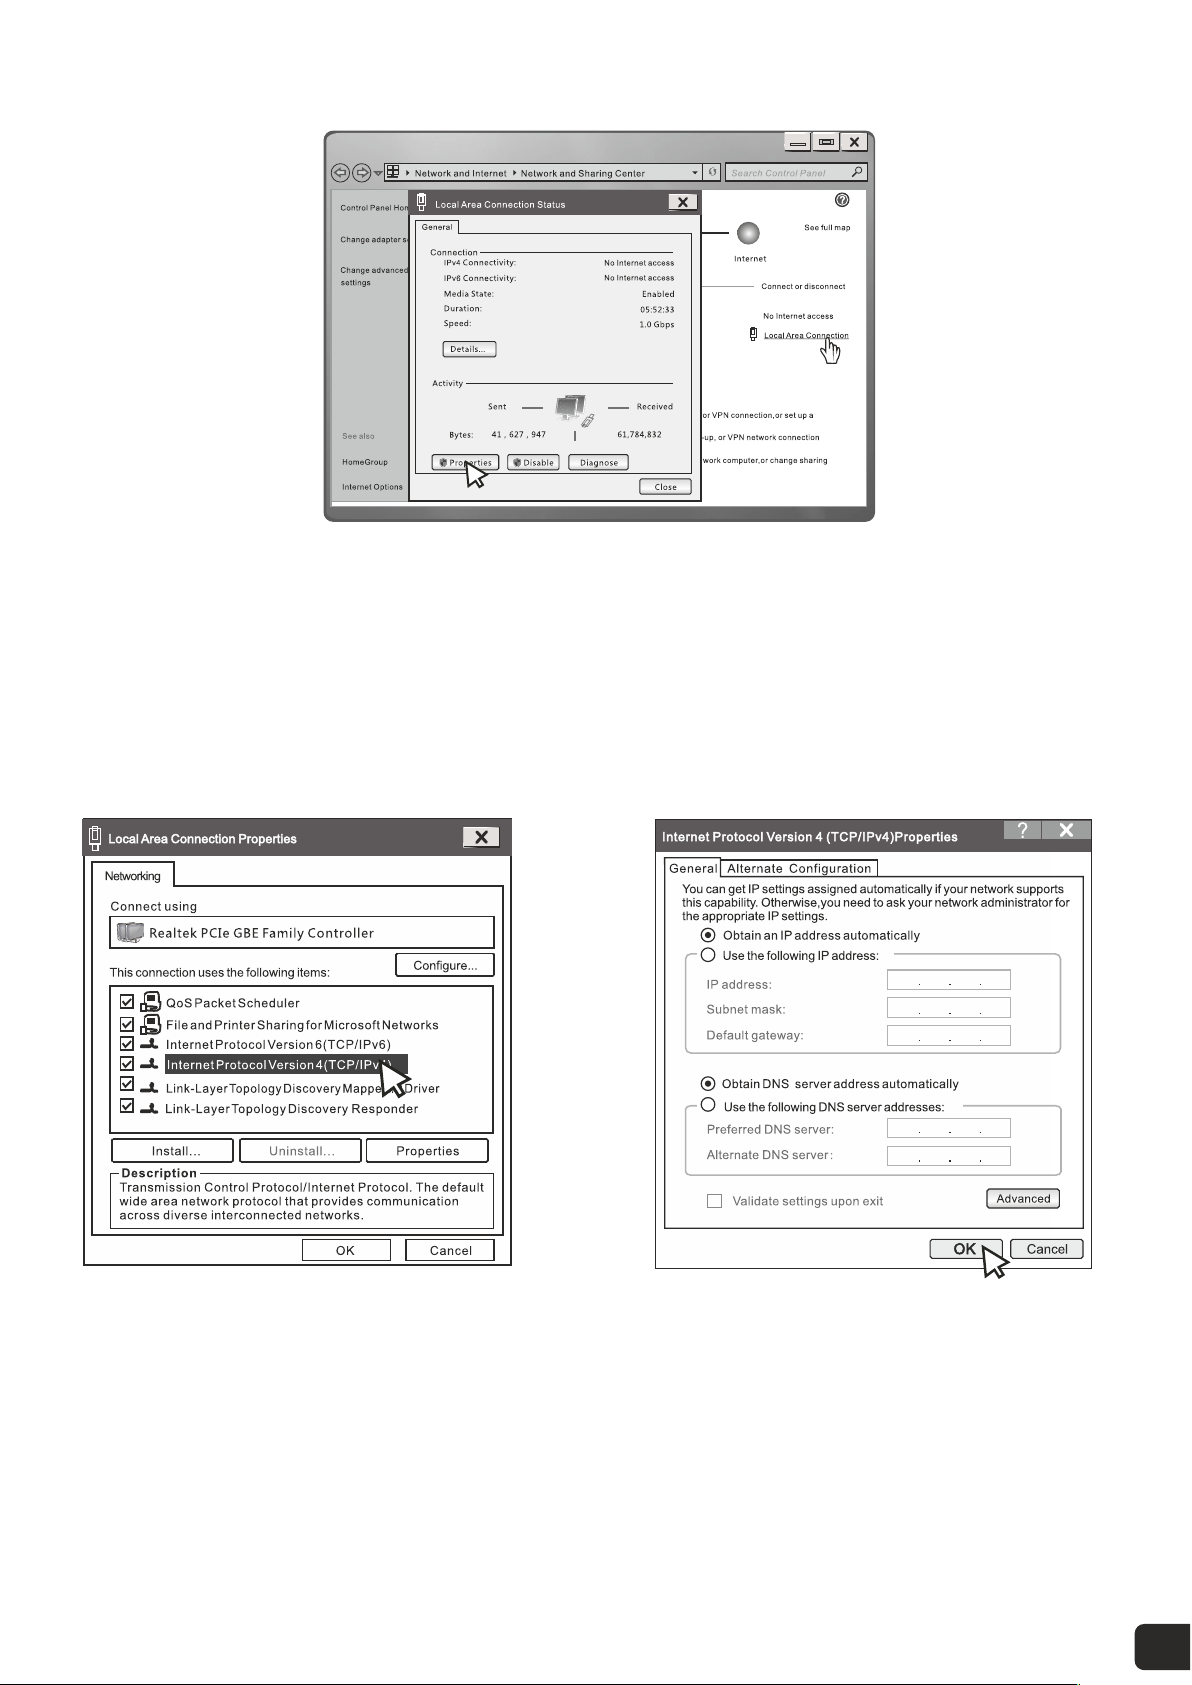
• Step 3 : Click Local Area Connection
• Step 4 : Then Click on Properties Button.
• Step 3 : Double Click Internet Protocol Version4 (TCP/IPv4)
• Step 4 : Select Obtain an IP Address automatically and Obtain DNS server address automatically.
• Click Ok button
• B. "Use the following IP address (S)"
• IP Address: 192.168.0.XXX: ( XXX is a number from 2~254)
• Subnet Mask: 255.255.255.0
• Gateway: 192.168.0.1
• DNS Server: You need to input the DNS server address provided by you ISP. Otherwise, you can use the router's default
gateway as the DNS proxy server.
• Tip: If you are not sure of the DNS server address, we recommend you to select “Obtain an IP address automatically (O)”
and “Obtain a DNS server address automatically”.
06

• Click "OK" to save the configurations.
• Start a web browser on a computer connected to the router, enter 192.168.0.1 into the address bar, and press Enter.
• Create an administrator password. For security purposes, create a local password for login before starting the quick
setup. Please enter 1-32 characters using a combination of number and symbols. Then click “Let’s Get Started” Button.
2.3 Setting up an Internet Connection
192.168.0.1
Create an administrator password
For security purposes, create a local password
for login before starting the quick setup.
Please enter 1-32 characters using a
combination of numbers and symbols.
New Password:
Let's Get Started
Confirm Password:
Firmware Version: v1.4_d201027 Hardware Version : Speed 600
www.ivoomi.co
According to the detection result, configure related settings. For details about the connection-type-specific configuration
procedures, refer to Setting up an Internet Connection with PPPoE, Static IP Address, Dynamic IP Address.
192.168.0.100
255.255.255.0
192.168.0.1
07
Ce manuel convient aux modèles suivants
1
Table des matières
Manuels Routeur réseau populaires d'autres marques


NETGEAR
NETGEAR FS526T - Switch Manuel utilisateur

Korenix
Korenix JetNet 5710G Series Manuel utilisateur

Automated Logic
Automated Logic ZN551 Manuel du propriétaire

Cisco
Cisco ASR 1000 Series Manuel de l'opérateur

EnGenius
EnGenius ESR-9710 Manuel utilisateur

Cisco
Cisco 805 Series Instructions d'utilisation et de sécurité