infaco MAL1B15 Manuel utilisateur

USER’S MANUAL
MAL1b15
NOTMAL1B15_ENUSA_01.indd 1NOTMAL1B15_ENUSA_01.indd 1 15/07/2020 10:40:1215/07/2020 10:40:12

NOTMAL1B15_ENUSA_01.indd 2NOTMAL1B15_ENUSA_01.indd 2 15/07/2020 10:40:1215/07/2020 10:40:12

PRECAUTIONS BEFORE USE___________________________________________4
ENVIRONMENTAL PROTECTION ______________________________________ 4
CASE CONTENTS_____________________________________________________4
PRODUCT OVERVIEW ________________________________________________5
SPECIFICATIONS __________________________________________________5
FIRST USE___________________________________________________________6
Battery___________________________________________________________________6
Carrying the Equipment _____________________________________________________ 6
PRECAUTIONS FOR USE______________________________________________ 7
YEARLY MAINTENANCE______________________________________________ 7
TRANSPORT PRECAUTIONS __________________________________________ 7
CHARGING THE BATTERY_____________________________________________8
Using the charger __________________________________________________________8
Charging the battery ________________________________________________________8
Charging a second battery____________________________________________________9
Storing the battery / Putting the battery to Sleep Mode or Winter Mode __________________ 9
Forgetting to put your Batteries in Sleep Mode________________________________________ 10
Battery storage instructions_________________________________________________________10
Charger safety ___________________________________________________________________10
SAFETY INSTRUCTIONS _____________________________________________ 11
TERMS OF WARRANTY _____________________________________________ 11
CONTENTS
NOTMAL1B15_ENUSA_01.indd 3NOTMAL1B15_ENUSA_01.indd 3 15/07/2020 10:40:1215/07/2020 10:40:12

cASE CONTENTS
1 Battery
1 Charger
1 Charger Power Cord
1 Battery-Holder Jacket (Belt + Suspenders)
1 Instruction Manual
4
Retain all warnings and instructions for future reference.
In warnings, the term “tool” refers to your mains powered electric tool (with
power supply cord) or your battery operated tool (with no power cord).
WARNING. Read safety warnings and instructions. Failure to heed war-
nings and follow instructions may lead to an electric shock, a fire and/or
serious injury.
ENVIRONMENTAL PROTECTION
Follow all country-specific waste disposal rules and regulations.
Electric appliances must not be disposed of as household waste.
Recycle the device, accessories and packaging.
Ask your approved INFACO dealer for up-to-date information on
eco-compatible waste disposal.
PRECAUTIONS BEFORE USE
NOTMAL1B15_ENUSA_01.indd 4NOTMAL1B15_ENUSA_01.indd 4 15/07/2020 10:40:1215/07/2020 10:40:12

Battery F3015
Charger F3015
5
product overview
specifications
Reference Battery 831B
Rated voltage 46.8 V
Capacity 2.5Ah / 117Wh
Weight 810 g
Dimensions 190mm x 90mm x 60mm
Reference Charger 841C1 Charger 841C2
Input 220/230V - 50/60Hz 110/120V - 50/60Hz
Output 54,6V - 2A
Power 110W
Fuse 3.15A
These specifications are given as an indication only. Under no circumstances may they be considered as contractually binding. They are
subject to modification without prior notice in the interests of product development.
Patented equipment
NOTMAL1B15_ENUSA_01.indd 5NOTMAL1B15_ENUSA_01.indd 5 15/07/2020 10:40:1615/07/2020 10:40:16

6
first use
The first time you use the equipment, we strongly recommend you to ask the advice of your dealer, who
is qualified to give you all the advice you need for correct use and optimum performance.
It is essential to read these instructions carefully before using the device.
In wet weather, it is imperative to carry the battery under waterproof clothing to keep the
battery unit protected from the rain.
Battery
Before using the equipment for the first time and/or putting the battery to sleep mode, fully charge
the battery (see charging procedure on page 10).
The F3015 Lithium battery MUST be recharged using the INFACO Lithium charger
(Ref.: 841C1/841C2).
It is prohibited to use a different charger as this may lead to a serious electrical accident.
Carrying the Equipment
1. Remove the battery, the battery-holder belt, the suspenders, the holster and the power cord
from the case.
2. Fit the battery onto the battery-holder belt. To do this, slip straps through the battery tabs.
Place the holster on the left or right strap on the battery-holder belt.
3. Slip the power cord through the left or right eye-hole provided in the battery-holder belt.
4. Fix the battery-holder belt to your waist, the battery must be located in the lumbar region.
When using suspenders, fix them to the battery-holder belt and adjust them to your size by pulling
on the straps.
NOTMAL1B15_ENUSA_01.indd 6NOTMAL1B15_ENUSA_01.indd 6 15/07/2020 10:40:2515/07/2020 10:40:25

7
PrEcautions for use
Do not leave the pruning shears and/or the battery on the ground, and do not expose them to bad
weather conditions.
Make sure the battery’s protective plastic casing is not cracked and is free from any physical damage
When working it is normal that the battery temperature rises (as during charging).
Recommended operating temperature: -5 to 35°C Use outside this temperature range may reduce
the tool’s performances.
In wet weather, it is imperative to carry the battery under waterproof clothing to keep it protected
from the rain.
After using the tool in wet conditions or in a damp environment, it is strongly recommended to store
the (disconnected) device outside its case in a warm, dry and ventilated place.
Keep the cord away from the cutting zone.
At the end of the pruning season, remember to put the batteries in sleep / winter mode to prevent their
premature ageing during storage (see page 11). We strongly recommend that you send your units for
an annual maintenance/service every year. This will ensure proper functioning of your unit and gives an
opportunity to have your units checked and assessed.
TRANSPORT PRECAUTIONS
The case is certified for the transport of Lithium batteries > 100Wh (UN 3480-3481 standard). However,
some rules must be followed when shipping using a transporter:
The unit must be fully disconnected (pruning shears, coil, and battery).
It is compulsory for the battery to be placed in the housing provided in the case. The case must be taped /
shut correctly to prevent any risk of it opening.
YEARLY MAINTENANCE
NOTMAL1B15_ENUSA_01.indd 7NOTMAL1B15_ENUSA_01.indd 7 15/07/2020 10:40:2515/07/2020 10:40:25
8
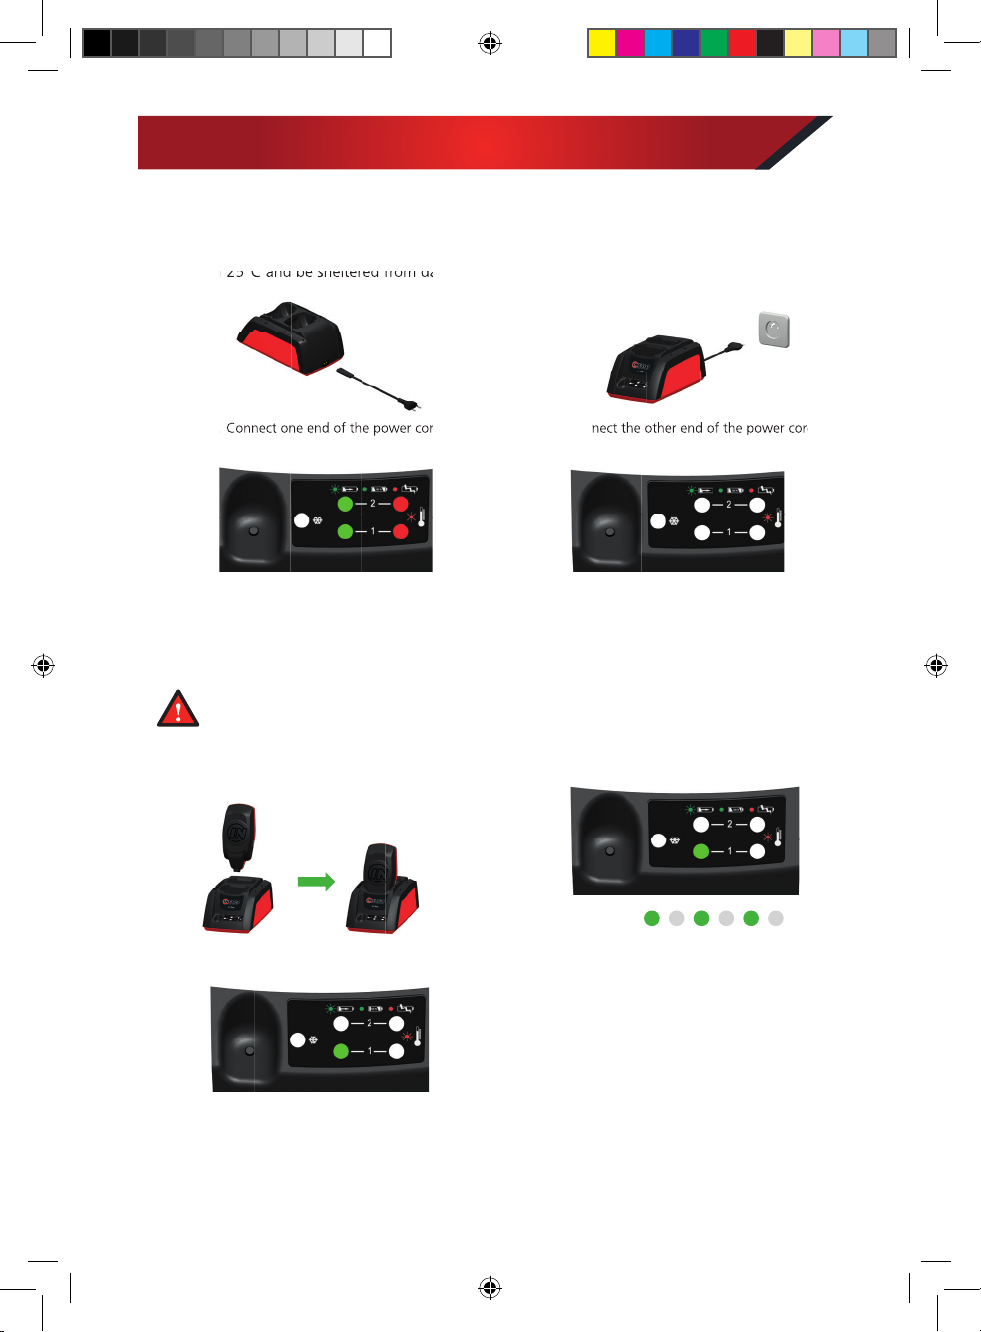
charging the battery
Using the charger
To charge your battery, plug in the charger in a well ventilated area which is free from inflammable
products and other sources of combustible materials. The area must be at a temperature between
10°C and 25°C and be sheltered from damp conditions.
1. Connect one end of the power cord
to the charger.
1. Place the battery on channel 1
of the charger.
3. When powered on, the charger initialises:
Green LED + Red LED light
for 2 seconds.
3. . Battery charge completion:
- Channel 1: Green LED on (not flashing).
The time needed to fully charge an 831B battery
is about one and a half hours.
2. Connect the other end of the power cord
to the mains outlet.
2. Once the battery is in place, the charger detects it
and begins charging:
- Channel 1: Green LED flashes quickly
throughout the charge.
4. When the LEDs turn off,
the charger is ready for use.
Charging the battery
It is strictly forbidden to charge the batteries when the temperature in the room is below 0°C
or higher than 40°C.
When charging, the battery must not be covered and not be close to a heat source.
10°C and 25°C and be sheltered from damp conditions.
1. Connect one end of the power cord
2. Connect the other end of the power cord
Voie 1
NOTMAL1B15_ENUSA_01.indd 8NOTMAL1B15_ENUSA_01.indd 8 15/07/2020 10:40:3915/07/2020 10:40:39

9
6. Once the battery on channel 1 is fully charged, the
battery on channel 2begins charging:
- Channel 1: Green LED on and not flashing
(battery charged)
- Channel 2: Green LED flashes quickly
throughout the charge.
3. SLEEP MODE complete:
- The charger’s LED stays red (not flashing).
- Channel1’s LED (and channel 2’s if there are 2 batteries) stays green (not flashing).
The battery must be removed from the charger and stored in the case.
Indicate that wintering is disabled when the mains plug is disconnected
To enable or disable wintering, the wintering button must be pressed.
7. The two batteries are charged:
- Channel 1: Green LED on (stops flashing).
- Channel 2: Green LED on (stops flashing).
Storing the battery / Putting the battery to Sleep Mode
or Winter Mode
To keep your batteries in good condition (at the end of every pruning season or when not used for more
than 1 month) the following process must be applied (this process can take up to 10 hours per battery)
Channel 2
4. Place the battery on channel 2
of the charger.
5. If the battery on channel 1 is charging, the battery on
channel 2 switches to a waiting charge status:
- Channel 1: Green LED flashes quickly
throughout the charge.
- Channel 2: Green LED flashes slowly
throughout the wait.
A second battery can be placed on the charger:
Channel 1
Channel 2
1. Place the battery (or batteries) on the charger.
NOTE: If there are two batteries on the charger,
the sleep mode will be carried out on both batteries,
one after the other.
2. Press the SLEEP button to begin the process.
The LED switches to red (not flashing) and the charging
LED flashes green.
NOTE: If there are two batteries on the charger,
the sleep mode will be carried out on both batteries,
one after the other.
Channel 1
Charging a second battery
Channel 2
NOTMAL1B15_ENUSA_01.indd 9NOTMAL1B15_ENUSA_01.indd 9 15/07/2020 10:40:5115/07/2020 10:40:51

10
Forgetting to put your Batteries in Sleep Mode
If the sleep process has not been followed correctly there may be a loss of autonomy in future
uses of the battery. To remedy this situation, leave the battery on charge for between 12 and 72
hours (for extreme cases of incorrect storage that cause an imbalance).
Full autonomy can also be recovered over several daily charges that can be spread over the first week of
work. To do this, make sure the battery remains on the charger every night during the first week of work.
Reminder: Putting the battery to sleep mode eliminates any risk of battery imbalance (see page 11).
Battery storage instructions
Store the battery and the charger in a well ventilated area, free from inflammable products or heat
sources, and keep out of reach of children.
Do not store empty batteries. If the battery is very flat it will no longer charge and will be considered
to be out of service.
Do not store the battery without carrying out the Sleep / Winter mode process.
Do not store batteries that are out of service, return them to your approved INFACO dealer.
Do not store batteries when they are connected to the charger or to a tool.
Do not store the charger connected to the mains power supply.
All failures to follow the storage and safety instructions will result in the manufacturer’s guarantee
being voided.
There is a fire hazard if the product suffers damage (impacts, being dropped, exposure to
high temperatures, etc.).
According to the 2002/96/EC standard, do not dispose of the battery with household waste,
do not burn it or dispose of it in water. Do not open the battery.
Return the battery to an approved INFACO dealer.
Used or defective batteries must be recycled according to the 91/157/EEC directive.
Charger safety
Temperature fault on channel 1:
Flashing red LED
1. Remove the battery from channel 1 and wait a few
minutes for the battery to cool down.
2. Place the battery on the charger. If the problem persists,
please contact your approved INFACO dealer.
Temperature fault on channel 2:
Flashing red LED
1. Remove the battery from channel 2 and wait a few
minutes for the battery to cool down.
2. Place the battery on the charger. If the problem persists,
please contact your approved INFACO dealer.
Channel 1
Channel 2
NOTMAL1B15_ENUSA_01.indd 10NOTMAL1B15_ENUSA_01.indd 10 15/07/2020 10:40:5315/07/2020 10:40:53
Ce manuel convient aux modèles suivants
4
Table des matières
Autres manuels infaco Accessoires pour appareils photo


