iCES ICR-240 Manuel utilisateur

Model: ICR-240
Instrucon manual PLL FM Radio with Alarm clock
Gebruiksaanwijzing PLL FM Radio met Alarm
funce
Bedienungsanleitung PLL FM Radiowecker
Mode D’emploi Radio réveil FM PLL
Manual de instrucciones Radio FM PLL
(reducción ruido) con reloj y alarma

Index
English ………………..………………............…….....…………...........................……………….1
Nederlands ……………………………...……...........…….........…………..............................9
Deutsch ……………………...................………….........……….....................................…16
Français …………………………………………….........………….......…..............................…23
Español ………………………………….........………….......…………………….....………...……...30
1

English
1. Safety Instrucons
1. Read, keep and follow these instrucons carefully.
2. The appliance is only for domesc use and not for commercial use.
3. Please check that the voltage on the type plate of your appliance
corresponds with your house electricity supply (type plate is located on the
back of the unit).
4. Do not use this apparatus near water.
5. Do not block any of the venlaon openings. Install in accordance with the
manufacturer’s instrucons.
6. Do not install near any heat sources such as radiators, heat registers, stoves,
or other devices (including amplifiers) that produce heat.
7. Do not defeat the safety purpose of the polarized or grounding type plug. A
polarized plug has two blades with one wider than the other. A grounding
type plug has two blades and a third grounding prong. The wide blade or the
third prong is provided for your safety. When the provided plug does not fit
into your outlet, consult an electrician for replacement of the obsolete
outlet. (For UK only)
8. Protect the power cord from being walked on or pinched, parcularly at
plugs, convenience receptacles, and the point where they exit from the
apparatus.
9. Only use aachments/accessories specified by the manufacturer.
10. Unplug this apparatus during lightning storms or when unused for long
periods of me.
11. Refer all servicing to qualified service personnel. Servicing is required when
the apparatus has been damaged in any way, such as the power supply cord
or the plug, when liquid has been spilled or objects have fallen into the
apparatus, when the apparatus has been exposed to rain or moisture, does
not operate normally, or has been dropped.
12. Do not use a damaged power cord or plug or a loose outlet. Doing so may
result in fire or electric shock.
13. Apparatus shall not be exposed to dripping or splashing and no objects filled
with liquids, such as vases, shall be placed on or near the apparatus.
14. Do not let children play with the product.
15. Do not store the product in extremely cold or warm environments.
16. The appliance is not intended for use by persons (including children) with
reduced physical, sensory or mental capabilies, or lack of experience and
knowledge, unless they have been given supervision or instrucons
concering the use of the appliance by a person responsible for their safety.
2
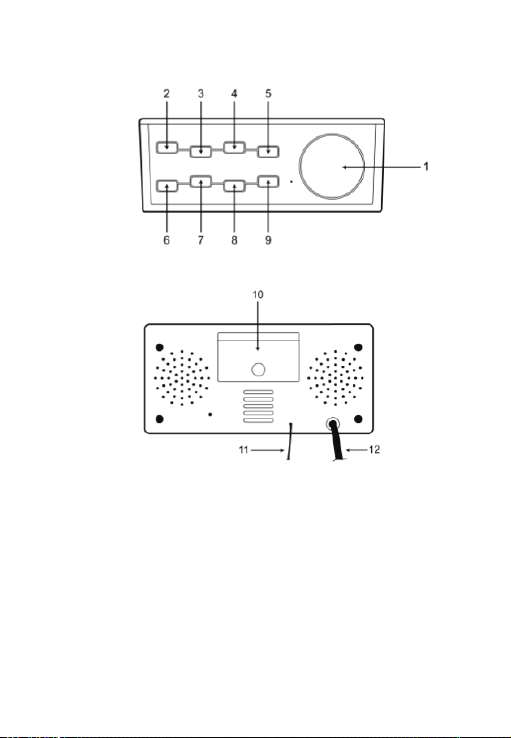
2. Controls and Indicators
1. “SNOOZE / SLEEP / DIM” buon
2. “ON / OFF / NAP” buon
3. “P-“ buon
4. “ALARM 1 / VOL –“ buon
5. “HOUR / TUNING –“ buon
6. “TIME / PRESET” buon
7. “P+” buon
8. “ALARM 2 / VOL +” buon
9. “MIN / TUNING +” buon
10. Baery compartment
11. FM antenna
12. AC plug
Top View
Back View
3
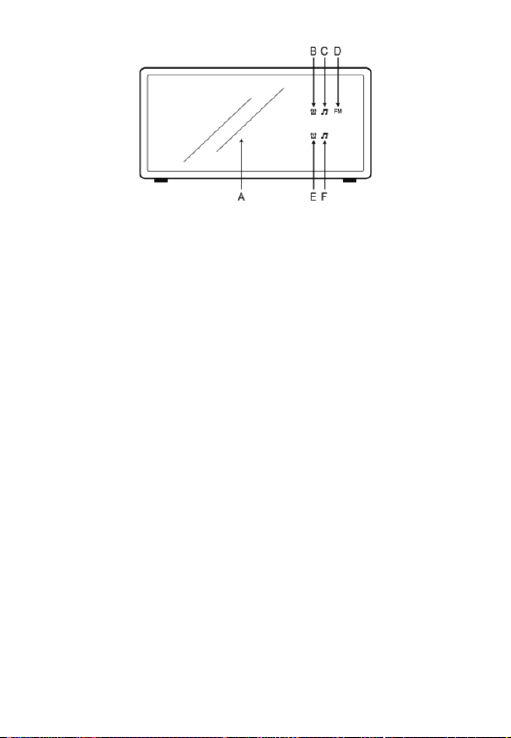
A. Time and radio frequency display
B. Alarm 2 buzzer
C. Alarm 2 radio indicator
D. FM
E. Alarm 1 buzzer
F. Alarm 1 radio indicator
3. Preparaon for Use
This clock radio includes a baery backup system that will maintain the me and
alarm sengs during a temporary power interrupon. Insert two ‘AAA’ size
baeries correctly by matching the polarity (+/-) markings in the baery
compartment (10). If you experience a power failure while baeries are installed,
the display will turn ‘off’ but the clock will connue to run and maintain your
alarm sengs. Please replace all baeries at the same me with only new
baeries.
The clock radio has slip proof silicon feet. Place the clock radio only on protected
furniture.
Plug the AC plug (12) into a 230vac electrical outlet.
Unwind the FM antenna (11) on the back of the clock radio. Extend and
reposion the antenna for the best radio recepon.
4. Alarm Clock Operaon
SETTING THE TIME
Note:
• You cannot set any funcon when the clock display is blinking aer it’s plugged
in, press the “TIME/PRESET” buon to stop the blinking and start the sengs.
Front View
4

• The me can only be set when the radio is turned off. Press the “ON / OFF /
NAP” buon (2) to turn the radio on or off.
• When the clock display is blinking, you cannot power on the radio by the “ON
/ OFF / NAP” buon (2).
1. Press and hold down the “TIME / PRESET” buon (6) for approximately 3
seconds unl the display flashes.
2. Press the “HOUR / TUNING –“ buon (5) repeatedly to change the hour
seng.
3. Press the “MIN / TUNING +“ buon (9) repeatedly to change the minute
seng.
4. Press the “TIME / PRESET” buon (6) to confirm at the me and the display
will stop flashing.
SETTING THE ALARM TIME
This clock radio has dual alarms that can be set and used independently. The
procedure to set both alarms are the same. Both alarms can either sound the
buzzer or wake up to radio.
Note: The alarm me can only be set when the radio is turned off. Press the “ON
/ OFF / NAP” buon (2) to turn radio on or off.
1. For seng alarm me 1 with buzzer, press “ALARM 1 / VOL –“ buon (4)
and indicator (E) will flash. For seng alarm me 1 with radio, press
“ALARM 1 / VOL –“ buon (4) twice and the indicator (F) will flash.
2. When the digits are flashing, press the “HOUR / TUNING –“ buon (5)
repeatedly to change the hour seng. Press the “MIN / TUNING +“ buon (9)
repeatedly to change the minute seng.
3. Press the “ALARM 1 / VOL –“ buon (4) to confirm.
4. To cancel alarm, press the “ALARM 1 / VOL –“ buon (4) three mes when the
current me is showing. The alarm indicators will be off.
5. When the alarm sounds, press any buon to turn off alarm or press the
“SNOOZE / SLEEP / DIM” buon (1) to enter snooze mode. or will
blink during snooze mode. The alarm will sound again aer 5 minutes. The
alarm buzzer does not cut the radio sound. If the alarm waking up by radio is
acvated, the volume control for the radio is not available.
6. Follow the same instrucons for alarm 2 with the “ALARM 2 / VOL +” buon
(8).
5

6
Note:
• You must make the me and alarm me adjustments while the display is
flashing. The display will stop flashing aer approximately 10 seconds if
adjustments are not made.
• If two alarms are set together, for example alarm1 set to buzzer alarm and
alarm2 set to radio alarm, when the buzzer is acvated by alarm1 and radio is
acvated by alarm2, the previous alarm does not stop automacally and has
both the buzzer and radio sound together.
RADIO
General Operaons
1. Press the “ON/OFF/NAP” buon (2) to turn the radio on and off.
2. For manual tuning, press the “HOUR / TUNING –“ buon (5) or the “MIN /
TUNING +“ buon (9) for increments of 0.1mHz.
3. For automac tuning, press and hold down the “HOUR / TUNING –“ buon (5)
or the “MIN / TUNING +“ buon (9) for approximately 3 seconds. Depress the
buon and the radio will start to scan for the next available staon.
4. Press the “ALARM 1 / VOL –“ buon (4) or the “ALARM 2 / VOL +“buon (8)
to adjust the volume level. The display changes to show the volume level
indicaon (00 to 14) during the volume adjustments, then changes back to
the radio staon frequency and then to the current me.
5. Press the “HOUR / TUNING –“ buon (5) or the “MIN / TUNING +“ buon (9)
to show the radio staon frequency.
Pre-set Staon Memory
1. The radio can store up to 20 FM staons.
2. To store a staon in the memory, tune to the desired radio staon. Press and
hold down the “TIME/PRESET” buon (6) for approximately 3 seconds and
“P01” on the display will flash. Press the “P+” buon (7) or “P-“ buon (3) to
the desired staon memory (P01 to P20). Press “TIME/PRESET” buon (6)
once to confirm.
3. Repeat the above steps for up to 20 staons.
4. To recall the staon, press the “P+” buon (7) or “P-“ buon (3) unl the
desired staon is reached.
Sleep Mode
1. When the radio is on, press the “SNOOZE / SLEEP / DIM” buon (1) to enter
the sleep mode. “OFF” will be displayed. Press the “SNOOZE / SLEEP / DIM”
buon (1) repeatedly for the duraon of the “SLEEP” me. The range of
“SLEEP” me is 90 minutes to 10 minutes, as displayed on the screen.

NAP
Set the desired NAP me and the radio will turn on automacally aer the preset
me.
1. When the radio is off, press and hold the “ON / OFF / NAP” buon (2) for
approximately 4 seconds and the display and FM indicator (D) will flash.
2. Press the “P+” buon (7) or “P-“ buon (3) to set the desired nap me (45, 60,
90 or 120 mins)
3. Press the “ON / OFF / NAP” buon (2) to confirm.
DIMMER
When the radio is off and the current me showing, press the “SNOOZE / SLEEP
/ DIM” buon (1) to select the brightness of the display as high or low.
5. Guarantee
ICES offers service and warranty in accordance with the European law, which
means that in case of repairs (both during and aer the warranty period) you
should contact your local dealer.
Important note: It is not possible to send products that need repairs to ICES
directly.
Important note: If this unit is opened or accessed by a non-official service center
in any way, the warranty expires.
This device is not suitable for professional use. In case of professional use, all
warranty obligaons of the manufacturer will be voided.
6. Disclaimer
Updates to Firmware and/or hardware components are made regularly.
Therefore some of the instrucon, specificaons and pictures in this documenta-
on may differ slightly from your parcular situaon. All items described in this
guide are for illustraonal purposes only and may not apply to a parcular
situaon. No legal right or entlements may be obtained from the descripon
made in this manual.
7

7. Disposal of the Old Device
8. CE Marking
Hereby, Lenco Benelux BV, Thermiekstraat 1a, 6361 HB Nuth, The Netherlands,
declares that this product is in compliance with the essenal requirements and
other relevant provisions of Direcve 1999/5/EC.
The declaraon of conformity may be consulted at www.ices-electronics.com
9. Service
For more informaon and helpdesk support, please visit www.ices-
electronics.com
Lenco Benelux BV, Thermiekstraat 1a, 6361 HB, The Netherlands.
This symbol indicates that the relevant electrical product or
baery should not be disposed of as general household
waste in Europe. To ensure the correct waste treatment of
the product and baery, please dispose them in accordance
to any applicable local laws of requirement for disposal of
electrical equipment or baeries. In so doing, you will help
to conserve natural resources and improve standards of
environmental protecon in treatment and disposal of
electrical waste (Waste Electrical and Electronic Equipment
Direcve).
Products with the CE marking comply with the EMC
Direcve (2004/108/EC) and the Low Voltage Direcve
(2006/95/EC) issued by the Commission of the
European Community.
8

Nederlands
1. Veiligheidsvoorschrien
1. Lees, bewaar en volg deze instruces.
2. Dit apparaat is uitsluitend bestemd voor huishoudelijk gebruik.
3. Controleer of de spanning op het specificaeplaatje van uw apparaat
overeenkomt met het lichtnet in uw huis (specificaeplaatje is te vinden op
de achterzijde van het apparaat).
4. Gebruik het apparaat niet in de buurt van water.
5. Blokkeer geen van de venlaeopeningen. Installeer het apparaat volgens de
instruces van de fabrikant.
6. Niet installeren in de buurt van hiebronnen zoals radiateurs, hieroosters,
kachels of andere hie genererende apparatuur (waaronder versterkers).
7. Houd het veiligheidsdoeleinde van de gepolariseerde stekker of aardstekker
intact. Een gepolariseerde stekker hee twee uiteindes, waarbij de ene breder
is dan de andere. Een aardstekker hee twee uitsteeksels met een derde
aardpen. Het bredere uitsteeksel of de derde pen is voorzien voor uw
veiligheid. Mocht de geleverde stekker niet in uw stopcontact passen,
raadpleeg dan a.u.b. een elektromonteur voor vervanging van het verouderde
stopcontact (Alleen voor het Verenigd Koninkrijk van toepassing).
8. Zorg ervoor dat niemand op de voedingskabel kan gaan staan of dat de kabel
kan worden ingedrukt, voornamelijk bij stekkers, stopcontacten en het punt
waar kabels uit het apparaat komen.
9. Gebruik uitsluitend uitbreidingen/accessoires gespecificeerd door de
fabrikant.
10. Haal de stekker uit het stopcontact jdens onweer of wanneer u het apparaat
voor langere jd niet gebruikt.
11.Laat alle reparaes over aan gekwalificeerd onderhoudspersoneel. Reparae
is vereist wanneer het apparaat op enige wijze beschadigd is geraakt,
bijvoorbeeld een beschadigde voedingskabel of stekker, vloeistof of voorwer
pen zijn in het apparaat terechtgekomen, het apparaat is blootgesteld aan
regen of vocht, het apparaat werkt abnormaal of is gevallen.
12. Gebruik nooit een beschadigde voedingskabel of stekker of een los stopcon
tact. Dit vormt namelijk een risico op brand of elektrische schokken.
13. Het apparaat mag niet worden blootgesteld aan druppelend of opspaend
water en er mogen geen voorwerpen gevuld met vloeistoffen, zoals vazen, op
het apparaat worden geplaatst.
14. Laat kinderen dit product niet als speelgoed gebruiken.
15. Berg het product niet op in extreem koude of warme omgevingen.
9
Autres manuels pour ICR-240
1
Table des matières
Langues :
Autres manuels iCES Radio-réveil


