Hyco Maestro MAC3X Manuel utilisateur

Maestro 3kW
Air Curtain
MAC3X
Instruction Manual
Version 1.0 September 2014
MAC3X_Layout 1 24/10/2014 15:09 Page 1

P EASE READ THESE INSTRUCTIONS BEFORE
COMMENCING INSTA ATION. UPON COMP ETION
OF INSTA ATION ENSURE THE INSTRUCTIONS ARE
EFT WITH THE USER/MAINTAINER OF THE PRODUCT.
Maestro 3kW Air Curtain
MAC3X
1. INTRODUCTION
Thank you for purchasing a Hyco Maestro air curtain heater. With its three heat
settings, including fan only, the Maestro air curtain provides heating for all conditions
throughout the year.
2
MAC3X_Layout 1 24/10/2014 15:09 Page 2

2. IMPORTANT SAFETY POINTS
THE APP IANCE MUST ON Y BE CONNECTED TO A SING E PHASE
SUPP Y.
THE PRODUCT SHOU D ON Y BE CONNECTED TO A SUPP Y THAT
MEETS THE SPECIFICATIONS DETAI ED ON THE RATING ABE .
THE APP IANCE IS NOT INTENDED FOR USE BY PERSONS
(INC UDING CHI DREN) WITH REDUCED PHYSICA , SENSORY OR
MENTA CAPABI ITIES, OR ACK OF EXPERIENCE AND KNOW EDGE,
UN ESS THEY HAVE BEEN GIVEN SUPERVISION OR INSTRUCTION
CONCERNING THE SAFE USE OF THE APP IANCE BY A PERSON
RESPONSIB E FOR THEIR SAFETY.
DO NOT USE THE HEATER IF THE POWER CORD SHOWS ANY SIGN
OF DAMAGE.
CHI DREN SHOU D BE SUPERVISED TO ENSURE THEY DO NOT P AY
WITH THE APP IANCE.
NOT SUITAB E FOR OUTDOOR USE.
WARNING: IN ORDER TO AVOID OVERHEATING, DO NOT COVER
THE HEATER.
THE SURFACE OF THIS APP IANCE CAN BECOME HOT; NEVER EAVE
VERY YOUNG CHI DREN OR VERY VU NERAB E PEOP E UNSUPERVISED
WITH THE HEATER.
CHI DREN AND VU NERAB E PEOP E SHA NOT BE A OWED TO
C EAN OR PERFORM MAINTENANCE OF THE HEATER UNSUPERVISED.
3
MAC3X_Layout 1 24/10/2014 15:09 Page 3

3. INSTA ATION
SE ECT A SUITAB E SURFACE TO MOUNT THE HEATER ON.
THE HEATER MUST NOT BE OCATED IMMEDIATE Y BE OW A SOCKET.
THE HEATER MUST BE MOUNTED AT EAST 1 METRE AWAY FROM
ANY COMBUSTIB E MATERIA S SUCH AS FURNITURE, CURTAINS,
BEDDING ETC...
WARNING: THIS HEATER IS NOT EQUIPPED WITH A DEVICE TO
CONTRO THE ROOM TEMPERATURE. DO NOT USE THE HEATER
IN SMA ROOMS WHEN THEY ARE OCCUPIED BY PERSONS NOT
CAPAB E OF EAVING THE ROOM ON THEIR OWN, UN ESS
CONSTANT SUPERVISION IS PROVIDED.
1 Remove the four screws and lift away the air inlet cover as shown below.
4
1
MAC3X_Layout 1 24/10/2014 15:10 Page 4

5
2 oosen the bolts retaining the bracket inside the heater and remove the
bracket from the heater completely.
ENSURE THERE ARE NO HIDDEN CAB ES OR PIPES BEFORE
COMMENCEMENT OF DRI ING.
3 Choose the final mounting position of the heater. Consider the orientation
required for the heater to ensure it will adhere to all previous warnings.
2
3
CEILING
WALL WALL WALL
1
MAC3X_Layout 1 24/10/2014 15:10 Page 5

6
4 Ensuring a horizontal level, offer up the bracket and mark the mounting
holes onto the surface. Drill the marked holes and insert the wall plugs
before screwing the bracket firmly to the surface (ensure the bracket is
the correct way up as per the diagram).
5 Offer up the heater to the bracket and locate the mounting bolts into the
bracket lugs. Tighten the lugs enough to aid the orientation of the heater
before tightening them firmly to prevent any future movement. Finally
replace the air inlet cover on the front of the heater.
4
5
MAC3X_Layout 1 24/10/2014 15:10 Page 6

4. E ECTRICA CONNECTION
E ECTRICA INSTA ATION MUST BE CARRIED OUT BY A QUA IFIED
E ECTRICIAN IN ACCORDANCE WITH THE ATEST EDITION OF THE
IEE WIRING REGU ATIONS.
IF THE HEATER IS TO BE CONNECTED TO THE FIXED WIRING OF
THE PROPERTY THEN INSTA ATION MUST INC UDE A DOUB E PO E
ISO ATING SWITCH WITH A BREAK CONTACT DISTANCE OF AT
EAST 3MM.
Electrical connections should be made as follows:
Green/Yellow earth wire to the terminal marked “E” or
Brown/Red live wire to the terminal marked “ ”
Blue/Black neutral wire to the terminal marked “N”
7
MAC3X_Layout 1 24/10/2014 15:10 Page 7

5. OPERATION
Fan ON/OFF
I Heating ON/OFF
II Heating ON/OFF
Settings
Fan only = Fan ON, I OFF, II OFF
Half power (1500W) = Fan ON, I ON, II OFF
Half power (1500W) = Fan ON, I OFF, II ON
Full power (3000W) = Fan ON, I ON, II ON
NOTE: The fan must be ON for the heater to operate.
8
123
1
2
3
MAC3X_Layout 1 24/10/2014 15:10 Page 8

6. C EANING & MAINTENANCE
BEFORE C EANING AND MAINTENANCE A WAYS ENSURE THE
UNIT IS DISCONNECTED FROM THE POWER SUPP Y AND
COO ED COMP ETE Y.
Use a vacuum cleaner to clear the inlet and outlet vents of any dust or debris.
To clean the surface simply wipe with a clean damp cloth. Do not use any harsh
or abrasive cleaning chemicals.
7. THERMA PROTECTION
The heater is fitted with two levels of overheat protection. An auto resetting thermal
cut-out will disable the heating element in the first instance of an over-heat, this will
automatically reset upon the heater cooling to a safe temperature. The second level
of safety against over heat is a thermal fuse which will not reset and cannot be
replaced.
For technical faults contact Hyco on 01924 225200.
9
MAC3X_Layout 1 24/10/2014 15:10 Page 9
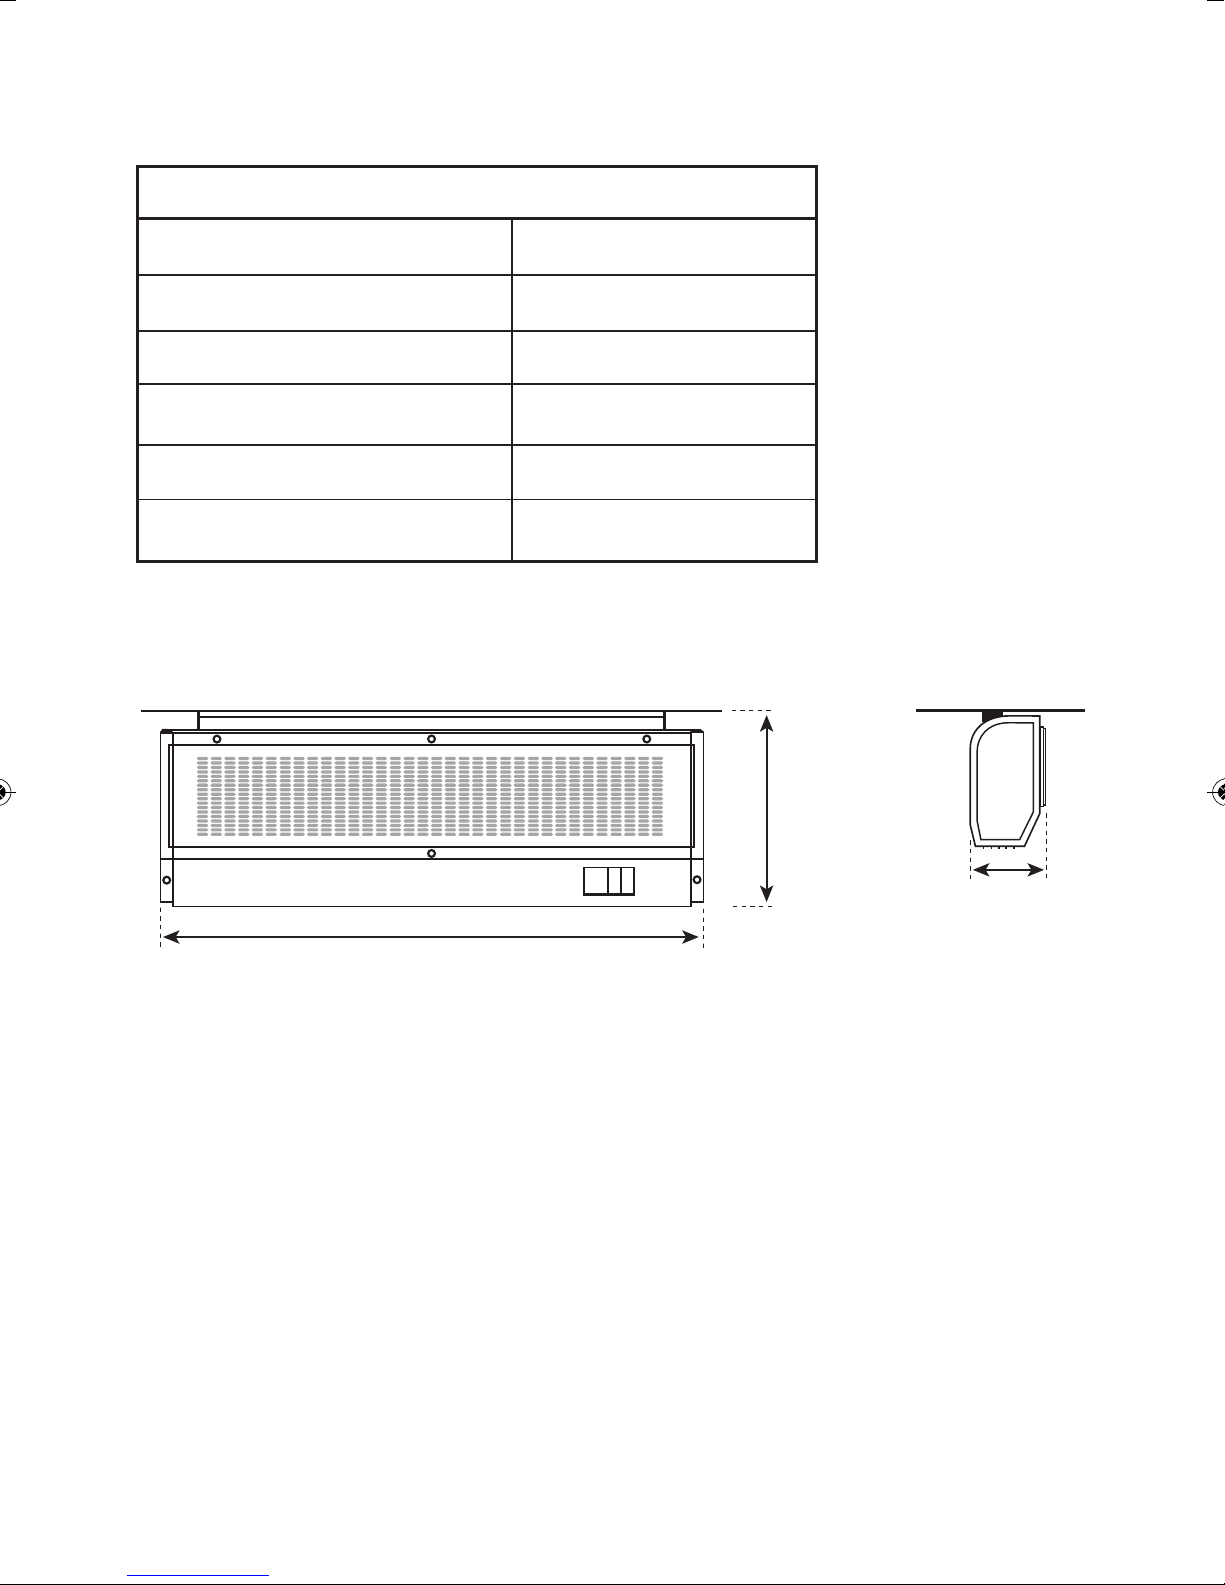
8. SPECIFICATIONS
MAC3X
Supply 230V ~ 50Hz
IP rating IPX0
Power 1500/3000W
Sound level 60 decibels
Airflow 254m3
Weight 5.2kg
10
105mm
580mm
205mm
CEILING CEILING
MAC3X_Layout 1 24/10/2014 15:10 Page 10
Table des matières


