
Hwasung HMKP-830 Manuel utilisateur
User Manual
HMKP-830
Title
Rev.
Page
HMKP-830
Ver1.0
P.1
※Safety Caution!
Caution : Please follow the direction in using the product as it may become the reason of
malfunction, serious injury, or even death.
Do not disassemble or modify the product.
Do not remove jammed paper while power is turned on.
Do not go over the specified voltage.
Do not wash the product.
Do not hit or cause an impact to the product.
Do not store the product in the wet / humid place.
Caution : Please follow the direction in using the product as it may become the reason of
malfunction, serious injury, or even death.
Please contact us to take an action when product fails.
Please power off during the removal of any matter.
Please ventilate the air circulation in closed area.
Please install the product away from the near interferences.
Please install the wiring in a safe place.
Please follow the directed terms of compliance in using the electrical product.

Title
Rev.
Page
HMKP-830
Ver1.0
P.2
List of Contents
1. Printer features & External dimension ................................................................... 3
1-1) Name of each parts ................................................................................... 3
1-2) External Dimension .................................................................................... 4
1-3) Instruction on Equipping MECHANISM .......................................................... 5
1-4) Model Number .......................................................................................... 6
2. Operation ......................................................................................................... 7
2-1) Variable Paper Setting ................................................................................ 7
2-2) Paper Change ........................................................................................... 8
2-2-1) Clamshell Method ............................................................................ 8
2-2-2) Auto-loading Method ....................................................................... 9
2-3) Jam Removal .......................................................................................... 10
2-4) Presenter Jam Removal ............................................................................ 10
2-5) Self-Test................................................................................................ 11
2-6) HEX Dump Print ...................................................................................... 12
2-7) On-Board Update ................................................................................... 13
2-8) Firmware Restoration (Rebooting Firmware) ................................................ 14
2-9) Communication Setting ............................................................................ 17
2-10) Memory Switch...................................................................................... 20
3. General Specification....................................................................................... 23
3-1) Printer Specification................................................................................. 23
3-2) Power .................................................................................................... 23
3-3) Paper Supply Load .................................................................................. 23
3-4) Weight ................................................................................................... 23
3-5) Operating Temperature / Humidity ............................................................. 23
3-6) Storing Temperature / Humidity ................................................................. 23
3-7) MCBF .................................................................................................... 23
3-8) Presenter Specification ............................................................................ 23
4. Interface Specification ..................................................................................... 24
4-1) RS232C ................................................................................................. 24
4-2) USB....................................................................................................... 24
4-3) Ethernet ................................................................................................. 24
5. Commands..................................................................................................... 25
6. Windows Driver ............................................................................................... 58
6-1) Printer Function Configuration ................................................................... 58
6-2) Paper Supply Configuration ...................................................................... 59
6-3) Making New Paper Format ........................................................................ 60
7. Ticket Standard............................................................................................... 62
8. USB Communication User Interface ................................................................... 64
9. Ethernet Settings............................................................................................. 67
*Manual Update Records ..................................................................................... 69
Title
Rev.
Page
HMKP-830
Ver1.0
P.3
1. Printer features & External dimension
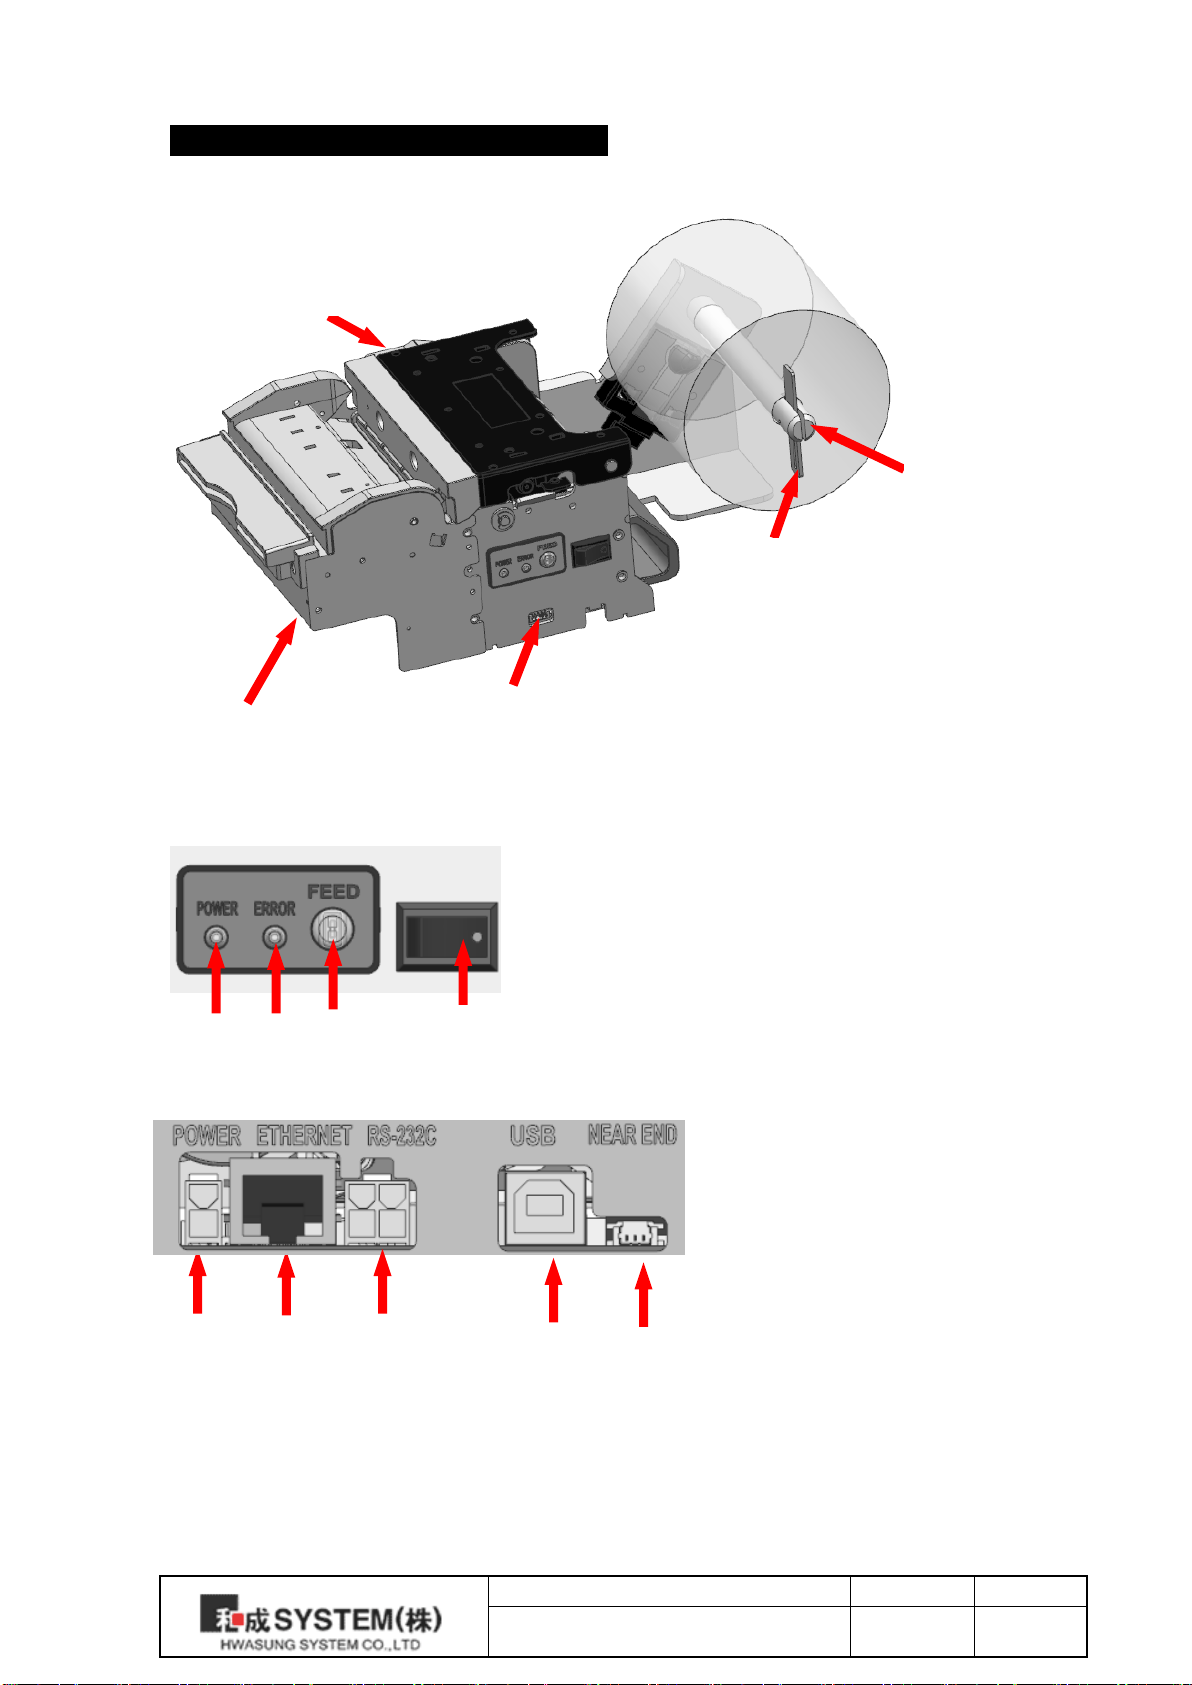
1-1) Printer Features
32 41
Paper Roll
Holder
Paper Holder
Fixture
Lever
Frame
(control board)
Presenter
1. Power Switch
2. Error LED
3. Power LED
4. Feed Button
5. DC (24VDC)
6. Comm. Connector (Ethernet)
7. Comm. Connector (Serial, Female 4 pin)
8. Comm. Connector (USB, Type B)
9. Near End Sensor Connector
5 6 7 8 9
REAR
[Image1-
1]
[Image1-
2]
[Image1-
3]
Title
Rev.
Page
HMKP-830
Ver1.0
P.4
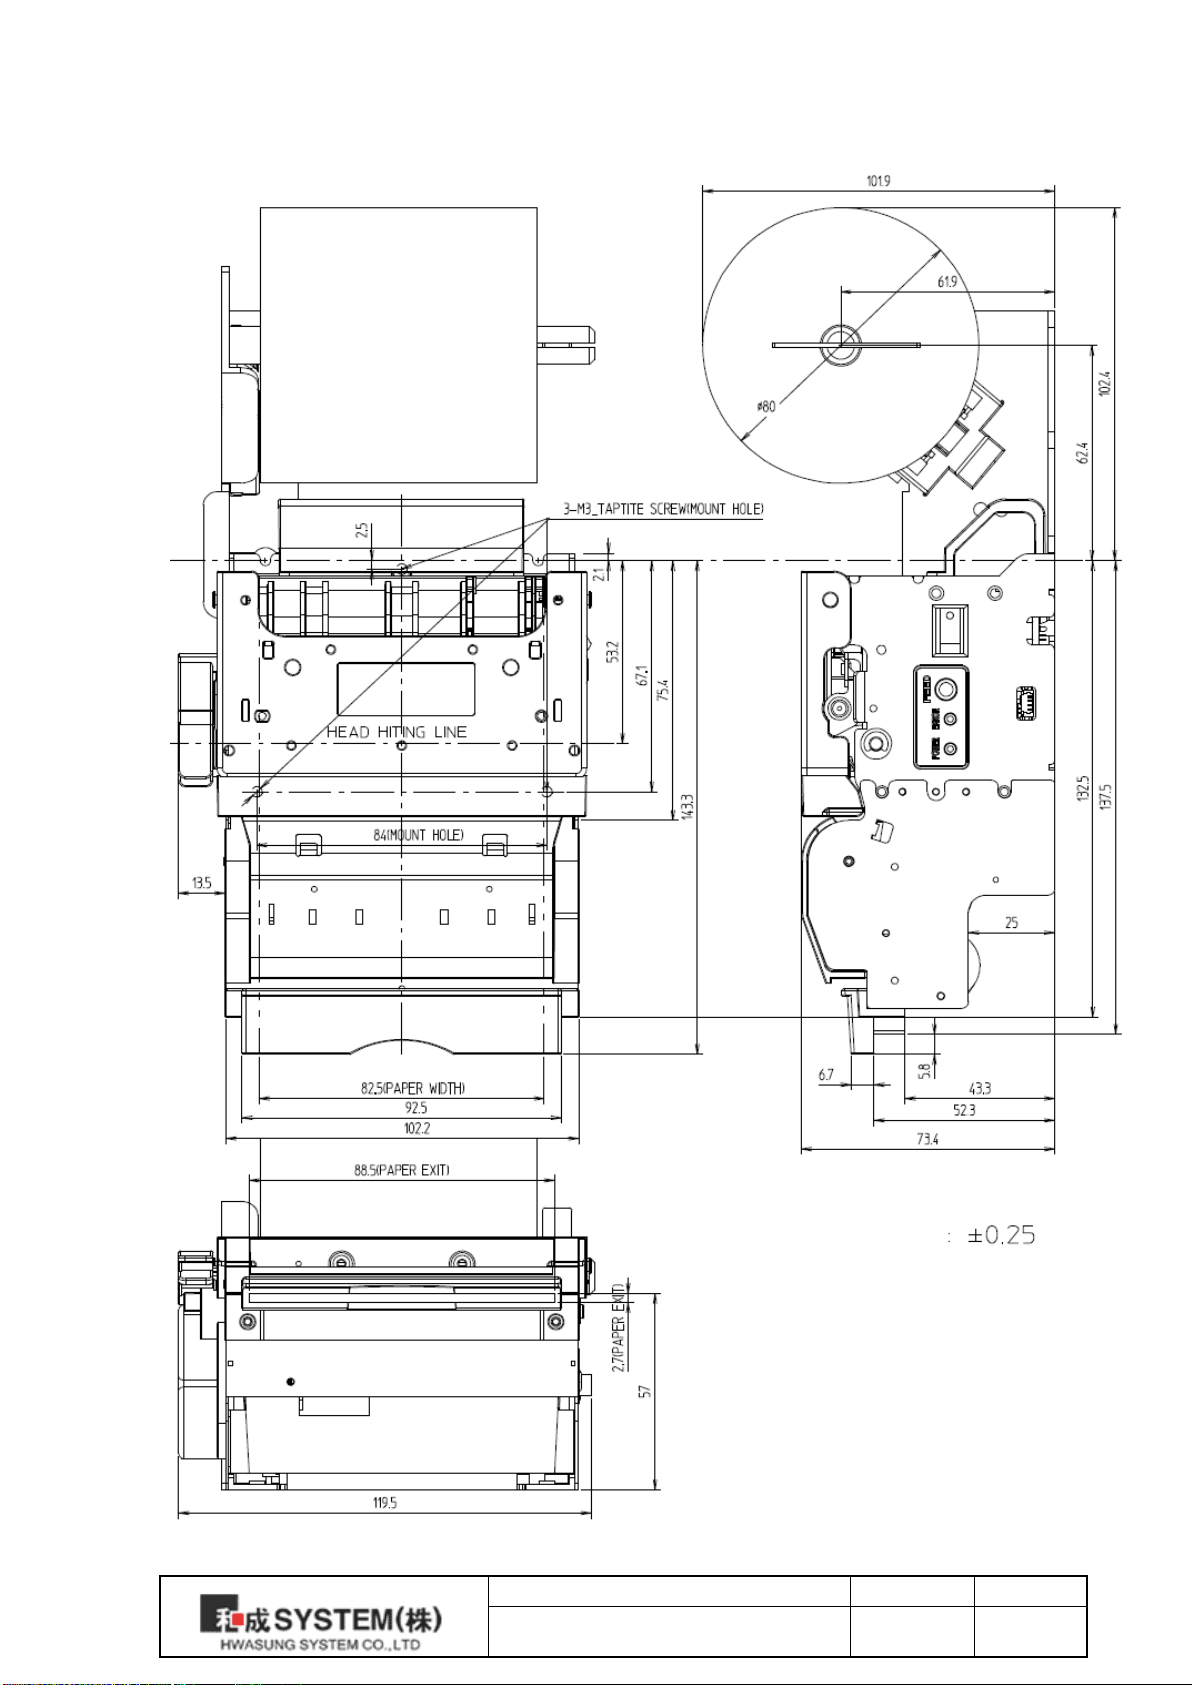
1-2) External Dimension
[Image1-4]Standard Type
TOLERANC
E
Title
Rev.
Page
HMKP-830
Ver1.0
P.5
1-3) Instruction on equipping MECHANISM
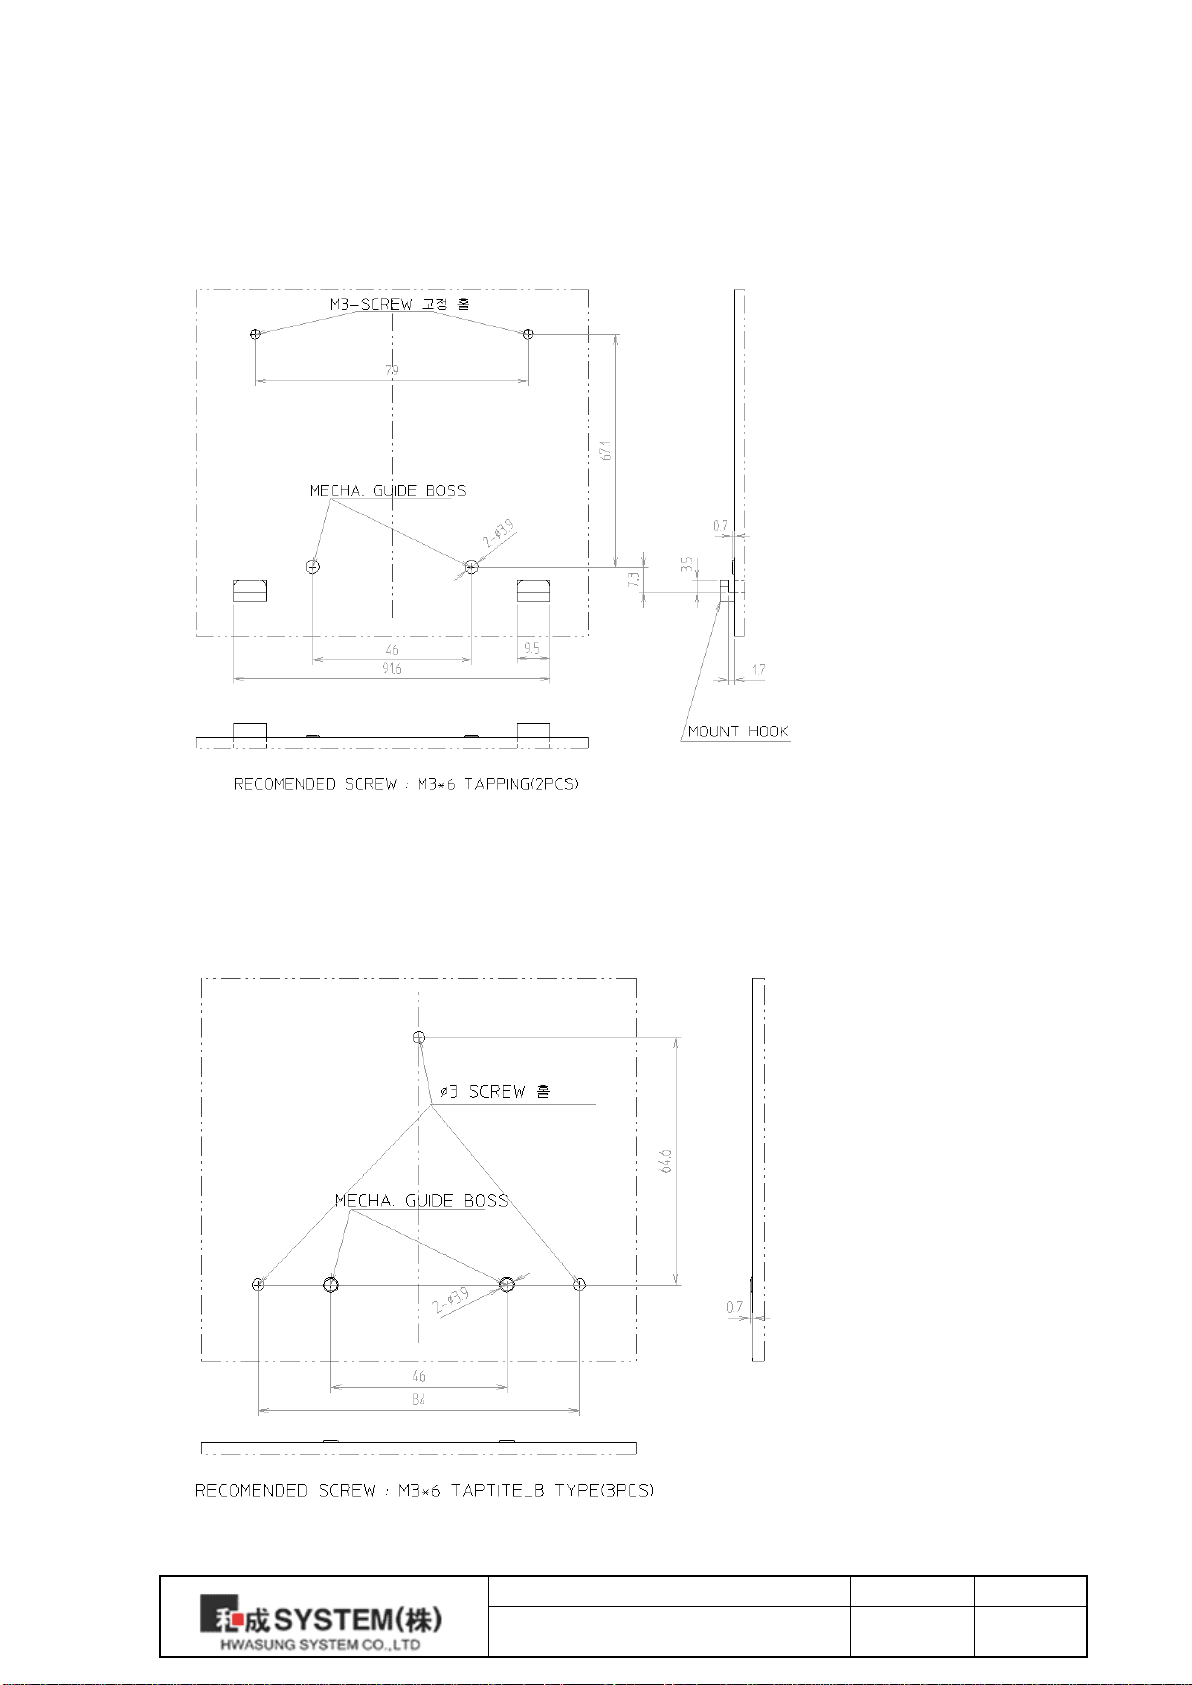
Please use one of the option below to fix the PRINTER MECHANISM on the SET.
1-3-1) Instruction on securing from theTop side
Example of Guide and Hole location on the SET SIDE
Secure using two HOOKS on the FRONT side and use two SCREWS to secure the REAR
side.
1-3-2) Instruction on securing from the BOTTOM SIDE
Example of Guide and Hole location on the SET SIDE
Secure using 3 SCREWS at the BOTTOM side.

Title
Rev.
Page
HMKP-830
Ver1.0
P.6
1-4)modle Number
HM□□-830
※Frame Type
K : Kiosk (Fixture) Type
C : Control Board Type
※Option Type
Blank : Standard Type
P: Presenter Type
Title
Rev.
Page
HMKP-830
Ver1.0
P.7
2. Operation
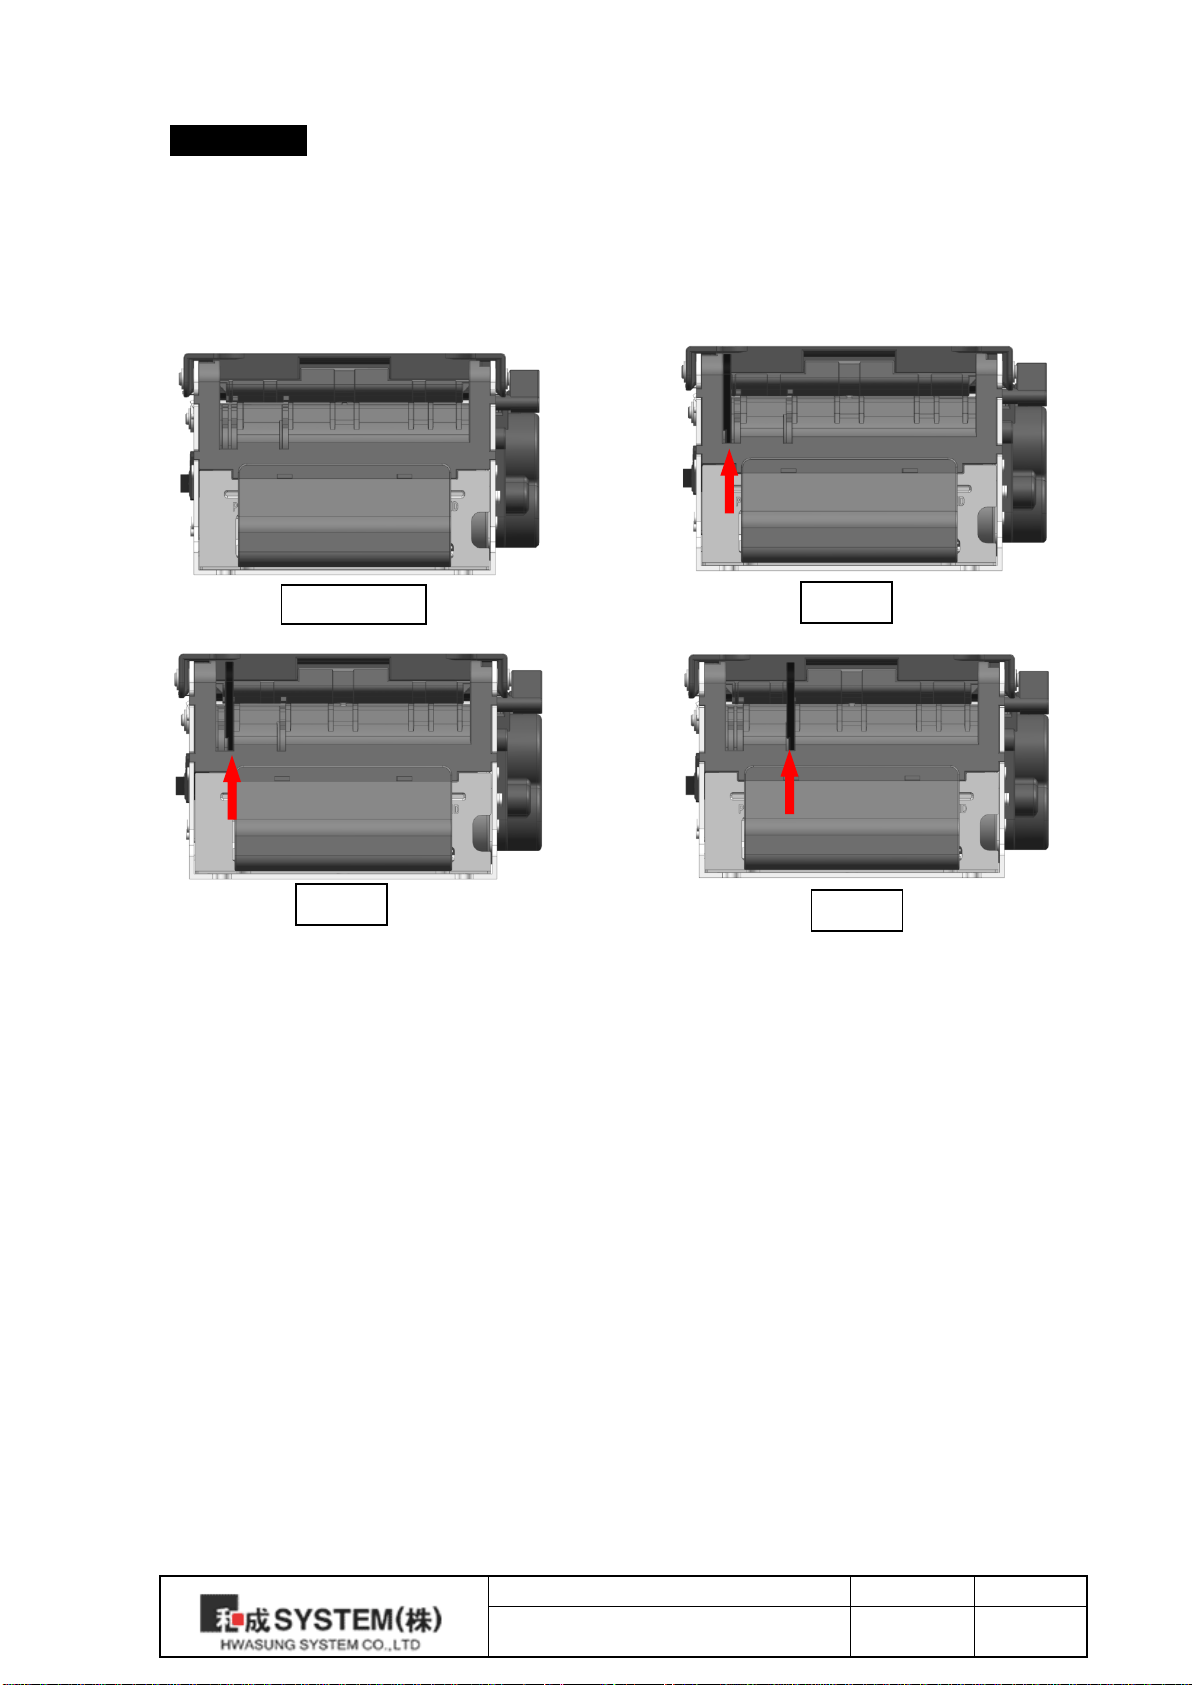
2-1) Variable Paper Setting
[Image2-1]
82.5mm
80mm
77mm
60mm
* Insert the guide into the groove of the paper entry as shown on the image to use different
size of papers accordingly.
Title
Rev.
Page
HMKP-830
Ver1.0
P.8
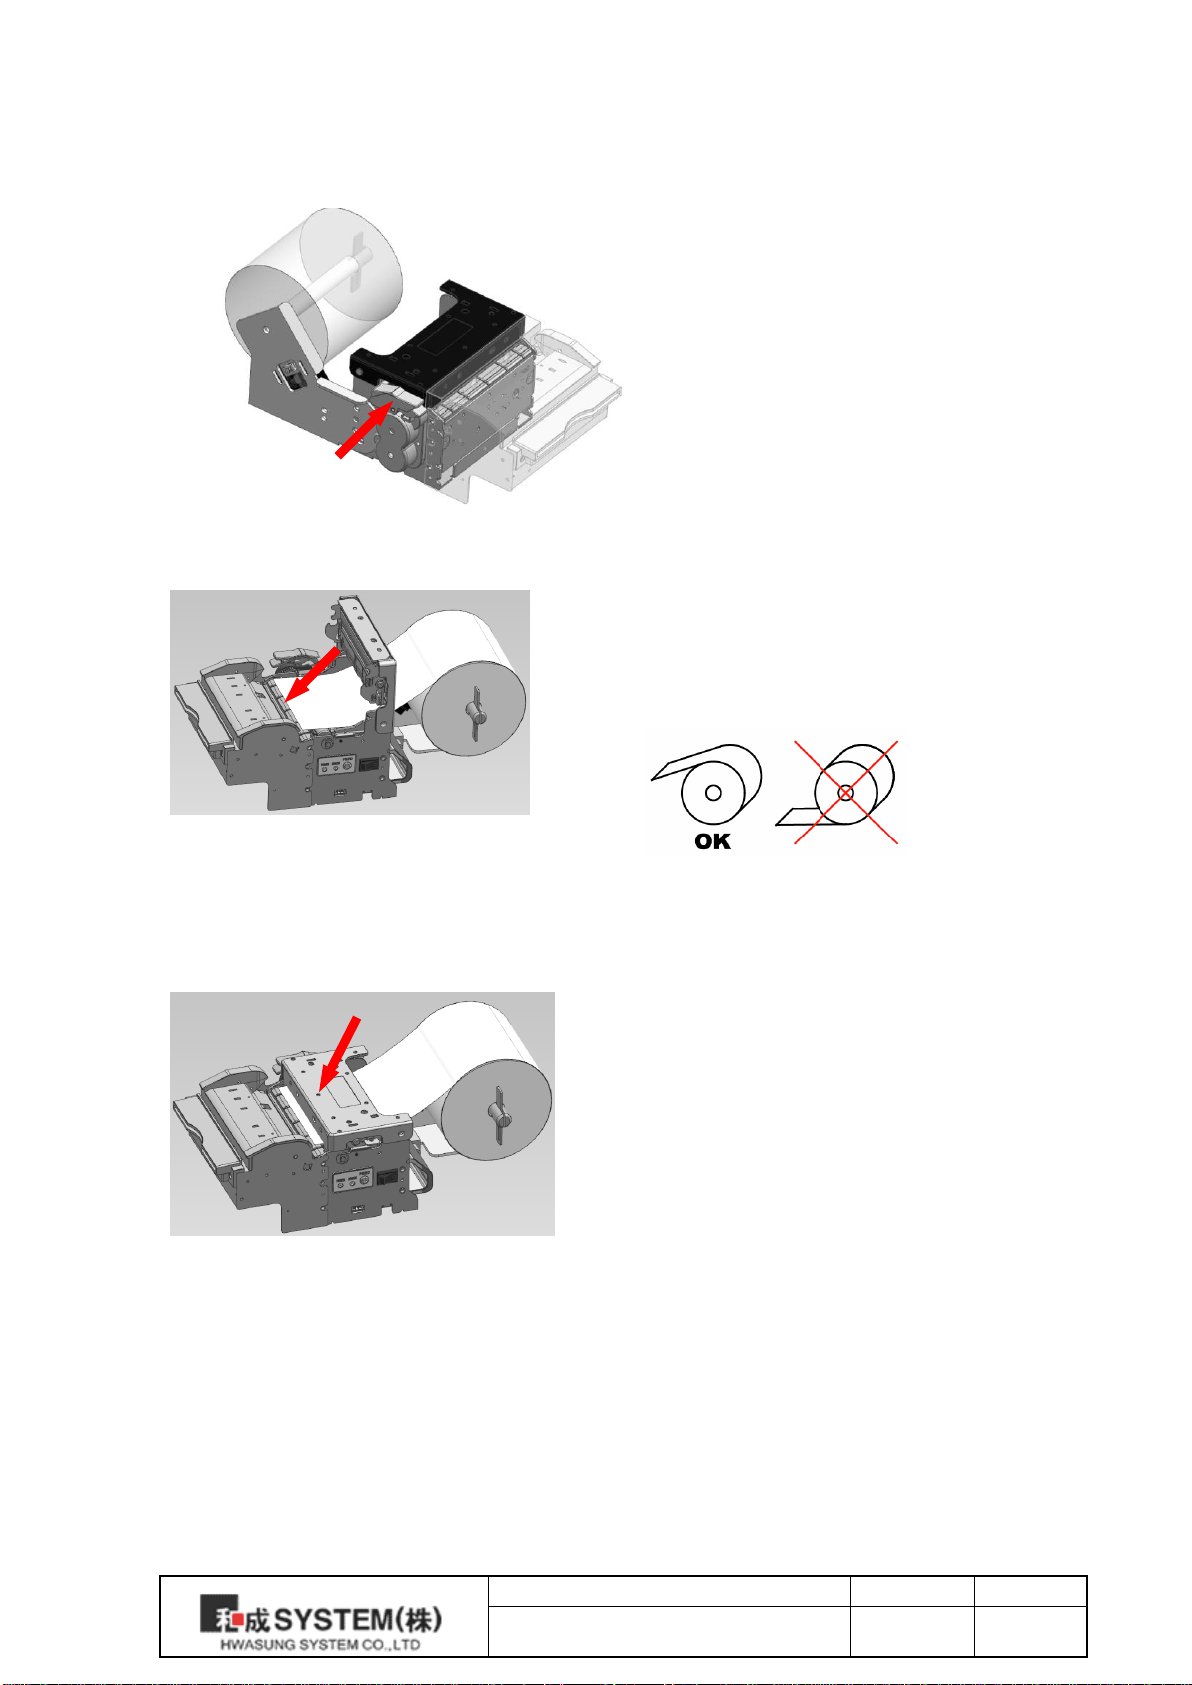
2. Insert the paper through the feeding entrance. Be
cautious of not changing the diretion of the paper rolls.
Insert the paper until the end of the paper is protruding
from the cutter.
3. Close the cover in the direction of the arrow in [Image 2-
4]. After changing the rolls, press the feed button to
check if the paper is feeding properly.
*If paper does not feed out properly, open the cover and
insert the paper again.
2-2) Paper Change
There are two ways to change the paper.
2-2-1) Clamshell Methods
[Image2-2]
[Image2-3]
[Image2-5]
[Image2-4]
1. Press the Open Lever outwards to open
the cover.
Lever
Title
Rev.
Page
HMKP-830
Ver1.0
P.9
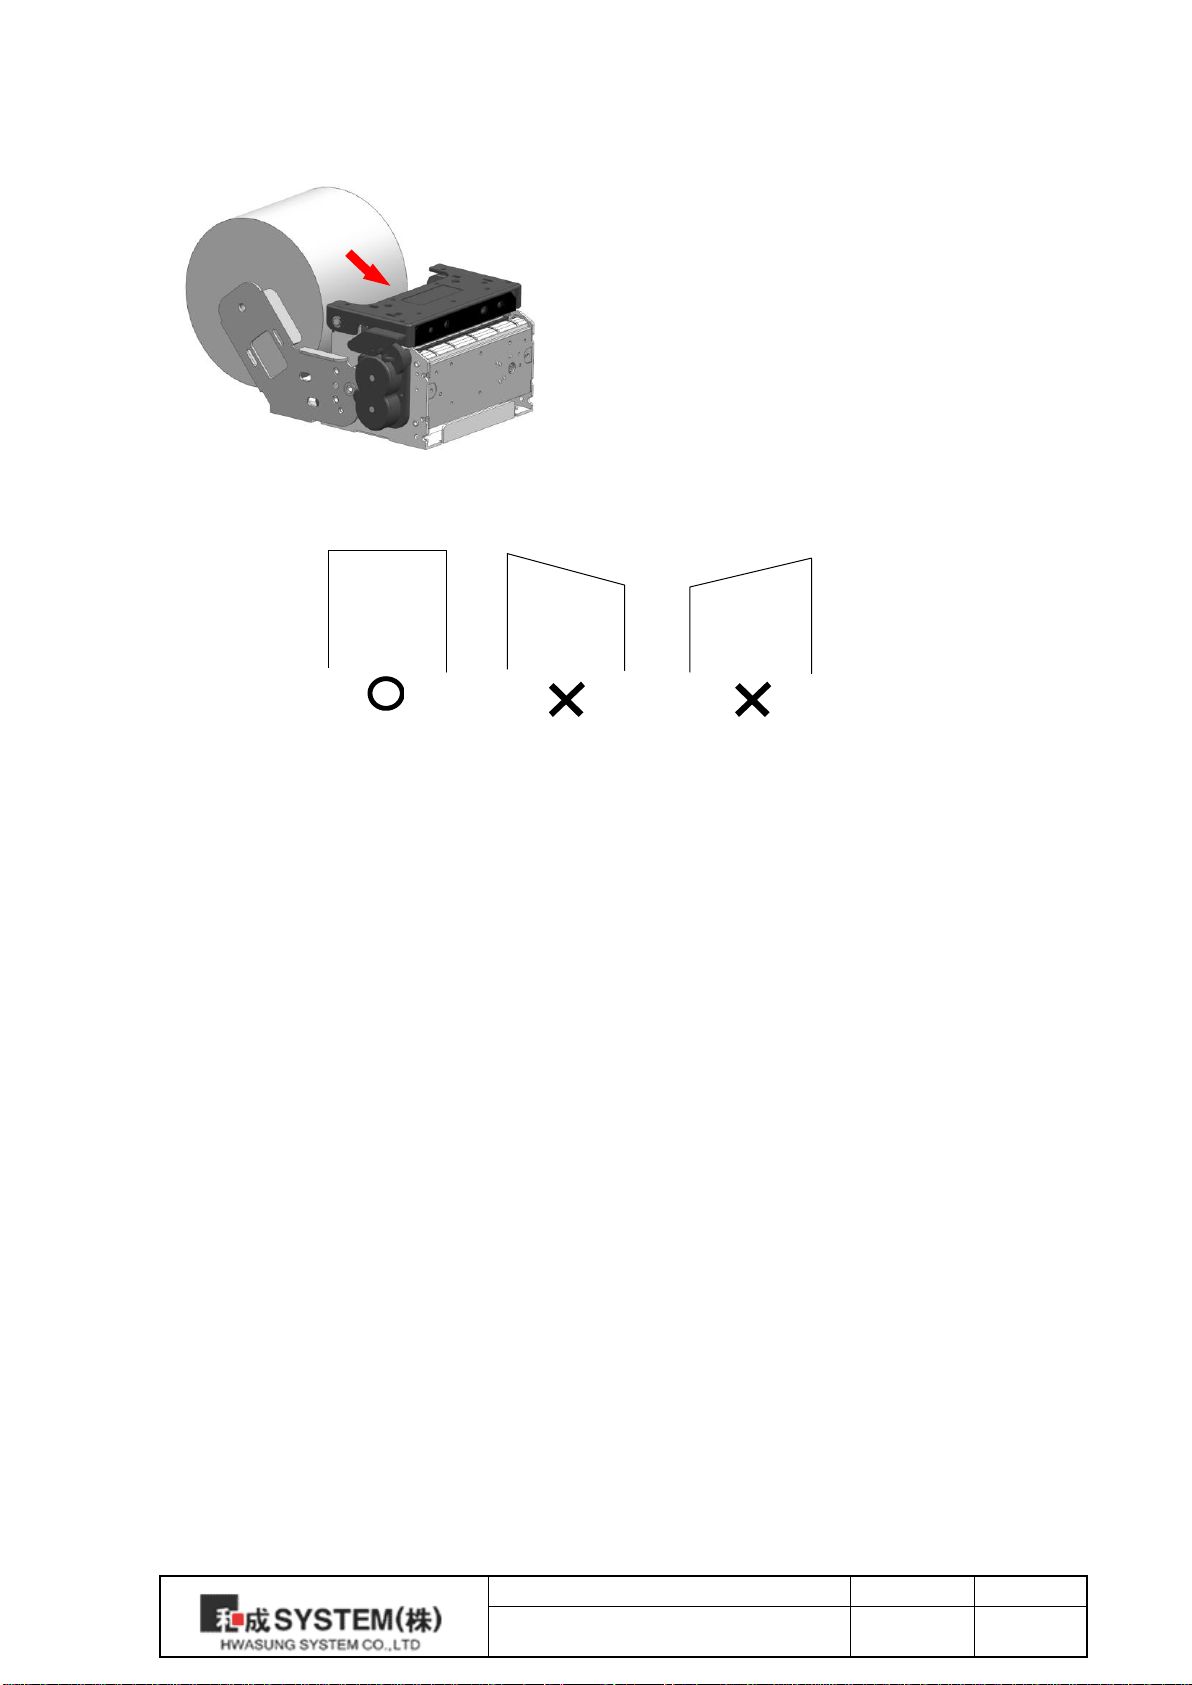
2-2-2) Auto Loading Method
※Deeply push the paper into the feeding entrance.
※You may hear the motor work noise but that is
normal.
[Image2-7]
[Image 2-6]
3. Push the paper into the feeding entrance
while the cover is shut, the printer will start
the auto load and it will cut the paper after
feeding it to a certain point.
1. Turn on the Printer’s Power
2. Cut out the end of the paper as shown in
[Image 2-7]
..
Table des matières
Autres manuels Hwasung Plieuse


