Honeywell MPA1 Manuel utilisateur

Document -800-26311_Rev-B – July 2020
Access Control Unit
MPA1 User Guide

Revisions
Rev Date Revisions
A 02/2020 Document created.
B 07/2020 Document updated with ULC Features

| 1
Document 800-26311
Contents 1
1 Contents . . . . . . . . . . . . . . . . . . . . . . . . . . . . . . . . . . . . . . . . . . . . . . . . . . . . . . . . . . . . . . . . . . . . 1
1 Getting Started . . . . . . . . . . . . . . . . . . . . . . . . . . . . . . . . . . . . . . . . . . . . . . . . . . . . . . . . . . . . . . 5
Overview . . . . . . . . . . . . . . . . . . . . . . . . . . . . . . . . . . . . . . . . . . . . . . . . . . . . . . . . . . . . . . . . . . . . . . . . . . . . . . . . . . . . . . . . . . . . . 5
Connecting to the Web Server . . . . . . . . . . . . . . . . . . . . . . . . . . . . . . . . . . . . . . . . . . . . . . . . . . . . . . . . . . . . . . . . . . . . . . . 5
Setting Up an Ethernet Port 6
Navigating through MPA . . . . . . . . . . . . . . . . . . . . . . . . . . . . . . . . . . . . . . . . . . . . . . . . . . . . . . . . . . . . . . . . . . . . . . . . . . . 10
The MPA1 Dashboard 10
Accessing the Menu 11
2 Basic Settings . . . . . . . . . . . . . . . . . . . . . . . . . . . . . . . . . . . . . . . . . . . . . . . . . . . . . . . . . . . . . . 17
Overview . . . . . . . . . . . . . . . . . . . . . . . . . . . . . . . . . . . . . . . . . . . . . . . . . . . . . . . . . . . . . . . . . . . . . . . . . . . . . . . . . . . . . . . . . . . . 17
Configuring the EVL (Ethernet Virtual Group). . . . . . . . . . . . . . . . . . . . . . . . . . . . . . . . . . . . . . . . . . . . . . . . . . . . . . . 18
What is an EVL? 18
Network Requirements 18
Setting for EVL mode 19
Creating an EVL 19
Managing Configuration Data . . . . . . . . . . . . . . . . . . . . . . . . . . . . . . . . . . . . . . . . . . . . . . . . . . . . . . . . . . . . . . . . . . . . . . 23
Configuring Host/Loop Communications 24
Initial Panel Setup . . . . . . . . . . . . . . . . . . . . . . . . . . . . . . . . . . . . . . . . . . . . . . . . . . . . . . . . . . . . . . . . . . . . . . . . . . . . . . . . . . 27
Entering a Panel Name 28
Configuring the Network Settings 29
Configuring Time Management 30
Configuring Spaces. . . . . . . . . . . . . . . . . . . . . . . . . . . . . . . . . . . . . . . . . . . . . . . . . . . . . . . . . . . . . . . . . . . . . . . . . . . . . . . . . 38
Configuring Spaces 38
Configuring Doors 42
Configuring Door Outputs 50
Configuring Panel I/O and Groups 52
Configuring Card Formats 57
Managing Site Codes 61
Configuring Interlocks 63
Configuring People and Cards . . . . . . . . . . . . . . . . . . . . . . . . . . . . . . . . . . . . . . . . . . . . . . . . . . . . . . . . . . . . . . . . . . . . . . 66
Configuring People 66
Configuring Cards 69
Configuring Access Groups . . . . . . . . . . . . . . . . . . . . . . . . . . . . . . . . . . . . . . . . . . . . . . . . . . . . . . . . . . . . . . . . . . . . . . . . . 73
Creating a New Access Group 74
3 Monitoring and Reporting . . . . . . . . . . . . . . . . . . . . . . . . . . . . . . . . . . . . . . . . . . . . . . . . . . 77
Monitoring. . . . . . . . . . . . . . . . . . . . . . . . . . . . . . . . . . . . . . . . . . . . . . . . . . . . . . . . . . . . . . . . . . . . . . . . . . . . . . . . . . . . . . . . . . 77
Monitoring Alarms and Events 77
Monitoring/Managing Doors 80
Monitoring Inputs 81
Monitoring Outputs 82
Monitoring Output Group 83
Reporting . . . . . . . . . . . . . . . . . . . . . . . . . . . . . . . . . . . . . . . . . . . . . . . . . . . . . . . . . . . . . . . . . . . . . . . . . . . . . . . . . . . . . . . . . . . 86

www.honeywell.com/security
2 | MPA1 User Guide
Generating Event Reports 86
Generating Diagnostic Reports 87
Generating People/Card Reports 88
4 Maintenance . . . . . . . . . . . . . . . . . . . . . . . . . . . . . . . . . . . . . . . . . . . . . . . . . . . . . . . . . . . . . . . 89
Overview . . . . . . . . . . . . . . . . . . . . . . . . . . . . . . . . . . . . . . . . . . . . . . . . . . . . . . . . . . . . . . . . . . . . . . . . . . . . . . . . . . . . . . . . . . . . 89
Backing Up . . . . . . . . . . . . . . . . . . . . . . . . . . . . . . . . . . . . . . . . . . . . . . . . . . . . . . . . . . . . . . . . . . . . . . . . . . . . . . . . . . . . . . . . . 89
Upload (From Panel) 90
Backing Up (or Uploading) Other Data from the Panel to the Host System 90
Synchronizing a New Panel with Information on an Existing Panel . . . . . . . . . . . . . . . . . . . . . . . . . . . . . . . . .95
Replace a Primary Panel in an Existing Loop (Web Mode) . . . . . . . . . . . . . . . . . . . . . . . . . . . . . . . . . . . . . . . . . .95
Overview 95
Primary Panel Replacement and System Wide Restore 95
Replace a Secondary Panel (Web Mode) . . . . . . . . . . . . . . . . . . . . . . . . . . . . . . . . . . . . . . . . . . . . . . . . . . . . . . . . . . . . 96
Overview 96
Secondary Panel Replacement and Synchronization 96
Hard Default a Primary in an Existing Loop (Web Mode). . . . . . . . . . . . . . . . . . . . . . . . . . . . . . . . . . . . . . . . . . . . 96
Overview 96
Primary | Secondary Panel Synchronization (Hard Default) 96
Hard Default an Existing Secondary Panel (Web Mode) . . . . . . . . . . . . . . . . . . . . . . . . . . . . . . . . . . . . . . . . . . . .97
Overview 97
Primary | Secondary Panel Synchronization (Hard Default) 97
Synchronization Detail Chart . . . . . . . . . . . . . . . . . . . . . . . . . . . . . . . . . . . . . . . . . . . . . . . . . . . . . . . . . . . . . . . . . . . . . . .98
Synchronization 98
Access control behavior during synchronization: 98
Restore Entire Loop Detail Chart. . . . . . . . . . . . . . . . . . . . . . . . . . . . . . . . . . . . . . . . . . . . . . . . . . . . . . . . . . . . . . . . . . . . 99
System Wide Backup Restore: 99
Restoring the Panel to Factory Default Settings . . . . . . . . . . . . . . . . . . . . . . . . . . . . . . . . . . . . . . . . . . . . . . . . . . 100
Resetting the Panel 100
Firmware Upgrades . . . . . . . . . . . . . . . . . . . . . . . . . . . . . . . . . . . . . . . . . . . . . . . . . . . . . . . . . . . . . . . . . . . . . . . . . . . . . . . 101
Panel Requirements 101
Overview 101
Planning for the Firmware Upgrade 102
Updating the MPA1 Panel Using the Web Interface 102
5 Caches and Certificates . . . . . . . . . . . . . . . . . . . . . . . . . . . . . . . . . . . . . . . . . . . . . . . . . . . 105
Caches. . . . . . . . . . . . . . . . . . . . . . . . . . . . . . . . . . . . . . . . . . . . . . . . . . . . . . . . . . . . . . . . . . . . . . . . . . . . . . . . . . . . . . . . . . . . 105
Clearing the Cache and Cookies in the Internet Browsers Used by the MPA1 Web Server 105
Generating and Installing Certificates . . . . . . . . . . . . . . . . . . . . . . . . . . . . . . . . . . . . . . . . . . . . . . . . . . . . . . . . . . . . 106
Section 1 - Generating sign-in request and installing certificates 106
Section 2 - Installing the master certificate into the browser 109
6 MPA1 Accounts . . . . . . . . . . . . . . . . . . . . . . . . . . . . . . . . . . . . . . . . . . . . . . . . . . . . . . . . . . . 115
Creating MPA1 Accounts . . . . . . . . . . . . . . . . . . . . . . . . . . . . . . . . . . . . . . . . . . . . . . . . . . . . . . . . . . . . . . . . . . . . . . . . . 115
Modifying a User Account . . . . . . . . . . . . . . . . . . . . . . . . . . . . . . . . . . . . . . . . . . . . . . . . . . . . . . . . . . . . . . . . . . . . . . . . 117
Deleting a User Account . . . . . . . . . . . . . . . . . . . . . . . . . . . . . . . . . . . . . . . . . . . . . . . . . . . . . . . . . . . . . . . . . . . . . . . . . . 118
Technical Support . . . . . . . . . . . . . . . . . . . . . . . . . . . . . . . . . . . . . . . . . . . . . . . . . . . . . . . . . . . . . . . . . . . . . . . . . . . . . . . . 119
Normal Support Hours 119
Web 119
7 Appendix . . . . . . . . . . . . . . . . . . . . . . . . . . . . . . . . . . . . . . . . . . . . . . . . . . . . . . . . . . . . . . . . . . 121

| 3
Document 800-26311_ A - February 2020
© 2020 Honeywell All Rights Reserved.
All product and brand names are the service marks, trademarks, registered trademarks, or
registered service marks of their respective owners. Printed in the United States of
America. Honeywell reserves the right to change any information in this document at any
time without prior notice.
Microsoft and Windows are registered trademarks of Microsoft Corporation. Windows
Server is a trademark of Microsoft Corporation.
Ordering Information
Please contact your local Honeywell representative or visit us on the web at
www.honeywellaccess.com for information about ordering.
Feedback
Honeywell appreciates your comments about this manual. Please visit us on the web at
www.honeywellaccess.com to post your comments.
All information in this document (descriptions, technical specifications, pictures,
illustrations etc) are indicative only, not binding and can be changed without notice.
Nevertheless, this document remains valid.
Personal Data Storage
Please be aware that this product can store personal data. Personal data is protected by the
General Data Protection Regulation (2016/679) in Europe and therefore the owners of
personal data have obtained certain rights thanks to this regulation.
We strongly advise you to be fully aware of these owner ("data subjects") rights as well as
which limitations you have to obey regarding the use and distribution of this data. Further
details can be found on the GDPR website of the EU:
https://ec.europa.eu/commission/priorities/justice-and-fundamental-rights/data-protect
ion/2018-reform-eu-data-protection-rules_en

| 5
Document 800-26311_ A - April 2020
Getting Started 1
Overview
The MPA1 is a modular 1 Door access control system. An MPA1 access control site is
configured with a host system and access control units that exceed existing NetAXS-123
specifications and approvals. These units also communicate with each other. Each access
control unit, or panel, has one reader port, which can support up to two OSDP readers. For
supported configurations, see Firmware Compatibility on page 105.
You can communicate with the MPA1 access control unit either through a host software
system or by connecting to the web server through an Ethernet connection. This chapter
describes how to connect to the web server.
For hardware and wiring installation instructions, please see the Installation Guide
supplied. The MPA1 is designed to work with most operating systems and browsers, but
Honeywell recommends Chrome™ for the best performance.
Note All information in this document (descriptions, technical specifications,
pictures, illustrations etc) are indicative only, not binding and can be
changed without notice. Nevertheless, this document remains valid.
Connecting to the Web Server
The MPA1 embedded web server is intended for supplementary and programming
purposes only. It has not been evaluated by UL for use as a monitoring station.
The embedded web server can be accessed through the following two connection types:
• Ethernet through a direct connection
• Ethernet through a hub/LAN connection

www.honeywell.com/security
6 | MPA1 User Guide
Note 1) The panel that you are connecting to the computer is the Primary panel.
The panel is set as Primary panel using the Device Utility App.
2) When creating a user in MPA1 -> Web server, the administrator should
obtain and maintain the consent.
Setting Up an Ethernet Port
There are two options for connecting the panel to a PC via a web server:
• Using a hub/LAN connection
• Using a direct connection
To set up an Ethernet Port
1. Connect your computer's Ethernet port to the panel's Ethernet port using one of the
following two methods:
a. Ethernet Hub connection: Connect both the computer’s Ethernet port and the
panel's Ethernet port to an Ethernet hub with standard Ethernet patch cables.
b. Web server direct connection: Connect the computer’s Ethernet port directly to
the panel’s Ethernet port with either a crossover or an Ethernet cable.
Note UL294 and UL60839-11-1 evaluation consist of the stand alone mode of
this device

| 7
Document 800-26311_ A - April 2020
2. Configure the computer’s network connection:
a. Select Start > Settings > Control Panel.
b. Click Network and Dial-up Connections.
c. Identify your local Ethernet connection (commonly labeled Local Area
Connection), and right-click the icon to display the Local Area Connection
Properties screen.
d. Highlight the Internet Protocol (TCP/IP) connection.
e. Click Properties to display your system’s current Internet Protocol properties.
TIP! Keep a record of your computer’s current network configuration as it appears in this
screen. You will need to re-instate this configuration later.
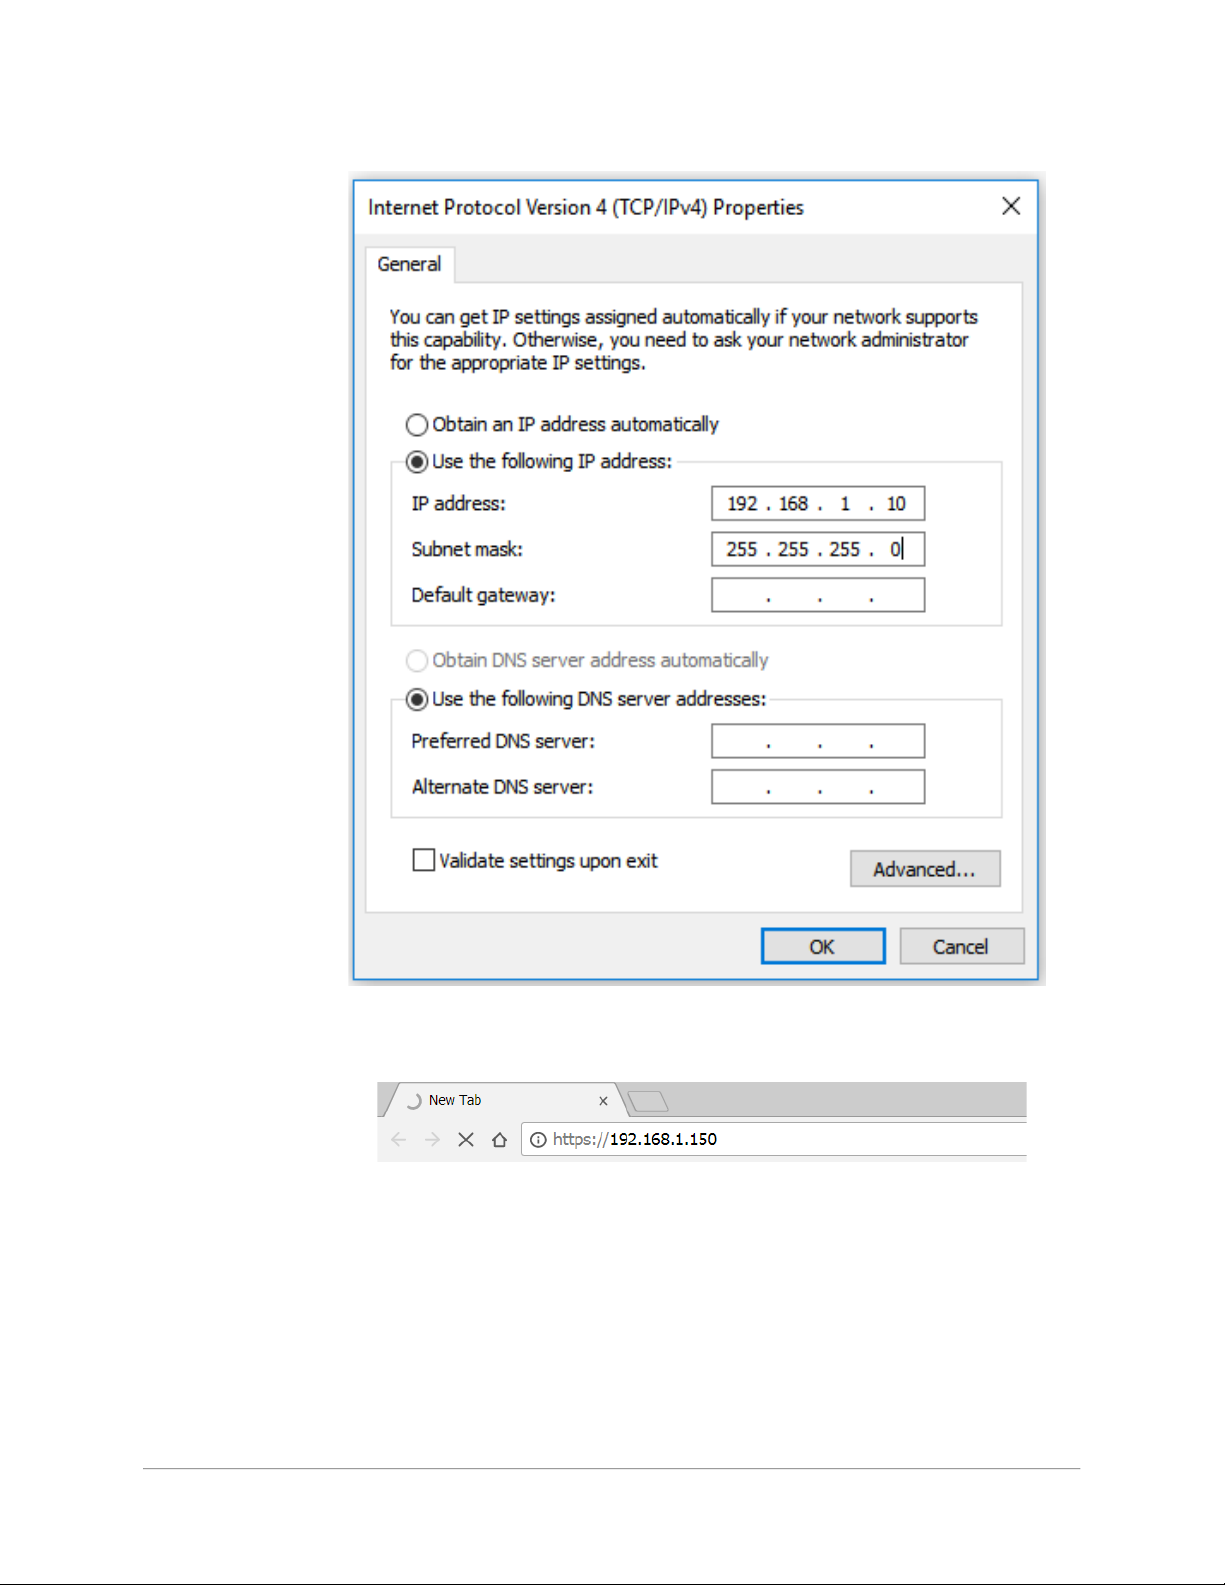
f. Select Use the following IP address.
g. Enter 192.168.1.10 in the IP address field.
www.honeywell.com/security
8 | MPA1 User Guide
h. Enter 255.255.255.0 in the Subnet mask field.
i. Click OK to accept the entries.
3. Open your browser, and enter https://192.168.1.150 as the target address.
CAUTION When connecting to the web using a browser, you
must use https:// for a secure connection. The standard http:// that is
the default in most browsers will not work.
4. Press the Enter key to display the Honeywell MPA1 login screen.

| 9
Document 800-26311_ A - April 2020
Note If you are using Google Chrome and you receive a message “Your connection
is not private”, follow the below steps to get to the Sign In screen.
a. Click Advanced to expand the popup window.
b. Click Proceed to <panel’s> IP address (unsafe). The Sign In screen appears.
Note For instructions on certificate errors see the Chapter 5, Caches and
Certificates.
5. Enter admin in the User Name field, and enter admin in the Password field. Both the
user name and password are case-sensitive.
Note If you fail to log in successfully 5 times, the Retry Limit will be exceeded, and
the account locks for 30 minutes. Any attempt to log into a locked-out
account, within the timeout period, restarts the 30 minute lock-out period.
Note On initial signing in, you will be asked to change your password to a new
password. For more information see Creating MPA1 Accounts on page 115.
6. Click Sign In. By default, the MPA1 opens to the Dashboard.
Table des matières
Autres manuels Honeywell Contrôleurs d'accès IP

Honeywell
Honeywell PRO22IC Manuel utilisateur

Honeywell
Honeywell MPA2 Manuel utilisateur

Honeywell
Honeywell Tema-Voyager Compact Manuel utilisateur

Honeywell
Honeywell NetAXS-123 Guide de dépannage

Honeywell
Honeywell MPA1C1 Manuel utilisateur

Honeywell
Honeywell MPA2C3 Manuel utilisateur

Honeywell
Honeywell NetAXS-123 Manuel utilisateur

Honeywell
Honeywell ACS-8 Manuel utilisateur

Honeywell
Honeywell IDENT-KEY 3 Manuel d'instructions

Honeywell
Honeywell MPA2 Guide de dépannage


