heimgard Smart Thermostat Manuel utilisateur

Quick start guide
version 1.0
Requires a
Heimgard hub
Smart
Thermostat
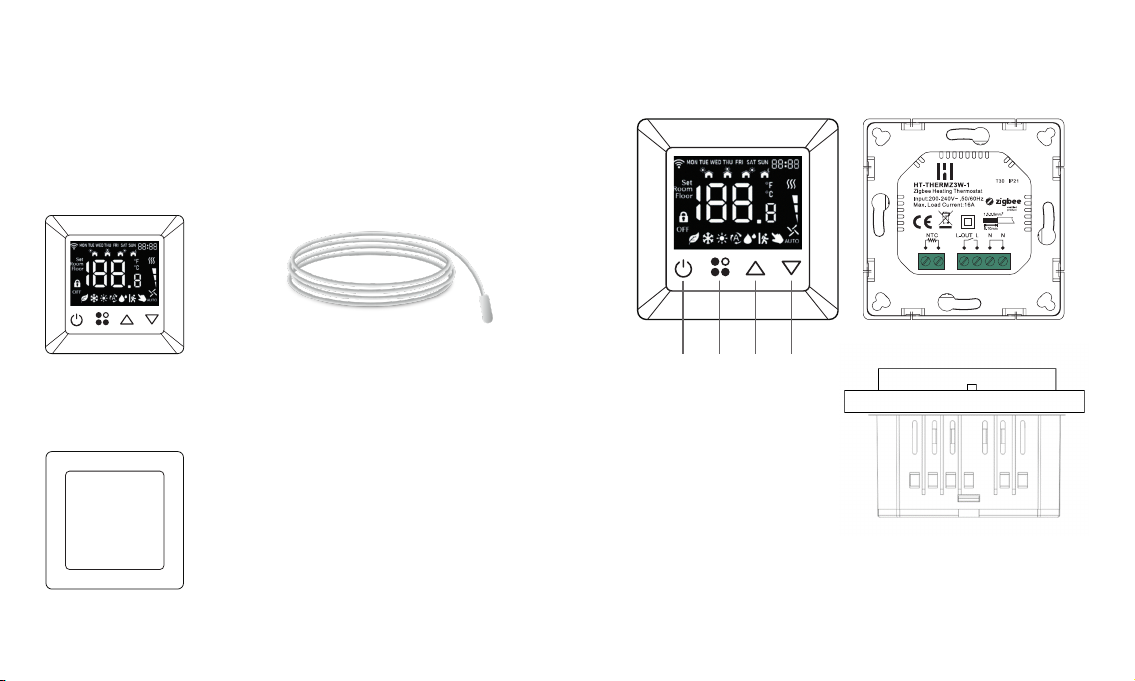
What is in
the box
A.
Smart Thermostat
C.
Frame
B.
Floor probe (NTC 10K)
Device overview
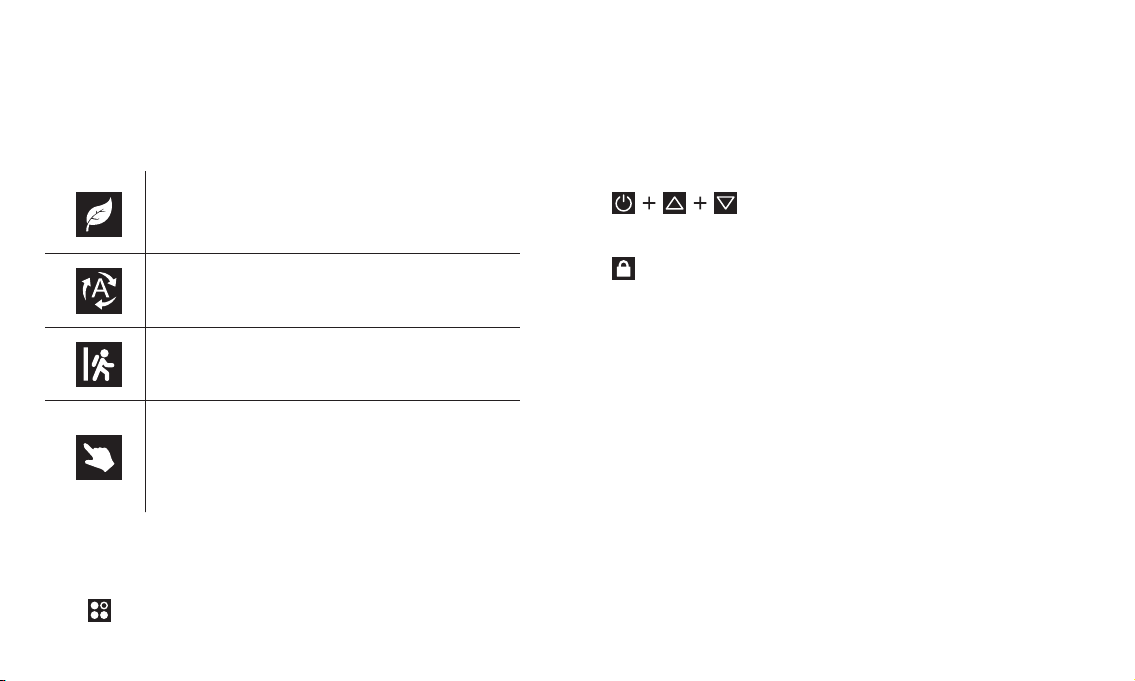
D. Power button (On/O, Back, Cancel)
E. Menu button (Toggle modes, Select, Conrm)
F. Up button (Scroll up)
G. Down button (Scroll down)
D. E. F. G.
Floor probe AC Power inputOutput
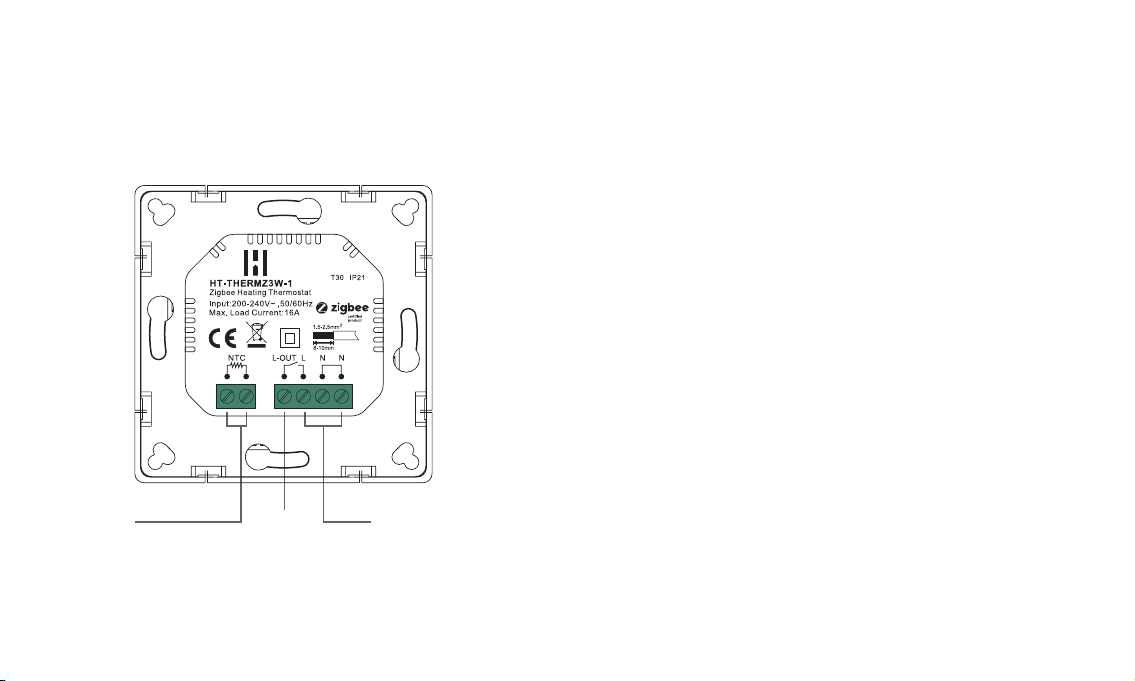
Connection/wiring
diagram overview
Installation and wiring
This device should be installed by a licensed electrician in a manner
that conforms to local regulations and building codes.
WARNING: Electrical power must be switched o during installation
Electronical properties
• Load (A) 16 Max
• Voltage (V) 230
• Voltage type AC
• Power source AC
Remove the display unit and backplate of the device
from the packaging.
FIRST ENSURE THE POWER IS OFF at the main
circuit breaker, and then test the wires with a probe or
multimeter to verify.
Connect the input power and output/heater wires to
the correct device terminals. Follow the connection
diagram and instructions on the next page:
1.
2.
3.
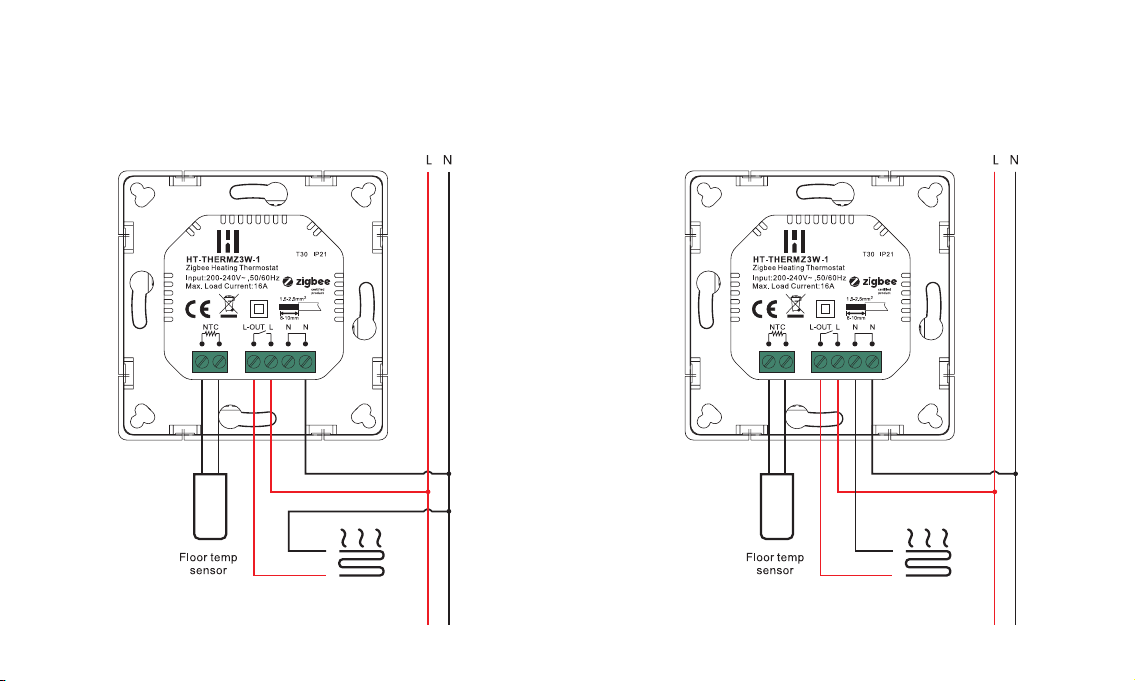
For installation follow the wire diagrams.
Option 1 Option 2
Wiring diagram
Get started
Power ON the device by switching the main circuit
breaker back ON. The device will automatically go into
inclusion mode when power on for rst time (verify
the inclusion mode time).
Open the Heimgard app and follow the steps listed
here to connect to your device.
Your device will appear in the Found Devices List and
the Network symbol on the thermostat display will
become solid.
Press congure to add the device to a specic
room. Add the device to the room that matches the
placement of the thermostat.
Activate inclusion mode manually
• Press and hold the Menu button (D)
• Go to nE.0 and press the Menu button (D) to select
• Go to nE.A by one press on Up button (F)
• Start inclusion mode by pressing Menu button (D)
• Ad will be displayed, and Network symbol will ash
Press and hold Press Press Press
1.
2.
3.
4.
Manage
Devices
How to use
The thermostat oers 4 dierent modes.
Choose manual to operate the device form the smart home app.
Press to switch between the four dierent operating modes.
*If you choose Auto mode, you will not be able to control the device from the smart home system
ECO mode - preset of set temperature
Default 17 degrees
Auto mode* - select this mode to use the local
programming and schedule on the device.
Required conguration of P-19
Away mode - preset of set temperature
Default 6 degrees
App mode - select this mode to operate the
thermostat form the smart home app to add smart
energy management automation and scheduled
heating using the smart home hub. You can still
adjust the set temperature locally on the device.
Child lock
Enable / Disable
Press and hold all three buttons ON/OFF (D) + UP (F) + DOWN (G)
at the same time for 5 seconds to enable or disable the child lock.
The lock symbol will be displayed when child lock is enabled.
Press and hold 5 sec.
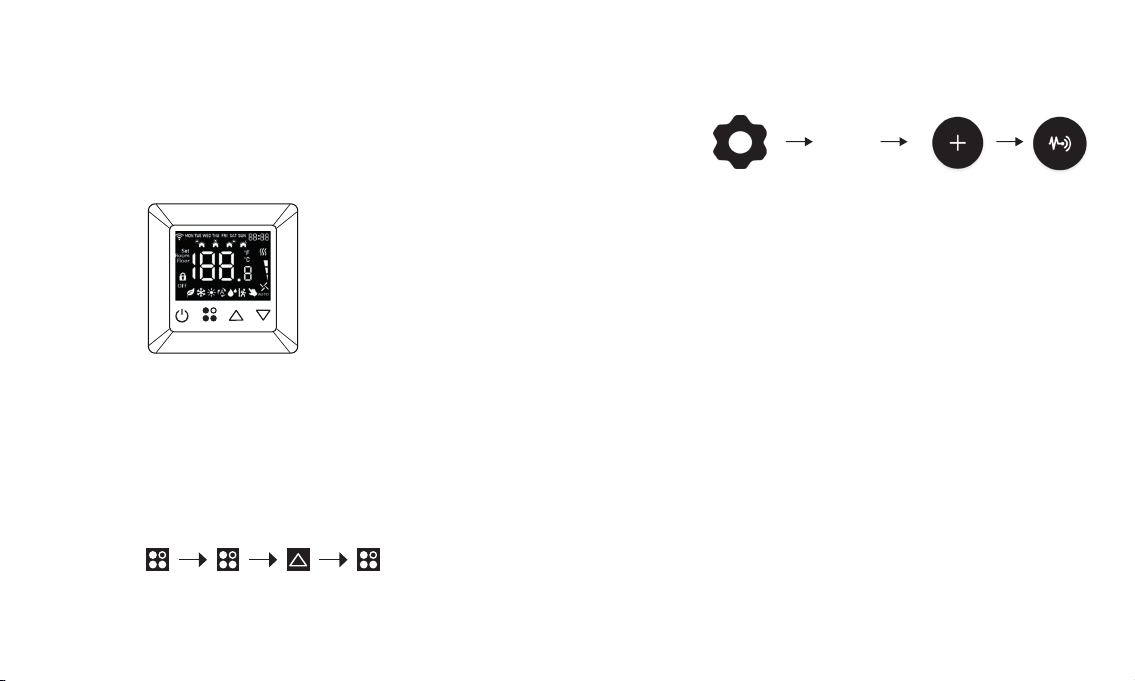
P-01 Add or remove from Hub
Add your thermostat to the Hub
The thermostat will automatically be in pairing mode for
60 seconds rst time you power up.
Use or to navigate
Select nE.A to activate pairing mode
Select nE.L to leave network
Press to conrm
P-02 Factory reset device
If you need to reset your device
Navigate to Sy.o and conrm by pressing
Navigate to Sy.r to reset and conrm by pressing
This will remove device from Zigbee network, delete all
settings and restore to default settings.
P-03 Display brightness
Adjust the Display brightness level
Use or to navigate
Local conguration • Li.1 - 20% Low brightness
• Li.2 - 50% Medium brightness
• Li.3 - 100% Max brightness (default)
Press to conrm
P-04 Button volume setting
Adjust the button volume level
Use or to navigate
• bU.0 - OFF (default)
• bU.1 - Low volume
• bU.2 - Medium volume
• bU.3 - Max volume
Press to conrm
P-05 Floor sensor probe setting
Congure the oor sensor probe type
*Note: ±1% accuracy, B25/50=3950K±1%
Use or to navigate
12 - NTC 12K/25°C
100 - NTC 100K/25°C
50 - NTC 50K/25°C
15 - NTC 15K/25°C
10 - NTC 10K/25°C (default)
Press to conrm
Press and hold to access the menu. Use or to navigate
through programs. Press to conrm.
P-06 Sensor settings
Select the sensor type you want to use to control the
thermostat
Use or to navigate
Select Co.r (ROOM) (default)
Select Co.F (FLOOR)
Press to conrm
P-07 Room temp settings
Room sensor calibration
Use or button to set the calibration adjustment
Available setting range is -3 to +3, unit is °C
Press to conrm
Default value is 0°C
P-08 Floor temp calibration
Floor sensor calibration
Press or button to set the calibration adjustment
Available setting range is -3 to +3, unit is °C
Press to conrm
Default value is 0°C
P-09 Anti-freeze settings
Freeze protection mode controls the thermostat to avoid
low temperature issues, e.g. frozen pipes. The anti-freeze
mode is executed under o status, and the reference
temperature is taken from the room sensor.
Set the threshold temperature for the anti-freeze function
to engage.
Choose OFF or a temperature between 5-10 °C
Use or to select
Press to conrm
Default value is 5°C
P-10 Unit display settings
Select the temperature unit (Celsius or Fahrenheit)
Use or to select
• Un.°C - Celsius (default)
• Un.°F - Fahrenheit
Press to conrm
P-11 Control sensor sensitivity
This function enables the controller to control the relay
only when the sensor temperature is a little bit lower than

the set temperature. This value can be set with a 0.5°
interval.
This prevents the controller switching the relay on/o
when the temperature oscillates around the set sensor
temperature.
Default value is 0.5°C.
Use or to set value
Press to conrm
P-12 Over current alarm
Congure the alarm or turning function on/o
Use or to navigate
• AL.y - Enable
• AL.n - Disable
Press to conrm
If the load is above 16.4A, the display will show alarm
“Warn” and “Cu”, the thermostat will sound and alarm, the
relay will be forced to turn o, and the device will report an
alarm every minute until the alarm is cancelled.
Reset the alarm by pressing and holding ON/OFF button
for at least 5 seconds, or cancel it through the app.
Default value is Enabled.
P-13 Button vibration settings
Adjust the Button vibration level
Use or to navigate
• Select vl.0 - OFF (default)
• Select vl.1 - Low
• Select vl.2 - Medium
• Select vl.3 - High
Press to conrm
P-14 Open window detection
Set the threshold value for “open-window” detection
Use or to select value between 1 - 10
To disable the open-window detection function select “0”
If the room sensor temp. decreases more than the set
value within 10 minutes, the icon will ash slowly,
and the device will be temporarily turned o. If anti-freeze
mode is enabled the device will activate anti-freeze, if anti-
freeze thresholds are crossed.
The “open-window” mode will be reset if the room sensor
temperature increases by 2°C within 10 minutes, if the
power of the device is reset, or if the operation mode is
changed. The icon will then disappear and the device will
indicate a return to normal operating mode.
P-15 Time settings
Set time hh:mm
Use or to adjust time
Press to conrm and switch between hh and mm
P-16 Week settings
Press to enter menu
Use or to set the day of the week
Press to conrm
P-17 External room temperature
Use or to select
• se.L - local sensor (default)
• se.r - remote sensor
Press to conrm and save the setting.
Local sensor (se.L) refers to the ROOM or FLOOR sensor.
The device will get the room’s temperature from the room
or oor temp sensor based on your conguration of P-06.
If you choose the remote sensor (se.r), the device will get
room temperature from the gateway (e.g a second device
in your smart home system which reports temperature).
Use the remote sensor in the case where you have the
thermostat installed outside the room you want to heat.
(e.g. when the oor heating does not provide a oor
sensor probe).
Fallback solution
If the remote sensor doesn’t receive the room
temperature from the gateway within 20 minutes, the
thermostat will use a fallback solution
= 1 MIN ON - 4 MIN OFF (Thermostat will be set to 20%
ON - 80% OFF)
The fallback solution will be executed until a remote
sensor reports room temperature.
P-18 Home interface temperature display
Select which temperature to show on display. You can
choose set temperature, room temperature or oor
temperature.
Use or to select
• te.s - set temperature
• te.r - room temperature (default)
• te.f - oor temperature
Step 2: Press to conrm and save the setting.
When the set temperature is modied manually, the
display will show the set temperature for 10 seconds.
Table des matières
Manuels Thermostat populaires d'autres marques

EWELLY
EWELLY EW-181 Manuel utilisateur

Prolon
Prolon T1100 Instructions d'installation

Computherm
Computherm Q20 Manuel utilisateur

Heatmiser
Heatmiser neoStat Manuel utilisateur

Aube Technologies
Aube Technologies TH111GFCI-NP 240 VCA Manuel utilisateur

Mars
Mars HEAT CONTROLLER IR Wireless Thermostat Manuel utilisateur


