Hall Technologies HT-RANGER Manuel utilisateur

Hall Technologies January 20, 2023 Page 1 of 31
Hall Technologies • 1234 Lakeshore Dr Suite #150 Coppell, TX 75019 • halltechav.com
HT-RANGER
BYOD Presentation Switcher
USER MANUAL
January 19, 2023

Hall Technologies January 20, 2023 Page 2 of 31
Important Safety Instructions
!
1. Do not expose this apparatus to rain, moisture, dripping or splashing
and that no objects filled with liquids, such as vases, shall be placed
on the apparatus.
2. Do not install or place this unit in a bookcase, built-in cabinet or in
another confined space. Ensure the unit is well ventilated.
3. To prevent risk of electric shock or fire hazard due to overheating,
do not obstruct the unit’s ventilation openings with newspapers,
tablecloths, curtains, and similar items.
4. Do not install near any heat sources such as radiators, heat
registers, stoves, or other apparatus (including amplifiers) that
produce heat.
5. Do not place sources of naked flames, such as lighted candles, on
the unit.
6. Clean this apparatus only with dry cloth.
7. Unplug this apparatus during lightning storms or when unused for
long periods of time.
8. Protect the power cord from being walked on or pinched
particularly at plugs.
9. Only use attachments / accessories specified by the manufacturer.
10. Refer all servicing to qualified service personnel.

Hall Technologies January 20, 2023 Page 3 of 31
Table of Contents
Introduction ................................................................................................................................................ 4
Overview ........................................................................................................................................ 4
Features .......................................................................................................................................... 4
Package Contents ....................................................................................................................................... 4
Panel Description ........................................................................................................................................ 5
Front Panel ..................................................................................................................................... 5
Rear Panel ....................................................................................................................................... 6
Installation and Wiring ............................................................................................................................... 7
Installation ...................................................................................................................................... 7
Wiring ............................................................................................................................................. 8
Key Functions ............................................................................................................................................. 8
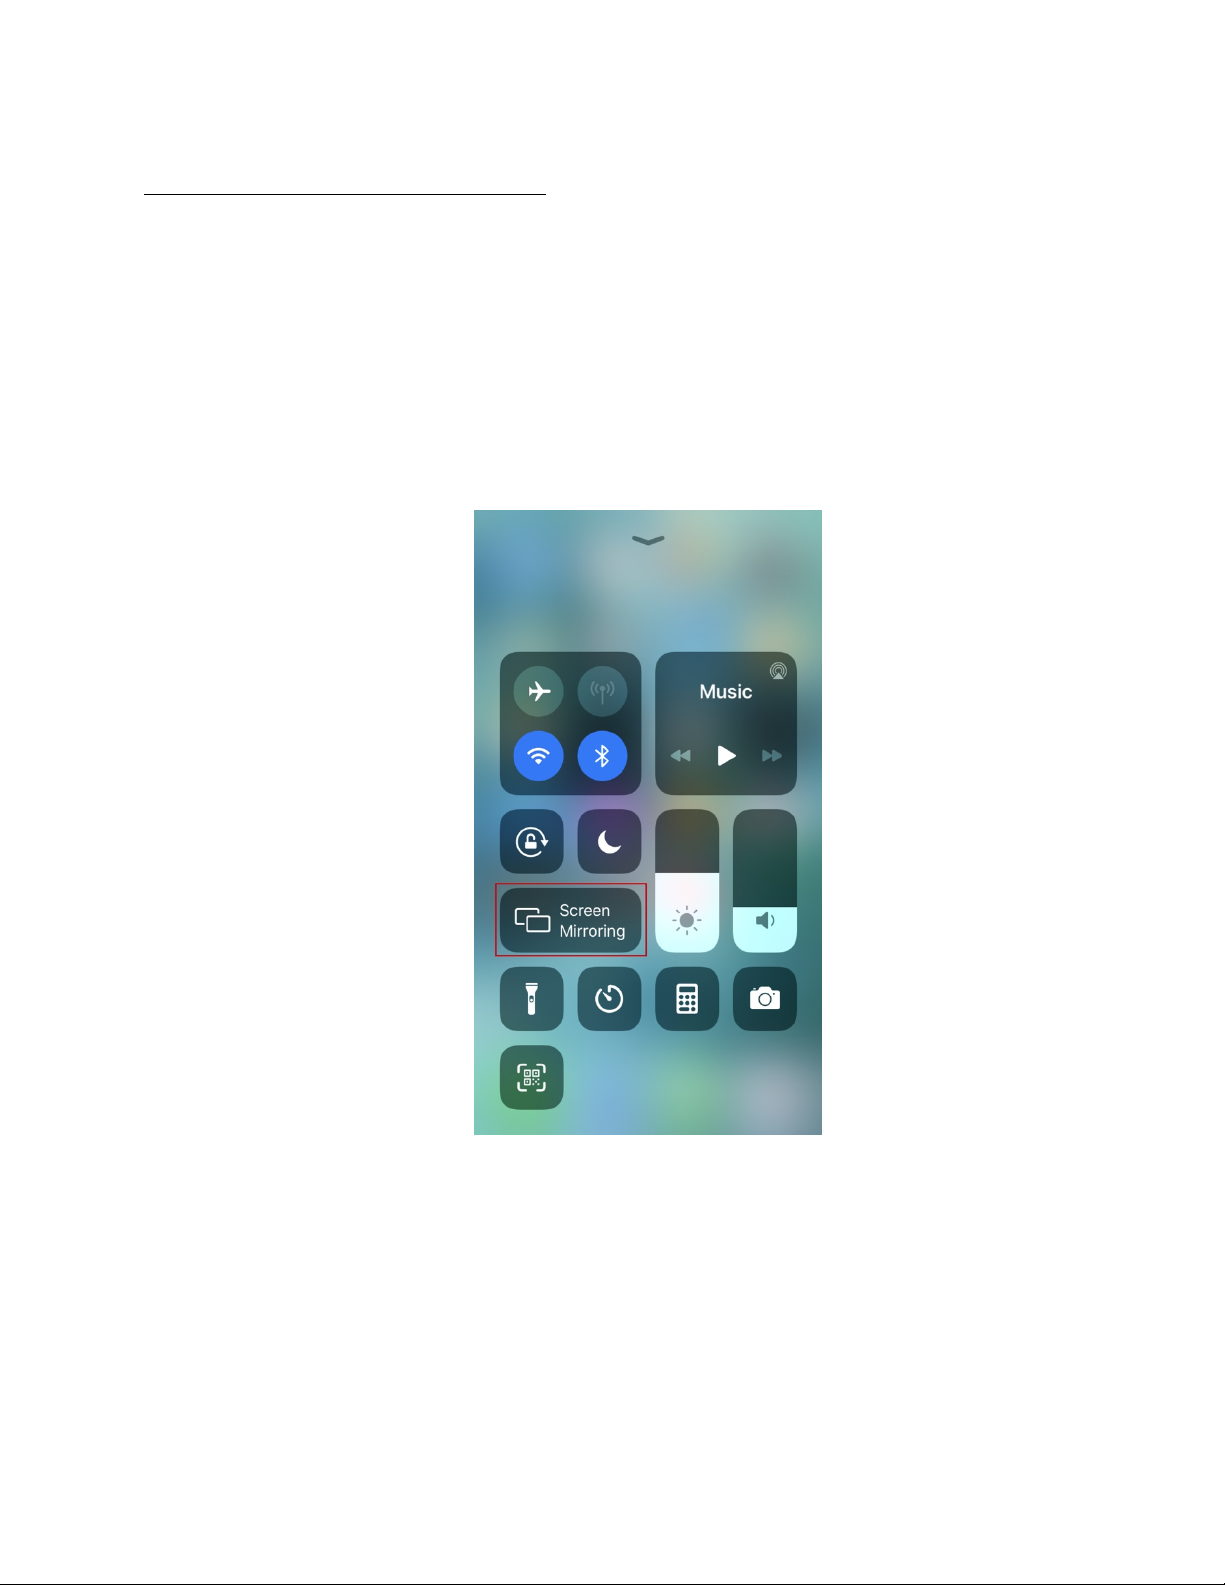
Screen Mirroring ............................................................................................................................. 8
(1) Screen Mirroring over Airplay (for Apple Devices) ....................................................... 9
(2) Screen Mirroring over Smart View (for Android Phones & Windows PCs) ................. 10
(3) Screen Mirroring over Miracast (for Android Phones & Windows PCs) ..................... 10
(4) Screen Mirroring over HT-Voyager (HT Wireless Dongle) ........................................... 12
Dual View Display ......................................................................................................................... 13
Automatic Signal Switching .......................................................................................................... 13
Guide Screen ................................................................................................................................ 14
OSD ............................................................................................................................................... 14
Web GUI ................................................................................................................................................... 16
General Tab .............................................................................................................................................. 18
Device Name ................................................................................................................................. 18
Wired Network ............................................................................................................................. 18
BYOD ............................................................................................................................................. 19
Soft AP .......................................................................................................................................... 20
Output .......................................................................................................................................... 21
Display Control ............................................................................................................................. 22
Wi-Fi Settings ................................................................................................................................ 23
Password ....................................................................................................................................... 23
Guide Screen ................................................................................................................................ 24
Maintenance ................................................................................................................................. 24
Version Info ................................................................................................................................... 25
Video Source Tab ...................................................................................................................................... 25
State and Switch ........................................................................................................................... 25
Manage Alias ................................................................................................................................ 26
Firmware Upgrade .................................................................................................................................... 27
Troubleshooting ....................................................................................................................................... 28
Specifications ............................................................................................................................................ 29

Hall Technologies January 20, 2023 Page 4 of 31
Introduction
OVERVIEW
The HT-RANGER is a high-performance BYOD presentation switcher with wireless presentation
capability. It includes a built-in Wi-Fi module and offers multiple connection options, including AirPlay,
Miracast, Smart View, HT-Voyager and physical HDMI and USB-C ports. Connecting to the HT-RANGER
using any of these methods can project the video from the connected device to the connected display,
in either full screen mode or dual view mode.
The HT-RANGER includes multiple features such as automatic signal switching, CEC, Guide Screen, and
OSD display.
FEATURES
• Dual view presentation.
• Built-in Wi-Fi module for wireless connectivity with devices over AirPlay, Miracast, Smart View, and
HT-Voyager.
• Supports HDMI input and output resolutions up to 4K@30Hz 4:4:4.
• Detailed On Screen Display (OSD) information.
• Device control using Web UI and Telnet API.
• Laptops connected to the HT-RANGER using the USB-C interface can access USB peripheral devices
(i.e. cameras, microphones) connected to USB-A ports on the HT-RANGER.
Package Contents
• 1 x Switcher
• 2 x Wi-Fi Antennas
• 1 x DC 12V Power Adapter with US Pins
• 2 x Mounting Brackets (with Screws)

Hall Technologies January 20, 2023 Page 5 of 31
Panel Description
FRONT PANEL
No.
Name
Description
1
Power LED
Solid yellow LED when the HT-RANGER is powered on.
2
Status LED
• Solid yellow LED: The HT-RANGER is outputting at least one video source.
• Blinking yellow LED: The HT-RANGER is in standby mode
• Off: The HT-RANGER is displaying the Guide Screen.
3
Input
Source
LEDs
• Solid yellow LED: The corresponding video input source signal is connected and is
being displayed.
• Fast blinking yellow LED: The corresponding video input source signal is connected
but the source is not being displayed.
• Slow blinking yellow LED: The corresponding video input source signal is being output
but the signal is not valid.
• Off: The switcher is in standby mode, or the corresponding video input source signal
is not connected.
4
Pairing
USB-C port for connecting to HT-Voyager for pairing.
5
Reset
Reset button.
When the switcher is powered on, use a pointed stylus to hold down this button for five
or more seconds and then release. The HT-RANGER will reboot and restore to its factory
defaults.

Hall Technologies January 20, 2023 Page 6 of 31
REAR PANEL
No.
Name
Description
1
Wi-Fi
Connect to the antenna pair provided for access to Miracast and the soft AP
function.
2
12V
Connect to the DC 12V power adapter provided.
3
Input port
Connect to an HDMI and/or a USB-C source.
4
USB 1-2
USB-A ports, supports the two following functions:
(1) Connect to USB peripheral devices (e.g. keyboard, mouse, touch screen, etc.).
Note: Both USB ports can supply power to the USB peripheral devices:
! USB1 port: outputs DC 5V 1A power
! USB2 port: outputs DC 5V 0.5A power
(2) Connect either port to a U-disk for firmware upgrade. For more information, see
Firmware Upgrade section.
5
HDMI OUT
Connect to an HDMI display.
6
LAN
Connect to a network device (e.g. network switch, router, computer, etc.) for LAN
control (Web GUI & Telnet API) and AirPlay mirroring signal input.

Hall Technologies January 20, 2023 Page 7 of 31
Installation and Wiring
INSTALLATION
Note: Before installation, please ensure the device is disconnected from the power source.
Attaching Antennas
1. Attach the included antenna to the threaded connector and screw it in clockwise.
2. Repeat the above step for the other antenna.
Attaching Installation Brackets
1. Attach the included installation bracket to the enclosure using the screws provided.
2. Repeat the step for the other side of the device.
3. Attach the brackets to the desired install surface (installation hardware not included).

Hall Technologies January 20, 2023 Page 8 of 31
WIRING
Warnings:
! Before wiring, ensure all devices are disconnected from power.
! When wiring, carefully connect and disconnect the cables, ensuring each connector is properly
seated.
Note: By default, if the USB-C video source is displayed in full screen, all USB devices (i.e. cameras and
microphones) connected to the USB Type-A ports of the switcher will be routed to the USB-C input port.
This allows the laptop connected to the USB-C input access to these USB devices as if they were
connected to the laptop directly.
Key Functions
The switcher supports multiple functions such as screen mirroring, dual view display, automatic signal
switching, Guide Screen and OSD, providing simple use of the system.
SCREEN MIRRORING
With screen mirroring support, the HT-RANGER allows you to share your mobile devices’ content
wirelessly over AirPlay Mirroring, Miracast, Smart View, and HT-Voyager. In this manual, mobile devices
available for screen mirroring are referred to as “screen mirroring sources”, which include Apple devices
(iPhone/iPad/Mac), Android phones, Windows PCs, and HT-VOYAGER.

Hall Technologies January 20, 2023 Page 9 of 31
1. Screen mirroring over airplay
Using an iPhone 8 (iOS 15.2) for example:
1. Connect your iPhone to the soft AP of the device.
ð Soft AP SSID: this should be the same as the device name which can be obtained from the
OSD at the upper right corner of the display screen. By default, it is set as HT-RANGER.
ð Password: this password can be set through Web UI or Telnet API and can be obtained from
the OSD at the bottom right corner of the display screen. By default, it is set as 12345678.
2. Slide up from the bottom of the iPhone’s screen to show the control center. Click Screen
Mirroring and choose the device name in the pop-up list.
3. HT-RANGER now displays your iPhone’s screen.
4. To disconnect iPhone from the device: click “Stop Mirroring”. The display stops displaying
your iPhone’s screen.

Hall Technologies January 20, 2023 Page 10 of 31
2. Screen mirroring over Smart View
For Android mobile (using Samsung Galaxy S9 for example):
1. Enable the Wi-Fi or WLAN feature of the mobile.
2. Slide down from the top of the screen and click the Smart View icon in the pop-up interface.
3. The Smart View window appears and starts to search for Miracast receiver. Click the HT-RANGER
device name in the search result and the device will output the mobile screen.
3. Screen mirroring over Miracast
For Windows 10 PC:
1. Enable the WLAN feature of your PC.
2. Click the icon on bottom right of the screen to open Action Center.
Table des matières
Autres manuels Hall Technologies Changer

Hall Technologies
Hall Technologies KVM-UHD-4 Manuel utilisateur

Hall Technologies
Hall Technologies HSM-88-4K Manuel utilisateur

Hall Technologies
Hall Technologies EMCEE200 Manuel utilisateur

Hall Technologies
Hall Technologies FHD264 Manuel utilisateur

Hall Technologies
Hall Technologies HT-TRK1 Manuel utilisateur


