Glidecam CENTURION Manuel utilisateur

Set-up and Operations Guide
Glidecam Industries, Inc. 23 Joseph Street, Kingston, MA 02364
Customer Service Line 1-781-585-7900
Manufactured in the U.S.A.
COPYRIGHT 2016 GLIDECAM INDUSTRIES,Inc. ALL RIGHTS RESERVED
MANUAL
GLIDECAM
CENTURION

2
TABLE OF CONTENTS
SECTION # PAGE #
1. Introduction 3
2. Disclaimer and Warnings 4
3. Specications 5
4. Glidecam CENTURION Assembly 7
5. Glidecam CENTURION Batteries 9
6. Glidecam CENTURION Tilt Balance 10
7. Glidecam CENTURION Roll Balance 12
8. Glidecam CENTURION Yaw (PAN) Balance 13
9. Glidecam CENTURION Power On 14
10. Glidecam CENTURION Mode Switch and Joystick 15
11. Glidecam CENTURION Custom Grip Positions 16
12. Glidecam CENTURION Software 18
13. Glidecam CENTURION Software Defaults 19
14. Troubleshooting 22
15. Other Camera Attachment Methods 23
16. Professional Usage 23
17. Warning 23
18. Warranty 24
19. Online Information 25

Congratulations on your purchase of a Glidecam CENTURION.
Glidecam is the industry leader in camera stabilization. We have been in business
for over 20 years and strive to innovate and bring the best camera systems to the
market. The Glidecam CENTURION is a culmination of all the best technologies
with additional advancement on all the camera gimbals on the market today. The
technology, craftsmanship, research and development put into this gimbal make it
the best gimbal on the market today.
The Glidecam CENTURION is designed for a variety of cameras between 1-5lbs.
The gimbal easily adjusts to balance primarily SLR and mirrorless cameras. Not all
camera and lens combinations are accepted, so please adjust your model to balance
properly on this gimbal. If a perfect balance is not achieved around each axis then
the gimbal will not perform as specied.
The Glidecam CENTURION is a 3-axis Motorized Gimbal. The motors work with
position feedback, encoders, and the IMU sensor (Inertial Measurement Unit) to
communicate with our custom 32-bit controller. Combining the accuracy of our
sensors with the speed of the controller equals perfectly stable video in all three axis
with .02 degrees of accuracy.
The Glidecam CENTURION requires practice and understanding to achieve
professional looking results. We highly recommend that the user read this manual
thoroughly before setting up and operating the Glidecam CENTURION. Doing
so will save you time, and will minimize the risk of damage to your camcorder or
the Glidecam CENTURION. It is important to perform and follow the Set-up and
Operation’s procedures in the proper sequence, so as to avoid both frustration and
a possible accident.
If you have need of any technical assistance, you can call our Technical Support
Line at 1-781-585-7900, Monday through Friday between the hours of 9:00 am and
5:00 pm, Eastern Standard Time.
We’re sure that once you have your Glidecam CENTURION up and running, you will
nd years of enjoyment with it.
#1 INTRODUCTION
3

#2 DISCLAIMERS AND WARNINGS
By using this product, you hereby agree to this disclaimer and signify that you have read it in full. You agree
that you are responsible for your own conduct and any content created while using this product, and for any
consequence thereof. By not following the manual properly or in the correct order, you understand the warranty
will be voided.
By reading this disclaimer, you also agree that Glidecam reserves the right of nal interpretation of this disclaimer,
and that any part of this disclaimer is subject to change without prior notice.
Only use the supplied batteries, or backup batteries purchased directly from Glidecam. Internal functions may
be damaged if an alternate power source is used. Do not modify or adjust the Gimbal. The gimbal has been
calibrated and uploaded with appropriate settings. Modication or amending the gimbal is prohibited. Since
Glidecam has no control over setup, nal assembly, use, modication or misuse, no liability shall be assumed nor
accepted for any resulting damage or injury. By the act of use, setup or assembly, the user accepts all resulting
liability. Glidecam assumes no liability for damage(s) or injuries incurred directly or indirectly from the use of this
product.
Lithium Polymer batteries (LiPo) can be extremely hazardous and require special attention:
• Do not charge batteries near ammable materials or on ammable surfaces such as carpet or wood.
• Never use or charge a swollen, leaky or damaged battery.
• Examine charger regularly for damage to the cord, plug, enclosure or other parts. Never use a damaged
charger.
• Disconnect the charger when not in use.
• Do not heat, drop, freeze, or strike batteries.
• Clean battery terminals with a clean, dry cloth.
• Do not expose batteries to extreme temperatures, including excessive heat. Never leave batteries inside a
vehicle on hot days.
• Do not store batteries in a moist environment, or allow batteries to come into contact with any kind of liquid.
• Do not attempt to repair batteries yourself.
• Do not place or use batteries on strong electrostatic or electromagnetic surfaces or surrounding areas.
• Do not place heavy objects on the batteries or charger. Avoid dropping batteries.
• Do not mix battery brands.
• Always use a Glidecam approved adapter/charger.
• Please dispose of batteries properly. Batteries cannot be discarded in the trash, re, or compost. Use an
appropriate battery disposal in your area.
**WARNING**
Do not change any of the software proles or settings without rst saving your current settings. Every
gimbal is uniquely calibrated. This means if you alter the settings of your original settings we cannot
send you the original prole. Save your prole before editing.
**WARNING**
In cold temperatures the sensor of the Glidecam CENTURION may have to warm up before use. Leave
the Glidecam CENTURION on, and stationary for a few minutes to allow the sensor to warm up and work
at full functionality.
4

#3 SPECIFICATIONS
Performance
Load Weight (Reference Value) 1-5 lbs
Angular Vibration Range ±0.02°
Rotation Range Pan Axis Control: 360°/s
Tilt Axis Control: 360°/s
Roll Axis Control: 360°/s
Electrical and Mechanical
Motor Type 3 x Brushless with AS5600 (I2C) Encoders
Processing 32-bit processor
System Requirements
Desktop/laptop: Windows (32- or 64-bit): 8, 7, XP SP3
Mac OS X: 10.9 or above
Software Download: Obtained on Glidecam CENTURION page on Glidecam.com
*******Always save current proles before updating rmware or changing settings.******
General
Control Modes Prole 1: Follow Mode
Prole 2: Lock Pitch/Follow Yaw
Prole 3: Lock Mode
Prole 4: Customizable
Prole 5: Calibrate ACC
Additional prole: Inverted mode, briefcase,
return home, RC…
Supported Camera Dimensions Maximum depth at center of mass on cam-
era base plate: 7”
Maximum height measured from top of cam-
era base plate: 6’’
Maximum width: 7+’’ – available room for
LCD to extend off the side
Power Requirements 4x Glidecam batteries (26350mah 3.7v)
Operating Temperature 15 to 105°F
Double Grip Dimensions (WxDxH) Varies depending on grip position.
18x12x12’’
Weight: Single Grip 3.4lbs (with batteries)
Weight: Double Grip 4.5lbs (with batteries)
Slip-Ring Built in slip-ring allowing 360 rotations of the
motor without twisting wires.
Packaging Info
Package Weight 6.2 lbs
Box Dimensions (LxWxH) 15 x 12.5 x 4.3”
5

6
BATTERY CHARGERS
USB CHARGER
CORDS
HANDLEBAR
LITHIUM
BATTERIES
GRIP
PITCH MOTOR
YAW MOTOR
ROLL MOTOR
CAMERA
PLATE
CAMERA
MOUNTING
SCREW
GRIP JOYSTICK
PC
USB CORD
20MM
SELF LOCKING
SCREWS
**NOTE**: The Glidecam CENTURION also has many accessories like the Glidecam CENTURION BALANCE
STAND. Please visit Glidecam.com for Glidecam CENTURION accessories.
15MM
SELF LOCKING
SCREWS
7
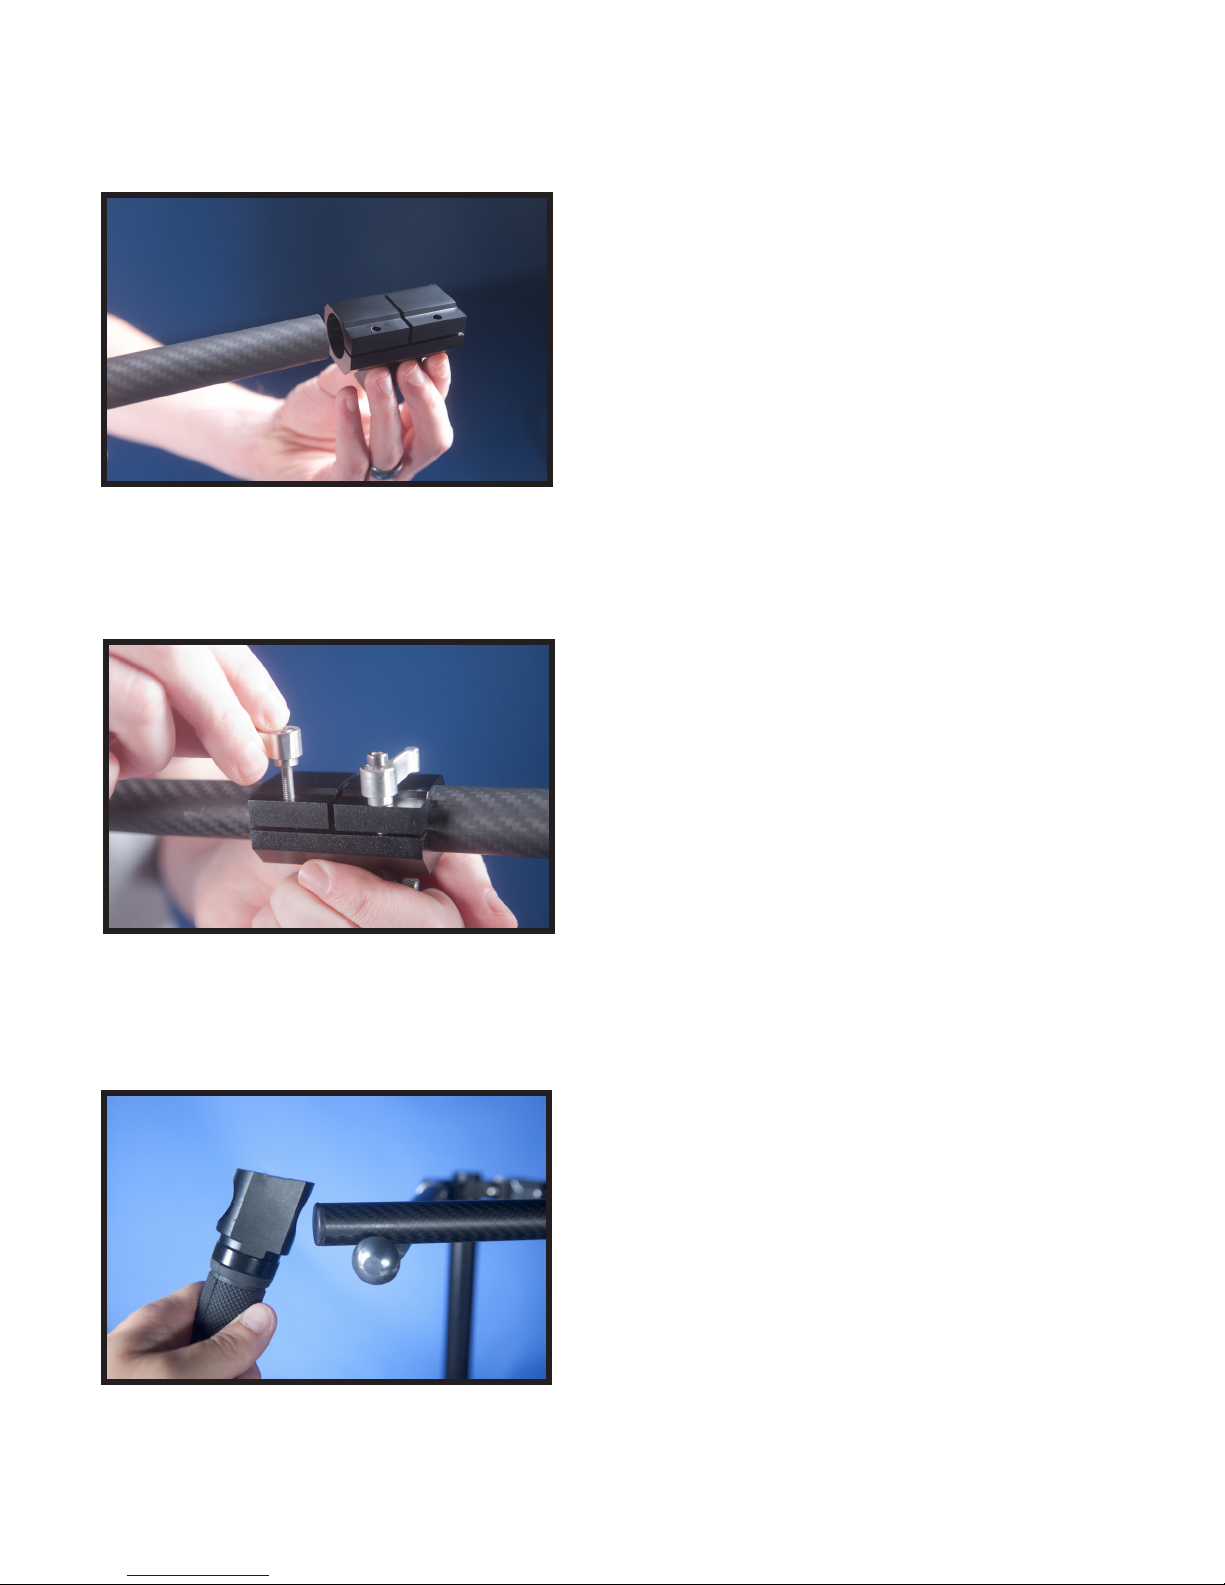
Figure 3
Insert both ends of the grip bar to the central stem.
#4 GLIDECAM CENTURION ASSEMBLY
Figure 1
Insert the handle posts into the handle lock.
Figure 2
Insert the self locking screws (15mm) into the handle
lock to secure the handle posts in place.
NOTE: The Glidecam CENTURION includes two different
kinds of screws. The longer screw (20mm) is for the grip
and the shorter screw (15mm) is for securing the handle
posts in place. A 3mm allen wrench may be required to
fully tighten the screws.

Slide in the handlebar quick release above the Yaw
Motor.
8
Figure 6
Figure 7
Securely tighten the knob.
Figure 5
Insert and secure the self locking screws (20mm)
onto both grips.
**NOTE**: The Glidecam CENTURION includes two different
kinds of screws. The longer screw (20mm) is for the grip
and the shorter screw (15mm) is for securing the handle
posts in place. A 3mm allen wrench may be required to
fully tighten the screws.
Figure 4
Position the grips in the most comfortable operation
position. Usually perpendicular to battery grip.
Position the double grips parallel to the battery grip if
you are balancing your gimbal in an inverted position.

9
The batteries are 26350 3.7v. Only use the supplied charger and connect to an outlet via the
USB cable. Charge all batteries fully (Charge times vary, but are around 3hrs). Battery life varies
depending on how aggressively the gimbal is used ranging from 3-8hrs. The encoders increase
the battery life and don’t send power to the motors unless it’s needed. Store batteries 2/3rds
charged at room temperature. If batteries are not stored properly their life is greatly reduced.
#5 GLIDECAM CENTURION BATTERIES
Insert batteries in the battery compartment as shown
in Figure #8.
**NOTE**: The Glidecam CENTURION uses Lithium
Polymer batteries which can be extremely hazardous and
require special attention.
Figure 8
Figure 9
Figure 10

10
Your camera setup must be properly balanced for all 3 axis to achieve the best performance from
the gimbal. Accurate balance is especially critical for shots where extreme angles or movements
are performed, such as car shots, running, biking, aerials, etc. Without properly following the
balance instructions, your gimbal may not perform at all, or with poor accuracy, and with decreased
battery performance. When changing cameras or lenses, make sure all three axis remain properly
balanced. Improper balance can ruin the motors and void warranty, so please follow all instructions
in order.
#6 GLIDECAM CENTURION TILT BALANCE
Balance your Glidecam CENTURION on the
BALANCE STAND.
**NOTE**: The Glidecam CENTURION BALANCE STAND is
sold separately.
Balance the camera with the Pitch motor on the left
hand side when looking at the gimbal from the front.
Figure 11
Figure 12
This can easily be moved up and down with the pitch
motor screw.
Figure 13
**NOTE**: Alternatively
if you do not have the
Glidecam CENTURION
BALANCE STAND,
you can setup the
Glidecam CENTURION
by placing it upside on
the table.
Table des matières
Autres manuels Glidecam Accessoires pour appareils photo


