
Gesytec Easylon Manuel utilisateur

This manual refers to the Easylon Router+
with one LON/IP and one LON/FT port.
Gesytec GmbH
Pascalstr. 6
52076 Aachen, Germany
Tel. + (49) 24 08 / 9 44-0
Fax + (49) 24 08 / 94 4-100
www.gesytec.com
Doc. ID: LVR2/UserDoc/Router/2-PortRouter+_2P_Manual-EN-v1.1.docx,
Version v1.1, 10.7.2012
Router+ 2-Port
User Manual

Router+
i
LVR2/UserDoc/Router/2-PortRouter+_2P_Manual-EN-v1.1.docx
This Manual …
...describes set-up of and working with the Gesytec Easylon Router+ with 2
ports. Thereby the focus is set to an application oriented description of practical
procedures which are complemented, wherever possible, by notices related to
success indicators. This manual does not go into details related to theoretical
backgrounds of the related technologies. Please inquire the corresponding litera-
ture for further information. Backgrounds about LONWORKS® can be found on
the website www.echelon.com. Details describing the functionality of the router
as RNI interface can be found in the manual for the Gesytec Remote Network In-
terface that can be fetched from the website www.gesytec.com.
This manual is structured as follows:
Chapter 1 introduces the product.
Chapter 2 describes the connection of the router and the basic settings.
Chapter 3 describes the settings of the integrated Configuration Server.
In chapters 4 and 5 you learn how to use the individual functions of the device.
Miscellaneous service procedures are explained in chapter 6.
Chapter 7 shows how to localize and to resolve specific problems. Further in-
formation is finally included in chapter 8.
This documentation can be modified anytime without prior notification. Gesytec doesn’t take
over any responsibility for errors or inaccuracies in this documentation and possible resulting
outcome.
By no means Gesytec, its representatives and employees will be liable for possible failures, dam-
ages caused indirectly or from use, resulting from use or non-applicability of the software or the
accompanying documentation.
Easylon is a registered trademark of Gesytec GmbH. Echelon, LON, LONWORKS®, LonTalk and
Neuron are registered trademarks of Echelon Corporation. Windows, Vista and .NET are regis-
tered trademarks of Microsoft. Other names may be registered trademarks of the respective com-
pany.

Router+
ii
LVR2/UserDoc/Router/2-PortRouter+_2P_Manual-EN-v1.1.docx
Contents
About Easylon Router+.....................................................................................................11
1.1 Functions................................................................................................................1
1.2 Logical Configuration of Easylon Router+with 2 Ports.......................................2
1.3 Remote Network Interface.....................................................................................2
1.4 LEDs, Buttons and DIL Switches..........................................................................4
1.5 Important Notes .....................................................................................................6
Setting-Up the Device ........................................................................................................72
2.1 Connecting Cables .................................................................................................7
2.1.1 Power Supply.........................................................................................................7
2.1.2 Grounding Connections .........................................................................................7
2.1.3 LON/FT Interface ..................................................................................................7
2.1.4 LON/IP Interface ...................................................................................................7
2.2 Installing Software.................................................................................................8
2.3 Connecting to the Web Interface ...........................................................................8
2.4 Specifying the IP Address....................................................................................11
2.5 Adapting the Time Settings .................................................................................12
2.6 Changing the Password, Managing Users ...........................................................14
Configuration Server.......................................................................................................153
3.1 Setting up the Configuration Server ....................................................................15
3.2 Manage Routers via the Configuration Server.....................................................17
3.3 Tips for Configuration Server Settings................................................................19
Using the Router Functionality.......................................................................................214
4.1 Configuring the LON/IP Interface.......................................................................21
4.2 Setting-up the 2 Port Router (LonMaker)............................................................25
4.2.1 Preparation...........................................................................................................25
4.2.2 Commissioning....................................................................................................30
4.3 Configuring the LON/FT Interface......................................................................32
Using the RNI Functionality...........................................................................................335
Performing Service Procedures......................................................................................366
6.1 Restart Router ......................................................................................................36
6.2 Save and Load Configuration ..............................................................................36

Router+
iii
LVR2/UserDoc/Router/2-PortRouter+_2P_Manual-EN-v1.1.docx
6.3 Firmware Update .................................................................................................37
6.4 Reset Router to Factory Defaults.........................................................................38
Solving Problems..............................................................................................................397
7.1 Web Interface of the Router does not Open.........................................................39
7.2 DeviceFinder Does not Work with Certain DSL Routers ...................................40
7.3 LON LEDs Don’t Flicker ....................................................................................40
7.4 Communication Problems at the LON/IP Channel..............................................42
7.5 Status and LON LEDs Momentarily Glow..........................................................44
7.6 No Routing...........................................................................................................44
7.7 The LonMaker Does not Receive the Service Pin Messages ..............................44
Annex ................................................................................................................................468
8.1 Survey of Node IDs .............................................................................................46
8.2 Technical Specifications......................................................................................46
8.3 Echelon Configuration Server..............................................................................48
Figures and Tables...........................................................................................................499
9.1 Figures..................................................................................................................49
9.2 Tables...................................................................................................................50
Index..................................................................................................................................5110
Router+About Easylon Router+
1
LVR2/UserDoc/Router/2-PortRouter+_2P_Manual-EN-v1.1.docx
About Easylon Router+1
1.1 Functions
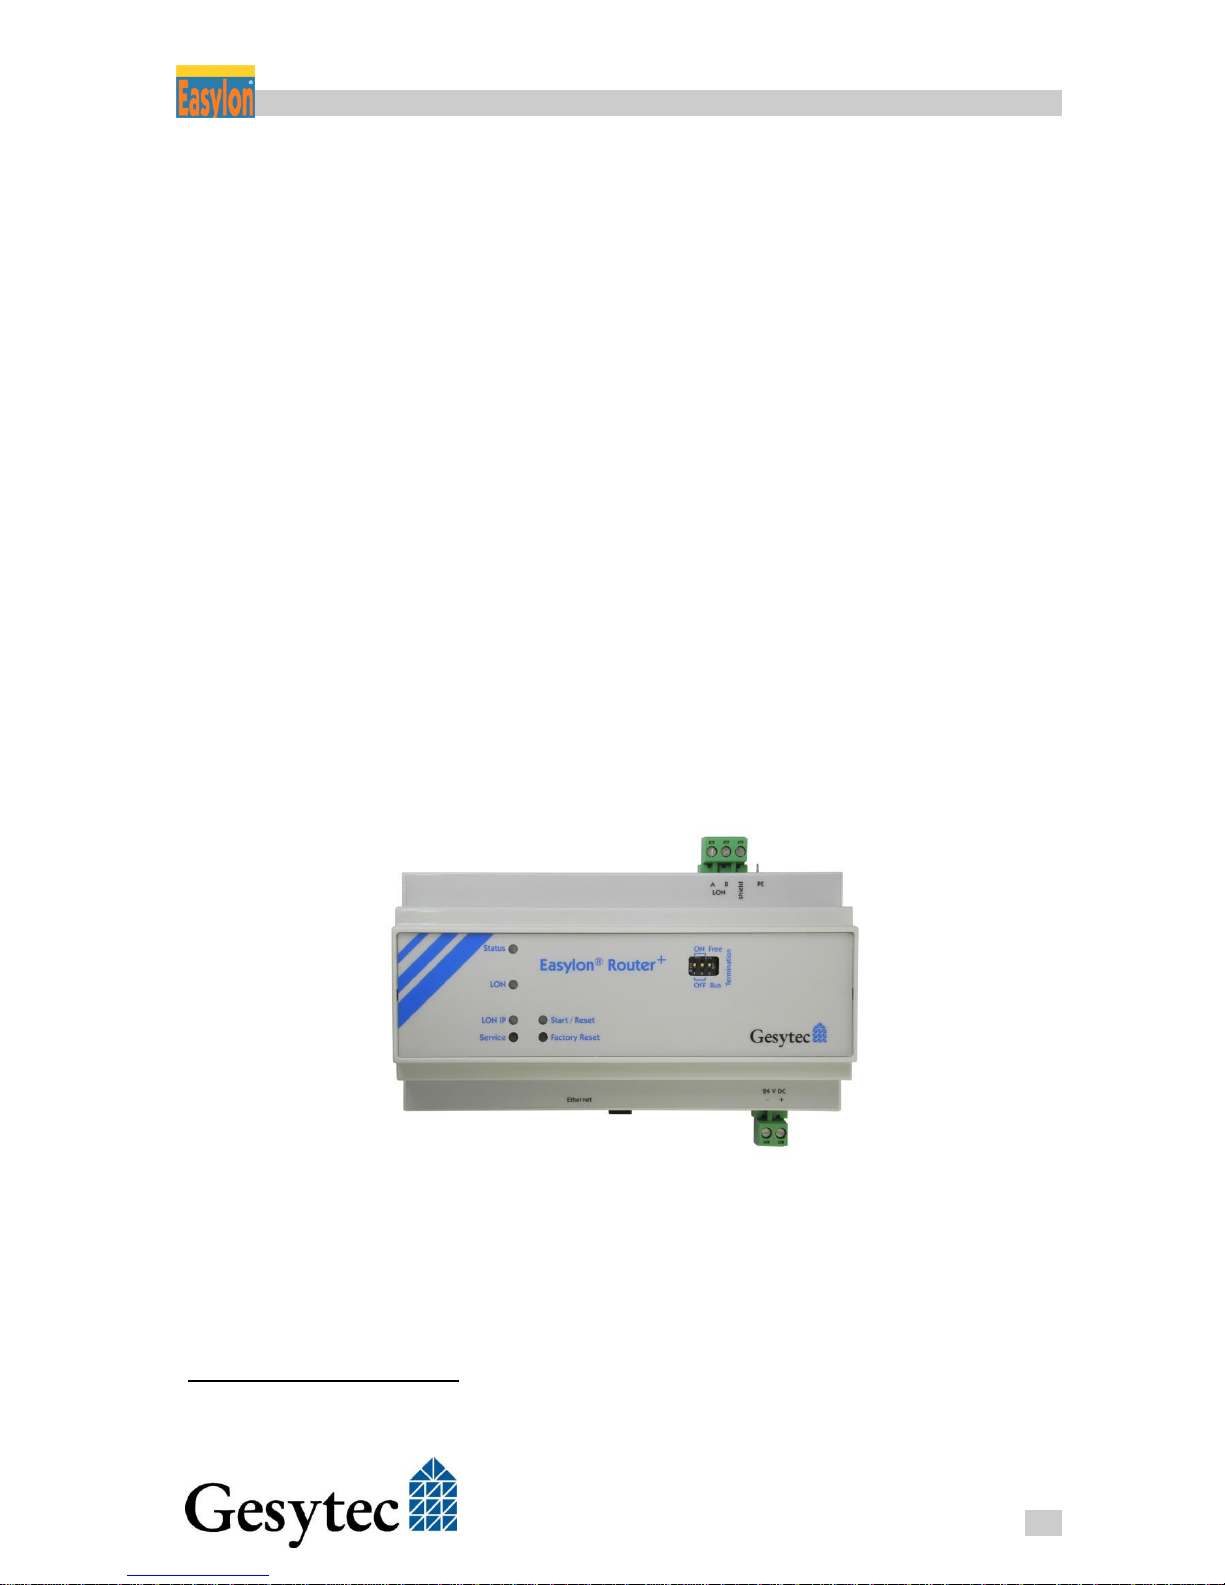
Easylon Router+with 2 ports
1
flexibly provides different functionalities within
the LONWORKS environment:
As router it connects a LON/FT (LONWORKS,CEA-709.3) network and
one CEA-852 (LON/IP) compatible network to each other.
As TCP/IP Remote Network Interface the device is suitable for VNI
and Layer-5 applications for remote access to LONWORKS networks.
An integrated time server (NTP) can bet activated for the connected
networks in order to synchronize the available devices to each other.
Configuration and diagnosis of the device are realized via an integrated Web In-
terface. LEDs at the front side of the housing indicate the current statuses of the
router interfaces. By means of buttons different service functions can be released
while a bus termination for the connected LON/FT segment can be set via DIL
switches.
Figure 1-1: Easylon Router+with 2 Ports
1
There is also a version of the Easylon Router+with one IP and two FT port available.

Router+About Easylon Router+
2
LVR2/UserDoc/Router/2-PortRouter+_2P_Manual-EN-v1.1.docx
1.2 Logical Configuration of Easylon Router+with 2 Ports
Physically the router consists of an FTT-10 transceiver for the LON/FT
LONWORKS network connection (CEA-709.3) and an Ethernet interface for
connection to a LON/IP LonWorks network (CEA-852).
The Easylon Router+with 2 ports operates as any LONWORKS router. It can be
commissioned with any LNS based network management tools e.g the LonMak-
er by Echelon.
24 V D C
–+Ethernet
Easylon®Router+
Status
LON
LON IP
Service
Start / Reset
Factory Reset
ON Free
OFF Bus
A B PE
LON
shield
LON / IP
Figure 1-2: Router Logic
1.3 Remote Network Interface
Using the Gesytec RNI technology a standard LONWORKS interface to access
each channel of the Easylon Router+ can be created, meaning that for the 2-port
router an access to the LON/IP channel, the LON/FT channel can be realized.
As a Remote Network Interface is available for each channel of the router, a
transparent access to the individual channels –such as for the common diagnosis
tools or the Easylon Analyzer software–can be used independent from the
LON/IP technology. The RNI driver by Gesytec provides an Echelon compatible
driver interface.
The access is available in both modes, VNI and MIP. Details related to address
generation of the specific Node IDs are included in chapter 8.1 “Survey of Node
IDs“. Chapter 4.3 informs about the RNI configuration to use the various con-
nections.

Router+About Easylon Router+
3
LVR2/UserDoc/Router/2-PortRouter+_2P_Manual-EN-v1.1.docx
Please use an RNI driver for a MIP interface for normal LONWORKS applica-
tions. A VNI interface may only be used for applications explicitly supporting
the VNI technology, such as LNS.
Router
LON
LON IP
VNI
MIP
50001
50011
VNI
MIP
50000
50010
Figure 1-3: Assignment of the IP-Ports to the Router Channels

Router+About Easylon Router+
4
LVR2/UserDoc/Router/2-PortRouter+_2P_Manual-EN-v1.1.docx
1.4 LEDs, Buttons and DIL Switches
24 V D C
–+Ethernet
A B PE
LON
shield
X1 X2
X3 X4
Easylon®Router+
Status
LON
LON IP
Service
Start / Reset
Factory Reset
ON Free
OFF Bus
1
2 3
Figure 1-4: Control Elements and Connections
X1 LONWORKS connections, LON/FT (CEA-709)
X2 Protective earth
X3 Ethernet connection, LON/IP (CEA-852)
X4 Connection to power supply
Switches for bus termination setting
LON service button
Factory reset button
LEDs
The following LEDs are available at the front side of the housing and at the lat-
eral RJ45 connector:
Status: After activation this LED initially glows red. As soon as the rout-
er is ready for operation it changes to green. If the device has discovered
an error, the LED constantly glows red. An overload situation on one of
the two channels will be visualized by a permanently red status LED and
activation of the respective channel LED for one second.

Router+About Easylon Router+
5
LVR2/UserDoc/Router/2-PortRouter+_2P_Manual-EN-v1.1.docx
If the device has no IP address
2
the LED is flashing periodically red (or
green, if its base state is already red due to another condition).
LON and LON/IP: During the router’s initial phase those LEDs remain
disabled. The LEDs flicker during operation if data are transmitted via
the respective channel. In case of overload of a channel the appropriate
LED glows red for one second while the status LED is continuously set
to red.
Start / Reset: This LED glows green while the router is launched. During
a Factory Reset the LED gives different signals, cf. chap. 6.4.
When the router is running, this LED also shows the connection state to
the Configuration Server: LED on = connected to Configuration Server.
Ethernet: The RJ45 connector includes a green and a yellow LED. As
soon as a connection between an IP network has been established, the
green LED is glowing. While transmitting data packets, the green LED
flickers. The yellow LED indicates the connection speed. Is this LED il-
luminated, the speed is 100 Mbit/s, otherwise 10 Mbit/s.
Buttons
Furthermore the device is provided with two buttons:
Service: By pushing this button, service pin messages are sent out on
both LON interfaces and the LON and LON/IP LEDs give a are short
signal.
Factory Reset: This button sets the device back to the factory settings, as
described in chapter 6.4.
Via the DIL switches a topology dependent bus termination can be set for the
LON/FT segment:
Free / Bus: With the right switch of the block you specify if a termina-
tion is to be switched for free topology “Free“(50 Ohm) or for a bus
topology “Bus“ (110 Ohm).
ON / OFF: The termination itself is switched “Off”and “On”by turning-
over both left switches.
Always switch over both left termination switches, which means they always
have to be set to OFF or ON together, but never oppositional.
2
This may be caused by missing Ethernet connection or a duplicate IP address may have been assigned.

Router+About Easylon Router+
6
LVR2/UserDoc/Router/2-PortRouter+_2P_Manual-EN-v1.1.docx
1.5 Important Notes
The designated use of the Easylon Router+is the transmission of information be-
tween a LON/FT network and a LON/IP network, the function as Remote Net-
work Interface and the specification of a reference time (Time Server).
Only use main adapters for the power supply of the Router+that are provided
with a SELV identification and a connecting cable with a maximum length of
1.5 m.
By default, the router is supplied with the preset, constant IP-Address
192.168.100.100. In order to avoid collisions, make sure that this IP-
Address has not already been assigned to another device in your network.
To allow for access to the setting options of the router via the Web Interface, a
user with name „gesytec“ and password “admin“ is defined upon delivery.
Please immediately change the password after initial commissioning.
Autres manuels pour Easylon
1
Ce manuel convient aux modèles suivants
1
Table des matières
Autres manuels Gesytec Routeur réseau
Manuels Routeur réseau populaires d'autres marques


NETGEAR
NETGEAR FS526T - Switch Manuel utilisateur

Korenix
Korenix JetNet 5710G Series Manuel utilisateur

Automated Logic
Automated Logic ZN551 Manuel du propriétaire

Cisco
Cisco ASR 1000 Series Manuel de l'opérateur

EnGenius
EnGenius ESR-9710 Manuel utilisateur

Cisco
Cisco 805 Series Instructions d'utilisation et de sécurité