geratech EGE-HDMV-441SL Manuel utilisateur

EGE-HDMV-441SL
4×1 HDMI Seamless Quad Switcher


EGE-HDMV-441SL
4×1 HDMI Seamless Quad Switcher
DISCLAIMERS
The information in this manual has been carefully checked and is believed to be accurate.
Geratech Technology assumes no responsibility for any infringements of patents or other
rights of third parties which may result from its use.
Geratech Technology assumes no responsibility for any inaccuracies that may be
contained in this document. Geratech also makes no commitment to update or to keep
current the information contained in this document.
Geratech Technology reserves the right to make improvements to this document and/or
product at any time and without notice.
COPYRIGHT NOTICE
No part of this document may be reproduced, transmitted, transcribed, stored in a retrieval
system, or any of its part translated into any language or computer le, in any form or by
any means—electronic, mechanical, magnetic, optical, chemical, manual, or otherwise—
without express written permission and consent from Geratech Technology.
© Copyright 2016 by Geratech Technology.
All Rights Reserved.
TRADEMARK ACKNOWLEDGMENTS
All products or service names mentioned in this document may be trademarks of the
companies with which they are associated.

EGE-HDMV-441SL
4×1 HDMI Seamless Quad Switcher
SAFETY PRECAUTIONS
Please read all instructions before attempting to unpack, install or operate this equipment
and before connecting the power supply.
Please keep the following in mind as you unpack and install this equipment:
• Always follow basic safety precautions to reduce the risk of re, electrical shock and
injury to persons.
• To prevent re or shock hazard, do not expose the unit to rain, moisture or install this
product near water.
• Never spill liquid of any kind on or into this product.
• Never push an object of any kind into this product through any openings or empty slots
in the unit, as you may damage parts inside the unit.
• Do not attach the power supply cabling to building surfaces.
• Use only the supplied power supply unit (PSU). Do not use the PSU if it is damaged.
• Do not allow anything to rest on the power cabling or allow any weight to be placed
upon it or any person walk on it.
• To protect the unit from overheating, do not block any vents or openings in the unit
housing that provide ventilation and allow for sufcient space for air to circulate around
the unit.
REVISION HISTORY
VERSION NO. DATE (DD/MM/YY) SUMMARY OF CHANGE
VR0 07/03/16 Preliminary release
VS1 20/02/17 Updated text and diagrams

EGE-HDMV-441SL
4×1 HDMI Seamless Quad Switcher
CONTENTS
1. Introduction.........................................................................1
2. Applications ........................................................................1
3. Package Contents ..............................................................1
4. System Requirements........................................................1
5. Features...............................................................................2
6. Operation Controls and Functions ...................................2
6.1 Front Panel......................................................................2
6.2 Rear Panel.......................................................................3
6.3 Remote Control ...............................................................4
6.4 OSD Menu.......................................................................5
6.5 RS-232 Protocol ............................................................ 11
6.6 RS-232 and Telnet Commands .....................................12
6.7 Telnet Control ................................................................20
6.8 WebGUI Control ............................................................22
6.8.1 Image Adjust ..........................................................23
6.8.2 Image Swap...........................................................23
6.8.3 Output Resolution ..................................................24
6.8.4 Windows Setup......................................................24
6.8.5 OSD/LOGO Settings..............................................25
6.8.6 Window Convert ....................................................26
6.8.7 Chromakey Setup ..................................................26
6.8.8 Ethernet .................................................................27
7. Connection Diagram ........................................................28
8. Specications ...................................................................29
8.1 Technical Specications ................................................29
8.2 Video Specications ......................................................30
9. Acronyms .......................................................................32

EGE-HDMV-441SL
4×1 HDMI Seamless Quad Switcher
1
1. INTRODUCTION
This HDMI Switcher is a high performance, low latency, multi-windowing system that can
be easily congured for a variety of professional video processing tasks. Up to 4 different
input sources may be freely selected and arranged and output to a single display. When
switched into single window mode the unit can be a seamless switcher with cross-fade
support, or two sources can be combined with the use of chroma keying. 90-degree
rotation is also supported when outputting a single full screen window. Additionally, the
unit supports the option of uploading a graphic logo for display over the top of the output
video. Video resolutions up to 1080p60 and PC resolutions up to WUXGA are supported
along with audio up to 192kHz, 7.1 channel, LPCM for both inputs and output. The unit can
be controlled in a wide variety of ways, including via front panel buttons with OSD menu,
WebGUI, Telnet, RS-232, and IR remote.
2. APPLICATIONS
• Broadcasting control rooms
• Surveillance rooms
• Public commercial displays
• Video conference and digital presentation boardrooms
3. PACKAGE CONTENTS
• 1×4 by 1 HDMI Switcher with PiP/PoP & Multi-Window Display
• 1×Remote Control (CR-124)
• 1×12A/3A Power Adaptor
• 1×Rack Mount Ears (Set of 2)
• 1×Operation Manual
4. SYSTEM REQUIREMENTS
• HDMI source equipment such as media players, video game consoles or set-top boxes.
• HDMI receiving equipment such as HDTVs, monitors or audio ampliers.

EGE-HDMV-441SL
4×1 HDMI Seamless Quad Switcher
2
5. FEATURES
• Seamless switching between sources and windows
• Supports PiP, PoP, and multi-window display
• Easy individual window size and position and layer priority adjustment
• Enlarge or shrink up to 4 input windows
• Crossfade, chroma key, mirror, and rotation (90˚ left/right and 180˚) functions
• Supports the uploading of a user customizable graphic for display over the top of video
output
• 8 hot keys dedicated to window and source selection, 4 customizable window layout hot
keys, and 4 software-only hot keys for additional stored window layout congurations
• Control via front panel with OSD menu, WebGUI, Telnet, RS-232, and IR remote
6. OPERATION CONTROLS AND FUNCTIONS
6.1 Front Panel
1234
4
1
2
3
1
POWERMENU
CHANNEL
INPUT
WINDOW 23 4
21
34
ABCDE
GH
F
234
1
34
12
-
+
1 2 3 4 65
1IR WINDOW: Accepts IR signals from the included IR remote for control of this unit only.
2POWER: Press this button to power the unit on or place it into stand-by mode. In stand-
by mode the button will be lit RED.
3MENU: Press this button to enter the OSD menu, or to back out from menu items.
4-/+: Press these buttons to move up and down or adjust selections within menus.
5CHANNEL INPUT 1~4: Press these buttons to sequentially switch through the available
inputs for each associated window channel
EGE-HDMV-441SL
4×1 HDMI Seamless Quad Switcher
3
(1~4). It is possible for a single input to be displayed in multiple windows simultaneously.
6WINDOW A~H: Press buttons A~D will put the unit into full screen single window
mode and display the associated channel’s currently selected source (1~4). Switching
between windows A~D is seamless, and if the “Fade” option has been turned on a
crossfade will occur during the switch.
Press buttons E~H will put the unit into multi-window mode, allowing it to display up to 4
channels simultaneously, and display the associated pre-saved channel window layout.
The individual channel window positions, sizes and depth priority can be fully congured
via OSD menu, WebGUI, etc. Any changes made to channel position, size or depth will
be automatically applied and saved to the current Window. By default the channel depth
priority is (top to bottom): CH4 > CH3 > CH2 > CH1.
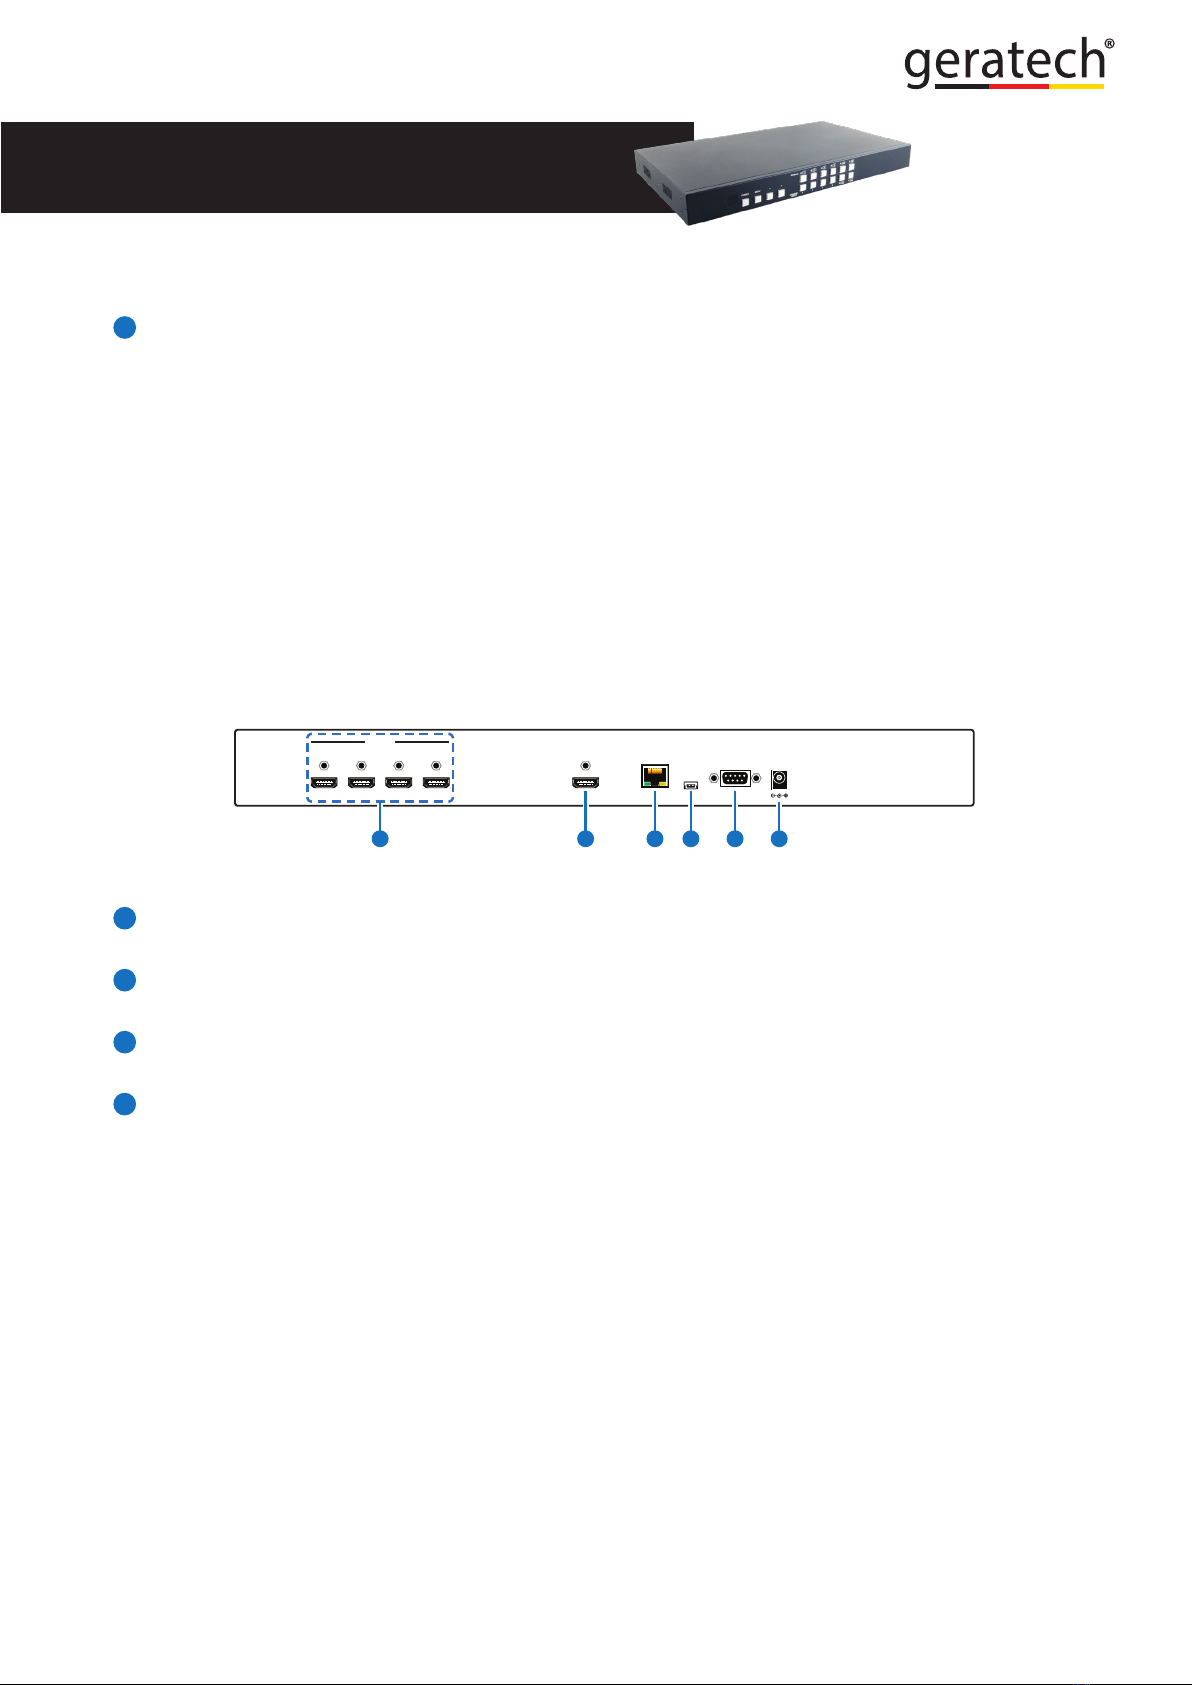
6.2 Rear Panel
RS232 DC 12V
USB
SERVICE
ONLY
CONTROL
HDMI OUT
4321
HDMI IN
2 3 4 651
1HDMI IN 1~4: Connect to HDMI source equipment such as media players, game
consoles or set-top boxes.
2HDMI OUT: Connect to an HDMI TV, monitor or amplier for digital video and audio
output.
3CONTROL: Connect directly, or through a network switch, to your PC/laptop to control
the unit via Telnet/WebGUI.
4USB SERVICE ONLY: This slot is reserved for rmware update, logo le upload, and
factory use only.
Logo le requirements: A 256 color bitmap (.bmp) le with a maximum resolution of
512×512 pixels.
Upload procedure: Enter the OSD menu and activate the Load New Logo function (I/
O Setup→LOGO Settings→Load New LOGO→Yes) to activate the mini-USB port. The
Window A and CH1 button LEDs will illuminate to indicate it has entered logo update
mode. You may now connect the unit to your PC via a mini-USB to

EGE-HDMV-441SL
4×1 HDMI Seamless Quad Switcher
4
USB cable. The unit should appear as an empty USB drive on your PC named “USB
UPDATE”.
Drag or copy the logo le into the new “USB UPDATE” drive on your PC and the upload
will automatically proceed. All Window and Channel buttons will be illuminated while the
upload is in process. After 1~2 minutes the device will automatically reboot and the logo
will be available for use.
5RS-232: Connect directly to your PC/laptop to send RS-232 commands to control the
unit.
6DC 12V: Plug the 12V DC power adapter into the unit and connect it to an AC wall outlet
for power.
6.3 Remote Control
1Power: Press to power the unit on or place it into
stand-by mode.
2Info: Press to show the unit’s rmware version.
3CH 1~CH 4: Press to sequentially switch through
the available inputs for each associated window
channel (1~4).
4WA~WH: Press these buttons to select the desired
window arrangement for output. WA~WD are for
full screen, single window, video output. WE~WH
are for multi-window pre-saved channel layouts.
5Mute: Press to mute the audio from the HDMI
output.
6
▲/▼/◄/► & OK: Press the arrows to navigate
the OSD menu and press OK to conrm selections.
7Menu: Press to enter the OSD menu.
8Exit: Press to back out from menu items, or to exit
the OSD menus.
9Audio 1~Audio 4: Press to select the active audio
source from HDMI input source 1~4.
10 FAV. 1~FAV. 4: Press to activate one of the 4
additional pre-saved channel layouts.
11 Fade-In-Out*: Press to toggle the Fade-in-out
function on/off.

EGE-HDMV-441SL
4×1 HDMI Seamless Quad Switcher
5
Chroma Key*: Press to toggle the Chroma Key function on/off.
Note: Channel 1 is always the background and channel 2 is always the keyed
foreground image.
Mirror*:
Press to display current channel mirrored (left/right).
Rotation*:
Press to rotate the image 90˚ left, 90˚ right or 180˚.
Note: For functions with asterisks (*) only work on Windows A~D. The unit will
automatically switch to Window A if they are activated while displaying Windows E~H.
6.4 OSD Menu
LEVEL 1 LEVEL 2 LEVEL 3 LEVEL 4
I/O Setup Output
Resolution
480p
576p
720p50
720p60
1080p24
1080p25
1080p30
1080p50
1080p60
1024×768
1280×800
1280×1024
1366×768
1440×900
1600×900
1600×1200
1680×1050
1920×1200
Native
Menu Exit
Table des matières
Autres manuels geratech Changer


