GameChanger VISION CAM Manuel utilisateur

INSTRUCTION MANUAL
fwww.GameChangerTraps.com
501-746-0711

TABLE OF CONTENTS
2
Table of Contents
Introduction
InVid Vision App Download & Setup
InVid Vision App Quick Start Guide
Live View Instructions
Device Config. and Motion Detection
Alarm Notification and Wifi Capability
Setting Camera Up on Trap
Best Practices and Troubleshooting
Limited Warranty and Terms of Use
2
3
4
5
6
7
8
9
10
11

3
INTRODUCTION
What is included?
• Vision Camera
• Wand Antenna
• Storage Box
• Clean Wipes
• 5’ Antenna Cord
• Vision Camera Instructions
1. Antenna Port
2. Gate Plug
3. Camera Lens
4. Camera Mount
5. Power Plug
6. Power/Gate Plug (optional)
7. Wand Antenna
8. Camera Status
Power:
Solid Red – Good
Status:
Solid Green – Good
Cellular:
Solid Orange – Good
Signal:
Solid Green – Great Signal
Orange – Good Signal
Red – Poor Signal
Wi-Fi:
Blinking Green – Good
Support Text 501-746-0711
1
2
3
4
56
7
8

4
InVid VISION APP DOWNLOAD & SET-UP
DOWNLOAD THE
InVid VISION APP
VISIT YOUR APP STORE TO DOWNLOAD
Create Account
• Click on Log In/Sign Up
• Click Sign Up
• Enter your email address
• Agree to Service Agreement and Verify
• You will receive an email with a verification
code
• The app will automatically prompt you to enter
the code you received by email
• Create a password for the account
Text the email address to
501-746-0711
so the camera can be added to the account.

5Support Text 501-746-0711
InVid VISION APP QUICK START GUIDE
Setting Up Push Notifications
From the HOME MENU
• Select Me
• Select General
• Select Push Notification Settings
• Turn on the “Allow Notifications”
(the slider should in the on
position)
General Information on App
• Select Me
• Help and Feedback
• Function Introduction
Checking Camera Settings
After you have texted Game Changer
your email address and the camera is
added to your account, you will be able to
configure the following settings:
• Go to Devices
• Select your camera
• A list will appear at the bottom
of the screen
• Select edit
Make sure:
• Streaming is on
Protocol 2
• Live View is on
Low
• Playback is on
Low
You can also access the “Live View”
from the pop of screen as well.

6
LIVE VIEW INSTRUCTIONS
Once the camera is in position and streaming from the trap, you will be able to view and use
the function of the InVid App.
To access Live View from the Home Screen
• Click on the Menu Bar to return to the
home screen
• Then select Live View
Main App Functions
Snap a still image, to dowload go to
Menu > Picture and Video > Go to
Share to Text > Email or Save
Record footage while viewing, to
download go to Menu > Picture and
Video > Go to Share to Text > Email or
Save
Change Quality of video from High,
Medium, Low Resolution. For Bad
signal area use Low Resolution
To DROP GATES click Alarm Out >
Click Alarm Output1 > Make sure to
turn back OFF after Gates Drop
Quickly access playback of previous
recorded footage.
7Support Text 501-746-0711
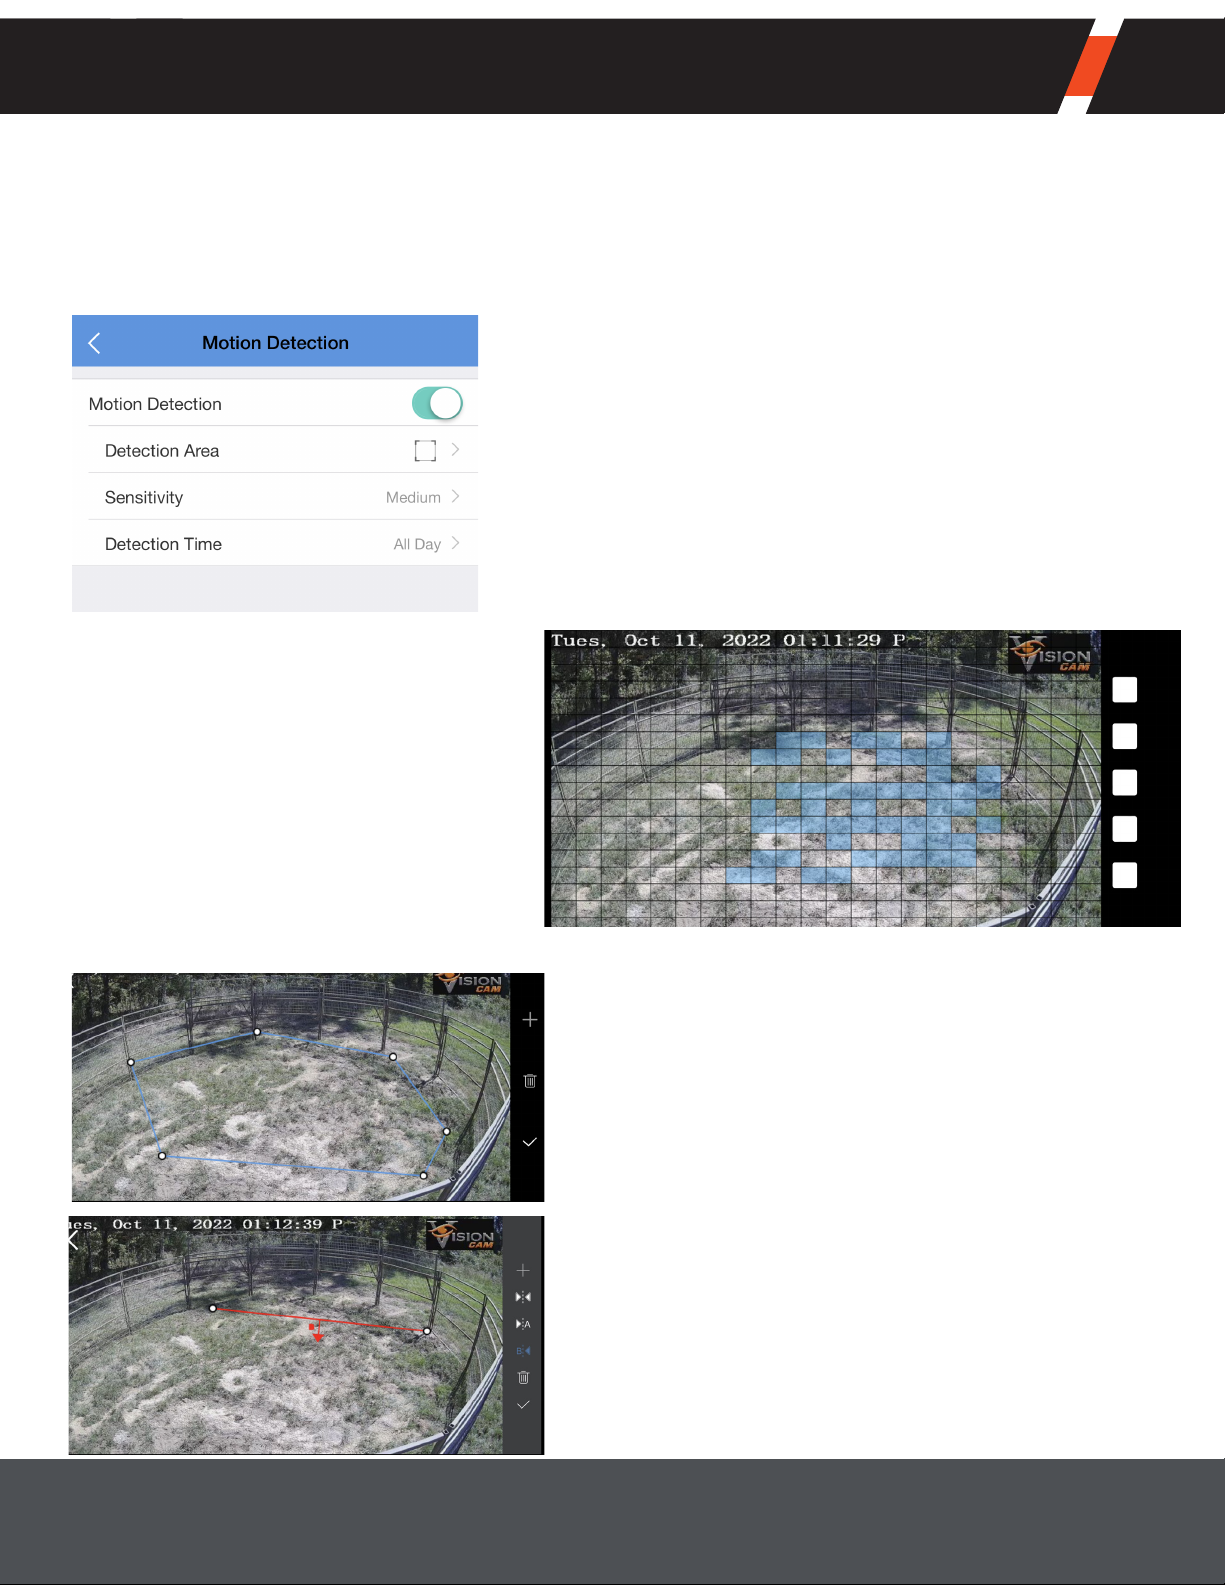
DEVICE CONFIG. & MOTION DETECTION
Device Configuration
To set motion detection and intrustion or crossline detection use Device Configuration.
This can be accessed from the main menu page or on the Live View screen.
From Device Configuration
• Click General Detection
• Click Motion Detection
• Motion Detection can be turned ON or OFF
• Click Detection Area to change the motion
detection on trap
• Click middle button to Erase
• Second from top to Add
• And top button to Save changes
Setting Sensitivity
Sensitivity can be set as Low,
Medium, or High
Detection Time
Detection time can be changed
from All Day or Custom
From Device Configuration
• Click VCA Detection
• Click Intrusion or Crossline
• Intrusion or Crossline can be turned ON or
OFF
• Click Detection Area to change the detections
on trap
• Move the dots to increase or decrease the
size of the detection area for Intrusion
• Move the dots to draw a line for the
Crossline detection
• Crossline be changed to set an in or out
detection

8
ALARM NOTIFICATION & WIFI CAPABILITY
Click on Alarm Notifications from the Main Menu to access notifications stored from
push notifications (May need to swipe down to update).
Click to Limit Playback to Motion or VCA Detection
Click to access Playback at that specific time
Wi-Fi Connect
The Wi-fi is only intended to be used while setting up the trap and troubleshooting in low
signal areas.
No other transmission should be used on the camera’s wi-fi.
• To connect, the camera must be powered up
• You must be within 10-15 feet
• Connect to wi-fi in settings on your phone, choose Game Changer, Password is
bullcreek1
• Once phone is connected to the camera it will transmit data and cellular signal thru

9Support Text 501-746-0711
SETTING CAMERA UP ON TRAP
Refer to page 3 for Camera Images
1. Secure Directional Antenna to top of camera pole, attach the five-foot cable to the antenna.
(When mounting the directional antenna make sure the small hole is facing toward the ground.)
2. Using the clamp (4) on the Vision Cam, attach it to the pole. Attach the five-foot cable from the
antenna to the 4G connector (1) on the camera.
3. Depending on the electronic package:
• Traps with a 3 Prong Yellow Cord attach it to 3 Prong Power on the camera (6). You will not
use the other power and gate port (5, 2).
• Traps with the Two Prong Power, connect wire to the Two Prong Power on the camera (5),
then connect the Two Prong Gate to the gate latch (2).
Now wait around 5-10 minutes for the camera to power up.
(Refer to page 3 for power light status.)
4. View the camera from the app and adjust camera mount to get full view of the trap. In low signal
areas refer to
page 8
for wi-fi option. Use the lens cleaner to clean any dust o the lens.
5. Always test the latch before you set the gates.
• On the trap click the latch closed, then go to the app and hit Alarm Out, next Alarm Out 1.
You should hear and see the latch open. Make sure you toggle alarm out 1 to o before exiting
the app. (
Refer to page 6
)
YOU ARE NOW READY TO SET YOUR GATES.
Charge Controller Configuration
Things to be aware of and check on the Charge controller located in the battery box.
• If the charge controller is showing 10.7 V Load or lower it will
NOT
supply power to the cam-
era.
• Once the solar panel charges the battery and the charge controller gets back to 12 V Load it
will turn the camera back on.
Solar Indicator:
Green Constant On: Bulk Equalization Charge
Green Slow Flash: Float Charge
Green O: Not Charging
Battery Indicator:
Green Flash: Battery too High
Green On: Battery Normal
Yellow On: Battery Medium
Red On: Battery Low
Red Flash: Battery Very Low
Load Indicator:
Red On: Load Output Normal
Red O: Load Not Working
Normally a fully charged 30 ah battery will last
4 days
with no solar input.

10
BEST PRACTICES & TROUBLESHOOTING
Best Practices
• You have 2 Gigs of data which is about 8 hours of live streaming on low quality resolution.
Try to only watch live video in short increments.
• Always check the signal of an area before even baiting hogs. A good rule is to have at least
1 bar of LTE on your cell phone for the camera to perform correctly.
• Download the Open Signal App. This app helps to find the direction of the closest cellular
tower and check data speed.
• Face the solar panel in direct sunlight facing south. Periodically clean dust o of solar
panel.
• Always check your batteries each time you visit the trap. Using a voltage meter is a quick
and easy way to make sure it is charged.
• It’s a good idea to have a spare battery that is fully charged in case it needs switched out.
• In the colder months with less sunlight the batteries will drain faster and will not charge as
much due to short days.
• During transport, always store the camera in the camera box provided.
Troubleshooting
Camera will not connect through the app.
1. Check the status of your lights.
2. It may help rotating the directional antenna to the closest cellular tower using the open
signal app.
3. In very poor signal areas, a second directional antenna can be connected instead of the
wand antenna (7) to improve service.
(See page 3)
4. Raising directional antenna may also help in poor service areas.
Camera not powering up.
1. Make sure battery is above 12 V.
2. Check all connections from battery, charge controller, and camera.
3. Check for any corrosion.
Not receiving notifications.
1. Make sure the
“Allow Notifications”
on the app is set to on.
2. Check your phone settings to make sure the app can send notifications.
Poor video quality.
1. Clean the lens.
2. Good signal areas you may be able to stream in medium resolution instead of low.
If you are still having issues text
501-746-0711
and a representative will get back with you as
soon as possible.
Table des matières


