FOXTR FOXTR2 Manuel utilisateur

Mid-Size Mobility Scooter
Model – FOXTR2
USER MANUAL
Please ensure that this user manual is read and understood before using the scooter

1
Contents
Introduction …………………………………………………………………….2
Intended Use ……………………………………………………………………2
Technical Specifications ………………………………………………………2
Feature Guide …………………………………………………………………..3
Safety Advice……………………………………………………………………4
Adjustments
Tiller Angle Adjustment …………………………………………………….5
Seat Swivel ………………………………………………………………….5
Seat Removal ………………………………………………………………..6
Tiller Controls ……………………………………………………………………7
Brake Release / Free Wheel Operation………………………………………8
Starting to Drive
Getting started………………………………………………………………..9
Moving off ……………………………………………………………………9
Steering …………………………………………………………………….10
Ramps and Slops ………………………………………………………….10
Surfaces …………………………………………………………………….10
Transferring…………………………………………………………………10
Storage………………………………………………………………………… 10
Battery and Battery Charger………………………………………………… 11
Maintenance …………………………………………………………………..13
Troubleshooting
Fuses……………………………………………………………………….. 13
Check List……………………………………………….………………… 13
Error Chart………………………………………………………………….. 14
Further Information…………………………………………………………….15
Warranty ………………………………………………………………………..17

2
Introduction
Congratulations on your purchase of the FOXTR 2 Mobility Scooter. This scooter incorporates the latest
innovative designs to guarantee a comfortable ride. The FOXTR 2 Scooter can be used in confined spaces
both indoors and out. Equipped with a direct drive rear transaxle and electromagnetic brake, the FOXTR 2
provides a safe and efficient experience.
Intended use
The FOXTR 2 is intended for indoor or outdoor use in pedestrian areas by a single individual with limited
mobility up to a maximum weight of 136kg (300 lbs). It’s precise maneuverability prohibits the use by
persons experiencing balance difficulties. Your assessor / healthcare professional will determine the
suitability of the scooter for each individual’s intended use.
Note:
Persons with lower body amputations should not use this device unless evaluated with artificial limbs fitted,
as stability may be compromised due to an irregular centre of gravity.
Technical specifications
Class 1 Medical Device (93/42/EEC as amended by 2007/47/EC)
Class 2 Indoor/Outdoor Vehicle (Use of Invalid Carriages on Highways Act)
Overall Size Seat Dimensions
Length 1280 mm (50”)
Width (Arms) 600 mm (23.6”)
Width (Mirrors) 730 mm (28.7”)
Width (Wheels) 630 mm (24.8”)
Max Height (with mirrors) 1170 mm (46.06”)
Battery 38 Ah
Maximum user weight 136 kg / 300 lbs
Range 32Km/20 miles
Battery Charger 3 Ah
Height Seat to Floor 560 mm (22.0”)
Turning Radius 1550 mm (61")
Safe working slope 8°
Overall Weight 94 kg (207 lbs)
Max. Speed 6.4 km/h (4mph)
Seat Width 480 mm (18.9”)
Backrest Height 530 mm (20.8”)
Seat Depth 410 mm (16”)
Component Weights
Seat 18.5 kg (40.7 lbs)
***Passenger weight, rough ground
conditions, low temperatures and battery
condition can affect maximum ran
g
e

3
Feature guide
FOXTR 2
1 Shopping Basket
2 Wing Mirrors
3 Padded seat and fold down backrest
4 Flip up adjustable arms rests
5 Seat swivel adjustment & seat depth slider
6 Rear Shock Absorbers
7 Pneumatic tires
8 Front LED light
9 Tiller adjustment hand knob

4
Safety advice
Do:
• Read this manual carefully before using your scooter.
• Turn the power off when transferring to and from the scooter.
• Select a slow speed when going down gradients (max 8°) or over uneven ground.
• Keep your feet on the scooter whilst driving.
• Ensure the seat is in a fixed position facing forwards before driving.
• Ensure the tiller is secure.
• Ensure the batteries are fully charged before your journey.
• Avoid rough or soft terrain and long grass wherever possible.
• Be aware of other road users and pedestrians.
• Turn the power off when not in use.
• Follow the maintenance guide to ensure safe operation of the scooter.
• Always remove the keys if leaving the scooter unattended. Unauthorized persons/ children may use the
scooter resulting in injury.
Do not:
• Carry passengers.
• Exceed inclines over 8°.
• Traverse inclines.
• Attempt inclines if the surface is slippery.
• Turn sharply at full speed.
• Exit or enter the scooter unless the power is switched off.
• Switch off the power whilst driving - this will cause the scooter to stop abruptly (see emergency procedures -
page 16).
• Use the scooter where you cannot safely or legally walk.
• Attempt to climb or descend kerbs except drop down kerbs.
• Use the scooter if under the influence of alcohol or any medication.
• Use a mobile phone whilst driving.
• Attempt to negotiate steps or escalators.
• Sit on the scooter if being transported in a vehicle.
• Attempt to tow any other devices.
• Exceed the stated weight limit.
• Connect any other devices to the batteries as this could cause permanent damage and void your warranty.
• Use any other batteries/charger other than those supplied by FOXTR.
• Travel through water or over soft terrain (mud, sand etc.)
• Lift the scooter by the shroud assembly or any plastic part.
• Sharply shift your centre of gravity as this could make the scooter unstable.
• Freewheel down hills. This will damage the motor and brake and void the warranty,
• Tow the scooter with any other vehicle in the event of a breakdown.
Every care has been taken to ensure that your scooter will give you safe, reliable service provided you adhere to the
advice given above.

5
Adjustments
Tiller Angle Adjustment
At the bottom right hand side of the scooter you will find the tiller angle adjustment hand wheel. To adjust the
angle, loosen the handwheel by turning anti-clockwise. Once the desired angle is achieved, tighten by rotating
clockwise. Ensure the tiller is fully secure before using the scooter.
Seat Swivel
The seat has a lockable swivel base to allow easier transfers. Simply push the lever circled forward and rotate
the seat at the same time. Releasing the lever will allow the seat to lock in position. The seat locks at 45-degree
intervals. Always ensure the seat is in a locked position before mounting or dismounting the scooter. The seat
should always be locked facing forward while driving.

6
Seat Removal
To remove the seat, fold down the back of the seat and simply lift the seat away from the chassis while lifting the
seat swivel lever.
Caution:
Do not hang baggage or other objects on the back of the seat as this may
affect stability.
Seat Height Adjustment
Remove the seat as previously described. Undo the locking bolt from the frame and set the seat to the desired
height. Re-fit the locking pin. Re-fit the seat as described above in seat removal section.
Caution:
The higher the seat is adjusted; stability may be affected due to the higher centre of gravity.

7
Tiller Control
1. Battery Gauge: This gauge gives you a guide to the amount of charge left in the scooter’s batteries.
This will give the truest reading when the scooter is in motion.
Note: Always fully charge the batteries before driving your scooter and never let the batteries become
completely drained, as this may cause permanent damage to the batteries.
2. Horn: The button operates the scooters horn. This should only be used to warn others of your presence
and not as a rebuke of any form.
Note: This should only be used to warn others of your presence and not as a rebuke of any form
3. Maximum Speed Knob: The speed control enables you to set the maximum speed of the scooter.
Turn clockwise to increase the maximum speed and anti-clockwise to decrease.
Note: Always start at a slow speed until accustomed with the characteristics of your scooter. Do not put
excessive pressure on the dial. Only turn as far as the stops
4. Front Lights: This button operates the LED headlight.
5. On/OffKey: The key switch is located on the right side of the tiller. Simply insert the key and turn
clockwise to switch the power on. The display will light up to indicate the power is on. There may be a
slight delay before the thumb levers operate as the controller checks the scooter’s circuits.
Note: Never leave the key in the switch unattended to prevent unauthorized use. Do not switch the
power off to stop the scooter unless it is an emergency. The scooter will stop very abruptly if stopped in
this way.

8
Brake Release / Free Wheel Operation
The brake release lever is situated at the right rear of the scooter. This lever allows you to disengage the drive
mechanism and push the scooter in 'freewheel' mode.
1. Disengage the drive: Push the lever forward until you reach the stop position (indicated by the 'N'
direction.)
2. Re-engage the drive: Simply push the lever toward the back of the scooter the Drive position- 'D'
position. The scooter will not operate when the lever is in the disengaged position. The scooter must be
turned off and on by the key switch to reset the circuits before it will resume normal operation. The
scooter will beep continually if the brake is disengaged when it is switched on.
Caution:
Never leave the scooter unattended whilst in free wheel mode as it will roll away down an incline.
'Free wheel' mode should only be used in an emergency to move the scooter due to power failure.
NEVER move the scooter in this mode whilst it is occupied. NEVER tow the scooter.
Note:
When in free wheel mode the scooter may be pushed on level ground at a walking pace. The
scooter will 'auto-brake' if this speed is exceeded.
Caution:
Never sit on the scooter and free wheel down a hill as this can cause permanent damage to the
motor, brake and controller due to excessive regenerative braking. As above the scooter can only
be moved at a walking pace when in freewheel mode.
9
Starting to Drive
Getting Started
Check list
Please check the following before moving
• You must fully charge the batteries prior to first use. ('See Batteries and Charging')
• Select a space.
• Mount the scooter by lifting the arm and sliding into the seat.
• Ensure the seat is securely locked in the forward position before driving.
• Adjust the tiller and seat if necessary. (See 'Adjustments')
• Do not use the tiller to fully support you during transfer.
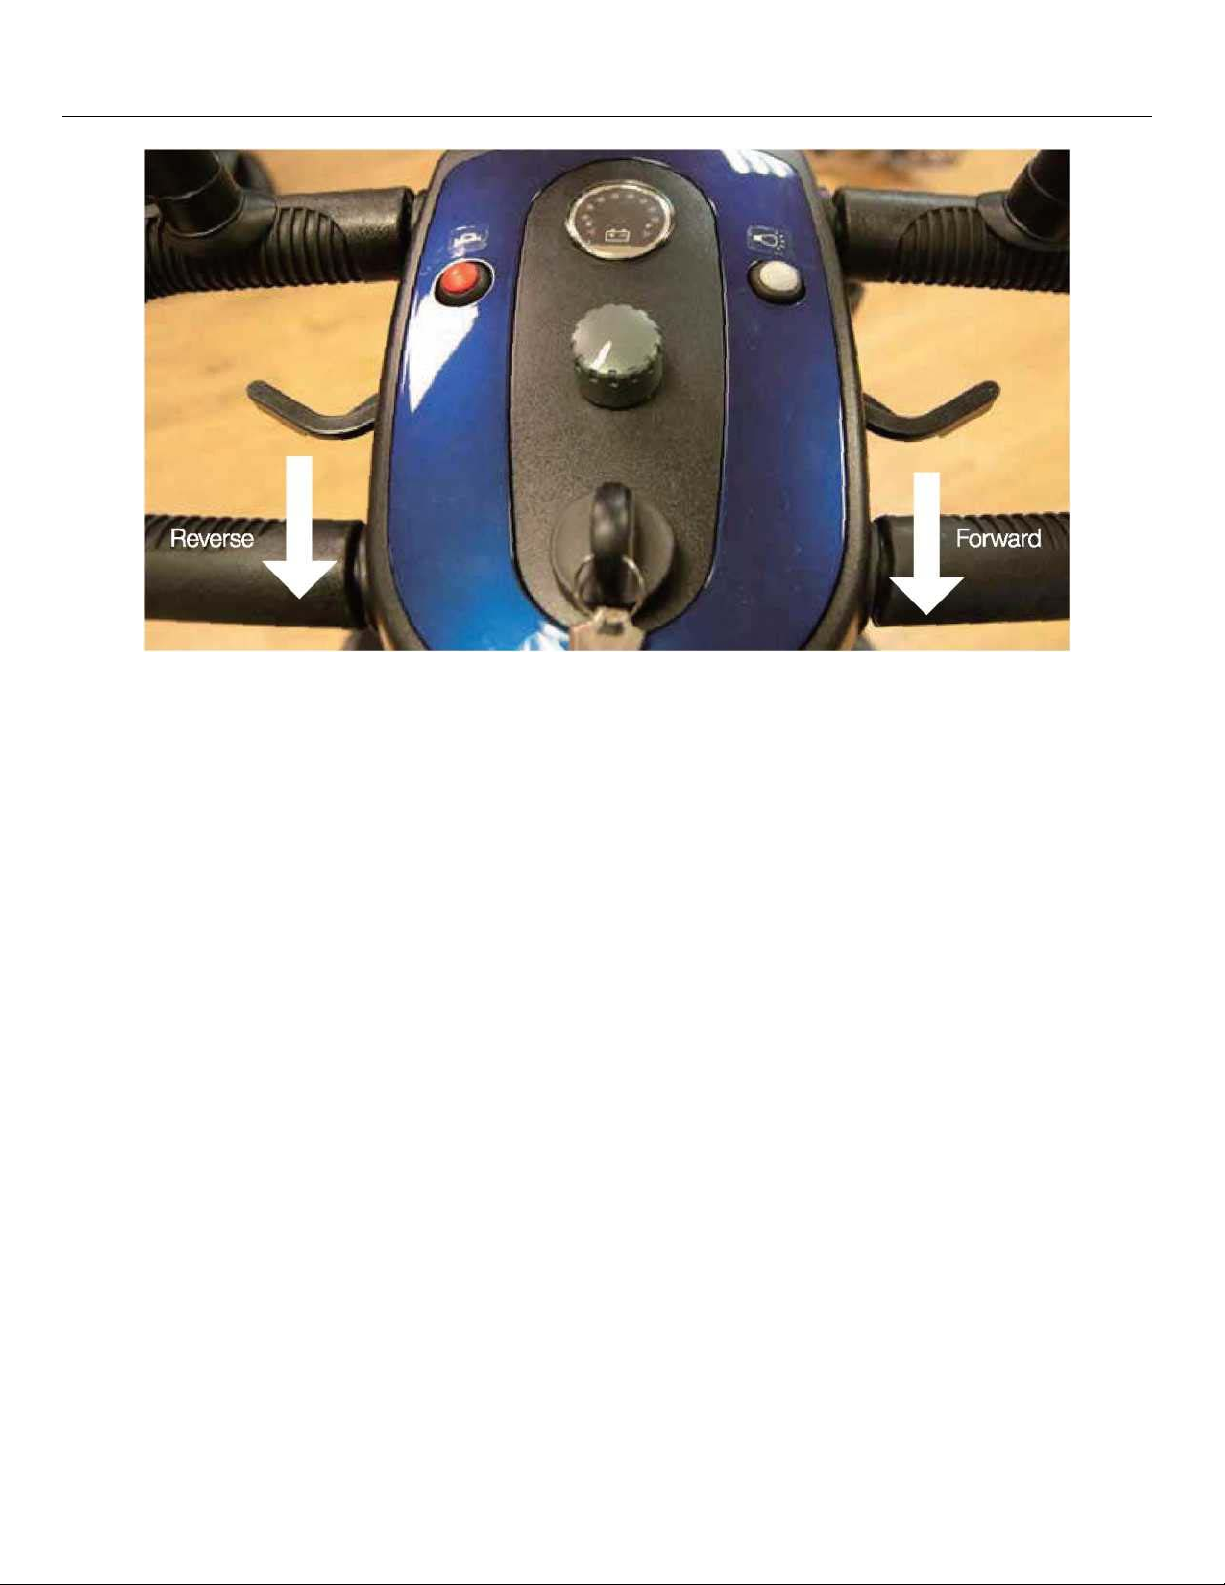
The scooter’s speed and direction are controlled by the wig-wag' lever. The arrows shown in the image above
show the direction in which the scooter will move when the lever is operated as indicated
Moving Off
Insert the key and switch on the power. Start by setting the speed control to a low setting. The further you pull
the lever the faster the scooter will travel, but only to the maximum speed that has been selected. Release the
lever and the scooter will come to a smooth, controlled stop.
Caution:
DO NOT switch off the power to stop the scooter as this will cause the transmission to lock and the scooter will
come to a sharp stop, which could possibly cause injury. This procedure should only be used in an emergency.
Table des matières
Autres manuels FOXTR Scooter


Manuels Scooter populaires d'autres marques


First Choice Mobility
First Choice Mobility Roma Medical Corella S741 Manuel utilisateur

Carrera
Carrera impel Manuel utilisateur

Afikim
Afikim Superlight SL-3 Manuel utilisateur

CareCo
CareCo ZOOM Manuel utilisateur

Douglas
Douglas Vespa G.S. Manuel utilisateur

Gazelle
Gazelle with BOSCH System Manuel utilisateur