FLX GLADIATOR Manuel utilisateur

www.x.bike
OWNERS MANUAL

CONTENTS
1 Welcome/ Contact Us
2 General Warning
6 Geometry
8 Fit
10 What’s in the Box
12 Assembly Instructions
21 Touring Package Instructions
24 Maintenance Instructions
25RearWheel
26Brakes
28Tires
30BatteryCare
33 Service
34 Warranty
36 More Tips
37 eBike Classications
WELCOME!
Reachusbyemail:
support@x.bike
VisitourShop:
4170MorenaBlvd.SuiteD
SanDiego,CA92117
Hours: 10am - 5pm Monday - Friday
Readytogetstarted?Let’sride!
- Team FLX
1
CongratulationsonthepurchaseofyournewGladiatorand
welcometotheteam!
Thismanualisdesignedtobreakdownthebasicsandhelpyoumakesure
thatyoureBikeremainsintopshape.It’simportanttohaveagoodunderstandingof
thebasicoperationandmaintenanceinordertokeepyourbikeperformingatahigh
standard.
Riding a bicycle can be a dangerous activity and it’s your responsibility
to make sure you are riding safely. We recommend familiarizing yourself
with this entire manual as well as your local eBike laws prior to your rst
ride.
ThelatestversionoftheOwner’sManualisalwaysavailableonlineat:
www.x.bike/manuals
Properassemblyandcarearecrucialtoyouhavingthesafestrideofyourlife.
Ifyouareunabletocompletetheassemblyorneedhelpwithgeneralmaintenance,
pleasereachouttous.Youdidn’tjustpurchaseabike—youjoinedourteam,and
weareheretosupportyouwheneveryoumayneedit!

RidinganeBike,aswithanymotorizedvehicle,involvestheriskofproperty
damageandseriousorfatalinjury.BychoosingtorideaneBike,youassumethe
responsibilityforthatrisk,soit’simportantthatyouknowandpracticeresponsible
riding.Properuse,careandmaintenanceofyoureBikeareessentialinreducingthe
riskofinjury.Thismanualwillinclude
bold warningsconcerningpotentialconse-
quencesthatcanoccurasaresultofyourfailuretoproperlymaintainyoureBikeor
followsaferidingpractices.
Bolded text
combinedwiththisalertsymbol,willindicateanarrayof
warningsincludingbutnotlimitedto:
A potentially hazardous situation that could result in injury or death if not
avoided
A potentially hazardous situation that could result in minor/moderate
injury if not avoided
An alert regarding unsafe practices
A situation which could result in serious damage to the eBike or any
action that would void your warranty
Itwouldbenearlyimpossibletoanticipateeveryconditionyoumayexperience
whileridingyoureBike,thereforethismanualdoesnotrepresentthesafeuseof
youreBikeineverypossiblescenario.Therearerisksassociatedwiththeuseofany
eBikethatcannotbepredictedoravoided—thoserisksarethesoleresponsibilityof
therider.
2 3
Special Note for Parents:
Asaparent/guardian,youarefullyresponsibleforthesafetyofyourminor.
ThisresponsibilityincludesmakingsurethattheeBikeissizedappropriatelyforthe
child,thatitisoperatingcorrectly,andtheconditionsaresafe.Youmustalsoensure
thatyouandyourchildhavebothlearnedandunderstandhowtosafelyoperatethe
eBike,howtoobeylocalmotorvehicle,bicycleandtrafclaws,aswellascommon
senseforsaferesponsibleriding.Asaparent,itisimportantthatyoureadthrough
thismanualandfamiliarizeyourselfwiththewarningsandproperoperationofthis
eBike.Pleasereviewthemwithyourchildbeforeallowingthemtoride.
Make sure your child wears an approved eBike helmet only when riding
their eBike.
Make sure your child’s eBike is properly sized (adjust the seat so that
both feet can touch the ground). If the eBike doesn’t t, do not allow your
child to ride it. Riding an improperly tted bike can result in injury or even
death.
3
Gladiator|OwnersManual Gladiator|OwnersManual
www.x.bike www.x.bike
ENERAL WARNING

4
STARTED
5
Gladiator|OwnersManual Gladiator|OwnersManual
ETTING
4

EOMETRY
6www.x.bike
Gladiator|OwnersManual
7www.x.bike
Gladiator|OwnersManual
TheGladiatorcomesinonesizethathasbeenengineeredtosuitavarietyof
ridersatdifferentheights.
Onthefollowingpage,youwillndageometrychartwiththemeasurements
forthemostimportantpartsofyourGladiatorframe.Measurementsaregiveninboth
StandardandMetricunitsforyourconvenience.
Please ensure that your eBike is properly sized for you before riding. If
your eBike is too small/too large, you may lose control and fall.
The most important part of t is ensuring that the seat position can be
adjusted so that the seated rider’s feet can touch the ground. This is
especially important for minors/children.
If your eBike does not t, please make the appropriate adjustments to
ensure a proper and safe t before riding.
A. Seat Tube Length
(Frame Size)
B. Seat Tube Angle
C. Head Tube Length
D. Head Tube Angle
E. Stack
F. Reach
19”(483mm)
73.5°
6½”(165mm)
69°
27.4”(696mm)
16 ⅓”(415mm)
G. Standover Height
H. Wheelbase
I. Chainstay Length
J. Bottom Bracket
Drop
K. Bottom Bracket
Height
30 ⅓”(770mm)
46.8”(1190mm)
18 ⅓”(465mm)
2½”(65mm)
12.8”(325mm)

FIT
89
Gladiator|OwnersManual Gladiator|OwnersManual
www.x.bike www.x.bike
Correct t is an essential part of eBike safety, comfort and proper
performance. If you are not able to make the proper adjustments to
ensure proper t yourself, please seek professional assistance.
Note:Thiswillnotapplytostep-throughmodels
Aproperlyttedroadbiketoberiddenonpavedsurfacesshouldhavea
minimumstandoverclearanceof1inch(2.5cm).
Standover Height
Diamond Frame eBikes:
Standoverheightisanimportant
basicelementofproperbiket.Itrefers
tothedistancefromtheground,tothe
topofthebikeframewhereyourcrotch
iswhenyouarestraddlingthebike.
Tocheckforproperstandover
height,straddlethebikeandbounceon
yourheels.Ifyoutouchtheframe,the
bikeistoobigforyou.
Tip: Be sure to wear the shoes
you’dwearwhileriding. Figure1.StandoverHeight
Note:Theseatpostmustbeinsertedtoat least theminimumseatpostdepth
requirement.Ifyoucannotadjustyourseatproperly and meetthemimimum
seatpostdepthrequirement,youwillneedtopurchasealongerseatpost.
If you cannot test this yourself, head to a local bike shop and have a
professional help you set the seat to an optimal riding position.
1.Sitontheseatandplaceoneheelon
apedal(doesn’tmatterwhichside).
2.Rotatethecrankuntilthepedalwith
yourheelonitisinthedownposition
andthecrankisarmisparalleltothe
seattube.
3.Yourlegshouldbecompletely
straight.Ifitisn’t,yourseatheightneeds
tobeadjusted.Ifyoumustrockyour
hipsinorderforyourheeltotouchthe
pedal,yourseatistoohigh.Ifyourleg
isbentwhileyourheelisrestingonthe
pedal,yourseatistoolow.
Figure2.SeatAdjustmentTest
Seat Position
Properseatadjustmentisanimportantfactorwhenitcomestogettingthebest
ofbothcomfortandperformanceoutofyoureBike.Followthestepslistedbelowto
checkforyourcorrectseatheight.
After any saddle adjustments, make sure that the seat adjusting
mechanism is properly tightened before riding. Failure to do so can
cause damage to the seat post and/or can cause you to lose control and
fall. When properly tightened, the seat should not be able to move in any
direction. Periodically check to ensure it is properly tightened.
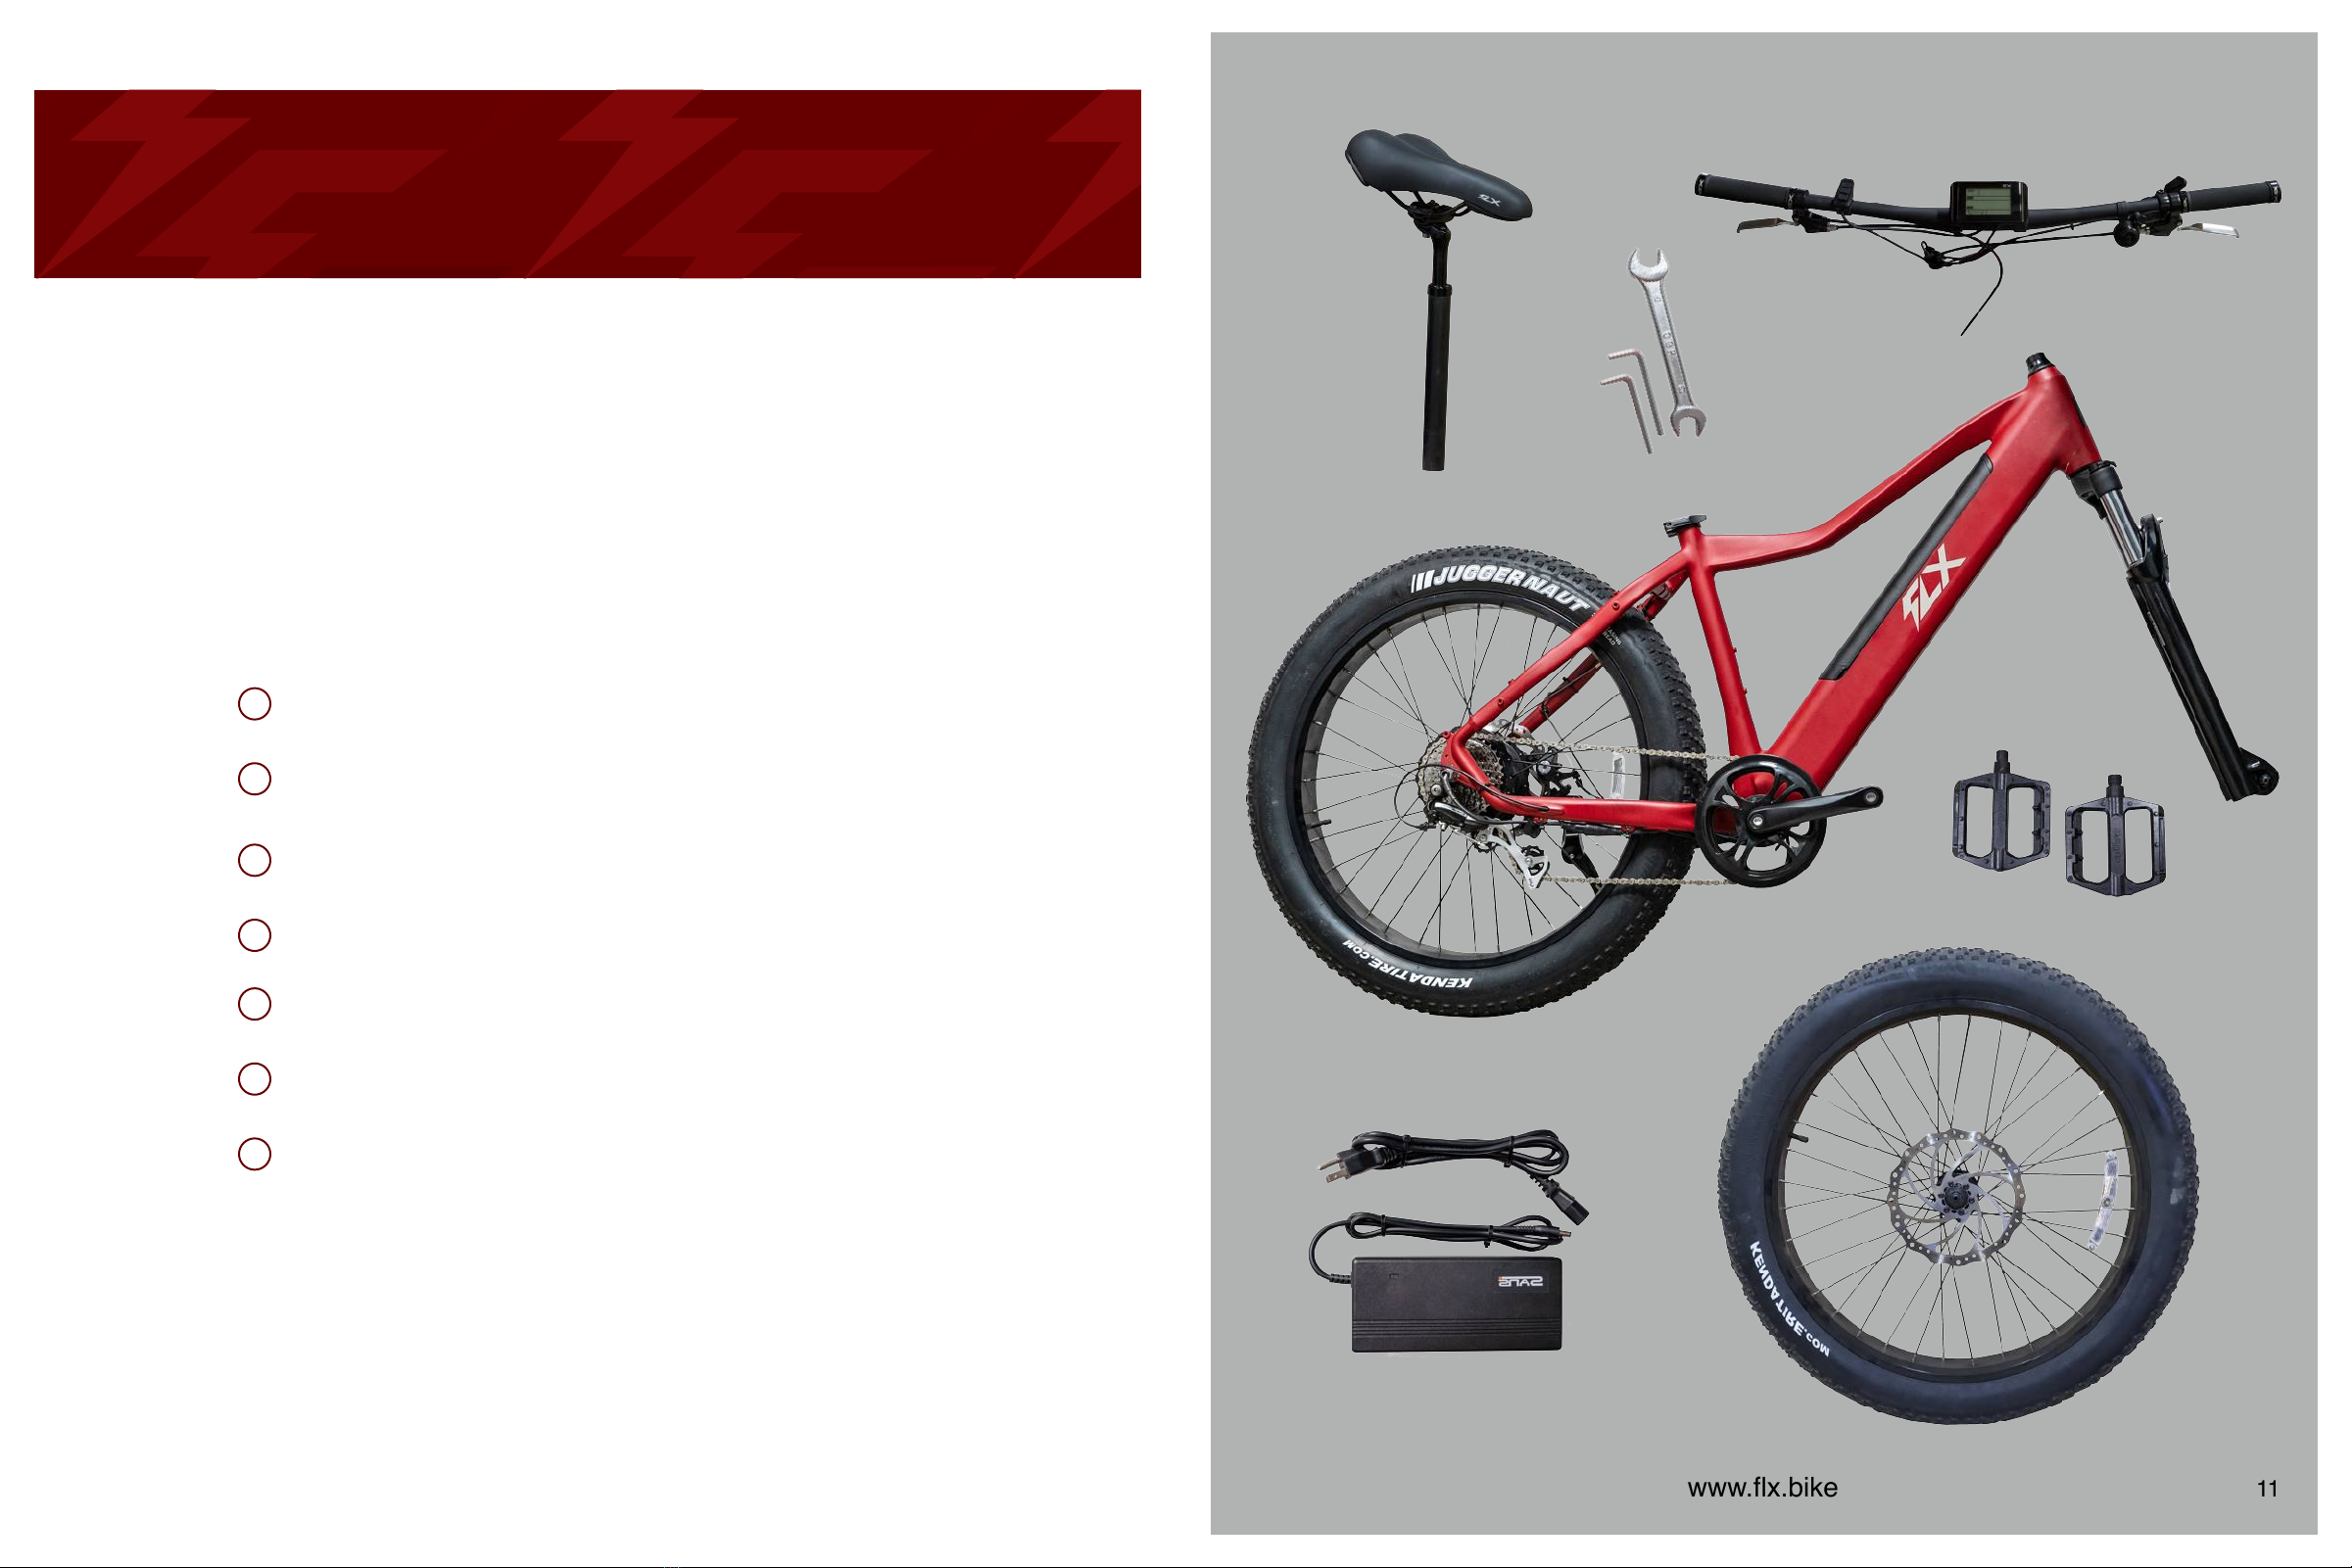
WHAT’S IN THE BOX
10 www.x.bike
Overview
KnowingyourGladiatorinsideandoutwillhelpyougetthemostoutofit.
Weencourageyoutofamiliarizeyourselfwiththecomponentsofyourbicycle,sothat
youknowwheretostartwhenitcomestoassemblyandmaintenance.
Here’swhat’sincludedinyourbox:
4. Bike Frame w/Rear Wheel Attached
1. Seat
3. Handlebars
6. Charger
5. Pedals (x2)
2. Tools: Allen Key (x2) & Wrench
7. Front Wheel
If for any reason you are missing any parts, please reach out to us at
support@x.bike so we can get your missing part to you.
Gladiator|OwnersManual
11www.x.bike
Gladiator|OwnersManual
1.
2.
3.
4.
5.
6.
7.

ASSEMBLY
www.x.bike
12
Gladiator|OwnersManual
13www.x.bike
Gladiator |OwnersManual
Overview
ThefollowingsectioncoverstheassemblydirectionsfortheGladiator.Proper
assemblyisanessentialstepinensuringyoursafetyandtheproperoperationofthe
bike.If at any point you do not feel comfortable assembling the bicycle your-
self, please seek professional assistance or reach out to our support team.
YoucanalsondadetailedassemblyvideoontheFLXYouTubechannel:
www.x.bike/gladiatorassembly
If you do not feel that you have the ability or skill to assemble the bike
yourself, please take it into a local bike shop for professional assistance.
Failure to properly assemble your eBike can result in serious injury or
death.
ToolsIncluded:
Please read through the entire assembly instructions section before you
begin. Proper assembly is important in order to ensure your safety and
satisfaction while operating your eBike.
STEP 1: Install the Handlebars
1.Usingthe4mmAllenwrench,unscrewthe4boltsandremovethestemplate.
2.Placeyourhandlebarsintothegrooveandreplacethestemplateoverthetop.
Tightentheboltsabout3/4thsoftheway.
3.Makethenaladjustmentsonyourhandlebarsposition,ensuringthattheyare
centeredandatacomfortableanglebeforetighteningtheboltstherestoftheway.
Note: DO NOT depress the brake levers before installing the front wheel.
Figure1.StemPlateBoltRemoval Figure2.TighteningStemPlateBolts
1.Onceyou’vesecuredyourhandlebars,
locatethecablerunningfromthebackof
theLCDdisplayandconnectittothe
correspondingcablelocatednearthe
chargingportofyourbike.
Tip: Line up the two arrows to
ensureproperconnection.
Figure3.ConnectingtheLCDcables
STEP 2: Connect LCD Display
4mm&5mmAllenKeys 15mm Wrench

14 www.x.bike
Gladiator|OwnersManual
15www.x.bike
Gladiator|OwnersManual
The steps outlined on the following page are extremely important! Riding
with an improperly secured wheel can cause serious injury or death. If
you can’t safely complete these steps, please take your eBike into a bike
shop for professional assistance.
5.Replacethespringandtheendcap.
Tip:Makesurethespringisonthe
outsideoftheforkwiththefatside
facingoutward.
6.Tightenthecapabouthalfwayand
inspectthewheeltomakesureit’s
positionedcorrectlybetweentheforks.
7.Whiletighteningtheendcap,besuretotestthetensionbyopening/closingthe
levereveryfewturns.Youwantittofeeltightandsecure,sothatyourwheelcannot
easilycomeundone.
Again, please seek professional assistance if you are unsure of your ability to
complete these steps.
STEP 3: Secure the Front Wheel
Note: Do not over-tighten the bolts when securing your front wheel
1.Locatethequick-releaseskewer—itwillbelocatedintheaccessoriesbox,along
withthepedalsandtools.Thisskewerwillhaveanendcap+springononeend,and
alever+springontheother.
2.Slidethewheelintoplace,makingsurethebrakecaliperslidesontotherotorand
bothoftheforksareproperlyhookedontothewheel.
3.Grabthequick-releaseskewerand
removetheendcapalongwiththespring
beingcarefulnottolosethem.
4.Insertthequickreleaseskewerallthe
waythroughtheaxle.
Figure6.InsertingtheThruAxle
Figure7.TighteningtheThruAxle
Figure5.PlacingtheWheelFigure4.QuickReleaseSkewer
STEP 4: Install the Seat
1.Loosenthequickreleaseleverontheframeanddroptheseatintotheopening.
Findaheightthatworksforyouandclosethequickrelease.
Figure8.DroppingSeatintoBike
Note: The seat post must be
inserted to at least 5” in depth
to avoid damage to your frame.
If you need to raise the seat
above this height, please
purchase a longer seat tube to
satisfy the depth requirements.

16 www.x.bike 17www.x.bike
Gladiator|OwnersManual Gladiator|OwnersManual
STEP 5: Attach the Pedals
1.Checktheendcaponbothpedalsinordertoidentifytheleftandrightpedal.
Tip:Imagineyouaresittingonthebiketocorrectlydetermineleftvs.rightside.
Note: The right pedal will tighten clockwise, while the left pedal will
tighten counterclockwise.
2.Grabyour15mmwrench,andscrewthepedaltightlyintothecorrectcrank.The
pedalsshouldthreadsmoothlyandeasilyifproperlyaligned.
Figure9.LeftVs.RightPedal Figure10.AttachingPedaltoCrank
STEP 6: Charge Your Battery
1.Useyourkeystounlockthebatterypin,
thenpullthebatteryupfromthebottom
andslideitdownwardtoremoveitfrom
theframe.
Tip:Toreplacethebattery,insertthe
topendinrst,slideitupward,then
pushinthebottomenduntilit’sfully
seated.
Figure11.RemovingtheBattery
Figure12.ChargingYourBattery
2.Connectthechargertotheportlocated
onthebatteryrst,thenplugyourcharger
intothewalltochargeit.
Tip:Allowthebatterytofullycharge
forabout8-12hoursfortherstfew
cycles.Afterthis,youmaychargeit
normally(3-6hours).
Figure13.CheckingBatteryLife
4.Youcanalsocheckthebatterylifeby
pressingonthebuttontowardthebottom
ofthebatterypack.Thelightwillindicate
howmuchjuiceisleftinyourbattery.
Blue=Fullycharged
Green=Partiallycharged
Red=NeedstoCharge
Figure14.CheckingtheLCDDisplay
3.Plugyourchargerintoanoutlet.The
indicatorlightwillturngreen.
GreenLight:
Notcharging/Fullycharged
RedLight:
Charging/Notfullycharged
Table des matières
Autres manuels FLX Scooter


Manuels Scooter populaires d'autres marques


First Choice Mobility
First Choice Mobility Roma Medical Corella S741 Manuel utilisateur

Carrera
Carrera impel Manuel utilisateur

Afikim
Afikim Superlight SL-3 Manuel utilisateur

CareCo
CareCo ZOOM Manuel utilisateur

Douglas
Douglas Vespa G.S. Manuel utilisateur

Gazelle
Gazelle with BOSCH System Manuel utilisateur