EZ FLO EZ001 Guide d'installation

READ INSTRUCTIONS BEFORE INSTALLING THE SYSTEM
TO INSURE PROPER INSTALLATION
* IMPORTANT *
www.ezflo.com.au
Minimize exposure to direct sunlight to
maximize service life
Use only with non-hazardous products
Protect against freezing to avoid tank
fracture
Installation and operating guide
mainline system
Do not connect to an irrigation system
that is not protected by an approved
back flow prevention device
Do not install if the pressure exceeds
600kPa
TM
© 2020, EZ-FLO Fertilizing Systems
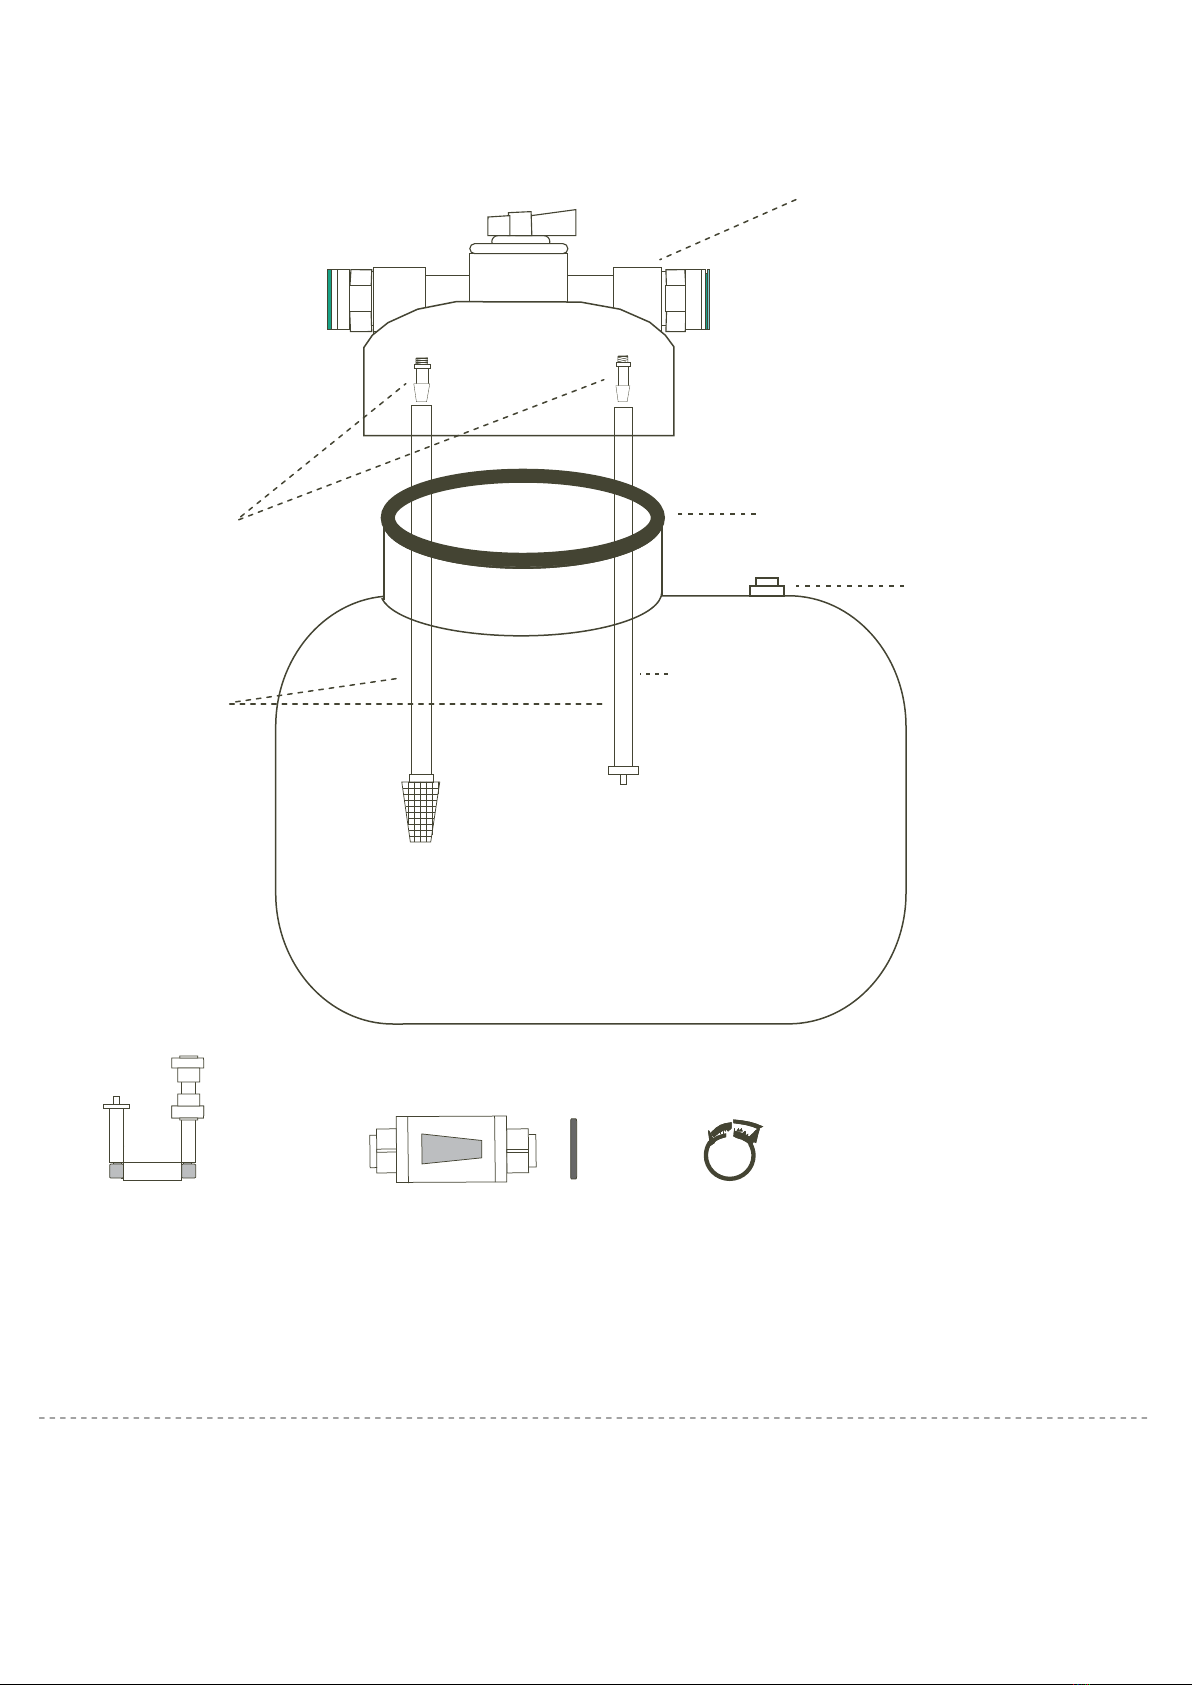
Tank assembly & parts list
FOR EZ-FLO WARRANTY INFORMATION VISIT OUR WEBSITE
www.ezflo.com.au
Tank Cap
# CAP-MBT
Blue connector
# PCB
Screen Fitting
# Puf
Agitation Fitting
# AGT
(not on EZFL01)
can be interchanged
with liquid adapter
Dip tube with screen
attached to Fertilizer-Out
connection in cap
Agitation tube attached
to Water-in coonection in
cap
Liquid
adapter
(Australasia only) (Optional use, not supplied w/ EZFL01)
Green connector
# PCG
Cap Fitting
# APF
Cap O-RING
# LOR
Relief Valve
# TNK - PRV
2 - Shutt odd valves
Part # SOV
with 2 washers
3 - Tubing Clamps
Part # RTC (1 extra)
1.25 meter 1/4'’
Clear Tubing
Part # CT5
1.25 meter 1/4'’
Black Tubing
Part # BT5
Dip Tubes
# DT - SET
Page 2
www.ezflo.com.au
TM
© 2020, EZ-FLO Fertilizing Systems
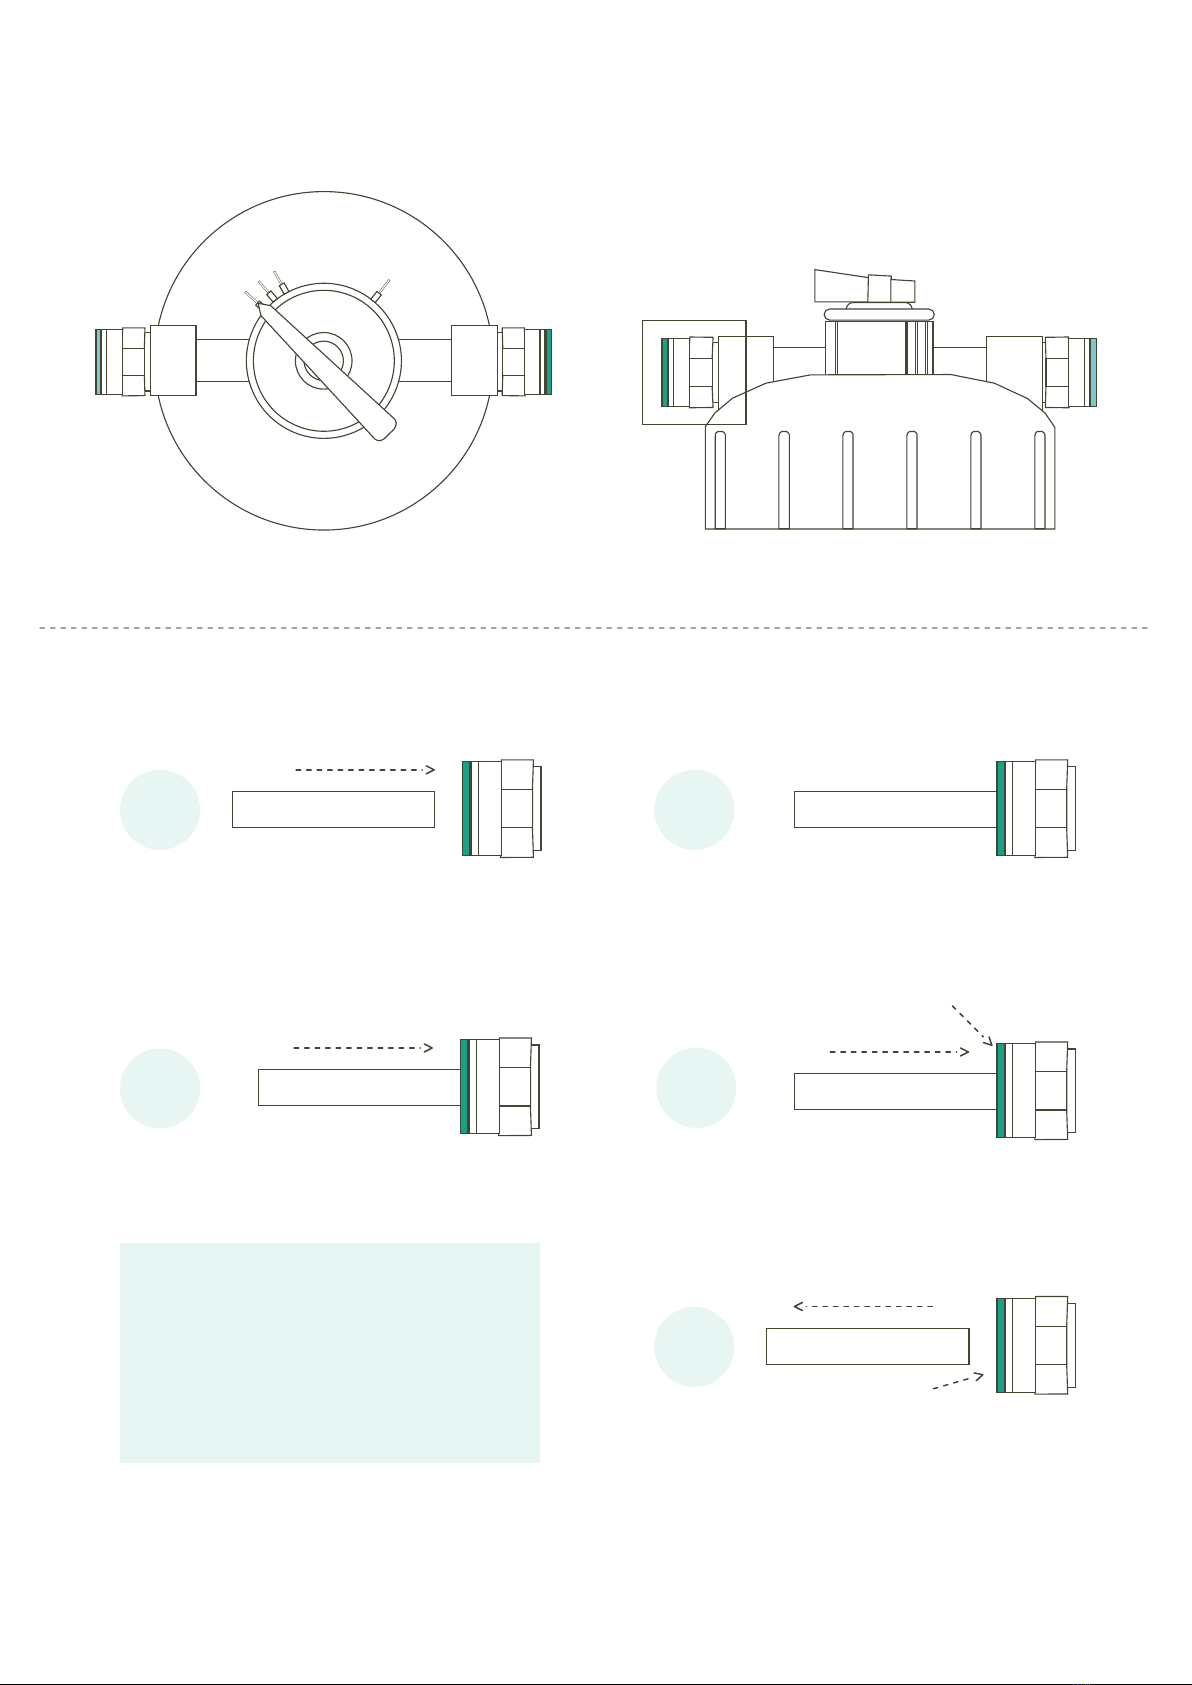
Cap Tubing Fittings: Insert and Release
IINNOOUUTT
SLOW
12
FAST
IN OUT
Top View Side View
The EZ-FLO system uses push connect fittings to
connect the clear and black 1/4” tubing to the cap
To Insert
1
Insert the end of the tubing into the
appropriate side (Clear to Green /
Black to Blue) by pressing into the hole.
Press gently until the tubing stops.
2
Gently tug the tubing
to insure it is locked into place.
Press tubing
To Remove
1
Shut off pressure to the system using the back
flow valve or included gray shut off valves.
2
Apply gentle pressure to the Green or Blue
collet with your fingers or provided washer.
Press Collet
Collet
3
While holding pressure, gently pull the
tubing away from the fitting to release.
Pull tubing
Hold pressure
,
Make sure to direct the fitting away
from your face and body. A small
amount of residual pressure may be
in the tank and cause a momentary
release of fluid.
Note:
2
Page 3
www.ezflo.com.au
TM
© 2020, EZ-FLO Fertilizing Systems
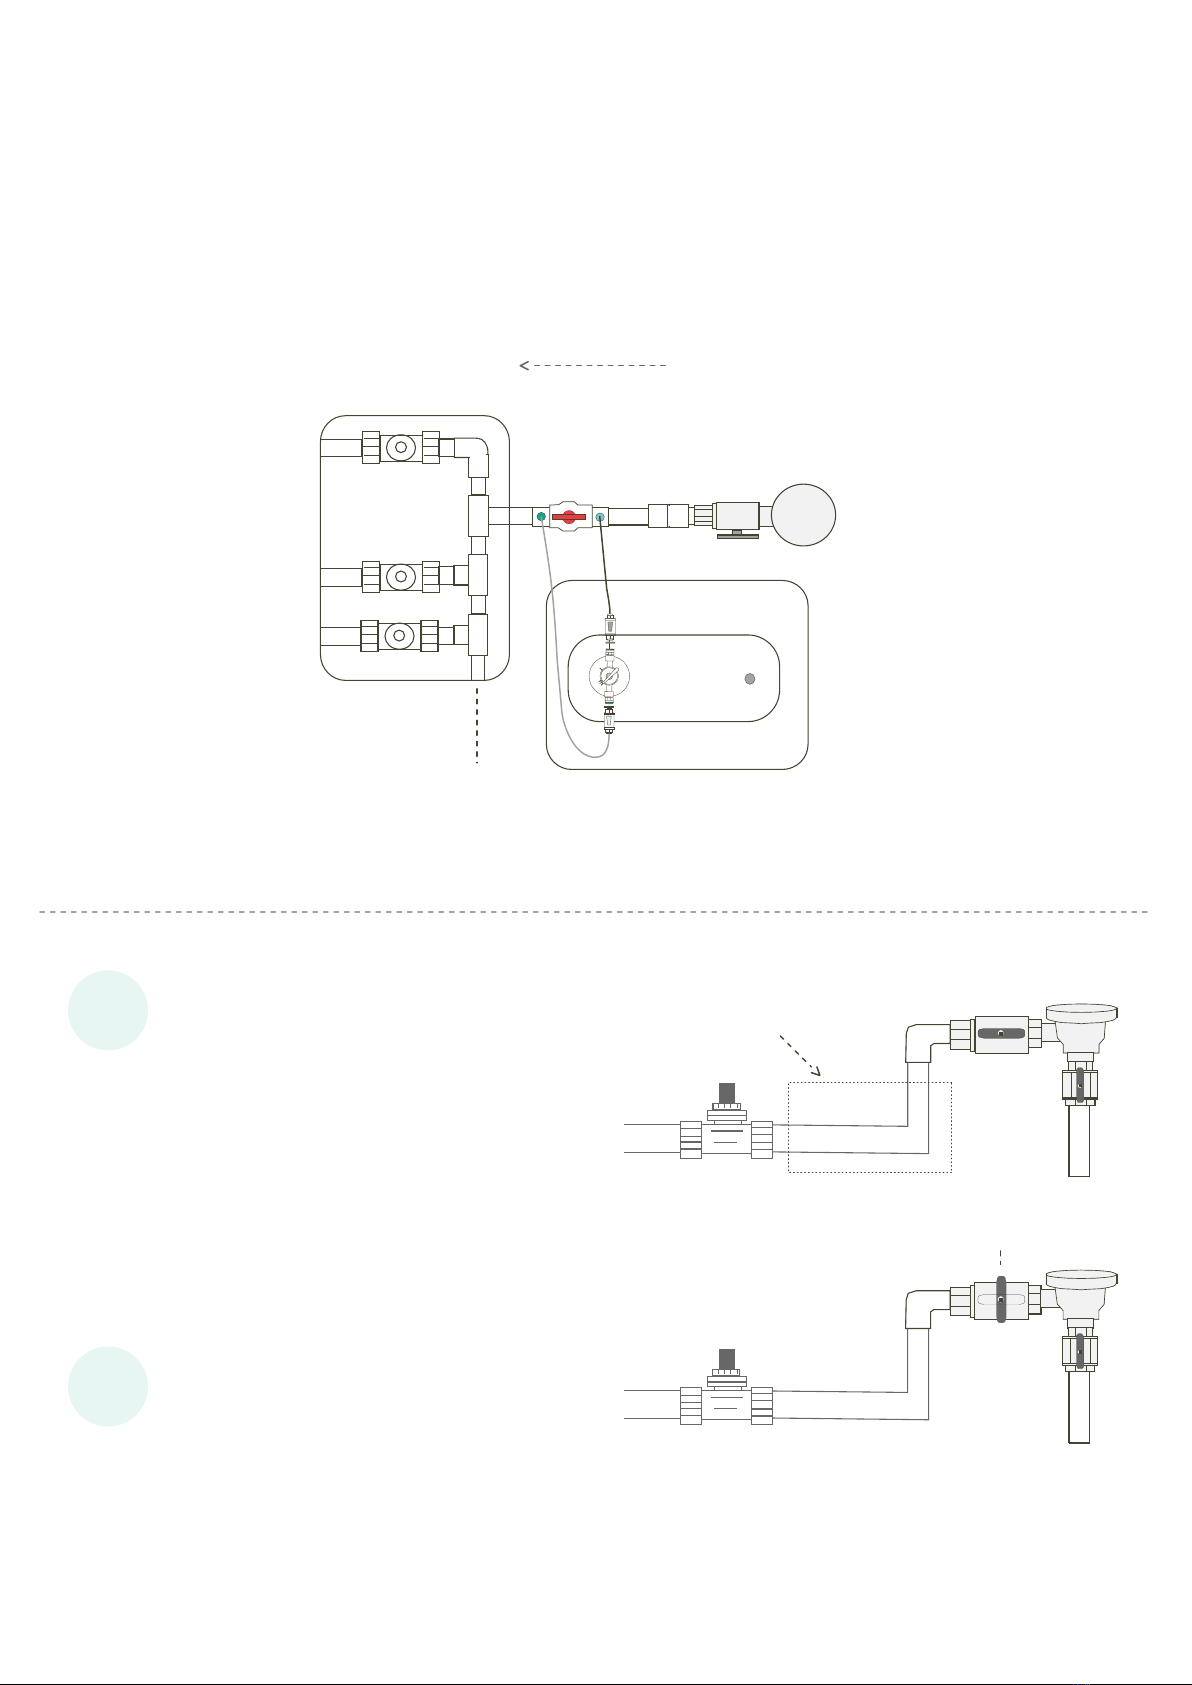
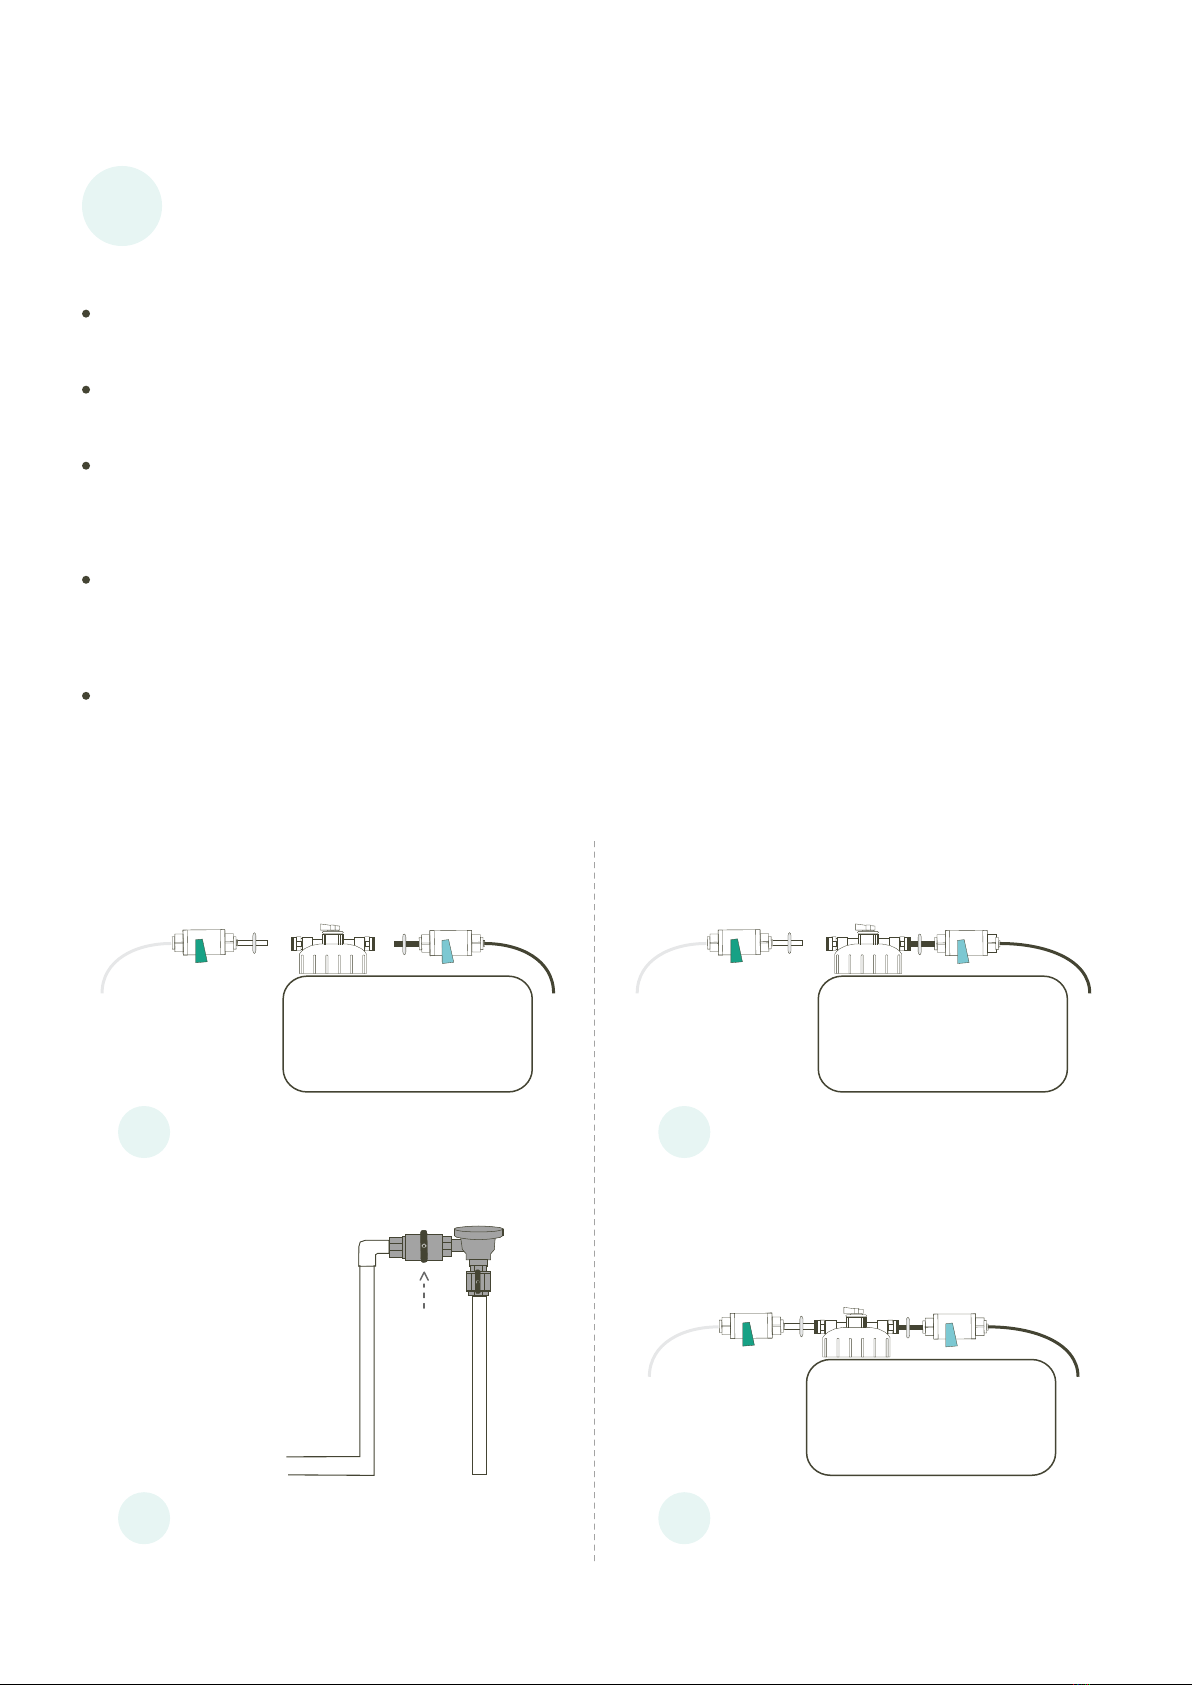
The system is normally installed in a valve box, connected to the main line of the
irrigation system after the back flow preventer and before the sprinkler valves.
One unit will feed both drip and sprinkler zones without changing any
connections or nozzles. It will feed both the front and back yard landscapes.
System Installation
Top View
IINNOOUUTT
SSLLOOWW
11
22
FFAASSTT
IINN
OOUUTT
EZ-FLO Unit
Valve or Pump Box
Back Flow
Preventer
Valve Box
Water Flow
Connection
To backyard
To drip emitters
To sprinklers
To sprinklers
Install connector in this area
Reliieve pressure by opening a
Zone Valve
Sprinkler Valve
Shut off water
2Shut off water and relieve
pressure.
1Locate the installation point
Connection must be made after an
approved back flow prevention
device. The connection can be
made either vertically or horizontally
in the irrigation main line.
A “CBV” style connection is required.
Page 4
www.ezflo.com.au
TM
© 2020, EZ-FLO Fertilizing Systems
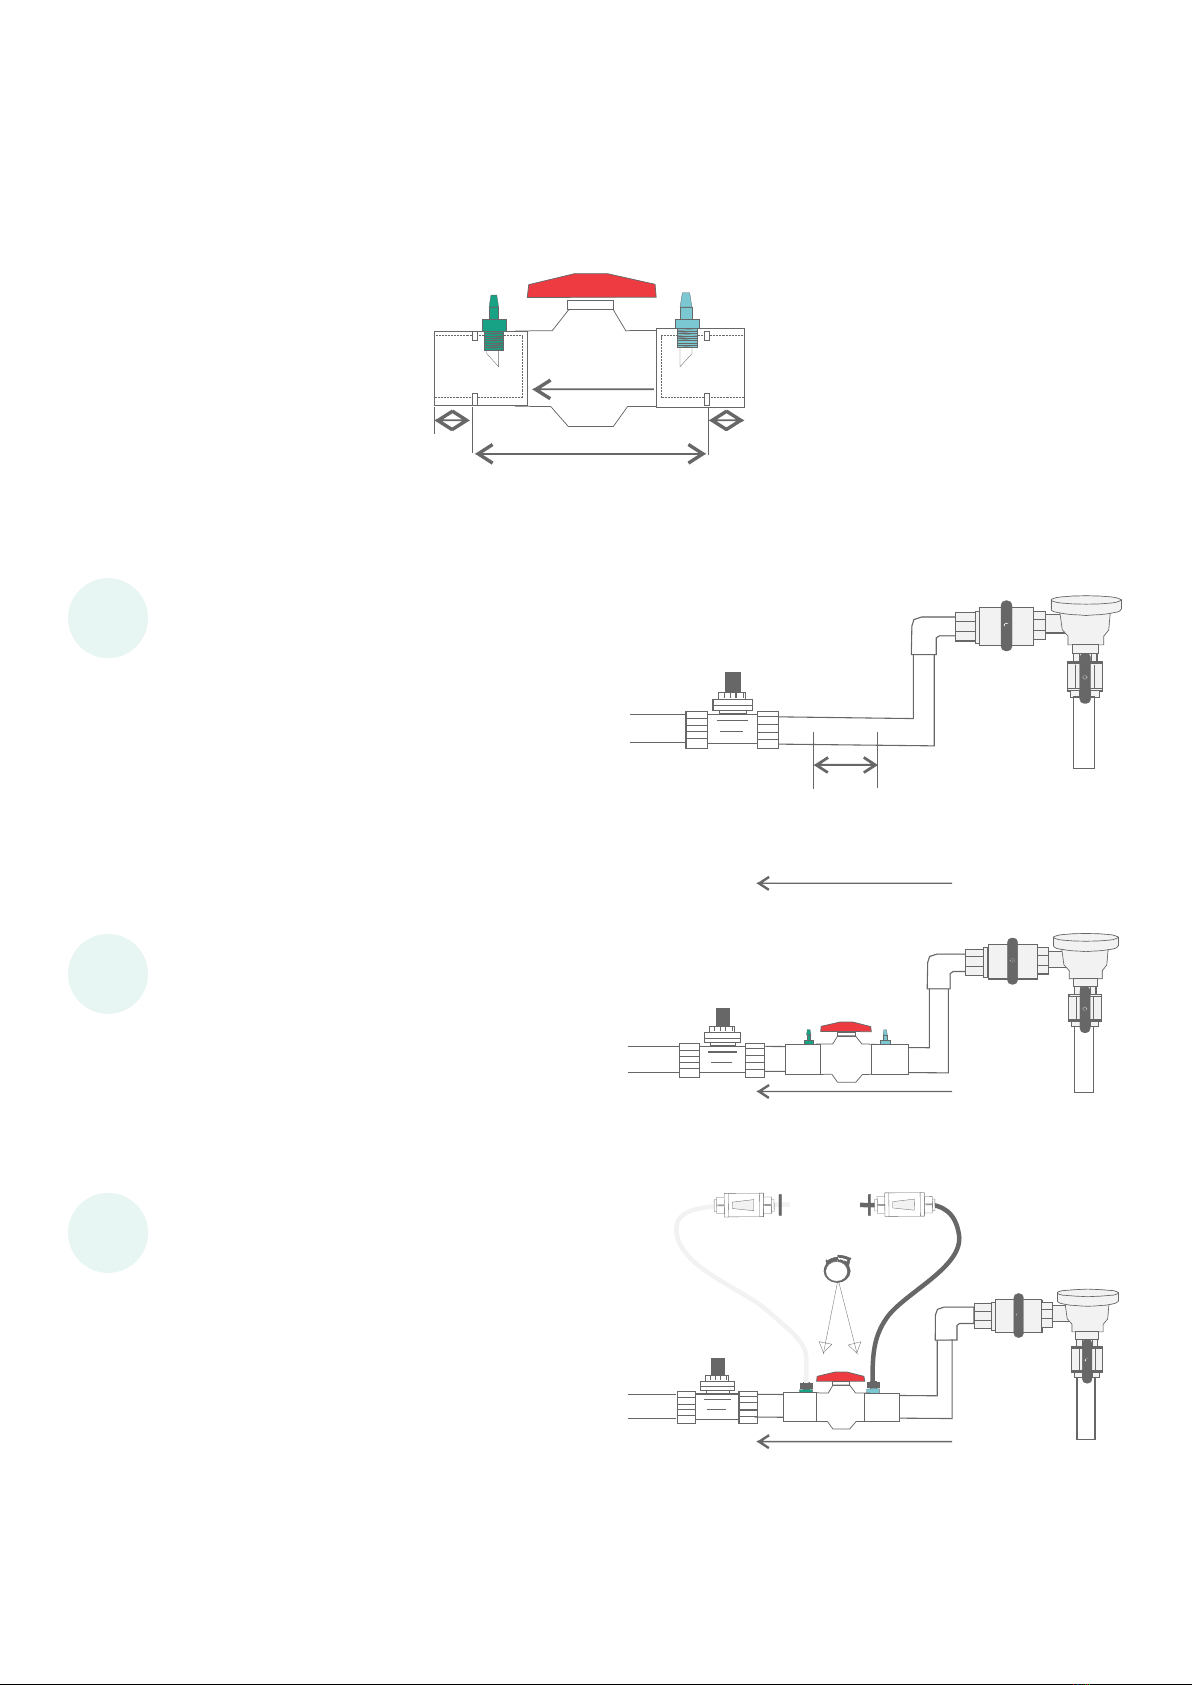
Main Line Connection
Sold separately
* Calibrating the CBV connection is on subsequent pages.
Glue in coupling with flow
arrow pointing in the direction
of the water flow
3Cut out a section of pipe
Slightly larger than the cut out length of the coupling.
4Glue the coupling into the line
5Attach tubing to the coupling
Attach black tubing to blue fitting,
clear tubing to green fitting and
secure with tubing clamps
F L O W
Cutout length
Cutout
length
Ball Valve Coupling
Flow
FLOW
FLOW
FLOW
green
green
blue
blue
optional
Cut
pipe
Page 5
www.ezflo.com.au
TM
© 2020, EZ-FLO Fertilizing Systems

Fill Tank with Product
Fill the tank based on the product’s coverage recommendations
Fertiliser typical Coverage Rates:
6
7
The EZ-FLO system can be filled with the majority
of liquid or water soluble products.
If in doubt email us info@ezflo.com.au
See capacity chart on page 9
Screw on tank cap
Follow all product precautions. Multiple
products can be combined and applied at
one time. Base much to put in the tank by
each product’s coverage recommendations.
Fill with water from shut off
valve or hose until full
Air will fracture the tank and is not covered.
By the warranty
DO NOT LEAVE AIR IN THE TANK!
* Check to make sure o-ring is in place prior to screwing the cap back on.
Fill tank with product
PRODUCTS
Fill line
Funnel
Part #FNL
Liquid 1 litre per 200 m every 4 to 6 weeks
2
1 Kg per 200 mPowder every 4 to 6 weeks
2
Page 6
www.ezflo.com.au
TM
© 2020, EZ-FLO Fertilizing Systems
Page 7
www.ezflo.com.au
TM
© 2020, EZ-FLO Fertilizing Systems
Connect Cap to Irrigation System
Shut off valves in the off position
8
Water in -
Blue connection
Green
Connection
1 3
On
2 4
Turn water on at back flow preventer
Connect blue connector to water in connection by presenting the black
tubing into the blue fitting
Bleed air from tank by slightly opening the shut off vlve on the black line
until air is purged, then close
Connect green connector to the green fertiliser out connection on cap by
pressing the clear tubing into the green fertiliser out side of the cap and open
both shut off valves.
Blue
Connection
Fertiliser Out -
Green Connection
Adjusting the ball valve will not affect the performance of the irrigation system.
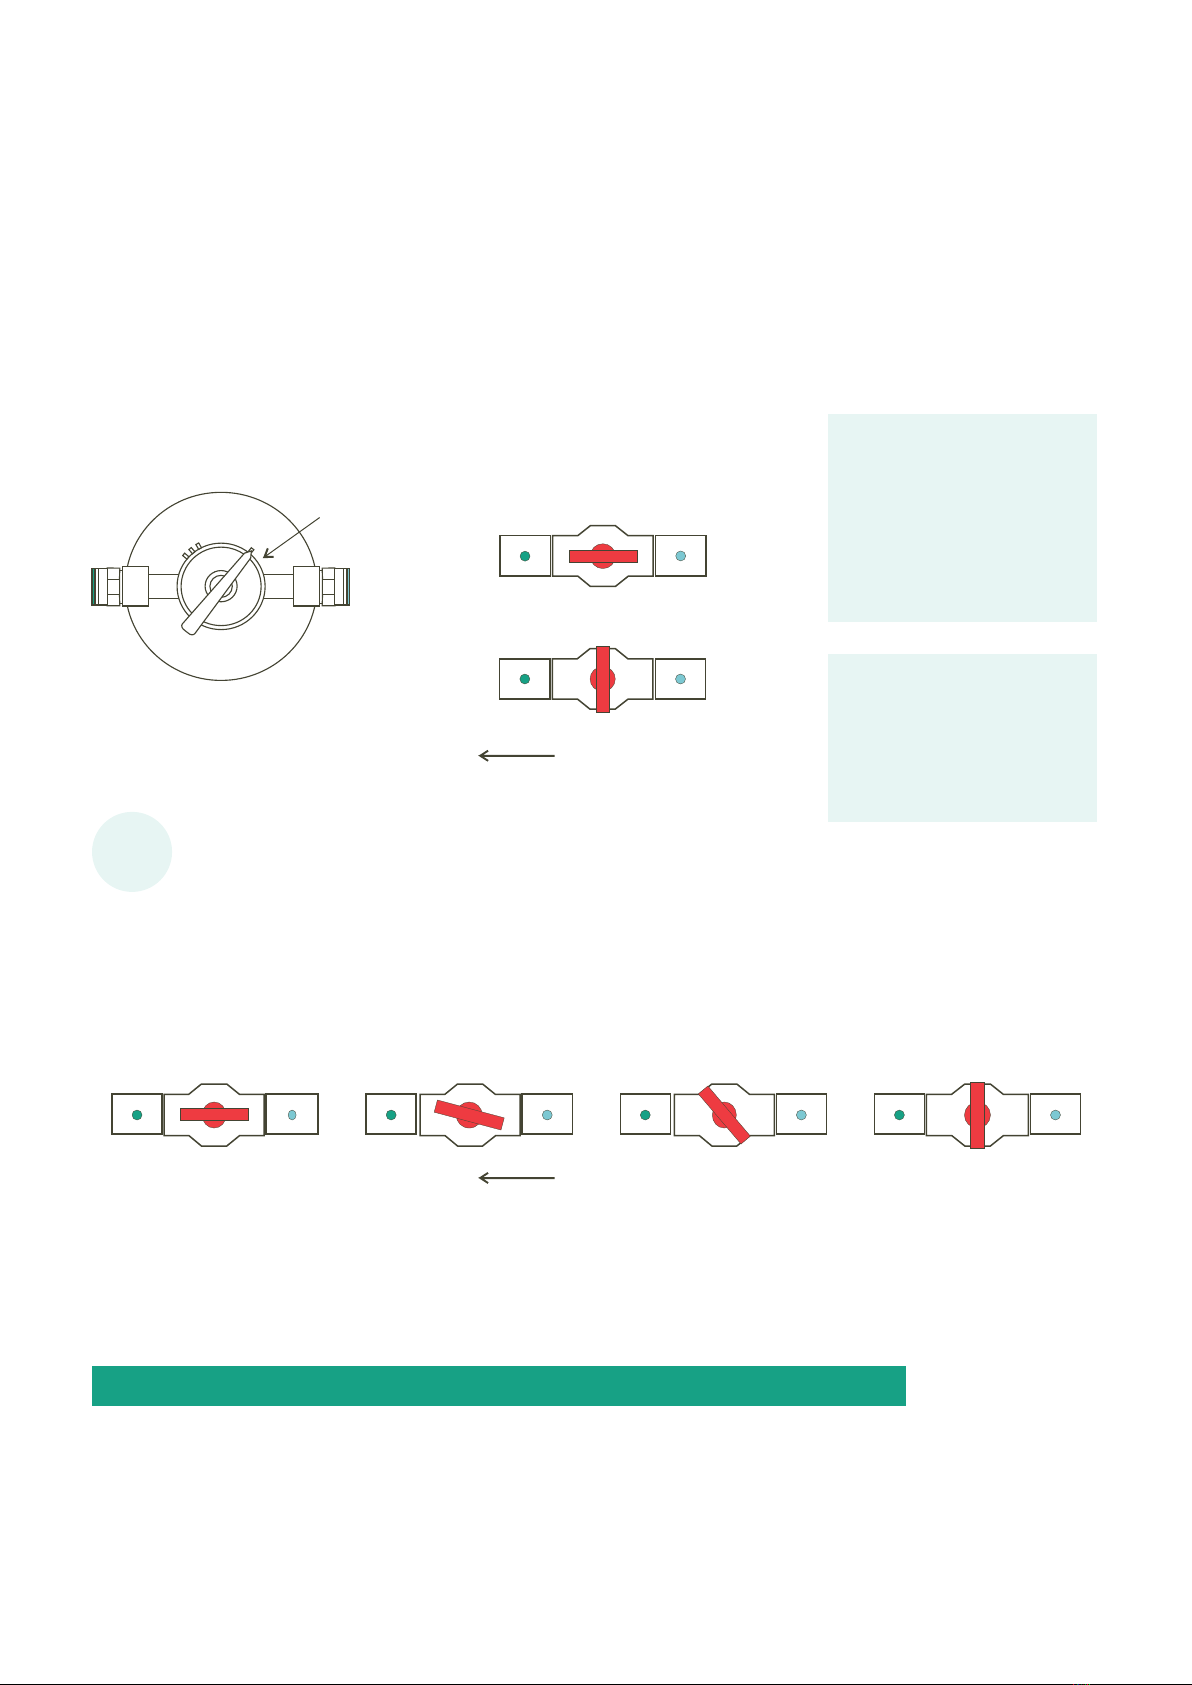
Connect Callibration - Coupling Ball Valve
The CBV connection must be calibrated to the flow rate of your irrigation system. If the irrigation system
is higher flow, primarily compsed of spray heads or larger drip irrigation zones, adjustment to the CBV
may not be required.
The EZ-FLO system must be full of fertiliser which provides a color that can be used to indicate flow
through the clear line. If your fertiliser is not colored, add blue or green dye to the tank.
Start by setting the proportioning cap adjustment setting
to the fast position and the CBV in full open position.
IINNOOUUTT
SLOW
12FAST
IN
OUT
Proportioning gap
Adjustment Knob CBV full Open
CBV full Closed
Full Open 15% Closed 50% Closed Full Closed
Water Flow
Water Flow
9
Turn on a sprinkler or drip zone with the closest to average liters per minute flow rate and watch
the clear fertiliser out tubing for color.
If color is steadily flowing through the clear output tube, the CBV does not require adjustment.
Once color is visible you no longer have to adjust the CBV connection. You may leave it in position
permanently.
Full closed is not common and may indicate improper installation or filling of the system.
Set the Proportioning Cap feed rate to the desired level.
The valve closure is only necessary when the irrigation system is not operating at full capacity.
Water is diverted through the EZ-FLO system as a bypass and reintroduced downstream of the
valve eliminating the pressure and flow loss.
The color in the tube
will be lighter than
the color in the tank
due to the mixing.
Note:
The color will be
lighter on the slower
feed rate settings.
Note:
Page 8
www.ezflo.com.au
TM
© 2020, EZ-FLO Fertilizing Systems
Connect Callibration - Coupling Ball Valve
IINNOOUUTT
SLOW
12
FAST
IN
OUT
SLOW
12FAST
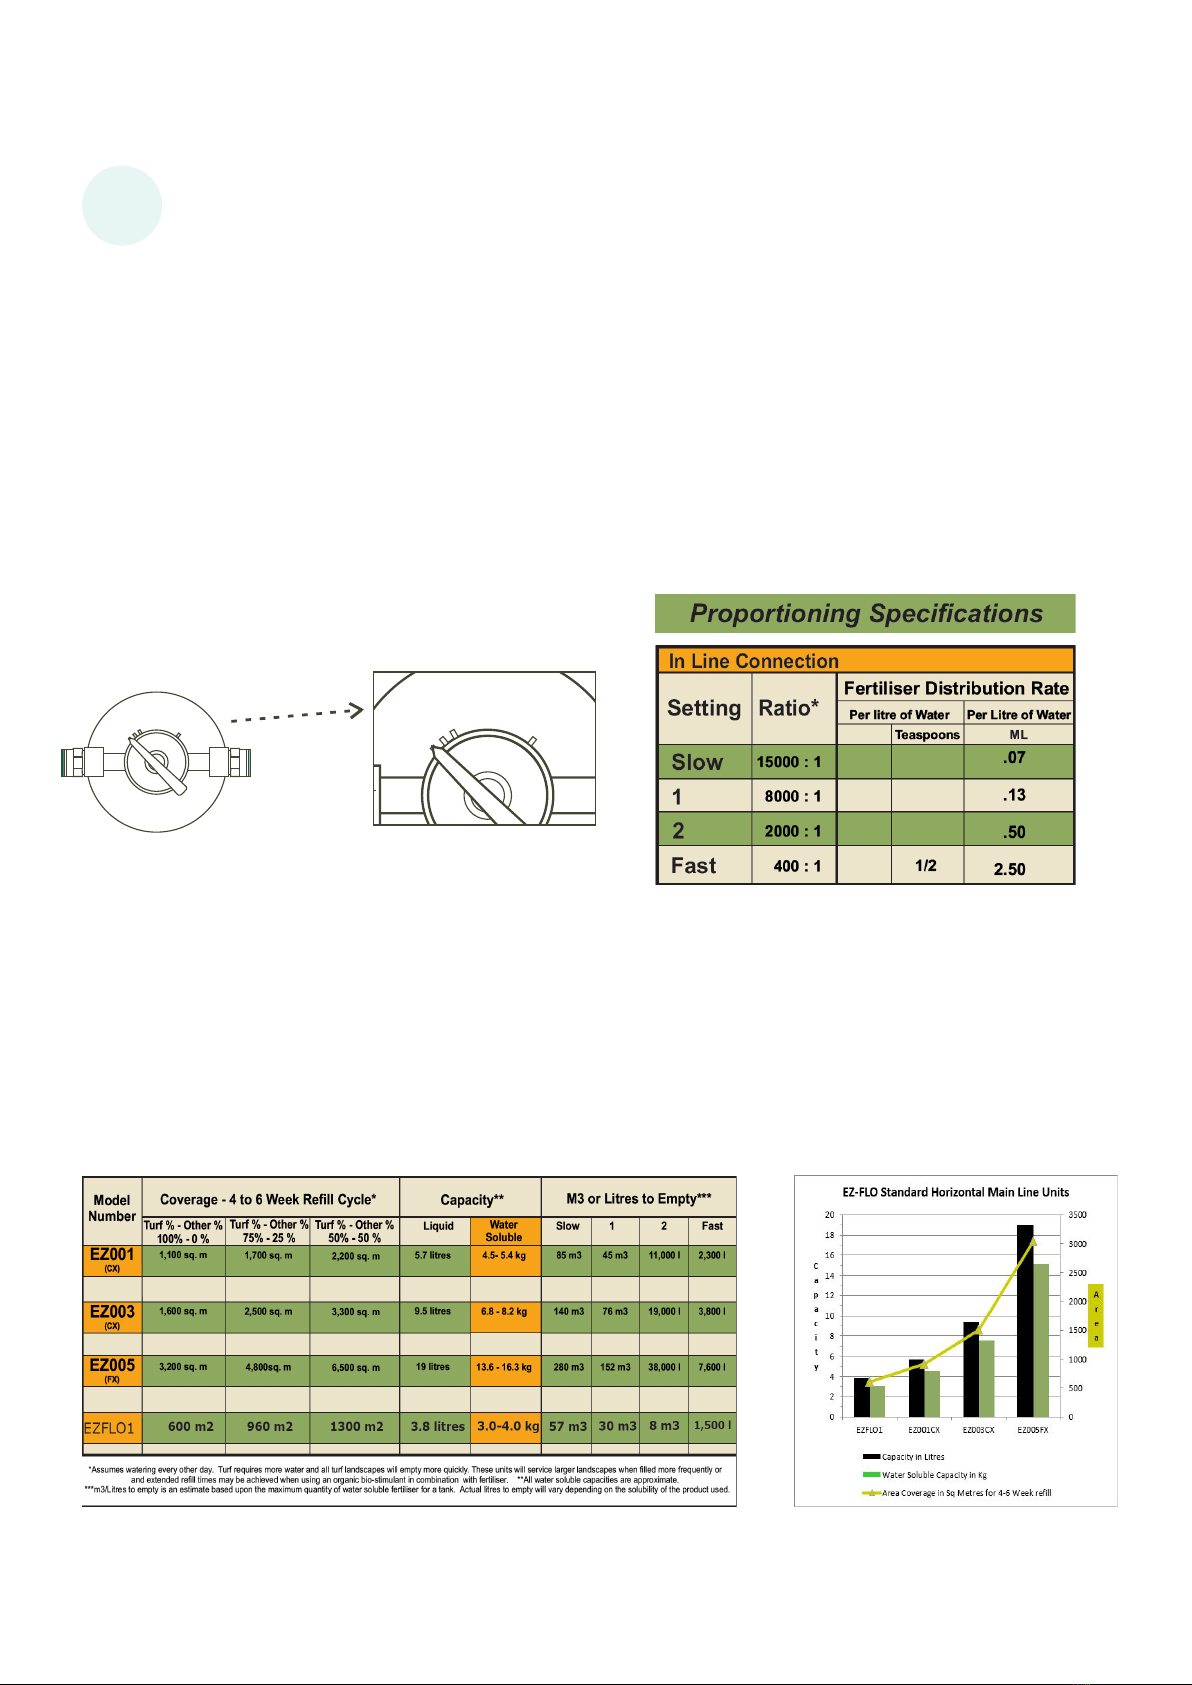
Set the flow rate by adjusting the adjustment knob to the proper setting.
- is used for normal and most common setting in regions with high watering Slow Setting
requirements such as hot dry climates or sandy soils.
- is used for normal maintenance in regions with more moderate climates and #1 Setting
moderate watering schedules where soils have good moisture retention.
- is used to encourage fast growth or to quickly improve the condition of a landscape #2 Setting
in poor condition. The unit will empty more quickly and can be refilled more often.
- is used to for periodic fertilisation. The unit will empty more quickly and can be Fast Setting
refilled more often.
* Ratio refers to the amount of water mixed with the fertiliser. For example, a 400:1 ratio means 400
liters of water will be mixed with 1 liter of fertiliser. The adjustment knob can be set in between settings
if desired.
These These ratios are approximate because feed rates can vary by the type of product being distributed.
Ratios are provide as a general guideline only. The watering frequency guideline is general and for
convenience only. Additional caution and care should be taken when using a feed setting faster than #1.
10 Set flow adjustment
Page 9
www.ezflo.com.au
TM
© 2020, EZ-FLO Fertilizing Systems

Frequently Asked Questions
How much product to put into the tank?
Refer to the product label and tank capacity. The system feeds very slowly and it is difficult to over
2
fertilise when using the system properly. Typical rates are 1 litre of liquid per 200 m of landscape
2
per month and 1 Kg of dry powder fertilizer per 200 m of landscape per month.
Can I use weed killer/ herbicide in the system?
Typically no, hazardous products are not recommended for use in the EZ-FLO system and the application
of herbicide should be tightly controlled.
How do I know when to refill?
The system can be checked for color by viewing the clear output tubing during irrigation operation. If the
fertiliser color is gone, you need to refill the system. Alternatively, you may let the system run empty and
refill based on a set schedule.
What fertiliser can I use?
Almost any liquid or water soluble powder product. Do not use dry broadcast fertilisers, they are not
compatible and may cause damage to the EZ-FLO or Irrigation system.
How often do I need to refill?
This will vary on landscape size and watering schedule. If you follow the EZ-FLO sizing and use
recommendations, you will typically last 4 to 6 weeks. If your landscape is smaller it will last longer.
If the landscape is larger or you water heavily, the system will empty faster.
What cap setting should I use?
Slow and #1 are the most common settings and generally the safest unless you are familiar with the
fertiliser product and injection system. The closer to fast, the faster the system will run out of product.
How do I know it is working?
When the irrigation system is running and the system is full of fertiliser, watch the clear output tube for
color. You may adjust the cap from slow to fast to see the color change. You can use blue or green food
dye to add color to the fertiliser.
Page 10
www.ezflo.com.au
TM
© 2020, EZ-FLO Fertilizing Systems
Ce manuel convient aux modèles suivants
3
Table des matières
Autres manuels EZ FLO Matériel agricole

Manuels Matériel agricole populaires d'autres marques

GSi
GSi PNEG-2314 Manuel utilisateur

Checchi & Magli
Checchi & Magli TEXDRIVE Manuel utilisateur

Amazone
Amazone Cenius 4003-2TX Manuel utilisateur

MASSEY FERGUSON
MASSEY FERGUSON MF 9313S Manuel utilisateur

Cima
Cima BLITZ Instructions d'utilisation et d'entretien

Amazone
Amazone CombiDisc 3000 Instructions d'installation


