Upozornenie:
Veľkosť zóny, v ktorej infrapasívny snímač reaguje na
pohyb osôb, závisí v prípade stropnej montáže
predovšetkým na výške umiestnenia snímača a na jeho
prípadnom natočení. Okrem toho je veľkosť zóny
ovplyvnená mnohými ďalšími okolnosťami, ako je rýchlosť
a smer pohybu vzhľadom k snímači, teplota okolia,
prítomnosť rušivých zdrojov tepla (vykurovacie telesá,
osvetlenie apod.). Informatívna zóna dosahu v závislosti
na smere pohybu vzhľadom k orientácii snímača je
znázornená na obr. 1a, b (výška snímača nad podlahou
je 2,5 m). Pri montáži do väčšej výšky (až asi 5 m) sa
zóna dosahu úmerne zväčšuje. Pokiaľ to typ držiaku
umožňuje, je možné naklopením snímača nasmerovať
a pretiahnuť zónu dosahu aj mimo osu montážneho
otvoru.
MONTÁŽ A NASTAVENIE
Infrapasívny snímač je určený pre montáž do stropných
podhľadov do držiakov halogénových žiaroviek MR16,
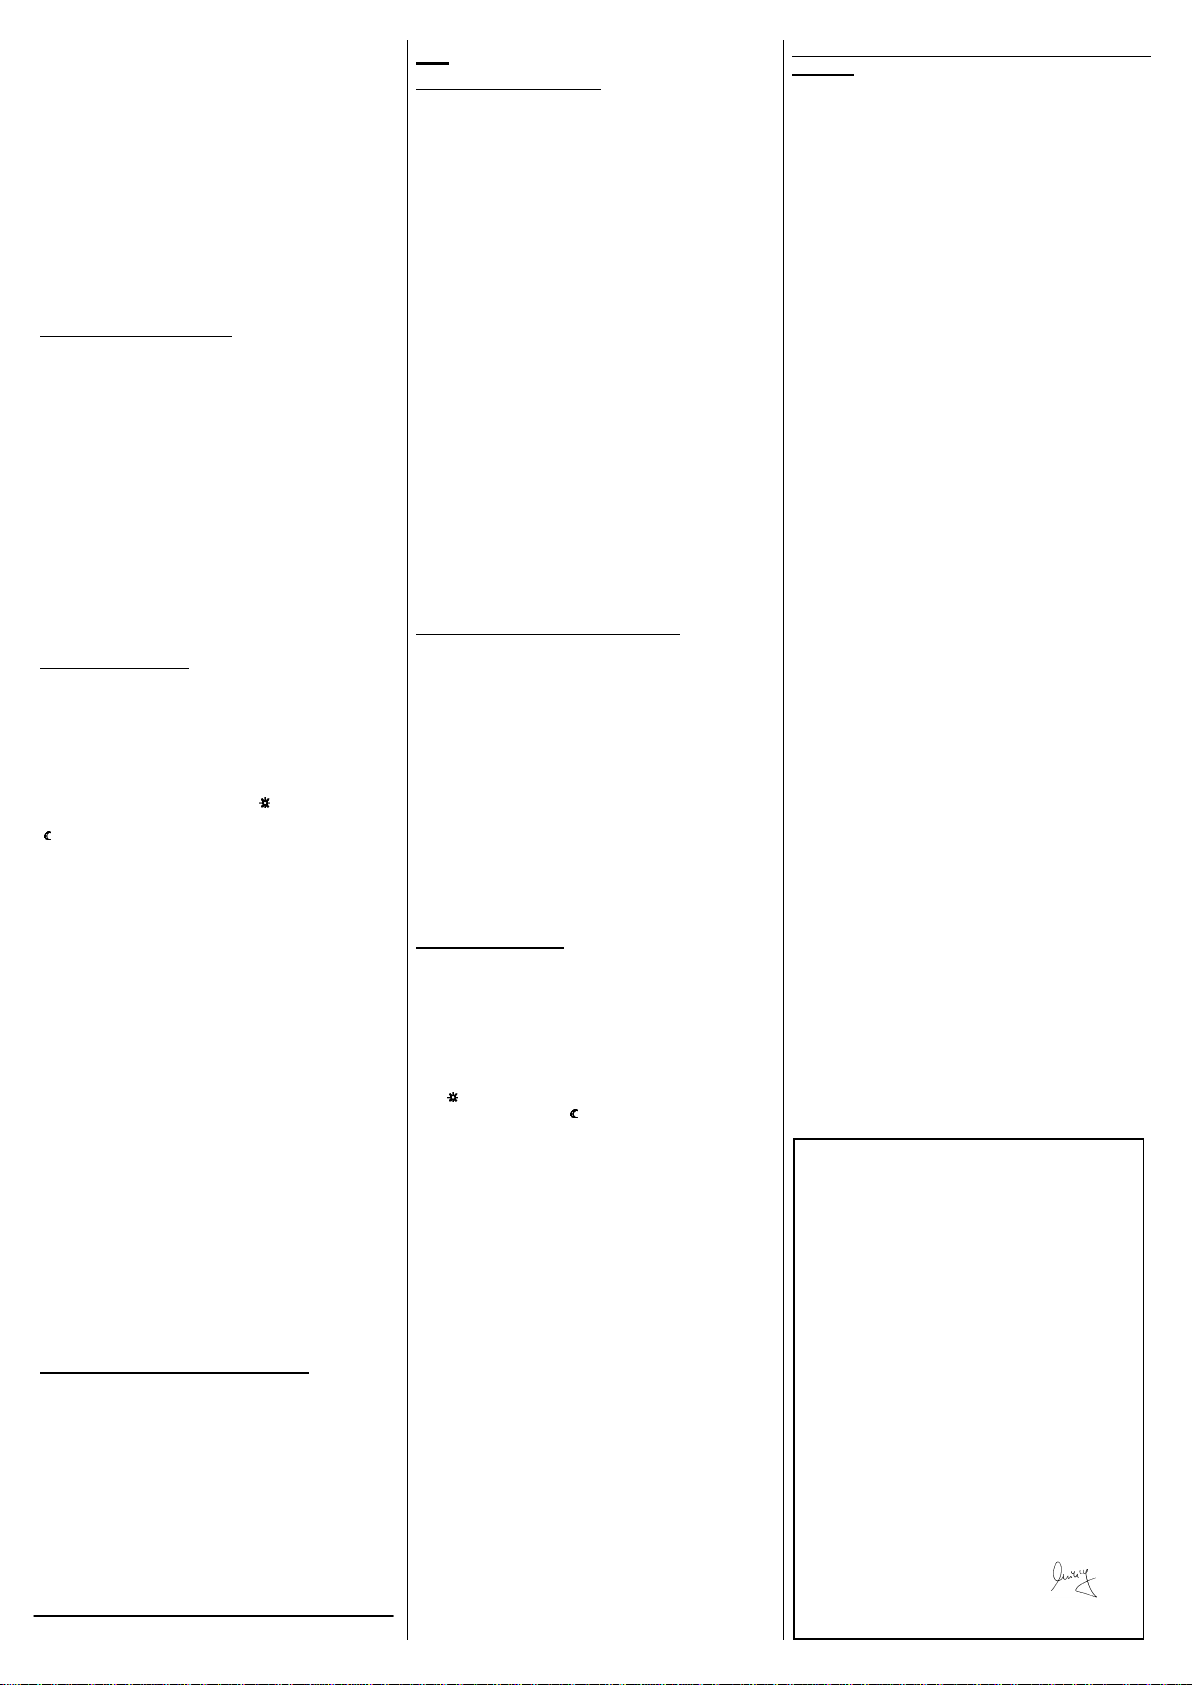
ktoré umožňujú pretiahnutie tela snímača (obr. 2). Anténa
vystupujúca zo zadnej časti krytu by po zasunutí snímača
do držiaku mala byť pre dosiahnutie maximálneho dosa-
hu vysielania dostatočne vzdialená od všetkých vodivých
predmetov.
Do snímača je najprv potreba vložiť batérie:
- pomocou krížového skrutkovača odstráňte skrutky
(obr. 3d),
- odložte zadnú časť krytu,
- vložte batérie (pozor na správnu polaritu – obr. 4),
- vráťte kryt na pôvodné miesto a upevnite skrutky.
Rovnako sa postupuje i pri výmene batérií.
Funkcia je z výroby nastavená na režim ON/OFF. Pokiaľ
potrebujete zmeniť režim na ON, pri odmontovanej
zadnej časti krytu vysuňte tlačený spoj a prestavajte
prepojku (obr. 5)
Nastavovacie prvky
Na zadnej strane snímača sú dva nastavovacie prvky
(obr. 3a, 3b):
a) LIGHT (hladina okolitého osvetlenia)
Snímač reaguje na pohyb, ak je úroveň osvetlenia v
mieste inštalácie nižšia ako nastavená hodnota. Pri vyš-
šej úrovni okolitého osvetlenia je prístroj deaktivovaný
(signál sa nevysiela ani v prípade detekcie pohybu). Pri
nastavení do ľavej krajnej polohy ( ) prístroj spína prak-
ticky za akéhokoľvek osvetlenia, v pravej krajnej polohe
() spína len za tmy.
b) TIME (oneskorenie vypnutia / potlačenie vysielania)
V režime ON/OFF sa týmto nastavovacím prvkom nasta-
vuje oneskorenie vypnutia, čo je doba, počas ktorej bude
svietidlo zapnuté od okamžiku ukončenia detekcie pohy-
bu. od asi 20 sekúnd do 30 minút. Poloha v strede rozsa-
hu zodpovedá asi 5 minút.
V režime ON sa oneskorenie vypnutia nastavuje na prijí-
mači, ktorý musí byť vo funkcii časovač. Nastavovacím
prvkom na snímači sa v troch hodnotách nastavuje potla-
čenie vysielania, čo je minimálna doba medzi dvomi vy-
sielaniami signálu pre zapnutie pri trvalom pohybe pred
snímačom. V krajnej polohe „–“je nastavená 1 min,
uprostred 5 min a v krajnej polohe „+“15 minút.
Upozornenie:
Doba potlačenia vysielania by mala zodpovedať
minimálne polovičnej dobe oneskorenia nastavenej na
časovači prijímača. To znamená, že napr. pre dobu
potlačenia 1 min je vhodné nastavenie časovača na
prijímači od 2 do 5 minút apod.
Zmena v nastavení oneskorenia vypnutia / potlačenia
vysielania sa prejaví až po uplynutí pôvodne nastaveného
času, alebo okamžite po stlačení vysielacieho tlačidla
(obr. 3c)!
Z dôvodu dosiahnutia maximálnej životnosti batérie je
treba čo najviac obmedziť počet vysielaní. Preto je
vhodné, pokiaľ to konkrétne prevádzkové podmienky pre
použitie snímačov umožňujú, nenastavovať zbytočne
krátku dobu oneskorenia vypnutia v režime ON/OFF a
rovnako nenastavovať najkratšiu dobu potlačenia
vysielania v režime ON.
Zápis snímača do pamäte prijímača
- na prijímači nastavte požadovanú funkciu (viď manuál
príslušného prijímača) podľa režimu snímača –
ON/OFF pre režim ON/OFF alebo časovač pre režim
ON,
- pre odvysielanie kódu potrebného pre zápis do pamäti
prijímača stlačte krátko pri zatienenej šošovke vysiela-
cie tlačidlo na zadnej strane snímača (obr. 3c). Vysie-
lanie kódu je indikované blikaním LED pod šošovkou
snímača.
ENIKA.CZ s. r.o. týmto prehlasuje, že tento P8 T PSMR
16/A, P8 T PSMR 16/A HR je v zhode so základnými po-
žiadavkami a ďalšími príslušnými ustanoveniami smerni-
ce 1999/5/ES.
GB
OPERATING PRINCIPLE
The device with a POSEIDON®system receiver is de-
signed to switch on/off electrical appliances (luminaries)
without manual control. The sensor receives invisible in-
frared radiation. If it detects a change caused e.g. by
movement of a person in the detection zone (Fig. 1), the
coded RF signal is transmitted.
The sensor works in two modes:
ON/OFF –first, the sensor transmits the ON signal. After
the switch-off delay expires, it transmits the OFF signal.
ON –the sensor transmits the ON signal only. The timer
function (preset on the receiver) will switch off the appli-
ance.
The LED located behind the lens of the passive infrared
switch indicates transmitting. Fast flashing indicates low
battery.
Note:
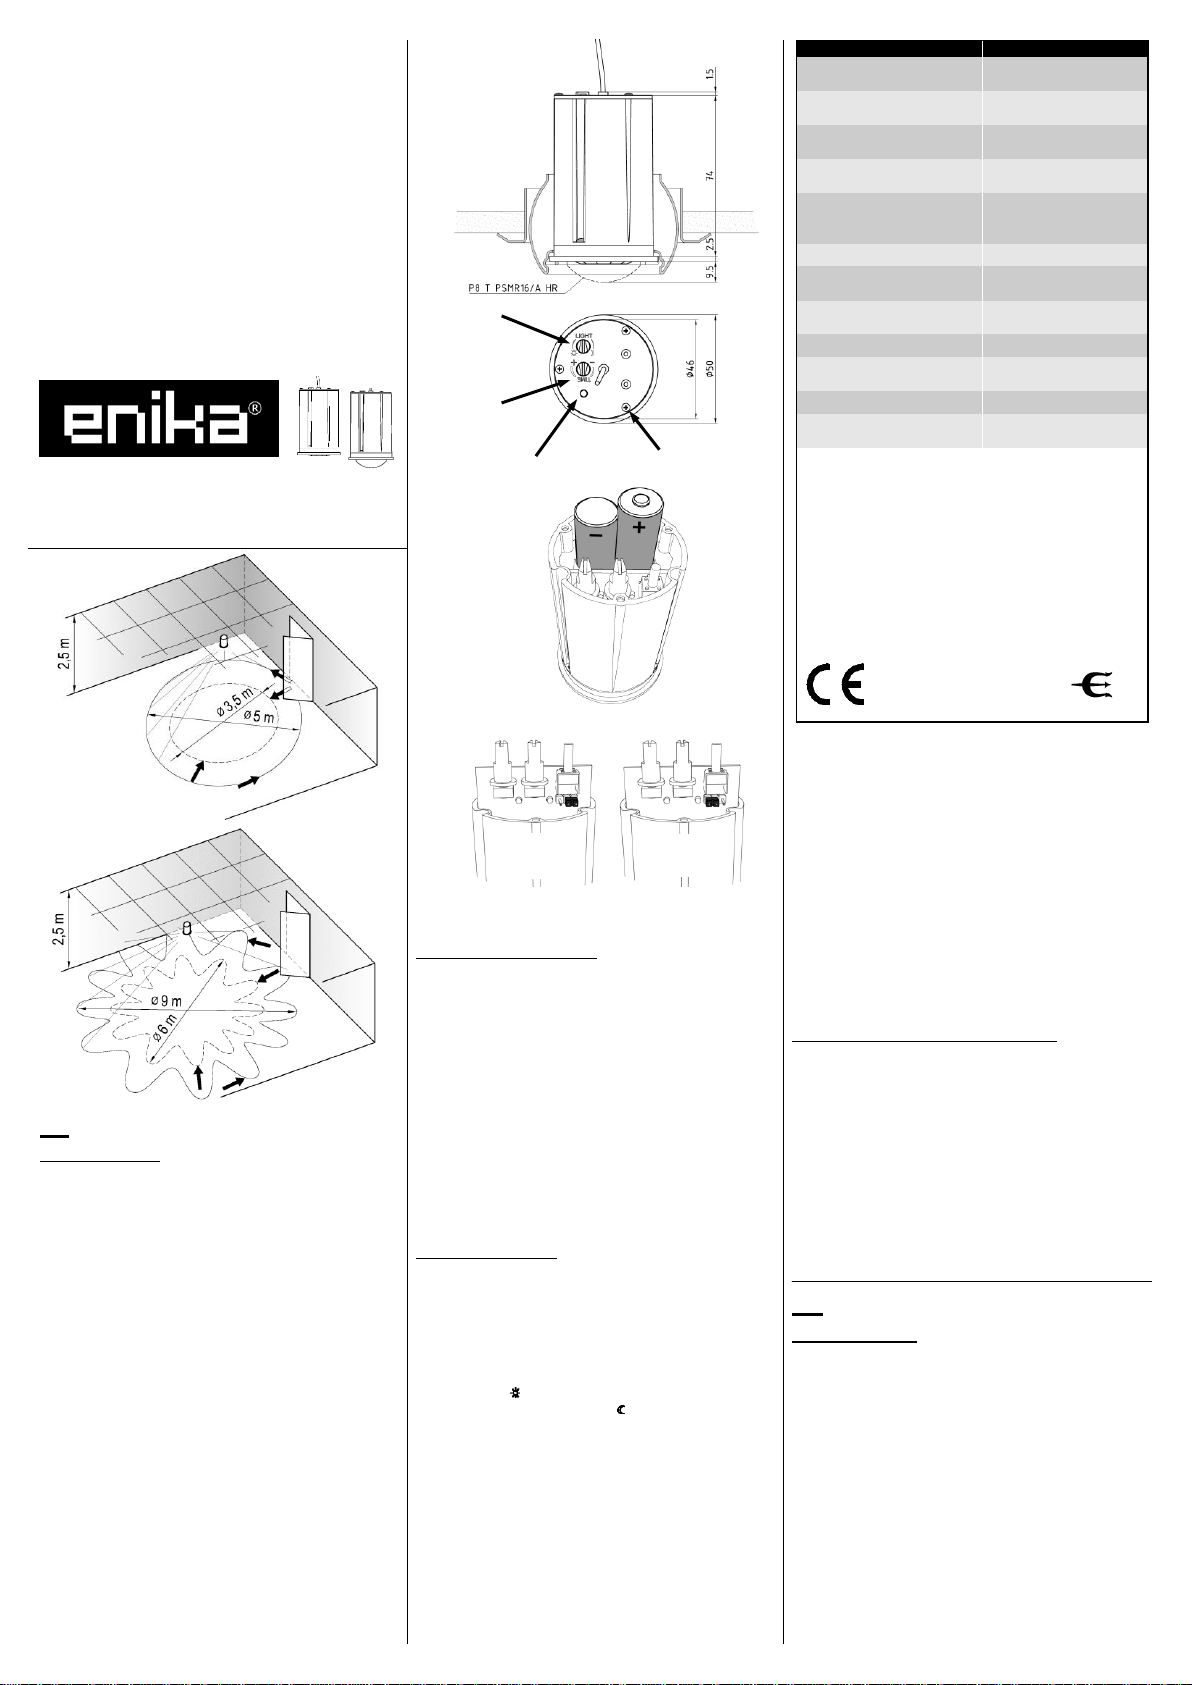
The size of the area covered by a ceiling-mounted PIR
switch depends mainly on its installation height and
turning angle. In general, the size of the movement
detection zone is affected by a lot of other factors too,
e.g. speed and direction of the person‘s movement with
respect to the switch, ambient temperature or presence of
interfering heat sources (heaters, lighting, etc.).
Informative indication of the detection zone depending on
the movement direction with reference to the switch
orientation is specified on Fig. 1a, b (installation height of
2.5 m). If installation height is higher (up to 5 m), the de-
tection zone proportionately expands. If the type of the
bracket permits, tilting the switch can direct and extend
the detection zone even out of the installation hole axis.
INSTALLATION and ADJUSTMENT
The infrapassive switch is used in ceiling mountings, in
holders of Mr16 halogen bulbs. These bulbs allow exten-
sion of the switch body (Fig. 2). To achieve the maximum
transmission range, the antenna projecting from the rear
cover should be sufficiently distant from all conducting ob-
jects after inserting the switch into the bracket.
First of all, insert batteries into the switch:
- use Phillips screwdriver to remove bolts (Fig. 3d),
- remove the rear cover,
- insert batteries (pay attention to their correct polarity –
Fig. 4),
- install the cover to its place and tighten bolts.
Follow the same procedure when replacing batteries.
The factory setting of the function is the ON/OFF mode. If
you want to change the setting to ON, remove the rear
cover, pull the printed circuit board and replace the
jumper according to Fig. 5.
Adjusting elements
Two adjusting elements are located on the rear side of
the switch (Fig. 3a, 3b):
a) LIGHT (response threshold)
The switch responses to movement, if the illumination
level in the installation location is lower than the set value.
If the level of the ambient illumination is higher, the device
will be deactivated (the signal will not be detected even in
case of movement detection). If set to the left limit posi-
tion ( ), the device will switch in any level of illumination,
in the right limit position ( ), it will switch only in darkness.
b) TIME (switch-off delay / suppression of transmitting)
Use this adjustment in the ON/OFF mode to set the
switch-off delay, i.e. the time of the ON status of the lumi-
nary from the time of the last movement detection. A pe-
riod between 20 seconds and 30 minutes can be set. The
middle position represents the period of approximately 5
minutes.
In the ON mode, the switch-of delay is set on the receiver
that must be set to the timer function. The adjusting ele-
ment on the switch is used to set suppression of transmit-
ting in three values. Suppression of transmitting means
the minimum period between two switch-on signal trans-
missions in case of permanent movements in detection
zone of the switch. The left limit position '–' represents
1 minute, the middle position 5 minutes and the right limit
position '+' represents 15 minutes.
Note:
The time of suppression of transmitting should
correspond to at least a half of the switch-off delay period
set on the receiver timer. This means e.g. that for
suppression of transmitting time of 1 min, it is desirable to
set the receiver timer from 2 to 5 minutes etc.
The change in switch-off delay / suppression of
transmitting takes affect when the originally set value is
over or after the transmitting button is pressed (Fig. 3c)!
In order to achieve the maximum battery lifetime, number
of transmissions must be minimized. Therefore, it is
suitable (if the specific operating conditions permit) not to
set unnecessarily short switch-off delay in the ON/OFF
and, at the same time, not to set the shortest time of
suppression of transmitting in the ON mode.
How to program the switch into the receiver
memory
- on the receiver, set the required function (see the in-
struction manual of the appropriate receiver) according
to the receiver mode –ON/OFF for the ON/OFF mode
or timer for the ON mode.
- to transmit the code necessary to register (program) in-
to the receiver memory, press shortly the transmitting
button on the rear side of the switch (Fig. 3c) while
blinding the lens. The code transmission will be indicat-
ed by the flashing LED behind the switch lens.
Hereby, ENIKA.CZ s.r.o. declares that this P8 T PSMR
16/A, P8 T PSMR 16/A HR complies with the essential
requirements and other relevant provisions of Directive
1999/5/EC.
Prohlášení o shodě
Výrobce: ENIKA.CZ s. r. o.
190 00 PRAHA 9, Pod Harfou 933/86
IČO: 28218167
tímto prohlašuje, že výrobek
typové označení: P8 T PSMR16/A (3299-22918)
P8 T PSMR16/A HR (3299-22928)
specifikace: ---
druh výrobku: infrapasivní snímač pohybu vysílací
frekvence: 868,3 MHz
vf výkon: 10 dBm
- je ve shodě se základními požadavky NV 426/2000 Sb. v platném
znění
- odpovídá základním požadavkům a dalším ustanovením evropské di-
rektivy
1999/5/ES
(R&TTE) (Směrnice o radiových zařízeních a tele-
komunikačních koncových zařízeních a vzájemném uznávání jejich
shody)
- splňuje požadavky těchto norem a předpisů:
rádiové parametry: ČSN ETSI EN 300220-1 V2.1.1:2006
EMC: ČSN ETSI EN 300220-2 V2.1.1:2006
EN 301 489-1 V1.5.1:04
VO-R/10/09.2012-11
elektrická bezpečnost: ČSN EN 60 669-2-1 ed.3:05
ČSN EN 60 669-1 ed.2:03
Toto prohlášení je vydáno na výhradní odpovědnost výrobce.
V Nové Pace dne 28.02.2013 ing. Vladimír Militký,
řízení sytému jakosti