elero AstroTec 28 060.0001 Manuel utilisateur

AstroTec
Nr. 28 060.0001
Operating instructions (translation)
Please keep these instructions in a safe place.
Timer is preprogrammed
EN
181003201_EN_0215

Contents
2 | EN
Safety instructions .......................................... 3
Explanation of displays and buttons....................... 4
General information .......................................... 5
Designated use .............................................. 5
Installation/Connection ...................................... 6
Connection as a drive controllert ......................... 6
Connection as a group controller ......................... 7
Initial operation .............................................. 8
Factory settings .............................................. 8
Light sensors ................................................. 9
Explanation of functions
Manual/Automatic sliding switch, Alarm signal
control light, Group control, Operating mode ............ 9
Buttons ..................................................... 9
Time/date .................................................10
Programme ...............................................11
Astro, Astro evening, Individual.......................... 12
Week, Block, Individual, Idle period, Switching time,
Offset .....................................................13
Settings menu
Holiday function, End limit ...............................15
Intermediate position, Ventilation/Reverse .............16
Language selection, Astro shift, City selection,
Automatic summer/winter time changeover ............. 17
Function menu
Drive controller/ group controller.........................18
External switch inputs, Expert mode.....................18

Contents
EN | 3
Programming menu
Overview of menu ........................................19
Date and time settings ...................................19
Astro function for week/block/individual + Idle
period ▲▼ .............................................. 20
Astro evening function for week/block/individual +
switching time ▲and idle period ▲....................21
Individual switching times ▲▼ in PROG 1 for
week/block/individual ....................................23
Individual switching times ▲▼ in PROG 2 for
week/block/individual ....................................24
Evening DOWN control command into
ventilation position........................................26
Holiday function, Sun /twilight function .................27
Position programming 1 (intermediate/ventilation/
reverse/end limit position)................................ 28
Position programming 2 (intermediate/ventilation/
end limit position) ........................................29
Language selection, Astro shift ..........................30
City selection, Expert mode (longitude, latitude,
time zone) ................................................31
Automatic summer/winter time changeover ............ 32
Function (for qualified staff only!)
Venetian blind/shutter selection, Drive/group
controller, Running time .................................33
External switching inputs, Processing of external
alarm signals .............................................34
Technical data .............................................. 36
Troubleshooting ........................................... 37

Safety instructions
4 | EN
Important safety instructions!
Always observe the following instructions.
Risk of injury by electric shock.
• All terminal connections to a 230 V network must be
made by an authorised electrician.
• Before installation, always disconnect the mains lead
from the power supply.
• The provisions of the local public utilities and
stipulations for wet and damp rooms in accordance
with VDE 100 must be observed for system instal-
lation.
• For use in dry rooms only.
• Use unmodified elero original parts only.
• Keep persons away from the systems guide track.
• Keep children away from controls.
• Always comply with national stipulations.
• Dispose of used batteries properly.
Replace batteries with identical type (CR 2032) only.
• If the system is controlled by one or more devices,
the system guide track must be visible during ope-
ration.
• Only cables with sufficient electric strength may be
used to connect control cables (protective low vol-
tages).
• The equipment contains small parts that could be
swallowed.
Warning!

Explanation of displays and buttons
EN | 5
1RWVLJQDONRQWUROO
OHXFKWH
$EGHFNNODSSH
$Q]HLJHQXQG7DVWHQHUNOlUXQJ
+DQG$XWRPDWLN
6FKLHEHVFKDOWHU
7DVWH
67237DVWH
7DVWH
)XQFWLRQ
$VWUR
83
'2:1
6
'LJLWDOGLVSOD\
'D\V0RQ6XQ
PLQ
$Q]HLJHIHOG6\PEROHUNOlUXQJ
3URJUDPPH
7LPHGDWH
7H[WOLQH
6HWWLQJ
PLQ
6
$VWUR7HF
0(18
5HVHW
2. 2.EXWWRQ
EXWWRQ
±EXWWRQ
0(18EXWWRQ
±
5HVHWEXWWRQ
Explanation of displays and buttons
Buttons under the cover
Display symbols
$ODUPVLJQDO
FRQWUROOLJKW
&RYHU
$Q]HLJHQXQG7DVWHQHUNOlUXQJ
0DQXDODXWRPDWLF
VOLGLQJVZLWFK
'2:1EXWWRQ
6723EXWWRQ
83EXWWRQ
PLQ

General / Designated use
6 | EN
General
The AstroTec, delivered from the factory with current date and
time settings (GMT), automatically controls the drive at the astro
times (sunrise and sundown).
The AstroTec can be operated manually at any time.
The easy-to-install light sensor allows the AstroTec to be extended
to include a convenient sunshade function (shading plants and
furniture).
Designated use
The AstroTec may only be used to control roller shutter and
venetian blind systems.
Connection of other devices must be carried out in consultation
with specialised dealers.
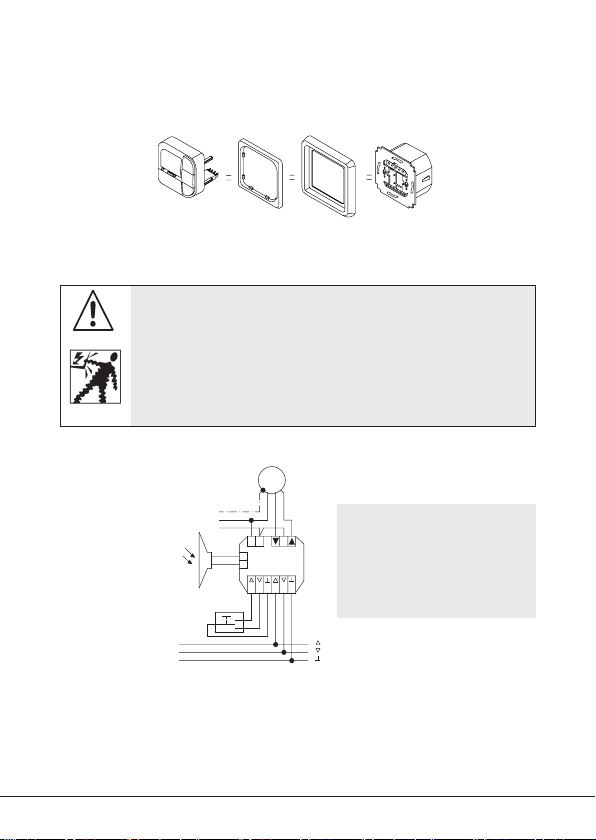
Installation / connection
EN | 7
Installation
0
%OLQG
SXVKEXWWRQ
&HQWUDO,QGLYLGXDO
/XPR
1
a
$VWUR7HF
1
/
/
3(
0DLQV
&
7RRWKHU
FRQWUROGHYLFHV
9+]
3. Replace the protective caps on the power supply unit.
4. Secure the power supply unit in the box.
5. Insert the operating device into the frame and insert it into
the power supply unit.
Connection as a drive controller
For details on suitable control systems, please refer to the con-
trol product catalogue.
Warning!
Risk of injury by electric shock!
• Terminal connections must be carried out by an autho-
rised electrician!
• If more than one drive is operated using the AstroTec,
the drives must be decoupled by relay controls.
• The switched current of the device must be observed at
all times!.
1. Remove the protective caps.
2. Connect.
Note:
Always use a shielded
control wire . . . *0.8 mm
Øor telephone line
JY-ST . . . *0.6 mm Ø.

Connection
8 | EN
SXVKEXWWRQ
%OLQG
&HQWUDO,QGLYLGXDO
1
$VWUR7HF
/ &
/
1
0DLQV
2XWSXW
,QSXW
7RRWKHU
FRQWUROGHYLFHV
7RRWKHU
FRQWUROGHYLFHV
3. Replace the protective caps on the power supply unit.
4. Secure the power supply unit in the box.
Insert the operating device into the frame and insert it into
the power supply unit.
Connection as a group controller
You can find the structure of a controller on elero.com in the
download area under „Installation instructions and circuit dia-
grams“.
Warning!
Risk of injury by electric shock!
• Terminal connections must be carried out by an
authorised electrician!
1. Remove the protective caps.
2. Connect.
Note:
Always use a shielded
control wire . . . *0.8 mm
Øor telephone line
JY-ST . . . *0.6 mm Ø.

Initial operation / Factory settings
EN | 9
Initial operation
To activate the AstroTec timer, touch any button on the device. To
select the language required use the +/- buttons and confirm your
selection with the OK button. The AstroTec is now in automatic
operating mode.
Factory settings
TIME/DATE: – Current GMT and current date
PROGRAMME: – ASTRO BLOCK IDLE PERIOD
(1-5)
▲06:30 HRS
▲No default idle period
IDLE PERIOD (6,7)
▲08:00 HRS
▲No default idle period
SETTING: – HOLIDAY OFF
– light sensor SUN 05 sunlight value
(if light sensor is connected)
– END LIMIT, location
– SUMMER/WINTER ON
FUNCTION: – ROLLER SHUTTER, DRIVE CONTROLLER,
EXTERNAL SWITCH, ALARM SIGNAL ON,
EXPERT MODE OFF
Note! Press the RESET button (with a ballpoint pen or similar
object) to restore the factory settings of the AstroTec.
Exception: Function menu, language selection and city
selection.

Light sensors/Explanation of functions
10 | EN
Light sensors
Note: If you wish to connect a light sensor to the AstroTec, the
instructions provided with the light sensor must be followed.
Explanation of functions
MAN/AUTO sliding switch
In the “MAN ” sliding switch setting, only manual command
controls and alarm signals are executed.
In the “AUTO ” sliding switch setting, manual and automatic
command controls are carried out (e.g. shade function, time, astro
function,...)
Alarm signal control light
When the alarm signal control light is illuminated, this indicates
an alarm signal. A continuous switching signal at the group or
individual control inputs for more than 5 seconds signifies an
alarm signal.
Group control
Group control refers to the control of several drives at the same
time. The chosen group is controlled by executing a control
command.
Operating mode
The time is shown in the display.
OK button
When the OK button is pressed, the values currently displayed are
saved.
Table des matières
Autres manuels elero Contrôleurs

elero
elero MemoTec-868 Manuel utilisateur

elero
elero ExitSafe 28 388.0001 Manuel utilisateur

elero
elero InDrive M30/1.6 RH Guide produit

elero
elero VarioTec-868 DC Manuel utilisateur

elero
elero Patio Manuel utilisateur

elero
elero Herkules 1 Manuel utilisateur

elero
elero Combio-915 JA Manuel utilisateur

elero
elero BoxControl Compact Manuel utilisateur

elero
elero Vario 1 Manuel utilisateur

elero
elero Picolo 0 Manuel utilisateur


