ElectrIQ eiQMTD2W Manuel utilisateur

USER MANUAL
2.5KG TUMBLE DRYER
eiQMTD2W
eiQMTD2B
Thank you for choosing electriQ
Please read this user manual before using this condenser tumble
dryer and keep it safe for future reference

2

3
CONTENTS
SAFETY
4
PRODUCT OVERVIEW
6
INSTALLATION
7
BEFORE EACH CYCLE
9
DRYING TIME REFERENCE
9
BEFORE EACH CYCLE
9
OPERATION
10
AFTER DRYING
11
CLEANING THE FILTER
11
TROUBLESHOOTING
12
TECHNICAL SPECIFICATION
12
SUPPORT
13

4
SAFETY INSTRUCTIONS
•Keep these instructions for use with the appliance. If the appliance
should be sold or passed on to others, make sure that the instructions
are passed on with it.
•This appliance is not intended for use by persons (including children)
with reduced physical, sensory or mental capabilities, or lack of
experience and knowledge, unless they have been given supervision or
instruction concerning use of the appliance by a person responsible for
their safety.
•This tumble dryer is intended for normal domestic use only.
•This appliance can be used by children aged from 8 years and above
and persons with reduced physical, sensory or mental capabilities or
lack of experience and knowledge if they have been given supervision
or instruction concerning use of the appliance in a safe way and
understand the hazards involved.
•Children shall not play with the appliance.
•Cleaning and user maintenance shall not be made by children without
supervision.
•Children of less than 3 years should be kept away unless continuously
supervised.
•It is not recommended that the dryer is placed directly next to ovens or
cookers as the performance of the dryer may be affected.
•Do not stack the tumble dryer on top of other appliances without the
correct stacking kit.
•Any electrical work required to install the appliance should be carried
out by a qualified person.
•It is important to clean the lint filter after each drying cycle or the
restrictions to airflow will extend drying times and could cause the
safety cut-out to trip.
•Under no circumstances should anything other than the recommended
articles be placed in the tumble dryer.
•The tumble dryer should be serviced by an appointed service
organisation and only genuine parts used.
•It is dangerous to alter or modify the product in any way other than
which is stated in this manual.
•We recommend that the appliance is unplugged each time after use. It
should always be disconnected from the mains.

5
•The rear of the dryer will get quite hot during use. Position the dryer so
that the back is not accessible while in operation, but ensure that the
sides have space available to allow adequate airflow
•The mains cable and plug assembly must only be replaced with a
genuine part by the manufacturer or his service agents in order to avoid
a hazard.
•It is important to clean fluff from the window of the dryer and around the
door seal after each drying cycle. Failure to do so could result in water
leaking and the door sealing properly.
•If you need to stop the tumble dryer before the end of a drying cycle,
ensure that the load and appliance are cooled before opening the door.
•Once the load is removed, all items need to be quickly spread out so
that any residual heat is dissipated.
•Remove all objects from pockets such as lighters and matches.
•DO NOT block the air inlets at the base and side of your dryer.
•DO NOT allow fluff to accumulate around the tumble dryer.
•DO NOT exceed the recommended maximum load.
•DO NOT place articles in the dryer if anything other than a water
solution has been used in the cleaning process.
•DO NOT use the tumble dryer if you suspect that it is damaged or faulty
in any way. Under no circumstances should you attempt to repair the
appliance yourself. Repairs carried out by inexperienced persons can
result in serious injury.
•Consult your local appointed service engineer and insist on genuine
spare parts.
•The dryer must be installed by a competent person and following the
instructions in this manual.
•Any electrical work required to install the appliance should be carried
out by a qualified person.
•The tumble dryer should be serviced by an appointed service
organisation and only genuine parts used.
•It is recommended that the dryer be serviced annually by a person
competent to service tumble dryers.
•The mains cable and plug assembly must only be replaced with a
genuine part available from the manufacturer or service agent.
•Packaging should be responsibly disposed of and kept away from
children and pets.
•Keep pets away from the appliance.

6
•It could be possible for a child or pet to gain access to the tumble dryer
through the door. Therefore, please check the drum before loading or
starting the appliance.
•DO NOT use a two-way adaptor, or extension lead. The dryer must be
connected to its own socket.
•DO NOT dry unwashed items in the tumble dryer.
•DO NOT attempt to dry dripping wet articles.
•The appliance must not be supplied through an external switching
device, such as a timer, or connected to a circuit that is regularly
switched on and off by a utility.
PRODUCT OVERVIEW
Door Gasket
Drum
Air Intake Shroud
Control Dial
Window
Door
Exhaust Vent
Back Cover
Casing

7
INSTALLATION
•The dryer must be installed in a clean dry place. Air must be able to
circulate freely around the appliance.
•The dryer should be placed on a firm level surface to avoid unwanted
noise and improve performance.
•Once the dryer is in its permanent position check that the dryer is level
with the aid of a spirit level.
•Ensure that the voltage of the power supply is the same as the
electrical specifications of the appliance.
•Do not place on top of any existing appliance, such as a dishwasher or
washing machine.
•Attach the provided legs to the bottom of the unit.
WALL MOUNTING INSTALLATION
WALL MOUNTING KIT
DESCRIPTION
Hanging brackets
2
Plastic spacers
2
Exhaust connector
1
12mm screws
4
25mm screws
4
8
1. Determine the dryers’ position on the chosen wall. Ensure that no
piping or writing is behind the wall. A minimum of 50 mm is needed
between the top of the dryer and the ceiling for ease of installation.
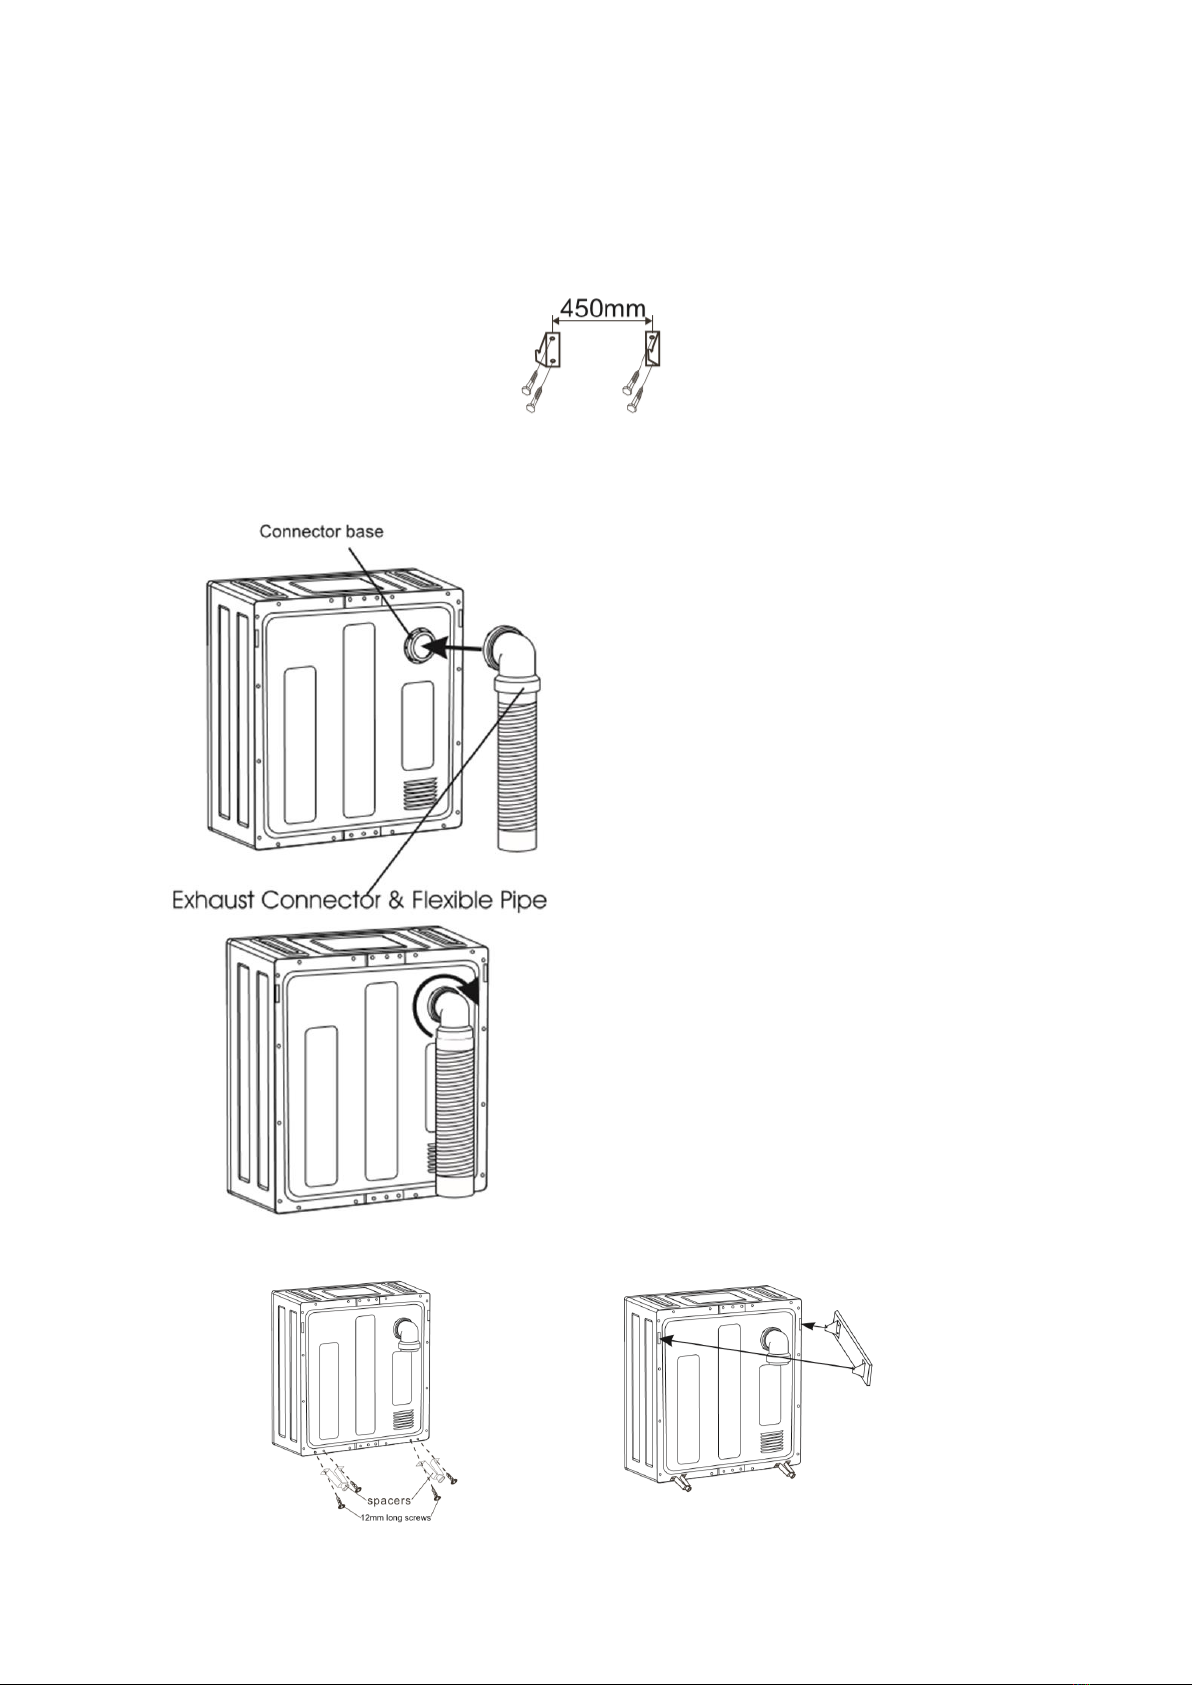
2. Mark two holes onto the chosen wall 450mm apart.
3. Align the hanging hooks and fasten in the screws, ensuring they
are secure.
4. Adjust the exhaust connector
direction, then install onto the
unit’s connector.
5. Turn the exhaust connector
clockwise until it fits into the
connector groove.
6. Using the 4x12mm screws, fix
the 2 spacers. (See below).
Then with assistance, mount the
dryer onto the wall bracket.

9
DRYING TIME REFERENCE TABLE
Drying times can be affected by many factors such as material, heaviness of load,
and full the dryer is etc. The below is a guide only.
BEFORE EACH CYCLE
Leave the dryer to stand for 2 hours before first use.
Use a soft fabric cloth to clean inside the drum.
•Before drying, thoroughly spin the laundry in the washing machine.
•Sort the laundry according to fabric type and drying programme.
•Before drying, close zips, hooks, and eyelets, button up and tie fabric belts.
•Do not dry articles containing rubber or small elastic materials.
TIPS BEFORE DRYING
Prior to loading the dryer, check that the items do not have the following symbols
anywhere on them. If they do, do not tumble dry these items.
DRYING CAPCIY
DRYING TIME
Approx. 0.5kg
Approx. 30 min
Approx. 1.0kg
Approx. 60 min
Approx. 1.5kg
Approx. 120 min
Approx. 2.5kg
Approx. 200 min

10
CONTROL DIAL
OPERATIONS
DIAL
Use the dial to set how long the dryer will
be in operation for and which setting it
will work at.
OFF
When the drying function has finished,
the dial will return to the off position.
COOL (20)
This function is used to cool down the
drying. When the dryer has finished its
cycle and the dial is in the OFF position,
turn it to “20” and the dryer will run with
cool air for 20 minutes.
AIR DRY (80)
This function uses cool air to dry your
clothing. It is ideal for “freshening” your
clothes.
HOT (200)
The maximum time setting is perfect for
drying large quantities of clothing.
WARM (80)
The warm setting has an anti-wrinkle
function for items that are difficult to iron.
This is best used for smaller loads, and
set between 30-60 minutes.
Ce manuel convient aux modèles suivants
1
Table des matières
Autres manuels ElectrIQ Séchoir

Manuels Séchoir populaires d'autres marques


Indesit
Indesit IDV 75 Manuel utilisateur

Infiniton
Infiniton SD-DG85C Manuel utilisateur

BOMANN
BOMANN WT 5019 Manuel utilisateur

Alliance Laundry Systems
Alliance Laundry Systems TMB795C Manuel utilisateur

Asko
Asko T793C Manuel utilisateur

Kenmore
Kenmore 8041 - 5.8 cu. Ft. Capacity Electric Dryer Manuel utilisateur