EHEIM skim350 Manuel utilisateur

Oberflächenabsauger D
Surface skimmer GB/USA
L’aspirateur de surface F
Aspiratore di superficie I
Aspirador de superficie E
73 61 640 / 11.14 - avw
Original
Bedienungsanleitung
A
a
b
c
d
e
g
➟
➟
e
max.
3 cm
⬍
a
b
B
f
d
d
max.⟺min.
A
B
C
⬅
⤏
C
Ersatzteile unter www.eheim.de
D
⬅
⤏
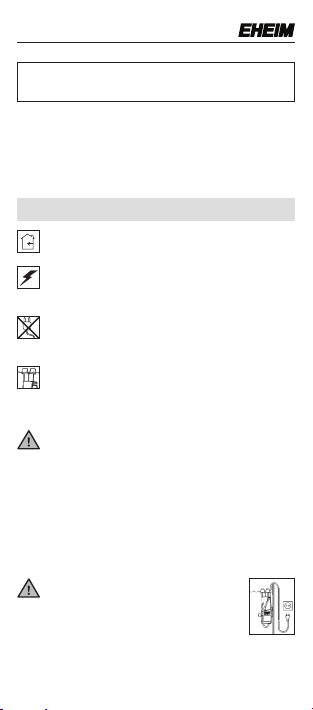
Sicherheitshinweise
Nur in geschlossenen Räumen für aquaristische
Einsatzzwecke verwenden.
Bei Wartungs- und Pflegearbeiten sind alle im
Wasser befindlichen Elektrogeräte vom Netz zu
trennen.
Die Anschlussleitung des Gerätes kann nicht er-
setzt werden. Bei Beschädigung der Netzan-
schlussleitung ist das Gerät zu verschrotten.
Oberflächenabsauger nur innerhalb des Wassers
verwenden. Die Pumpe muss unterhalb des Was-
serspiegels platziert sein und darf nicht trocken
laufen.
Dieses Gerät kann von Kindern ab 8 Jahren und
daruber sowie von Personen mit verringerten physi-
schen, sensorischen oder mentalen Fähigkeiten
oder Mangel an Erfahrung und Wissen benutzt zu
werden, wenn sie beaufsichtigt oder bezüglich des
sicheren Gebrauchs des Gerätes unterwiesen wur-
den und die daraus resultierenden Gefahren verste-
hen. Kinder durfen nicht mit dem Gerät spielen.
Reinigung und Benutzer-Wartung dürfen nicht von
Kindern ohne Beaufsichtigung durchgefuhrt werden.
Zu Ihrer eigenen Sicherheit empfiehlt
es sich, mit dem Anschlusskabel eine
Tropfschlaufe zu bilden, die verhindert,
dass evtl. am Kabel entlang laufendes
Wasser in die Steckdose gelangt. Bei
Verwendung einer Verteiler-Steckdose oder eines
externen Netzteils muss die Platzierung oberhalb
des Geräte-Netzanschlusses erfolgen.
Oberflächenabsauger Skim 350
Ausführung: siehe Typenschild am Motorkörper
Vielen Dank
für den Kauf Ihres neuen EHEIM Oberflächenabsaugers, der
Ihnen optimale Leistung bei höchster Sicherheit und Zuver-
lässigkeit bietet.
Deutsch

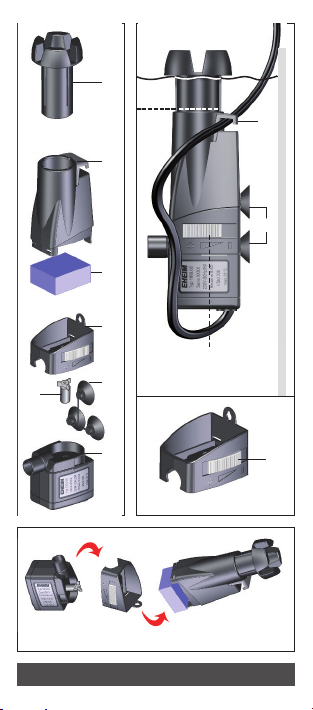
A Begriffsbestimmung
aSchwimmer bSchwimmergehäuse mit Kabelclip
cFilterpatrone dPumpendeckel mit Leistungsregler
e3x Sauger fPumpenrad gMotorkörper.
Netzstecker ziehen. Schwimmer entnehmen. Schwimmer-
gehäuse mit sanftem Druck nach oben kippen A und vom
B Installation und Inbetriebnahme
Die 3 Sauger e mit einer Drehbewegung in die seitlichen
Öffnungen des Pumpendeckels d drücken. Das Netzkabel
in die Kabelführung beinlegen und den Oberflächenab-
sauger unterhalb des Wasserspiegels an der Innenwand
des Aquariums befestigen. Der Schwimmer adarf max.
3 cm aus dem Schwimmergehäuse herausragen.
TIP Den Oberflächenabsauger so platzieren, dass der
Schwimmer bei maximal gefülltem Aquarium möglichst
weit aus dem Schwimmergehäuse herausragt (max. 3 cm).
So kann ein durch Verdunstung absinkender Wasserspie-
gel optimal ausgeglichen werden.
TIP Um den Eintrag von Luftblasen zu verhindern, sollte
der Leistungsregler dbei der Erstinstallation oder beim
Einsatz einer neuen Filterpatrone auf min. gestellt werden.
Mit zunehmender Verschmutzung kann der Leistungsregler
dann in Richtung max. verschoben werden.
Nach der Installation den Oberflächenabsauger über den
Netzstecker in Betrieb nehmen.
C Pflege und Wartung
Gerät – oder Teile davon – nicht in der Spülma-
schine reinigen. Nicht spülmaschinenbeständig!
Dieses Produkt nicht mit dem normalen Hausmüll
entsorgen. Führen Sie es Ihrer örtlichen Entsor-
gungsstelle zu.
Das Produkt ist nach den
jeweiligen nationalen Vor-
schriften und Richtlinien approbiert und entspricht
den EU-Normen.

Garantie
Dem Endabnehmer dieses Gerätes leisten wir 3 Jahre Ga-
rantie, die mit dem Tag der Lieferung an ihn beginnen. Vor-
aussetzung ist, dass dieser Garantieschein vom Händler
ausgefüllt ist. Die Garantie erstreckt sich auf Material- und
Montagefehler (außer auf Verschleißteile, z.B. Rotor), nicht
auf Schäden durch äußere Einflüsse oder unsachgemäße
Behandlung. Sie wird nach unserer Wahl durch Austausch
oder Reparatur der mangelhaften Teile geleistet.
Weitere Ansprüche gegen uns bestehen nicht, insbeson-
dere übernehmen wir, soweit gesetzlich zulässig, keine Haf-
tung für Folgeschäden, die durch dieses Gerät entstehen.
Senden Sie im Garantiefall den ausgefüllten Garantieschein
mit dem zu prüfenden Gerät an eine unserer Kundendienst-
stellen oder an die zuständige Vertretung. Alle Sendungen
an uns müssen portofrei erfolgen.
EHEIM Oberflächenabsauger Skim 350
Stempel und Unterschrift des Händlers
Pumpendeckel abnehmen. Filterpatrone entfernen B und
auswaschen. Pumpendeckel mit sanftem Druck nach un-
ten kippen C und vom Motorkörper abziehen. Pumpenrad
aus Pumpenkammer ziehen D.
Alle Pumpenteile gründlich auswaschen und mit EHEIM
Bürsten-Set (Best.-Nr. 4009560) reinigen. Eventuelle
Kalkablagerungen lassen sich entfernen, wenn man die
Pumpenteile für einige Stunden in Essig legt. Anschließend
alle Teile in entsprechender Reihenfolge wieder zusammen-
setzen.
Verkaufsdatum

Safety instructions
For indoor use only.
For use with aquariums.
All electrical equipment in the water must be dis-
connected from the mains during care and main-
tenance work.
The connecting line of this device can not be re-
placed.
In case of damage to the power cord, the device is
to be scrapped.
Use the micro surface skimmer only under water.
The pump must be placed below the water level
and must not run dry.
This equipment can be used by children above the
age of 8 or by persons with reduced physical, men-
tal or sensory capacities or a lack of experience or
knowledge, provided they are supervised or have
received instruction in the safe use of the equip-
ment and therefore understand the risks involved.
Do not allow children to play with this equipment.
Do not allow children to clean or conduct user
maintenance without supervision.
For your own safety, we recommend to
form a drip loop with the connection
cable to prevent any water running
along the cable from intruding into the
socket.
When using a multiple socket or an external power
supply unit, position them atop the devices power
connection.
Micro-Surface skimmer Skim 350
Model: see type plate on motor body
Tank you very much
for the purchase of your new EHEIM Surface skimmer that
offers you optimum performance with maximum safety and
reliability.
English

A Definition
aFloat bFloat chamber with cable clip cFilter car-
tridge dPump cover with power regulator e3x suc-
tion units fPump wheel gMotorbody.
Pull out the power cord. Remove the float. Tilt the float
chamber upwards by applying gentle pressure A and re-
B Installation and operation
Press the 3 suction units e into the lateral openings of
the pump cover d with a rotating movement. Insert the
power cord into the cable guide band secure the micro
surface skimmer to the inside wall of the aquarium below
the water level. The float amay not protrude more than
3 cm from the float chamber.
TIP Place the micro surface skimmer so that the float pro-
trudes as far as possible from the float chamber (max.
3 cm), with the aquarium filled to the maximum. Thus,
sinking of water level through evaporation can be opti-
mally compensated.
TIP To prevent the introduction of air bubbles, the power
regulator dshould be set at a minimum level during the
initial installation or use of a new filter cartridge. As the
water becomes dirtier, the power regulator can then be gra-
dually increased to maximum level.
Following installation, put the micro surface skimmer into
operation by plugging in the power cord.
C Care and maintenance
Do not clean the unit – or parts of it – in the dish-
water. Not dishwater resistant!
Do not dispose of this product as normal house-
hold waste. Take it to your local refuse collection
side.
The product is qualified in
accordance with the respec-
tive national regulations and guidelines and meets
EC standards.

Guarantee
EHEIM Surfaceskimmer Skim 350
Dealer’s stamp and signature
Date of sale
We shall give the ultimate buyer of this device a three-year
guarantee that begins on the date of delivery to him. This
applies on the condition that the certificate of guarantee
was filled out by the dealer. This guarantee covers material
and installation errors but not damage due to external in-
fluences or improper handling. It will be given at our own
option by replacement or repair of the defective parts.
Further claims towards us do not exist, in particular we
shall not assume any liability for consequential damage that
arises due to this device insofar as this is permitted by law.
In the event of damage, send the completed certificate of
guarantee with the device to be checked to one of our cus-
tomer service offices or to the responsible agency. All ship-
ments must be made to us postage free.
move it from the pump cover. Remove filter cartridge B
and rinse it thoroughly. Tilt the pump cover upwards by
applying gently pressure C and remove it from the motor
body. Draw off the pump wheel from the pump chamber
D.
Rinse alle pump components thoroughly with EHEIM brush
set (order no. 4009560). Any calcium deposits can be re-
moved by placing the pump components in vinegar for a
few hours. Then, reassemble all the components in the
same order.

READ AND FOLLOW ALL SAFETY INSTRUCTIONS.
- Check that the voltage shown on the label of the unit cor-
responds to the voltage of the mains supply.
- Disconnect all electrical appliances from the mains be-
fore placing your hands in the water.
- The line cord of this unit cannot be replaced or repaired.
Should the line cord become damaged the appliance
must be discarded.
- Close supervision is necessary when any appliance is
used by or near children.
- To avoid injury, do not contact moving parts.
- Always unplug an appliance from an outlet when not in
use, before putting or taking off parts, and before clean-
ing. Never yank cord to pull plug from outlet. Grasp the
plug and pull to disconnect.
- Do not use an appliance for other than intended use. The
use of attachments not recommended or sold by the ap-
pliance manufacturer may cause an unsafe condition.
- Read and observe all the important notices on the ap-
pliance and its cord.
- Care should be taken to arrange the cord so that it will
not be tripped over or pulled.
- DANGER. To avoid possible electric shock, special care
should be taken since water is employed in the use of
aquarium equipment. For each of the following situa-
tions, do not attempt repairs yourself; discard the ap-
pliance.
If the appliance shows any sign of abnormal water leak-
age, immediately unplug it from the power source.
Do not operate any appliance if it has a damaged cord
or plug, or if it is malfunctioning or if it is dropped or
damaged in any manner.
To avoid the possibility of the appliance plug or recep-
tacle getting wet, position aquarium stand and tank to
VERY IMPORTANT SAFETY INSTRUCTIONS
one side of a wall mounted receptacle to prevent water
from dripping onto the receptacle or plug.
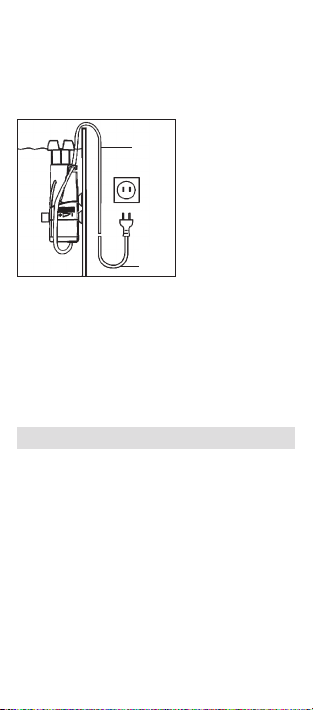
A “drip loop”, shown in the figure below, should be ar-
ranged by the user for each cord connecting the aqua-
rium appliance to a receptacle.
The “drip loop” is that
part of the cord below
the level of the recep-
tacle, to prevent water
travelling along the
cord and coming in
contact with the recep-
tacle.
If the plug or recep-
tacle does get wet,
DON’T unplug the
cord, disconnect the fuse or circuit breaker that supplies
power to the appliance. Then unplug and examine for pre-
sence of water in the receptacle.
Keep these instructions for future reference.
DRIP
LOOP
POWER
SUPPLY
CORD
PRECAUTIONS D’EMPLOI
LISEZ ET SUIVEZ SOIGNEUSEMENT CES PRECAUTIONS
D’EMPLOI.
- Vérifier que la tension de votre circuit corresponde bien
au voltage indiqué sur l’etiquette.
- A n’utiliser qu’avec un disjoncteur différentiel.
- Débrancher toutes les installations électriques avant de
mettre vos mains dans l’eau.
- Le câble de cet appareil ne peut être ni réparé ni rem-
placé. En cas de dommage il faut remplacer l’unité
complète.
- Prêter particulière attention dans le cas l’appareil soit
utilisé par ou en présence d’enfants.
Autres manuels pour skim350
1
Table des matières
Langues :
Autres manuels EHEIM Filtre de piscine


Manuels Filtre de piscine populaires d'autres marques


JUWEL Aquarium
JUWEL Aquarium EccoSkim Manuel utilisateur

POLYGROUP LIMITED
POLYGROUP LIMITED SFS600 Filter System with F600C Pump Manuel utilisateur

Pentair Pool Products
Pentair Pool Products Filter CFW Series Manuel utilisateur

Oase
Oase Skimmer 250 Manuel utilisateur

Oase
Oase CrystalSkim 350 Manuel utilisateur

AquaScape
AquaScape 43021 Instructions d'utilisation