
Easy Karaoke EKS780-BT Manuel utilisateur
INSTRUCTION MANUAL
CD+G Karaoke System with
Bluetooth and Light Effects
Thank you for purchasing this Karaoke System. Please read this instruction manual carefully before
using this product to ensure proper use. Keep this manual in a safe place for future reference.
EKS780-BT
For thousands of free professional karaoke
tracks go to www.easykaraoke.com

BEFORE WE BEGIN
WHAT’S IN THE BOX
IMPORTANT SAFETY INSTRUCTION
EN - 1
ATTENTION
The exclamation point within an equilateral triangle is intended to alert the user to the presence
of important operating and maintenance (servicing) instructions in the literature accompanying
the appliance.
This compact disc player is classified as a CLASS 1 LASER PRODUCT.
The CLASS 1 LASER PRODUCT label is located inside the CD compartment.
CLASS 1
LASER PRODUCT
The CAUTION marking is located at the bottom of the unit.
Below markings are located inside CD compartment.
DANGEROUS VOLTAGE
The lightning flash with arrowhead symbol, within an equilateral triangle, is intended to alert the
user to the presence of uninsulated dangerous voltage within the product’s enclosure that may
be of sufficient magnitude to constitute a risk of electric shock to persons.
DANGER:
Invisible and hazardous laser radiation when open and interlock failed or defeated.
Avoid direct exposure to beam.
CAUTION
RISK OF ELECTRIC SHOCK
DO NOT OPEN
WARNING: TO REDUCE THE RISK OF ELECTRIC
SHOCK, DO NOT REMOVE COVER (OR BACK).
NO USER-SERVICEABLE PARTS INSIDE. REFER
SERVICING TO QUALIFIED SERVICE PERSONNEL.
LASER SAFETY: This unit employs a laser.
Only qualified service personnel should
attempt to service this device due to possible
eye injury.
CAUTION: USE OF CONTROLS,
ADJUSTMENTS OR PERFORMANCE,
PROCEDURE HEREIN MAY RESULT IN
HAZARDOUS RADIATION EXPOSURE.
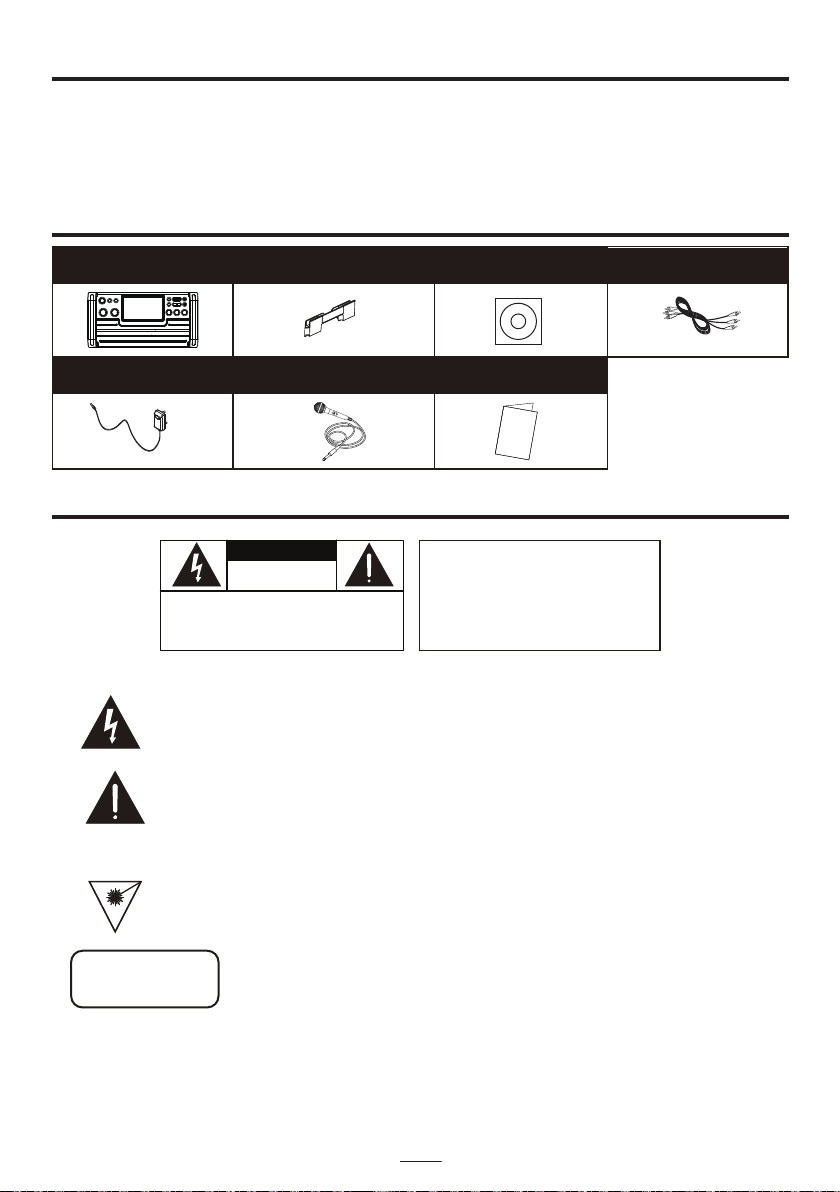
KARAOKE MACHINE TABLET
CRADLE PRE-RECORDED
KARAOKE CD+G DISC AV CABLE
AC POWER
ADAPTOR DYNAMIC MICROPHONE INSTRUCTION
MANUAL
Thank you for purchasing the EKS780-BT Karaoke Machine. This is your assurance of quality,
performance and value. This product was manufactured using the highest quality components
and standards of workmanship. Our engineers have included many useful and convenient
features in this product. Please be sure to read this instruction manual completely to make sure
you are getting the maximum benefit from each feature.
• This unit is designed to operate on an AC 100-240V~50/60Hz supply only. Connecting it to other power sources
may damage it. Ensure that the supply corresponds to the information on the rating label on the bottom of the unit.
• Under the environment with electrostatic discharge the sample may malfunction and need user reset to recover
sometimes.
IMPORTANT SAFETY INSTRUCTION
POWER CONNECTION & OPERATION
EN - 2
1. Ensure a minimum distance of 5 cm around the apparatus for sufficient ventilation.
2. The ventilation should not be impeded by covering the ventilation openings with items,
such as newspapers, tablecloth, curtains, etc.
3. No naked flame sources, such as lighted candles, should be placed on the apparatus.
4. It shall not be exposed to dripping or splashing and that no objects filled with liquids, such
as vases, shall be placed on the apparatus.
5. Do not place the product in closed bookcases or racks without proper ventilation.
6. Where the mains plug or an appliance coupler is used as the disconnect device, the
disconnect device shall remain readily operable.
1. The apparatus shall not be exposed to dripping or splashing and that no objects filled with
liquids, such as vases, shall be placed on apparatus.
2. The AC/DC adaptor and apparatus shall not be exposed to dripping or splashing and that
no objects filled with liquids, such as vases, shall be placed on the AC/DC adaptor and
apparatus.
3. The AC/DC adaptor is used as disconnect device.
The AC/DC adaptor of apparatus should not be obstructed OR should be easily accessed
during intended used. To be completely disconnect the power input, the AC/DC adaptor of
apparatus shall be disconnected from the mains.
4. An appliance with a protective earth terminal should be connected to a mains outlet with
a protective earth connection.
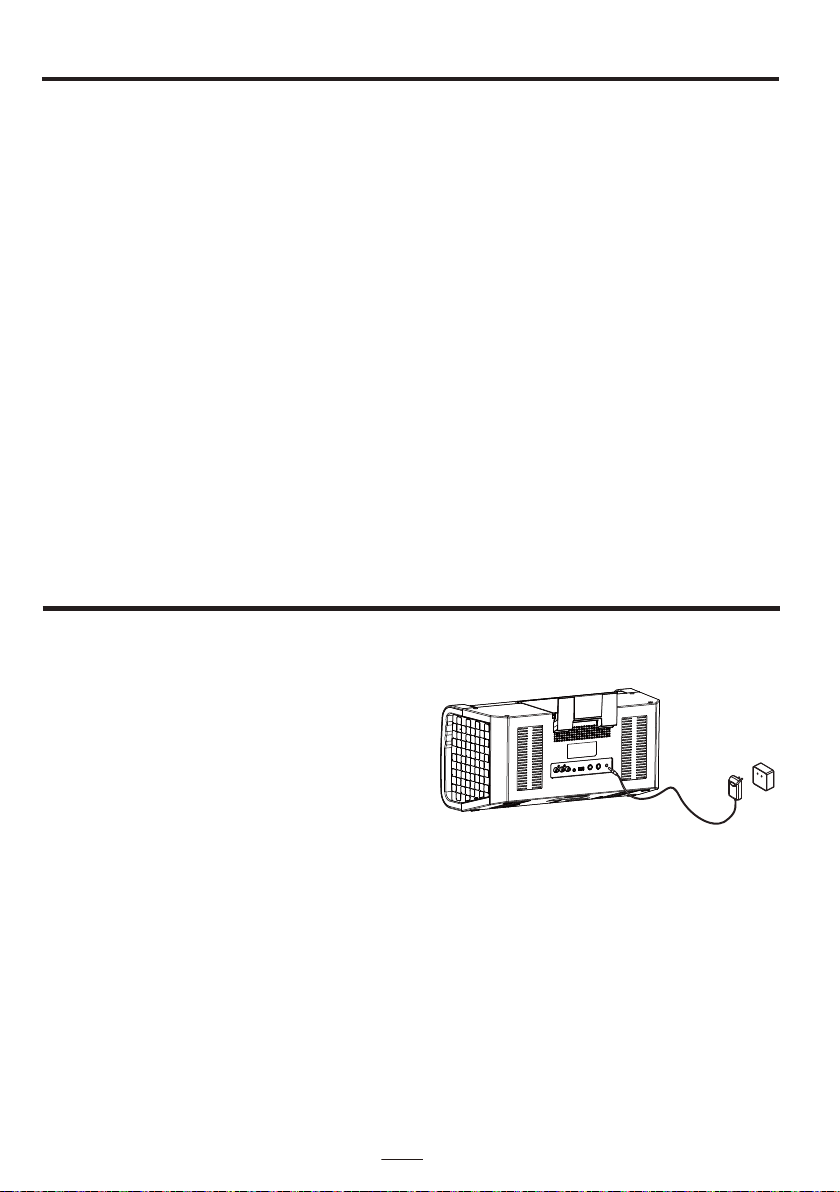
Plug the supplied power adapter small end into DC jack located on the rear panel, plug the
adapter into the standard AC wall socket.
CAUTION: The unit is designed to operate from
a mains supply of AC 100-240V~50/60Hz.
If the adapter does not fit properly,
turn it over and try again. Do not force it.
NOTES: When the unit is not operated by the
AC power or unused for long periods of time.
Please remove the power adapter from the
wall outlet and unplug from the main unit.
Over time your hearing will adapt to continuous loud sounds and will give the impression that
the volume has in fact been reduced. What seems normal to you may in fact be harmful. To
guard against this before your hearing adapts, set the volume to a low level.
Slowly increase the level until you can hear comfortably and clearly and without distortion.
Damage to your hearing is accumulative and is irreversible. Any ringing or discomfort in the
ears indicates that the volume is too loud. Once you have established a comfortable listening
level, do not increase the sound level.
Turn the VOLUME Control knob to increase / decrease the volume.
ESTABLISH A SAFE SOUND LEVEL
ADJUSTING THE VOLUME
CONNECTING AC POWER
SAFETY CONSIDERATIONS
WARNINGS
EN - 3
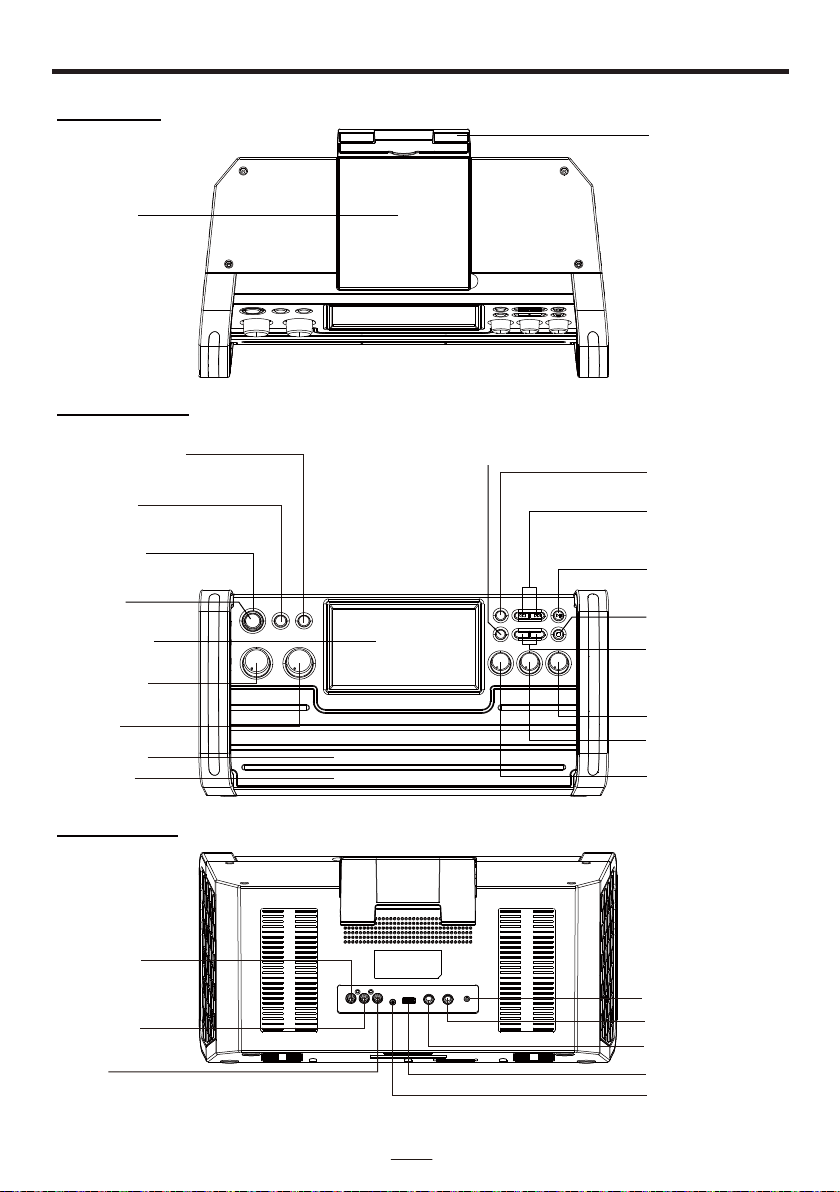
CONTROL LOCATION
TOP VIEW
FRONT VIEW
BACK VIEW
CD DOOR
ON/ OFF
BUTTON
POWER
INDICATOR
MIC VOLUME
TFT SCREEN
MASTER
VOLUME
DISCO LIGHT
VIDEO
JACK
FUNCTION
BUTTON
SCREEN ON / OFF
BUTTON PROGRAM / REPEAT
BUTTON
SKIP FORWARD /
BACKWARD
BUTTON
CRADLE
PLAY / PAUSE /
PAIR BUTTON
RECORD BUTTON
ECHO CONTROL
LINE IN JACK
STOP / LIGHT ON /
OFF BUTTON
KEY / PAGE +/-
BUTTON
BALANCE CONTROL
AVC CONTROL
SPEAKERS
AUDIO OUT
(R) JACK
AUDIO OUT
(L) JACK
USB SOCKET
MIC 2
MIC 1
DC JACK
EN - 4
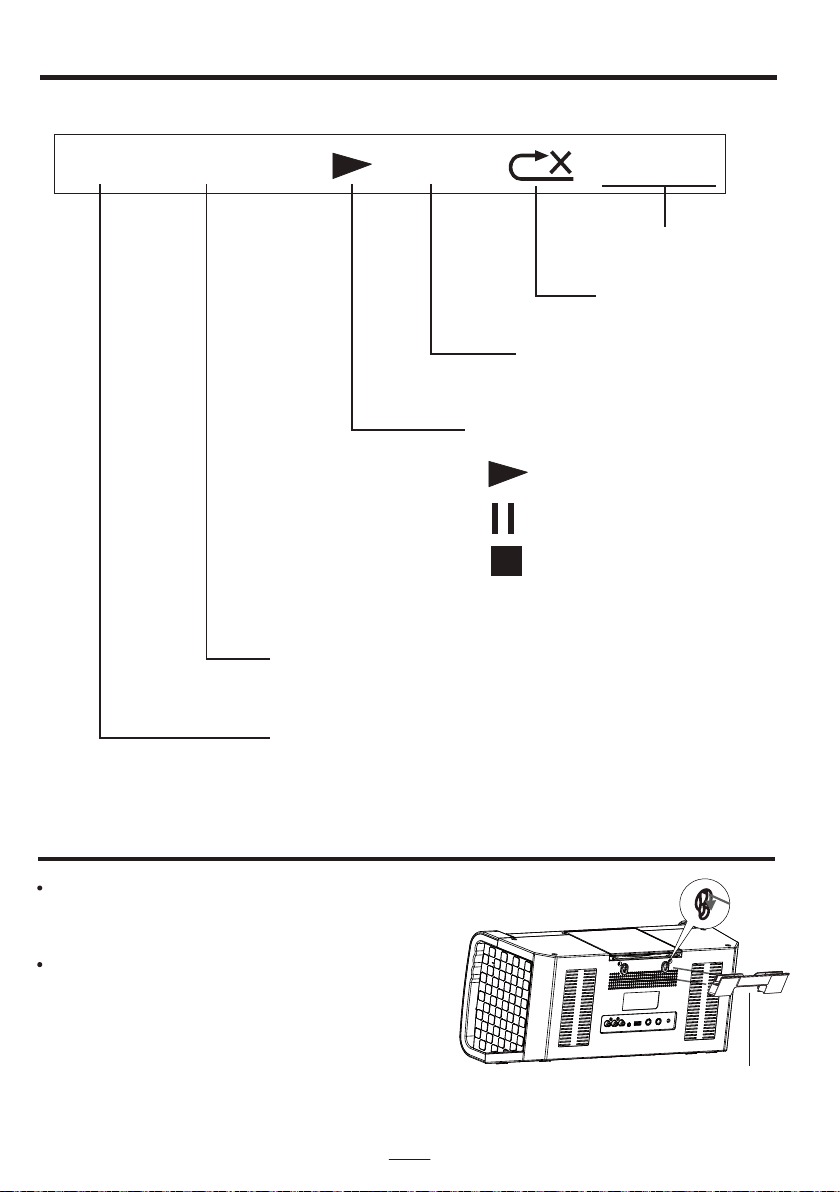
TFT DISPLAY ICON
CDG TRK 10/10 PROG 00:16:04
PLAYING TIME
REPEAT MODE
PROGRAM MODE
PLAY / PAUSE / STOP INDICATOR
PLAYING MODE
PAUSE MODE
STOP MODE
PLAYING TRACK NUMBER AND TOTAL TRACK NUMBER
CDG=CD+G DISC PLAYING
PLAYING CD/ CDR/ USB
Snap the tablet cradle via two mounting holes
at the back of the unit till the cradle is locked
in place on both ends securely.
Put yout tablet in landscape position (Do not
encourage to put in portrait position)
TABLET OPERATION
Tablet cradle
MAKING THE CONNECTIONS
CONNECTING TO YOUR TV OR VCR / HOME THEATER
Your Karaoke machine is designed to connect to your TV the same way you would connect
most video cameras, VCR / Home theater or video games consoles. We have provided
RCA cables to connect your unit to a TV, VCR / Home theater, video device or an external
audio / sound system. The RCA cables have three connections at each end (white and red
are for left and right audio connections and the yellow is for video connections).
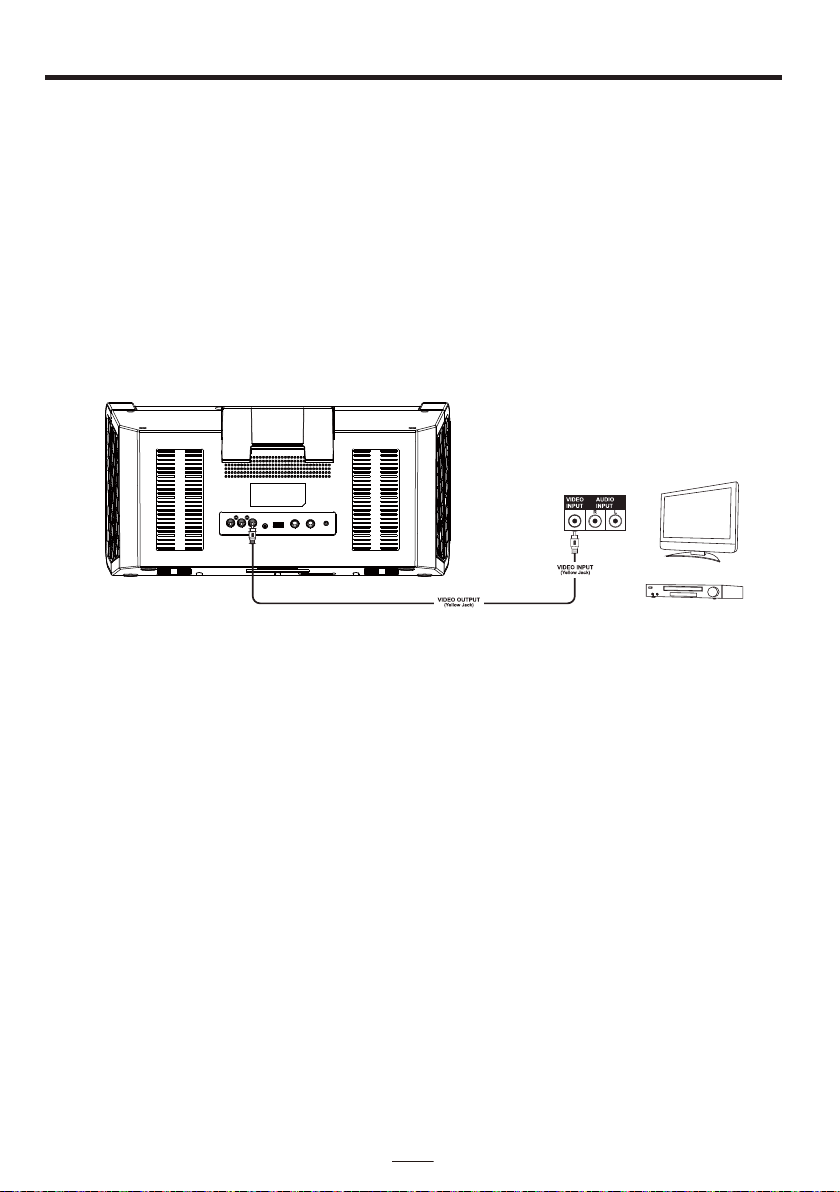
VIDEO CONNECTION
Please follow the steps below to display CD+G lyrics on the TV screen:
1. Locate the multi-colored RCA cables.
2. Connect video cable (yellow) to the Video Out of the back of the Karaoke Machine.
3. Connect the other end of the video cable (yellow) to the video input on your TV or VCR /
Home theater.
SELECTING YOUR KARAOKE MACHINE AS YOUR SOURCE/INPUT
Selecting your Karaoke Machine as a source / input on your TV is very similar to connecting
a VCR/DVD or Satellite system.
We’ve listed below the most common ways of selecting the source from your TV or VCR /
Home Theater:
1. In the set up menu of the TV or VCR / Home theater there may be an option for “Input
Select” where you can choose between “Cable/Ant., Video 1, Video 2, etc” as the input
source.
2. Look for a TV channel between the highest and lowest on your TV or VCR / Home
theater (i.e AUX, EXT, LINE 1 or LINE IN)
3. Your remote control for your TV or VCR / Home Theater may have source input
selections as well as detailed below: “Video, Video 1, Game, AUX, EXT or LINE-IN.”
Choosing one of those sources in most cases should display the lyrics from your
Karaoke Machine as well.
EN - 5
MAKING THE CONNECTIONS
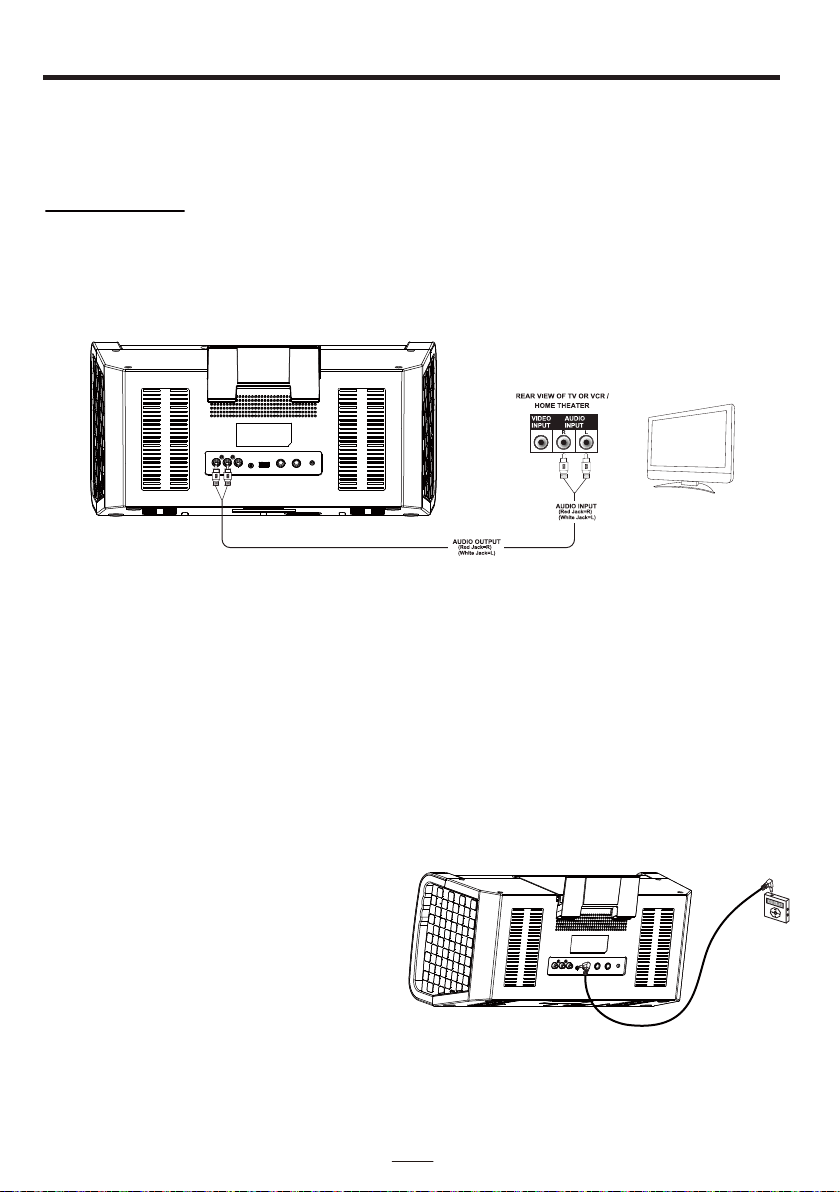
AUDIO CONNECTION
Please follow the steps below to connect audio signal from the unit to your TV, VCR/Home
Theater or home audio system.
RCA connection
1. Locate the multi-colored RCA cables (White and Red)
2. Connect audio cables to the Audio Out of the back of your Karaoke Machine.
3. Connect the other end of the audio cables to the Audio/Auxiliary input on your TV or
VCR/Home Theater or home audio system.
EN - 6
SETTING UP LINE IN CONNECTION
The Line-in mode allows you to connect external music player or external sound source to
your Karaoke Machine speakers
1. Plug a 3.5mm audio cable (not included) into your external music player and connect the
other end (3.5mm jack) into the LINE IN jack on the front of your Karaoke Machine.
2. Make sure your external music is turned on.
3. Start music playback on your external music player.
4. Adjust MASTER VOLUME to control the sound level of music playback from the speakers
on the Karaoke machine.
NOTE:
If the unit is in CDG / USB / Bluetooth
mode, when you connect an external
audio device to the LINE IN jack by an
LINE-IN cable, this unit will automatically
be switched to LINE IN mode. If you
remove the LINE-IN cable from the LINE
IN jack, the unit will resume to the previous
mode.
MAKING THE CONNECTIONS
EN - 7
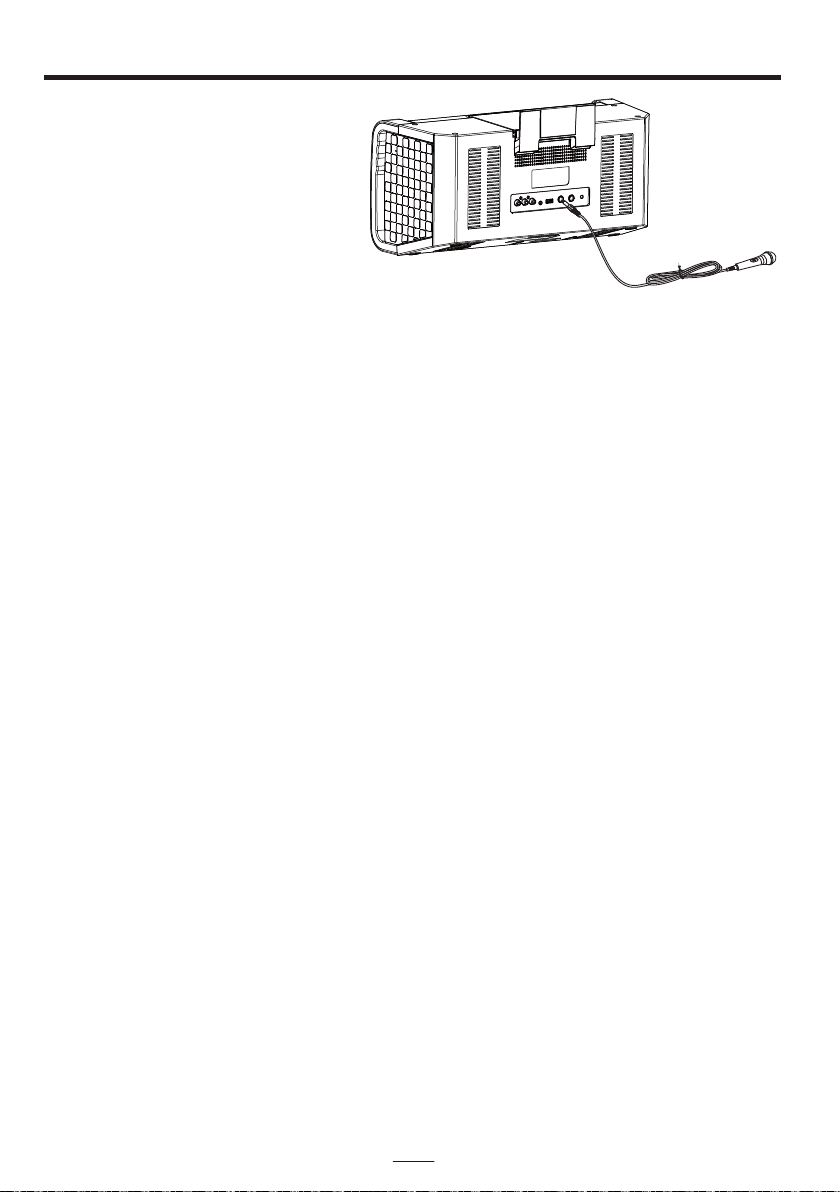
SETTING UP YOUR MICROPHONE
1. Plug a microphone into the MIC1
or MIC2 jack at the rear of your
Karaoke Machine. Their output is
mixed with playback from
CD/CD+G.
2. Located on the microphone,
there is an ON/OFF switch.
3. Ensure you set the ON/OFF
switch on the microphone to ON
when required for use.
Warning:
Please do not point the microphone head directly to the front of the speaker(s) on the unit
when you are singing, it would cause unwanted feedback sound that may affect the
performance of your unit.
Tapping or dropping the microphone while it is on can permanently damage your
microphone. Resist the urge to swing the microphone around by the cord!
VHF wireless microphones are not recommended to work with this Karaoke system. Some
VHF wireless microphones may cause unwanted noise and interference.
CD OR CD+G / MP3+G OPERATION
This unit is designed to play CDs/CD+G/MP3/MP3+G
disc bearing the identification logo respectively. If the
disc does not conform to the standard, it may not play
properly.
NOTE: The unit may not be able to read CDR or CDRW disc correctly. The readability
depends on the quality of recording produced by CD recorder or CD writer.
LOADING A DISC
1.
2. Gently close the CD Door to the CD compartment. The Karaoke
Machine begins to read the disc and “READ” will be displayed.
After that, the operation icon will appear on the top of the TFT
screen.
3. Press PLAY/PAUSE to play the disc. (If no disc is loaded, it will
display “NO DISC”)
STOP
If the STOP button is pressed in the course of playing, the disc will cease to play.
SKIP PLAY (For both CD and CD+G/MP3+G discs)
In stop or playback mode, you can skip up or down to a specific track by
pressing the forward or back SKIP Button.
PLAY/PAUSE
1. To start playing, press the PLAY/PAUSE button once, the currently track number and
PLAY indicator will appear on the screen.
2. To temporarily stop playing, press the PLAY/PAUSE button, the PAUSE indicator will be
shown on the screen.
3. To resume play, press the PLAY/PAUSE button again, the PLAY indicator will be shown on
the screen.
NOTE: - Pressing pause when a CD+G/MP3+G is playing may cause distorted lyrics
on the screen, any distortion will remain until the whole screen is
refreshed during an instrumental break or you stop the song and start it
from the beginning
- Never place anything except a compact disc on the disc compartment.
Foreign objects can damage the unit.
- Do not apply excessive force to disc cover.
- Only place one disc on the disc compartment at a time.
- Do not open the disc cover of the CD compartment while it’s playing.
EN - 8
TURNING POWER ON/OFF
1. To turn on the Karaoke Machine, press the POWER button
once, the POWER indicator will light up to full brightness and TFT
2. To turn off the system, press the POWER button again. The
power indicator and TFT screen will turn off.
screen will display the OPENING SCREEN and start to read CD.
(If no disc is loaded, it will display “NO DISC”)
Open the CD door, place a disc in the CD compartment with the
printed side facing up.
Table des matières
Autres manuels Easy Karaoke Système de karaoké


Manuels Système de karaoké populaires d'autres marques


Karaoke Warehouse
Karaoke Warehouse Player 2000 Manuel utilisateur

VocoPro
VocoPro DVG-888K II Manuel utilisateur

ION
ION DISCOVER KEYBOARD USB Manuel utilisateur

The Singing Machine
The Singing Machine SMVG-620 Manuel utilisateur

Singsation
Singsation CENTER STAGE FREESTYLE Manuel utilisateur

RSQ
RSQ NEO K-2 Manuel utilisateur


