E-Z Anchor Puller HERO Series Guide d'installation

Direct Drive Series Direct Drive Series Free-Fall Series
INSTALLATION, OPERATION, MAINTENANCE & WARRANTY
INFORMATION
FOR THE FOLLOWING MODELS -
HERO: EX-1 / EX-2 / EX-3
PATRIOT: EZ-1 / EZ-2 / EZ-3
REBEL: EZ-4 / EZ-5 / EZ-6
Toll Free Tel: (800) 800-1640 Toll Free Fax: (855) 855-1540
www.ezanchorpuller.com
CAUTION: READ AND UNDERSTAND THIS MANUAL BEFORE INSTALLATION &
OPERATION OF EZ ANCHOR PULLERS. SEE SAFEGUARDS AND WARNINGS!
PRODUCT DIAGRAM & MANUAL INDEX
Product Introduction & Handy Hints Page 3
Drum Winch Safety, Installation, Rope Guide & Operation Page 4
Electrical Wiring / Cable Size & Voltage Chart Page 7
Common Troubleshooting Solutions Page 8
The Hero Series (EX-1, EX-2, EX-3) Wiring Diagram & Specs Page 9
The Patriot Series (EZ-1, EZ-2, EZ-3) Wiring Diagram & Specs Page 11
The Rebel Series (EZ-4, EZ-5, EZ-6) Wiring Diagram & Specs Page 14
Free-Fall Operation & Direct Drive Conversion Page 16
E-Z Anchor Puller Warranty Agreement Page 18
E-Z Anchor Puller Warranty Form Page 19
www.ezanchorpuller.com 1.800.800.1640 2

Thank you for purchasing an E-Z Anchor Puller Mfg. Co. drum anchor winch. E-Z Anchor Puller Mfg. Co. goes
to great lengths to develop anchoring systems that not only meet all your performance and safety
requirements, but are also designed with a style and finish that enhances the aesthetics of your vessel. Our
commitment to quality, superior materials and processes is to ensure you will be pleased with your investment.
Rest assured that through the correct installation, operation, and maintenance, your new E-Z Anchor Puller
drum anchor winch will give you years of reliable performance!
This updated manual reflects the current product line of E-Z Anchor Puller Mfg. Co. and is intended to further
clarify and determine specific instructions to each anchor winch series we provide. While the Hero, Patriot, and
Rebel drum anchor winches are separated in this manual to meet your specific needs, the following Hints
and
Important Safety & Installation Section for
Any
Anchor Winch
sections are universally applicable.
Direct Drive vs. Free-Fall Operation : Our Hero and Patriot drum anchor winches are direct drive
, meaning
you will operate the anchor winch by pressing and holding the “down” side of your rocker switch until your
anchor hits the bottom, then pressing the “up” to slightly raise the anchor until your vessel is held steadily in the
designated area. To retrieve your anchor, press and hold the “up” side of your rocker switch until your anchor
rope is neatly spooled back onto the winch and the anchor is fully retrieved.
Our Rebel series, however, is powered into free-fall
mode by pressing the “down” side of your rocker switch for
2 seconds, then quickly releasing it. Your anchor will be deployed as fast as gravity allows it to go. DO NOT
ATTEMPT TO STOP YOUR ANCHOR MID-FREEFALL. Doing so will cause irreparable damage to your
anchor winch, and may cause serious injury. After your anchor hits the bottom, press and hold the “up” side of
the rocker switch for about 5 seconds until you're steadily in position in the water. To raise your anchor with
your Rebel anchor winch, press and hold the “up” side until your anchor is completely retrieved and your
anchor rope is neatly spooled back onto the drum winch. For Rebel specifications, go to page 16 in the Rebel
Installation Guide.
HANDY HINTS FOR INSTALLATION
● Locate the drum anchor winch in a suitable position so there is no interference from other ropes or objects.
Ensure that the rope has a clear
path & use a roller if required to direct the rope to the drum.
● Both exposed wires from the winch motor must be connected via joiners/solder and then heat shrink, including
internal silicon to wires (see cable chart, page 7) to eliminate corrosion or water entering wires.
● The drum must be in-line and centered to the guide roller or hawsepipe and bowsprit to ensure an even spread of
the rope and chain to the drum.
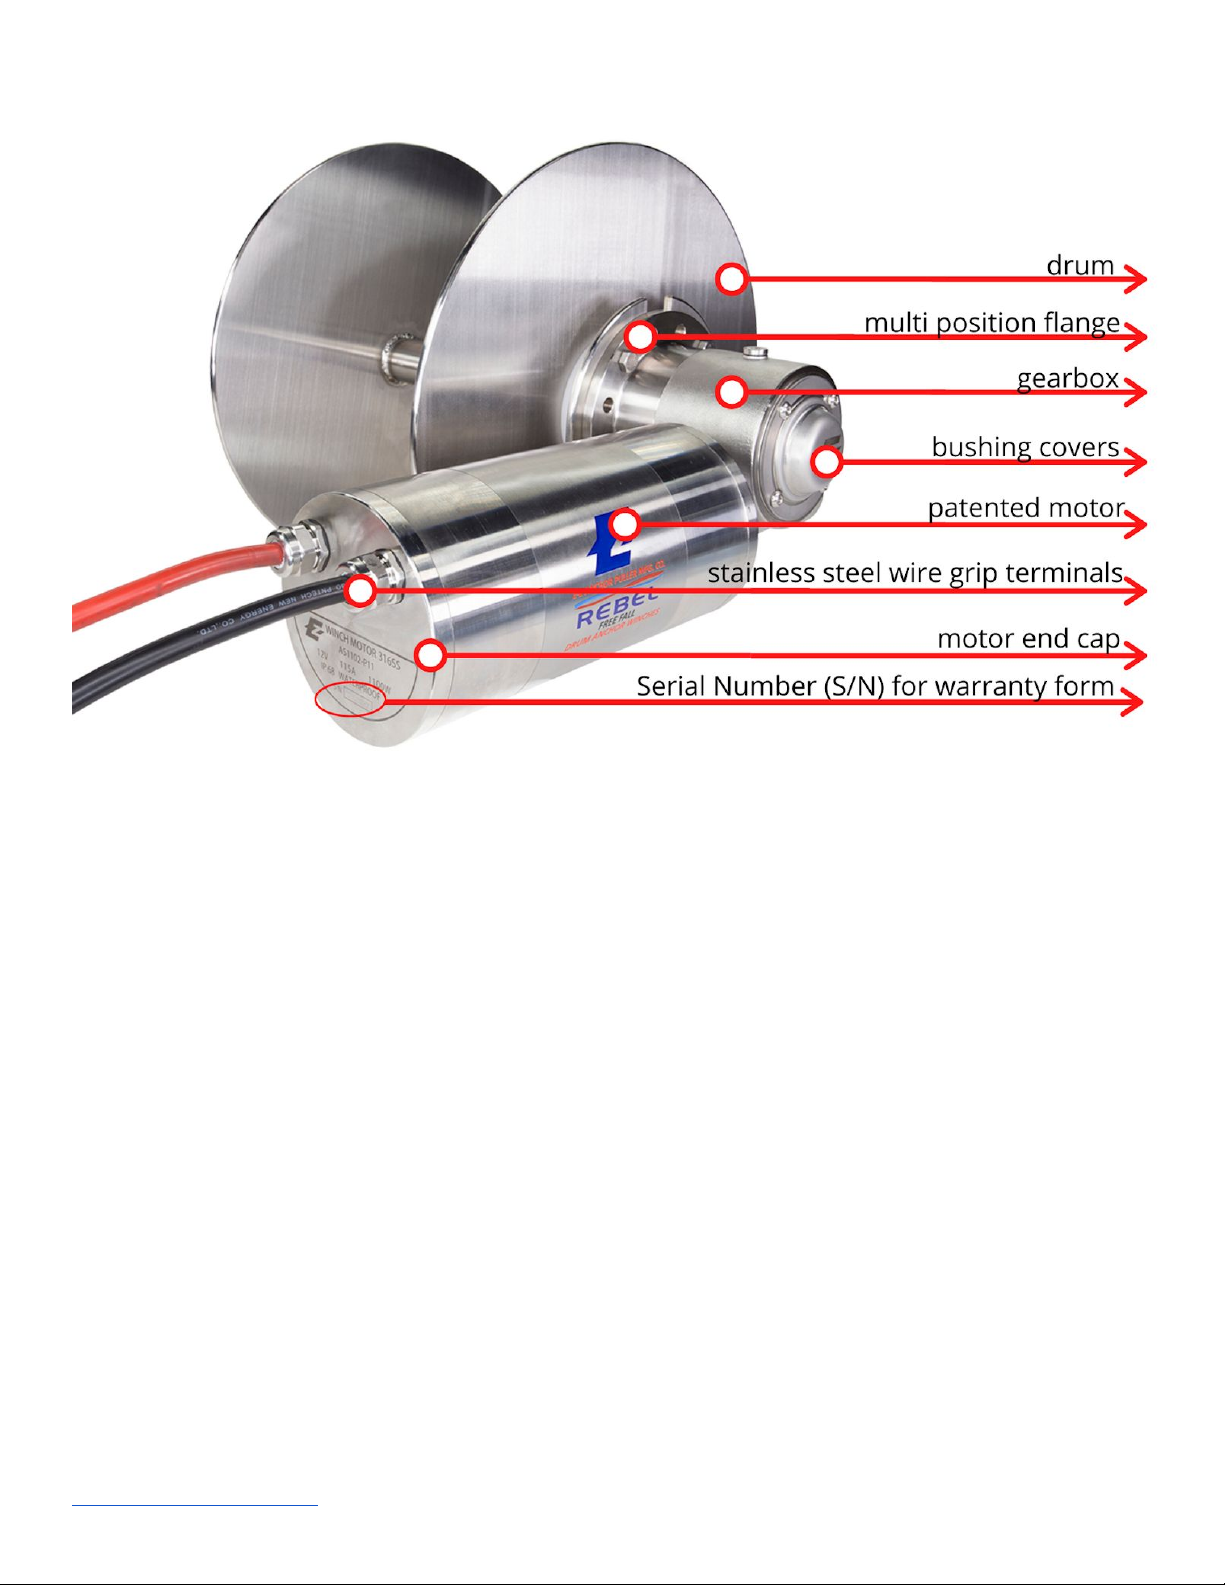
● Gearbox output multi-position flange (page 2) to drum bracket can rotate in eight different mounting positions for
your motor and gearbox components
● Bushing and bushing hub; if bushing needs to be replaced just unbolt four screws to hub and replace bushing,
you can purchase bushings at www.ezanchorpuller.com.
www.ezanchorpuller.com 1.800.800.1640 3

●Carefully
read the instructions provided in the manual sections that best apply to your Hero, Patriot or Rebel
anchor winch. If there is any confusion or questions, call 1.800.800.1640 immediately.
● Ensure sufficient room to run electric cables to the drum anchor winch. Follow the instructions above including
underdeck stiffening, alignment, mounting blocks and sealing procedures.
● To help the rope to lead onto the drum a minimum of 12”-24” / 30 -60 cm is recommended between the last roller
and the drum anchor winch. If the drum anchor winch is being used inside a chain locker it is recommended to
have a roller as wide as the spool / drum. See page 5 for more rope help.
IMPORTANT SAFETY & INSTALLATION SECTION FOR
ANY
ANCHOR WINCH
When boating in exceedingly rough waters, excessive strain on the winch may bend the shaft. Tie off
to a cleat for your own safety and the safety of your anchor winch in cases of extreme rough waters.
WARNING! DO NOT OVERLOAD!
Drum anchor winches are designed to lift loose anchors, NOT to break anchors free from obstructions that may
hinder your anchor from being retrieved. If anchor retrieval is impaired by high wind, heavy seas or the anchor
is snagged, ease the load by either motoring or maneuvering slowly forward into the wind, until the anchor can
be lifted vertically. The anchor rope may BREAK before the winch stalls!
DO NOT ATTEMPT PROLONGED PULLS AT HEAVY LOADS!
Under NO circumstances should the drum anchor winch be operated if it is stalled or overloaded.
Overloads can damage the winch and/or the rope and create unsafe operating conditions. If at all possible,
check for the cause of the overload/stalled unit and rectify the issue before continuing the retrieval of your
anchor.
The generator / main engine should be running during winch operation to minimize battery drain and maximize
winch power and speed. If considerable winching is performed with the engine off, the battery may become too
weak to restart the engine. Drum anchor winches are powerful machines: treat them with respect, use with
caution and always follow the safety guidelines to get the most out of your new investment.
RULES FOR OPERATION & SAFETY
1. Keep the winching area clear whether you are operating it or not: ensure that hands, feet, hair and clothing are
kept clear of the drum anchor winch and other loose gear when you're out on the water.
2. Inspect the anchor rope, chain and equipment frequently: a frayed rope or damaged splice to the chain should be
replaced immediately.
3. Periodically check the drum anchor winch installation to ensure that all bolts are tight.
4. Never use your drum anchor winch for lifting or moving people. Ensure no one is swimming nearby as the anchor
is lowered or retrieved.
5. This drum anchor winch is not designed or intended for overhead hoisting operations. Purchasing the winch with
the intent to do so will void the warranty (see page 18).
6. Avoid continuous pulls from extreme angles. This will cause the rope to pile up on one end of the drum, jamming
the rope in the winch and causing inevitable damage.
7. Always operate the drum anchor winch with an unobstructed view if possible.
8. ONLY use factory approved switches, remote controls and accessories. Use of non-factory approved components
may cause injury or property damage and will void your warranty.
www.ezanchorpuller.com 1.800.800.1640 4

9. Do not machine or weld any part of the drum anchor winch. Such alterations may weaken the structural integrity
and will void your warranty (see page 18).
10. Use suitable electrical wire gauges and connections between the battery, switch and other components. See
“Important Electrical Information
,” page 7, for details.
WINCH INSTALLATION INSTRUCTIONS
Ensure that the rope has a clear lead to the winch – use a roller if required to direct the anchor rope to the
drum. Ensure that there is sufficient room to run the electrical cables to the winch underneath the deck.
Depending on the motor/gearbox position the drum anchor winch can be overfeed or underfeed (i.e. spooled
over the shaft or under the shaft). If the deck or bulkhead selected for mounting is angled or curved, a suitably
shaped mounting block will be required to spread the load evenly over the deck surface and mount the winch
on a level and even footing. Place the shaped mounting block (if required) onto the deck or bulkhead. Use the
drum anchor winch as the layout template to mark the centers. Remove the winch and drill the holes.
Apply an appropriate marine-grade silicone sealant to the base plate and mounting block if required, taking
care to align mounting holes when assembling. For aluminum or steel hull vessels, it is important to
insulate the drum anchor winch with a non-conductive gasket to avoid corrosion. This also applies
below deck with the mounting bolts, nuts and washers. Always use the included marine-grade aluminium alloy
backing plate or a marine plywood or starboard stiffener of at least 16mm (5/8") should be fitted to the
underside of the deck to spread the load. Install and tighten mounting bolts.
ANCHOR LINE & CHAIN INSTRUCTIONS
*see exception for REBEL series at the end of this section
In winding the chain and rope onto the drum of your anchor winch, the rope is wound over or under the shaft of
the drum. Your rope should wind over or under based on how the winch is orientated on your boat. To install
the anchor rope onto the drum, first insert the rope through the hole* on your Hero EX-1, EX-2 or EX-3 / Patriot
EZ-1, EZ-2 or EZ-3 then either tie it back onto itself or attach with a shackle and wind the rope onto the drum.
The chain / rope should be wound “thread lay”, with close, even winding throughout the length of the chain /
rope.It is common practice to wet your anchor rope as you wind it onto the drum to establish this close, even
winding. If wound unevenly, the turns of your anchor rope will bunch-up, cross wind and may be liable to form
“doglegs” (i.e. causing kinks or odd bends in anchor rope), particularly on the more flexible chain / rope. Never
fill the drum full to the rim or edge of the flanges. If possible, leave a clearance equivalent to at least two layers
www.ezanchorpuller.com 1.800.800.1640 5

of chain / rope. A tension should be induced into the line as a tight winding is imperative. One person should
operate the drum anchor winch in the “UP” direction while a second person guides the wetted rope, making
sure each turn is winding tightly with each turn.
* On the Rebel EZ-4, EZ-5 or EZ-6, insert your rope through the welded rod
. DO NOT insert anything in the
hole of the rod/shaft of your Rebel series anchor winch (See page 16).
Note: NEVER UNWIND THE LAST LAY OF LINE ON THE SPOOL!
The amount of chain can be lengthened or shortened to meet individual needs. In these situations, the amount
of rope must be tailored to ensure there is a maintained clearance between the chain and the base plate. Avoid
damage to the drum anchor winch or vessel when bringing the anchor up, it is a preferred practice to mark the
chain/rope at approximately 6.5’ and 16.5’ (2m-5m) intervals from the anchor, to alert the operator to the
anchor position.
BASIC MAINTENANCE PRACTICES & REPAIR : Periodically check tightness of mounting bolts and electrical
connections. Remove any dirt or corrosion that may have accumulated on the electrical connections. Repair
should be done by an authorized E-Z Anchor Puller Mfg. Co. Repair Centers Only. Do not attempt to
disassemble the gearbox, disassembly will void warranty. The gear drive is filled and sealed at the factory
with long life synthetic oil and does not require replacement. A rinse of fresh water on all your deck gear after
every excursion ensures all salt deposits are kept to a minimum.
E-Z Anchor Puller Mfg. Co. recommends running the winch motor periodically if the vessel is not being used for
a long period of time to keep all the moving parts lubricated. Always rinse off with fresh water after being
exposed to corrosive environments to ensure that salt deposits and build up do not hinder anchor winch
functionality.
LUBRICATION : The gearbox and drum bearings are permanently lubricated with a high-performance gear
lube. If relubricating is necessary (after repair or disassembly) only use Shell Alvenia EP2 or equivalent. All
white bushings are self-lubricating and should not be lubricated as grease can reduce their efficiency and
performance life.
EMERGENCY FREE-SPOOL FEATURE FOR HERO &
PATRIOT SERIES*
*For Specific REBEL SERIES emergency procedures, go to page 17.
If your boat should lose all power and you need to deploy the
anchor, there is an emergency free spooling
feature that will allow you to do so. In order to do so, simply
take off the end cap of your gearbox and remove it’s shaft key
on the side of the gearbox by unscrewing ONLY the large
screw, which will back out the drive key along with the
bushing. Then retrieve the anchor rope by hand.
IMPORTANT ELECTRICAL INFORMATION: Circuit Breakers, Solenoids and Warranty
*NOTICE - If after wiring your anchor winch, your rocker switch operates “up” when holding the down
side of
your button (or vice versa), switch the leads on the solenoid terminals 1 and 3*
IT IS NECESSARY TO INSTALL A CIRCUIT BREAKER WITH AN ISOLATION / RESET SWITCH TO ISOLATE THE DRUM
ANCHOR WINCH WHEN NOT IN USE. This is to prevent the rope and chain from paying out if the winch is
www.ezanchorpuller.com 1.800.800.1640 6

accidentally reversed. Circuit breakers must
be fitted to ensure warranty. If the drum anchor winch is
overloaded or stalled the circuit breaker automatically cuts off power to the winch and protects the wiring and
motor. The circuit breaker should be located within 42” of the battery per ABYC
boating standards.
Furthermore, the circuit breaker assists in the protection against overloading the motor, however, they are
not total protection against overloading and overloading the motor will void the warranty.
Deck Switches (if fitted) are best located to either port or starboard or directly behind the drum anchor winch
in a position where it can be easily reached with your foot or knee, preferably where you can view the anchor
and chain coming aboard.
CABLE SIZE CHART : In the boating world it is suggested that,
● 3% max voltage drop for conductors providing power to panels and switchboards, navigation lighting, bilge
blowers, main DC feeders, and any other circuit where voltage drop should be kept to a minimum
● 10% max voltage drop on conductors used for general lighting and other non-critical circuits
Drum anchor winches are operable in the acceptable voltage loss range of 3% to 10%.
Batteries are best located as close to the drum anchor winch as possible.
Smaller diameter cables drop voltage considerably. Larger cables will reduce the voltage drop to the motor and
the heat generated when operating the winch. Use the following guide to determine your required size:
http://www.calculator.net/voltage-drop-calculator.html
THE FOLLOWING CABLE SIZES MUST BE USED AS A MINIMUM:
12 Volt DC system with copper wire & conductors Using a 40 amp circuit breaker producing 400W:
● up to 15' from battery use 6 awg cable and experience 4% voltage drop
● up to 30' from battery use 4 awg cable and experience 5% voltage drop
● up to 40' from battery use 2 awg cable and experience 4% voltage drop
12 Volt DC system with copper wire & conductors Using a 60 amp circuit breaker producing 700W:
● up to 15' from battery use 6 awg cable and experience 6% voltage drop
● up to 30' from battery use 4 awg cable and experience 8% voltage drop
● up to 40' from battery use 2 awg cable and experience 6% voltage drop
12 Volt DC system with copper wire & conductors Using a 80 amp circuit breaker producing 900W:
● up to 15' from battery use 6 awg cable and experience 8% voltage drop
● up to 30' from battery use 4 awg cable and experience 9% voltage drop
● up to 40' from battery use 2 awg cable and experience 8% voltage drop
12 Volt DC system with copper wire & conductors Using a 100 amp circuit breaker producing 1100W:
● up to 15' from battery use 4 awg cable and experience 6% voltage drop
● up to 30' from battery use 2 awg cable and experience 8% voltage drop
● up to 45' from battery use 1 awg cable and experience 9% voltage drop
12 Volt DC system with copper wire & conductors Using a 120 amp circuit breaker producing 1250W:
● up to 15' from battery use 4 awg cable and experience 7% voltage drop
● up to 30' from battery use 2 awg cable and experience 9% voltage drop
● up to 45' from battery use 1/0 awg cable and experience 9% voltage drop
● up to 55' from battery use 2/0 awg cable and experience 9% voltage drop
www.ezanchorpuller.com 1.800.800.1640 7

COMMON TROUBLESHOOTING QUESTIONS FOR ANY ANCHOR WINCH *
*see additional chart for REBEL-specific inquiries on page 17.
Issue
Possible Cause(s)
Solution(s) *numbers correlate to each other
Motor Runs, but with
Insufficient power or with
low RPM
1. Insufficient Battery
2. Electrical cables from
battery to speed reducer is
too small
3. Bad electrical connections
4. Insufficient charging system
1. Check battery terminal voltage
under load. If 10 volts or less,
replace or parallel another battery
to it at the motor terminal.
2. Refer to cable guide, page 7
3. Check all connections for
looseness or corrosion, then
tighten, clean and grease if
applicable
4. Insufficient charging system
Motor will not Operate
1. Inoperative solenoid or
stuck solenoid
2. Inoperative switch
3. Inoperative Motor
4. Loose connections
1. Check battery terminal voltage
under load. If 10 volts or less,
replace or parallel another battery
to it at the motor terminal.
2. Check voltage and “on”
connection, then check the back
of the rocker switch and at
solenoid terminals
3. If solenoids operate, check for
voltage at motor terminals.
Replace motor if needed.
4. Check all terminal connections
Rocker Switch Operates in
Wrong Direction
1. Hitting rocker switch “up”
button deploys rather than
retrieves (or vice versa)
1. Switch leads 1 and 3 on solenoid
terminals. See diagram for specific unit.
www.ezanchorpuller.com 1.800.800.1640 8


BASIC MAINTENANCE PRACTICES
Although much effort has been undertaken to manufacture the drum anchor winch
to make it as durable as possible, the drum anchor winch may be operated in a
corrosive environment. It is good practice to wash salt water off all
running parts
with fresh water after every use to avoid corrosion. All other general maintenance
practices outlined on pages 4 - 6 apply.
HERO LINE & CHAIN RECOMMENDATION CHART
Please follow the rope / chain configuration below in accordance with your unit and boat size.
HERO PERFORMANCE CHART
Model
EX-1
EX-2
EX-3
Metal Type
Aluminum alloy
Aluminum alloy
Aluminum alloy
Vessel Length
18’ - 21’/6m - 7m
18’ - 21’/6m - 7m
21’ - 24’/7m - 8m
Spool Size
7” (180mm) L x 8”
(200mm) diameter.
8” (200mm) L x 9.5”
(240mm) diameter.
8” (200mm) L x 11”
(280mm) diameter.
(
Dc
) Power Supply
12v
12v
12v
Circuit Breaker
40 amp
60 amp
60 amp
Motor (Watts)
400w
700w
700w
Motor Size Dia.
75mm
90mm
90mm
Gearbox Size
30AA
44AA
44AA
Max Pulling Load
1,000 lbs/454 kg
1,250 lbs/567kg
1,250 lbs/567kg
Max Recc. Work Load
71 lbs/32 kg
183 lbs/83 kg
151 lbs/69 kg
Net Weight
20 lbs/9 kg
33 lbs/15 kg
35 lbs/16kg
Gross Weight
26 lbs/12 kg
42 lbs/ kg
44 lbs/20 kg
www.ezanchorpuller.com 1.800.800.1640 10
Ce manuel convient aux modèles suivants
11
Table des matières
Manuels Entraînement CC populaires d'autres marques

Vincent Associates
Vincent Associates UNIBLITZ ED12DSS Manuel utilisateur

EKSMA OPTICS
EKSMA OPTICS DQ-100-4 Manuel de la liste des pièces

Chamberlain Garog
Chamberlain Garog D Series Manuel utilisateur

Parker
Parker PDS Series Manuel utilisateur

Festo
Festo DGC G Series Guide de configuration

Binks
Binks QS-5012-1-CE Manuel utilisateur


