DVDO iScan Pro Progressive Scan Display Interface Manuel utilisateur

User ManualUser Manual
Progressive Scan Display Interface
Technology
Brought to you by

iScan Pro User Manual
2

iScan Pro User Manual
3
Table of Contents
TABLE OF CONTENTS...................................................................................................3
INTRODUCTION..............................................................................................................5
INSTALLATION AND SETUP..........................................................................................7
TYPICAL CONFIGURATION...................................................................................................7
SYSTEM REQUIREMENTS......................................................................................................8
CONNECTIONS....................................................................................................................8
COLOR SPACE SELECTION .................................................................................................10
SYNCHRONIZATION SIGNALS.............................................................................................10
OPERATION...................................................................................................................12
INPUT SELECTION..............................................................................................................12
ASPECT RATIO CONTROL / SQUEEZE MODE......................................................................12
PICTURE CONTROLS..........................................................................................................13
FILM MODE INDICATOR....................................................................................................13
TROUBLESHOOTING ..................................................................................................14
HOW IT WORKS.............................................................................................................16
BACKGROUND...................................................................................................................16
DEINTERLACING................................................................................................................17
VIDEO PROCESSING..........................................................................................................18
TECHNICAL SPECIFICAT IONS....................................................................................19
WARRANTY INFORMATION.........................................................................................21

iScan Pro User Manual
4
SAFETY INFORMATION:..............................................................................................22
SAFEGUARDS .....................................................................................................................22
PRECAUTIONS:..................................................................................................................22
APPENDIX A –INTERNAL JUMPER SETTINGS........................................................23
REMOVING THE ISCAN PRO MOTHERBOARD.......................................................................23
MODIFYING COMPOSITE SYNC JUMPER SETTING...............................................................24
MODIFYING SYNC-ON-GREEN JUMPER SETTING.................................................................24
REASSEMBLING THE ISCAN PRO.........................................................................................24
Note:
♦Silicon Image, DVDO, ii Scan, iScan and iScan Pro are trademarks of
Silicon Image, Inc. This product is covered by pending U.S. and foreign
patents.

Silicon Image, Inc. iScan Pro User Manual
5
Note: This page intentionally left blank.

Silicon Image, Inc. iScan Pro User Manual
6
Introduction
Your iScan Pro package contains:
•iScan Pro Line Doubling Upconverter
•Universal power supply module
•Power cable
•Composite video input cable
•S-Video input cable
•Component video input cable
•User Manual
Your iScan Pro package does not contain an output cable. You will need to purchase an output
cable that works with your display device. There is more information on these cables in the
Installation section.

Silicon Image, Inc. iScan Pro User Manual
7
Installation and Setup
Typical Configuration
Figure 1 shows a typical configuration for a home theater system. In this setup, the iScan Pro is
being used to enhance the output from a DVD player, a satellite receiver and a VCR before the
selected signal is sent to a rear screen projection TV, or another progressively scanned display
device. Your configuration may be significantly different from this but the basic functional blocks –
input devices, input cables, iScan Pro, output cable and display device –will exist in your system.
One common deviation from this configuration is to use an A/V Receiver or another video switching
device to switch the video signals from the input devices. In this case, the input devices shown
below will be connected to the inputs of the A/V Receiver. The output of the A/V Receiver will then
be the only input device to the iScan Pro.
Cable TV
VCRSatellite ReceiverDVD Player
Progressively
scanned TV or
projector
Figure 1: Example Home Theater setup
Input Devices
Display Device
iScan Pro
(rear view)
Output Cable
Input Cables
Power Supply AC
Power
Antenna
Component Composite
S-Video

Silicon Image, Inc. iScan Pro User Manual
8
System Requirements
The iScan Pro is designed to interface to 31.5 kHz progressively scanned display devices such as:
•Data projectors
•Home Theater video projectors (31.5KHz scan rate required)
•HDTVs
•Progressive scan and Multimedia TVs
•Plasma TVs
•Computer monitors
If you are not sure whether or not your display will work with the iScan Pro, contact your dealer or
check the compatibility list on our web site at www.siimage.com.
The iScan Pro accepts NTSC, PAL and SECAM video sources on any one of its input connectors.
Connections
Inputs
There are three available inputs on the iScan Pro:
Input 1: Composite video
Input 2: S-Video
Input 3: Component video (YPbPr)
We recommend using the component video input for a DVD player and the S-Video input for
satellite receiver and/or digital cable box. For VCRs or laserdisc players, chances are good that
using the composite video input will give you a better picture because the iScan Pro typically has
better Y/C separation circuitry than most of these devices. However, you should try both composite
and S-Video to see which works better in your system.
To connect a cable or antenna input, we recommend running that cable to a VCR and using the
composite video output from the VCR to the iScan Pro.
The iScan Pro will automatically search for and select whichever of the three input ports is active.
You can also specify a priority-input choice so that if two or more of the inputs are active, the
priority switch indicates which input to use. See the Operation Section for more detail.
Output
The iScan Pro uses a single 15-pin VGA-style connector for its output. This is the same type of
connector that most computers use to drive computer monitors.
In order to connect the iScan Pro to your progressive scan TV, video monitor or projector, you will
need to determine what type of input connector your set has. Consult your display owner’s manual
for more details about requirements of the input connector.
The VGA output connector on the iScan Pro unit allows different configurations of cables.

Silicon Image, Inc. iScan Pro User Manual
9
+
For progressive scan TVs / monitors / projectors with VGA input:
A high quality VGA-to-VGA computer monitor cable should be used to
connect the iScan Pro’s output to devices that can accept progressive
signals through a VGA connector.
For progressive scan TVs / monitors / projectors with BNC input connectors:
Many high-end TVs, monitors and CRT projectors have BNC input
connectors. There are usually either 3, 4 or 5 BNC connectors depending
on how your display device handles synchronization signals. These
connectors are most commonly used for RGB but are sometimes used for
Component (YPbPr) signals as well. A standard VGA-to-BNC breakout
cable can be used to attach the iScan Pro to any projector or television
that has BNC connectors. The connections are shown in
Table 1.
For progressive scan TVs / monitors / projectors with component input:
The most common plug used for Component Video connections consists
of 3 RCA-type jacks. These are the same connectors that are used for
many types of audio connections. VGA-to-RCA cables are very rare so we
recommend using a VGA-to-BNC cable in combination with a set of three
BNC-to-RCA adapters. The red, green and blue BNC connectors should be
used with the adapters and the two remaining wires can be left
unconnected. The connections are as shown in Table 1.
Power Supply
The iScan Pro comes with a universal power supply module that accepts 100–240 VAC at 50/60
Hz. Plug the power supply into the wall outlet and then plug the small round connector into the “DC-
In” jack on the back of the iScan Pro. Only use the power supply that comes shipped with the
iScan Pro. The iScan Pro unit may be damaged if a power supply that does not meet its power
requirement is used.
To meet FCC and EMI guidelines, the iScan Pro power supply comes with a snap-on ferrite collar
similar to those supplied with laptop computers and other portable electronic devices. The ferrite
collar should be snapped on the end of the cable
leading from the power supply to the iScan Pro as
shown in the illustration below. Looping the power
supply cable twice through the ferrite and placing the
ferrite as near the end of the cable as possible will
maximize its effectiveness.

Silicon Image, Inc. iScan Pro User Manual
10
Color Space Selection
The iScan Pro can output video in one of two different color spaces. The first is the Red-Green-Blue
(RGB) color space that is commonly used for projectors, displays and monitors that are designed to
accept computer video output.
The second is Component Video, but is more accurately called YPbPr though you may hear it
referred to as Y-Pr-Pb, YUV, Y-Cr-Cb or Y/B-Y/R-Y (read “Y, B minus Y, R minus Y”). This color
space is commonly used for newer digital TV sets, displays and projectors that are designed for
use with Digital TV (DTV) tuners.
You will need to determine which color space is used by your progressively scanned display and
move the Color Space switch on the front panel of the iScan Pro to the appropriate position.
UP RGB
DOWN YPbPr
Typically, inputs on display devices that are labeled “Component Video”, “DTV” or “HDTV” are
YPbPr whereas inputs that are labeled “Computer” or “VGA” are RGB. Once set up, this switch
should not need to be changed unless you are changing display devices.
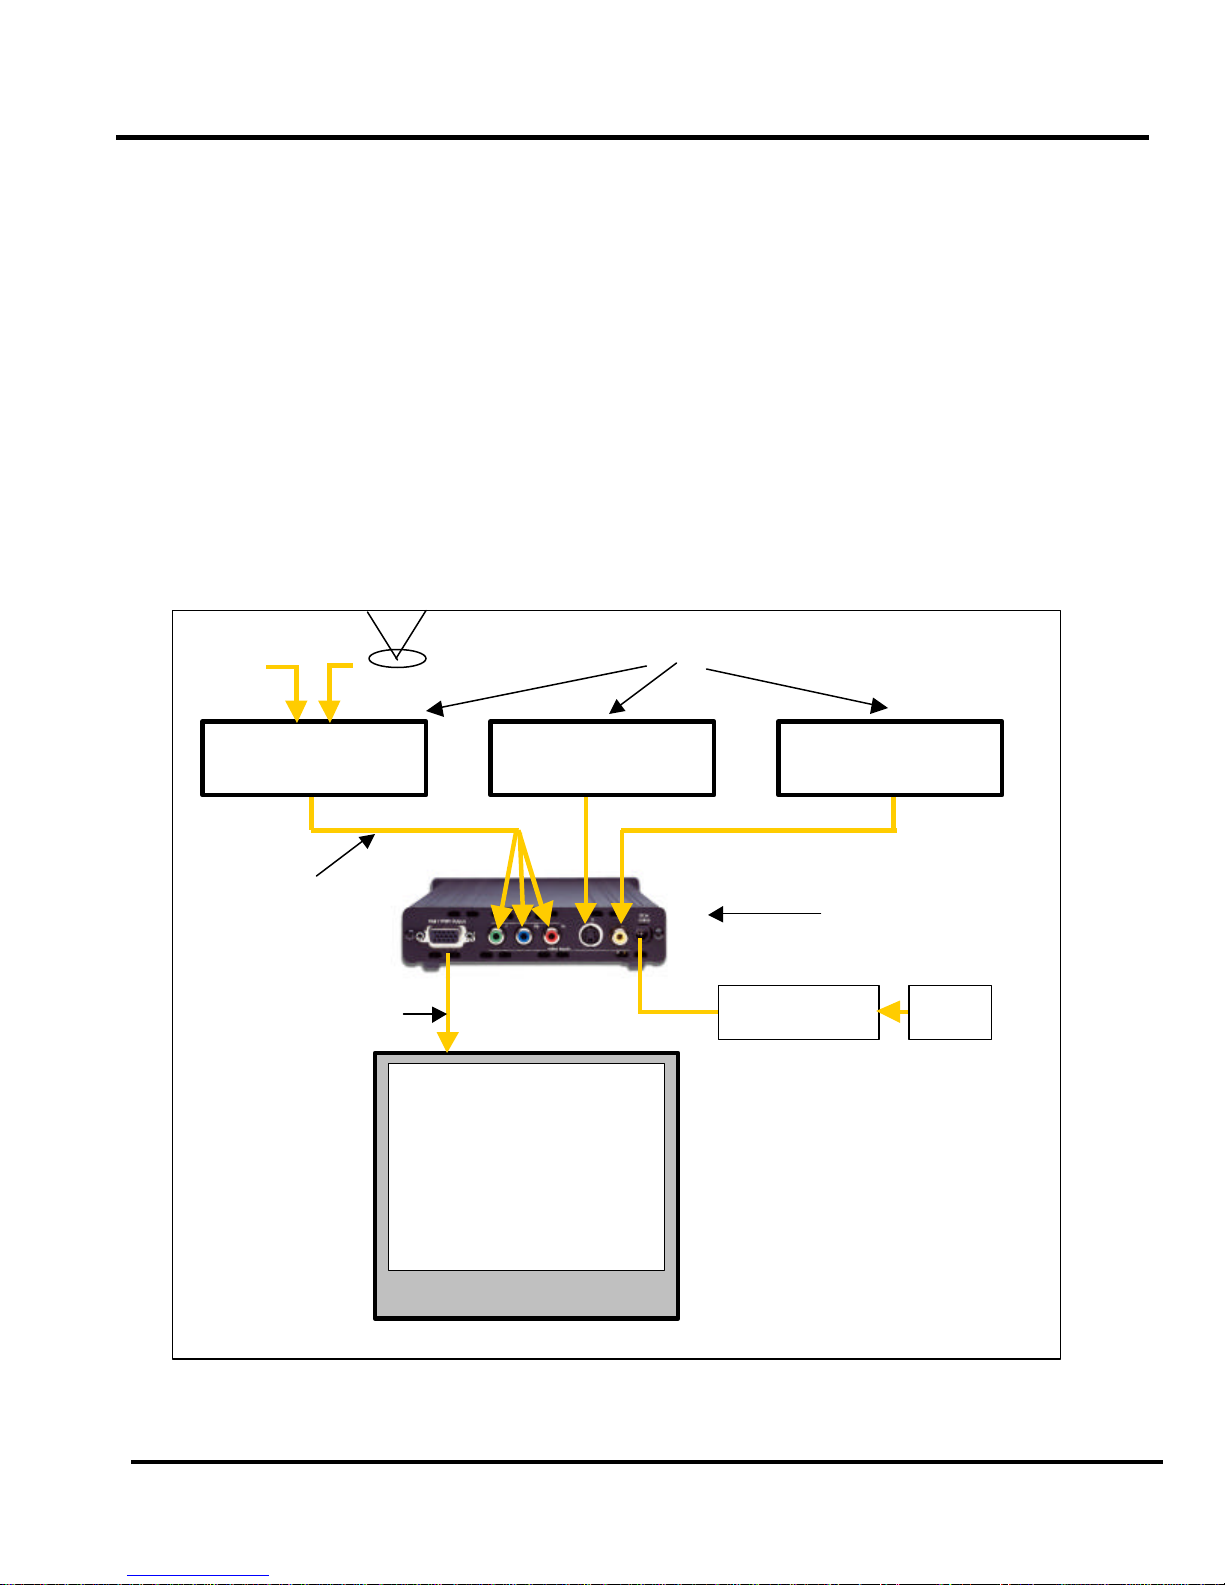
Synchronization Signals
All video devices require one or more synchronization signals that tell the device when to start a
new line and/or a new field. For YPbPr devices, this sync information is embedded in the Y signal.
For RGB devices, there are a variety of ways that this sync information can be conveyed and the
iScan Pro can support most of these. The iScan Pro generates separate H (horizontal) and V
(vertical) sync signals in addition to the RGB outputs. This results in a total of five signals
(RGB/HV). For many configurations, these five signals will be part of a single VGA-to-VGA output
cable and there will be no need to worry about the individual signals. For some devices you may
need to connect all five of these signals to individual BNC or possibly RCA type connectors. See
Table 1 below for more specific connection information.
Some display devices require that the two H and V sync signals be combined into a single
“composite sync” signal, resulting in a total of 4 signals (RGB/S). Devices requiring composite sync
typically accept the three video signals as well as the composite sync signal on BNC type
connectors.
Other devices require that the composite sync signal be further combined with the RGB Green
signal. This is referred to as “sync on green” and is typically connected to the device using 3 BNC
connectors, though 3 RCAs may also be used.
If your output device falls into either of these last two categories –composite sync or sync on green
–the iScan Pro will need to be internally configured to output the appropriate type of sync signal. To
do this you will need to follow the directions in Appendix A.
Ce manuel convient aux modèles suivants
1
Table des matières
Autres manuels DVDO Accessoires TV


