
Dune HD TV-301 Manuel utilisateur

Quick Start Guide ●Краткое руководство
English ●Русский
Manufactured under license from Dolby Laboratories.
Dolby and the double-D symbol are trademarks of Dolby Laboratories.
Manufactured under license under U.S. Patent #’s: 5,451,942; 5,956,674; 5,974,380; 5,978,762;
6,487,535 & other U.S. and worldwide patents issued & pending. DTS and the Symbol are registered
trademarks, & DTS 2.0 Channel and the DTS logos are trademarks of DTS, Inc. Product includes soft-
ware. © DTS, Inc. All Rights Reserved.
Quick Start Guide
●Краткое руководство
English ●Русский
Manufactured under license from Dolby Laboratories.
Dolby and the double-D symbol are trademarks of Dolby Laboratories.
Manufactured under license under U.S. Patent #’s: 5,451,942; 5,956,674; 5,974,380; 5,978,762;
6,487,535 & other U.S. and worldwide patents issued & pending. DTS and the Symbol are registered
trademarks, & DTS 2.0 Channel and the DTS logos are trademarks of DTS, Inc. Product includes soft-
ware. © DTS, Inc. All Rights Reserved.
Quick Start Guide ●Краткое руководство
English ●Русский
Manufactured under license from Dolby Laboratories.
Dolby and the double-D symbol are trademarks of Dolby Laboratories.
Manufactured under license under U.S. Patent #’s: 5,451,942; 5,956,674; 5,974,380; 5,978,762;
6,487,535 & other U.S. and worldwide patents issued & pending. DTS and the Symbol are registered
trademarks, & DTS 2.0 Channel and the DTS logos are trademarks of DTS, Inc. Product includes soft-
ware. © DTS, Inc. All Rights Reserved.
3
English
3
Table of Contents
Table of Contents
English
Quick Start Guide
• Introduction
• Key Features
• Extra Functions
• Package Contents
• Exterior
• Remote Control
• Getting Started
• Quick Setting of Video Output Mode
• Connecting USB Drives
• Using Internal HDD
• Using SD Memory Cards
• Using USB 3.0 Slave Function
• Accessing Network Drives
• Formatting HDD
• Switching the Player On and Off
• NAS (Network Attached Storage)
• Wi-Fi
• Limitations
• Updating Your Player and Getting More Information
Русский
Краткое руководство
• Введение
• Основные особенности
• Дополнительные функции
• Содержимое коробки
• Внешний вид
• Пульт управления
• Начало работы
• Быстрое изменение видеорежима
• Подключение USB-накопителей
• Использование внутреннего жесткого диска
• Использование карт памяти SD
• Использование интерфейса USB 3.0 Slave
• Доступ ксетевым дискам
• Форматирование жесткого диска
• Включение ивыключение проигрывателя
• NAS (Network Attached Storage)
• Wi-Fi
• Ограничения
• Обновление плеера идоп. информация
4 16
4
Dune HD TV-301 Quick Start Guide
Introduction
Dune HD TV-301 is an all-in-one solution for up to Full HD (1080p) video playback.
Key Features
●The newest Sigma Designs 8670/8671 media processor: enjoy excellent playback and performance of interactive
features.
●HDD player: connect an HDD to the player and play content directly from the HDD.
●Network player: connect the player to a local network and play content directly from PC or NAS (UPnP, SMB, NFS).
●MKV player: play HD and SD video in a popular MKV format and other modern video file formats, including top
quality HD video with very high bitrate.
●2 USB ports: conveniently connect HDDs, USB flash drives, USB card readers and other USB storage devices.
●HDD rack with hot swap function: easily and quickly insert and exchange internal 2.5’’ SATA HDD.
●USB 3.0 Slave port: easily and quickly transfer files between the HDD in the player and a PC.
●SD card slot: easily play media files on SD memory cards from your camera or other devices, or use an SD memory
card as a local or system storage (required for BD Live function).
●HDMI 1.3: ensure the best possible quality of HD video and HD audio.
●Video output flexibility: output video in any resolution and format (from SD to 1080p, 24p/PAL/NTSC).
●Upscaling: high quality upscaling of DVD and any other SD video content to Full HD (1080p) or other HD resolution.
●File browser: convenient file browser with powerful file management (copy, move, delete, rename, organize, sort).
5
English
Extra Functions
●High-quality music playback: play very high-quality (up to 192 Khz / 24-bit) music files in various formats (FLAC,
Monkey’s Audio APE, WAV/PCM, DTS, etc).
●Playlists: build playlists from your folders, use your own playlists, use repeat and shuffle functions.
●NAS function: access files on storage devices (HDD, optical drive, etc) attached to the player from the local
network (using SMB or FTP).
●BitTorrent: use built-in BitTorrent client to download files from P2P networks.
●Customizable user interface: work with media collections using cover art and icon browsing (with Full HD graphics).
●Internet radio: playback and record various Internet radio stations (HTTP/MP3 and other formats).

6
Dune HD TV-301 Quick Start Guide
Package Contents
1. Dune HD TV-301 media player
2. Remote control (batteries may
not be included)
3. Wi-Fi antenna (optional)
4. IR extender
5. AV cable (3.5mm minijack to 3xRCA)
6. USB 3.0 (Host-Slave) cable
7. External power supply
8. HDMI cable
9. Ethernet cable
10. Quick start guide
NOTE: Additional items (optional) may be included into the package, depending on player configuration, region, and
distributor.
1 5
6
2
10987
34
7
English
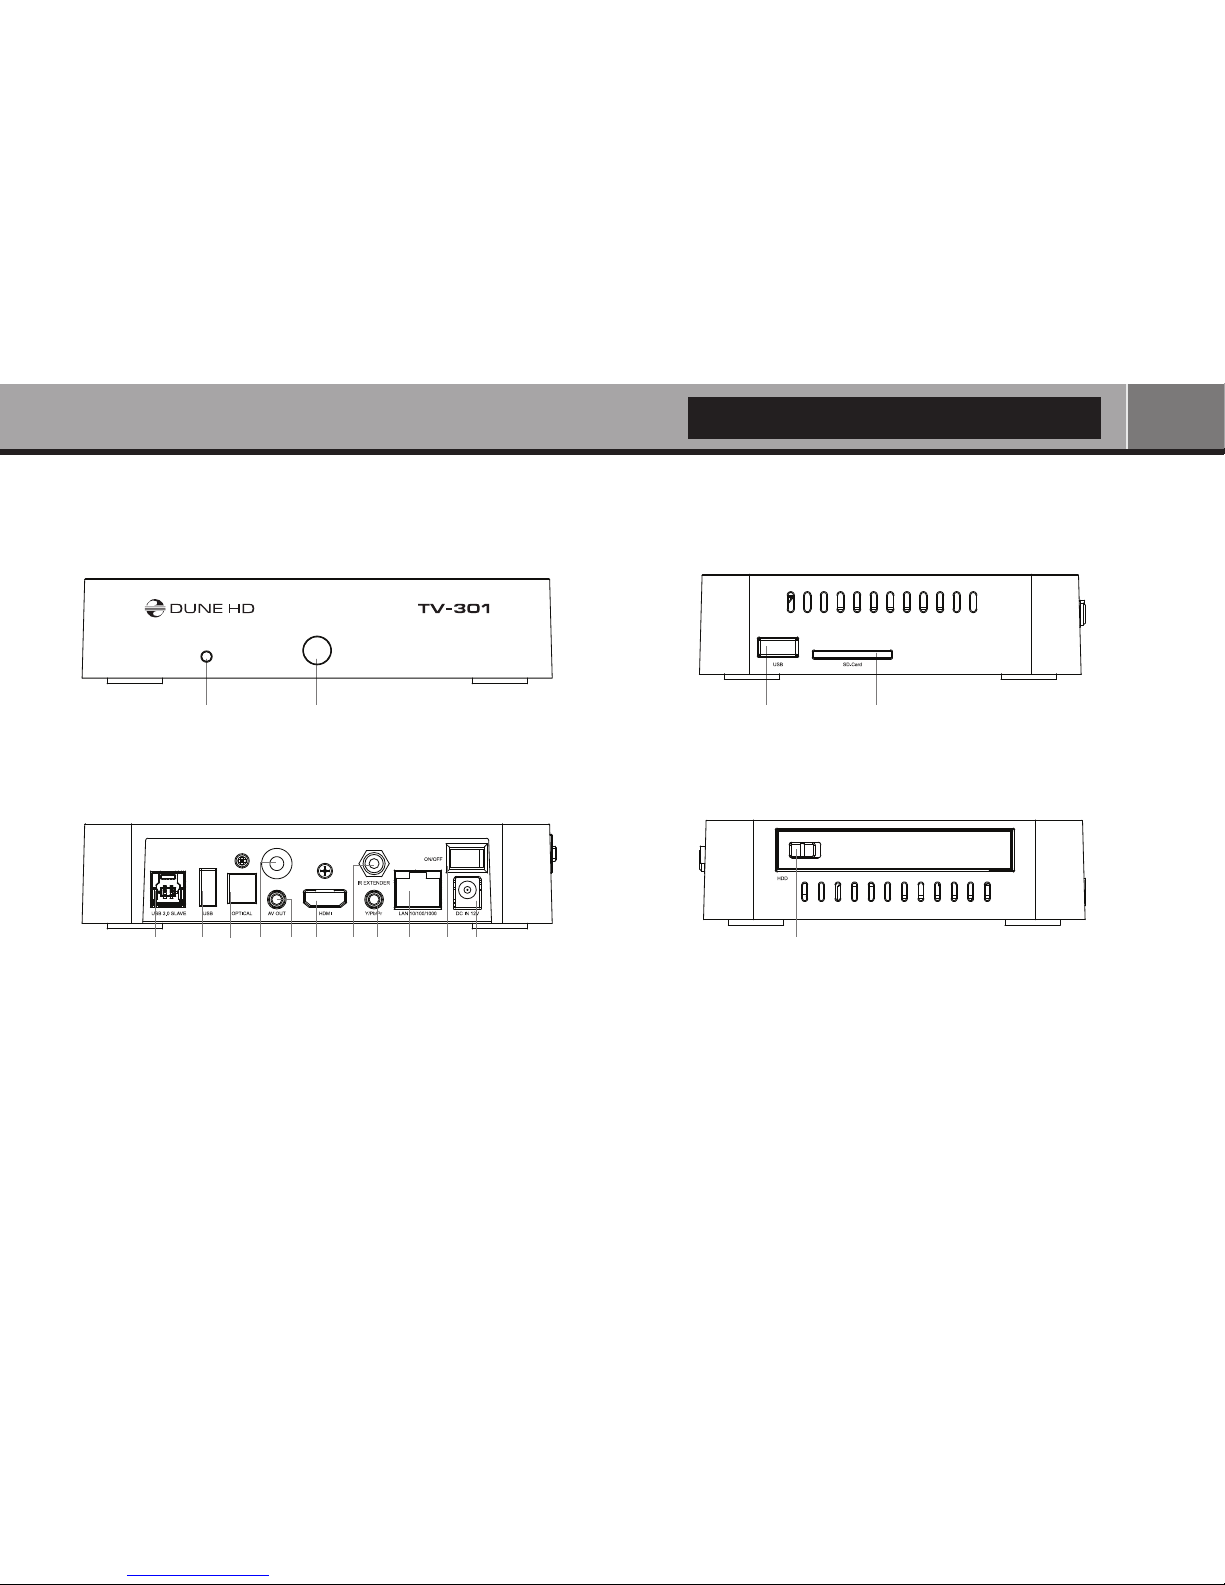
Front view Side view (right)
Exterior
1. USB 2.0 host
2. SD card slot
1. HDD rack
1. LED indicator
2. IR eye
1. USB 3.0 Slave
2. USB 2.0 host
3. Optical digital audio output
4. Wi-Fi antenna (optional)
5. 3.5 mm minijack AV out
6. HDMI 1.3
7. IR extender connector
8. Y/Pb/Pr (Component video) out
9. LAN 10/100/1000
10. Power switch
11. DC power 12V
Rear view Side view (left)
2211
2354 6 7 8 9 10 1111

8
Dune HD TV-301 Quick Start Guide
Remote Control
1. Command indicator — ashes in response to RC button pressing.
2. EJECT — open/close the optical drive tray. MUTE — turn the sound on/off. MODE —
switch the video output mode; control some other player functions. POWER — toggle
the standby mode.
3. A (Red), B (Green), C (Yellow), D (Blue) — control some player functions.
4. 0–9 — enter numbers and text; control some other player functions.
5. SEARCH — jump to a specied playback position. ZOOM — change the zoom factor for
the video content being played. SETUP — enter/leave the setup menu; adjust playback
settings during playback.
6. V+/V- (volume up / volume down) — adjust the volume.
7. P+/P- (page up / page down) — scroll up and down in various lists; control some other
player functions.
8. Arrows , , , , ENTER, RETURN, TOP MENU, POP UP MENU, INFO — main
buttons for controlling the player (navigate across the items on the screen, open/use
the currently selected item, go back to the previous screen, go to main menu, show
popup menu with actions, show information, control some other player functions).
9.
— control the playback.
1
2
3
4
5
6
7
8
10
9

9
English
10. SUBTITLE, ANGLE/ROTATE, AUDIO, REC, DUNE, URL — control the playback and some other player func-
tions.
NOTES:
●Use alkaline AAA batteries.
●Observe polarity when inserting batteries.
●Direct the remote control to the player. There must be no obstacles between the RC and the player.
●If RC functions only at short distances or stops functioning, make sure to replace the batteries.
●Some RC buttons may have several functions depending on the current player mode.
●Some RC buttons may be available only in certain player modes or only during playback of a certain content.

10
Dune HD TV-301 Quick Start Guide
Getting Started
Ensure there is enough space around the player for proper cooling. The space at each side should be not less than
10 cm.
Ensure the RC has batteries installed.
Connect the player to your TV and to other A/V equipment in an appropriate way. Use HDMI connection to get the
best possible quality of video and audio. Make sure to switch off the player and all relevant A/V equipment before
connecting them. Ensure your TV and other A/V equipment are configured to use proper inputs.
Switch on the player. The player will perform its initial loading procedure, which may take up to about 1 minute. During
the loading procedure, "DUNE HD" logo is shown on the TV.
●If you do not see "DUNE HD" logo on the TV when you switch on the player, it may mean some problem with the
connection between the player and the TV or that a wrong video input is chosen in the TV or A/V receiver/switch.
In such a case, recheck the cables and the settings of the TV or A/V receiver/switch, or try to use different cables
or a different way of connecting the player to the TV.
●If you see "DUNE HD" logo on the TV when you switch on the player, but then the picture disappears and no other
picture appears during at least 10 seconds, it may mean that a wrong video output mode is configured in the player.
In such a case, press the "REC" RC button, and then press one of the RC buttons "1", "2", "3", "4" or "5" to switch
to a different video output mode (see "Quick Setting of Video Output Mode").
Finally, you should see the main screen of the player menu. The main screen shows items allowing to use different
player functions and access all storage devices and network drives connected to the player.
Adjust the player settings as needed using "SETUP" item on the main screen of the player menu. In particular, you may
want to adjust video settings, audio settings, and network settings.
To choose the language of the player menu, use “Setup / General / Interface language” setting.
11
English
Use the RC buttons , , , , "ENTER", "RETURN" to navigate through the player menu. Use the
"POP UP MENU" RC button to show the list of available commands. Use the "INFO" RC button to show
the information about the selected item.
Quick Setting of Video Output Mode
The “REC” RC button allows quick setting of video output mode without entering the player setup
menu. This way of video output conguration may be required if you see no picture on the screen after
connecting your player to a TV.
Press the “REC” RC button and then one of the RC buttons “1”, “2”, “3”, “4”, or “5” to switch to one of the following
video output modes respectively:
1. Composite PAL
2. Composite NTSC
3. HDMI, 480i, 60 Hz
4. HDMI, 720p, 60 Hz
5. HDMI, 1080i, 60 Hz
After you see a picture on the TV, press the “ENTER” RC button, and then go to the player setup menu to perform
a more precise conguration of the video output mode if needed.
NOTE: The procedure of quick setting of video output mode can not be used during playback and in some other
cases. To ensure this procedure can be used, switch the player off, then switch the player on, and the wait about 1
minute to ensure the player loading is nished. After that press «STOP» RC button to ensure playback is stopped.
Then use «REC» RC button.
Table des matières
Autres manuels Dune HD Lecteur multimédia

Dune HD
Dune HD Smart B1 Manuel utilisateur

Dune HD
Dune HD Smart D1 Manuel utilisateur

Dune HD
Dune HD Real Vision 4K Duo Manuel utilisateur

Dune HD
Dune HD Smart B1 Manuel utilisateur

Dune HD
Dune HD Base3D Manuel utilisateur

Dune HD
Dune HD Smart BE Manuel utilisateur

Dune HD
Dune HD TV-102AW Manuel utilisateur

Dune HD
Dune HD TV-303D Manuel utilisateur

Dune HD
Dune HD Lite 53D Manuel utilisateur

Dune HD
Dune HD Duo 4K Manuel utilisateur


