
Dongcheng DZC05-26B Manuel utilisateur
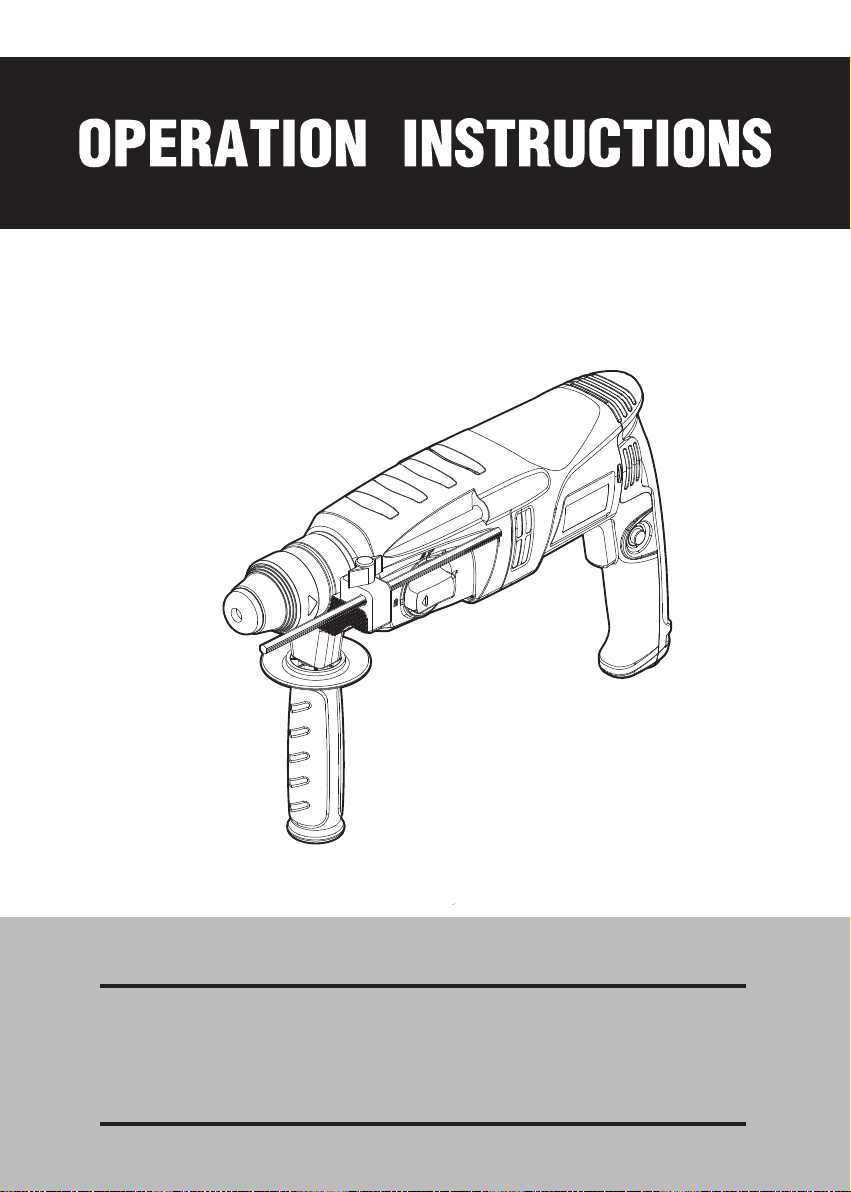
DZC05-26B AZC05-26B KZC05-26B
EN ··························································
FR ··························································
3
13
24ES ··························································


3
EN
Some dust created by power
sanding, sawing, grinding, drilling,
and other construction activities
contains chemicals known to
cause cancer, birth defects or
other reproductive harm. Some
examples of these chemicals are:
• Lead from lead-based paints,
• Crystalline silica from bricks
and cement and other masonry
products, and
• Arsenic and chromium from
chemically treated lumber.
Your risk from these exposures
varies, depending on how
often you do this type of work.
To reduce your exposure to
these chemicals: work in a well
ventilated area, and work with
approved safety equipment, such
as those dust masks that are
specially designed to lter out
microscopic particles.
For more information go to
www.P65Warnings.ca.gov.
General power tool safety
warnings
WARNING Read all safety
warnings, instructions,
illustrations and specications
provided with this power tool.
Failure to follow all instructions
listed below may result in
electric shock, re and/or serious
injury.
Save all warnings and
instructions for future
reference.
The term "power tool" in the
warnings refers to your mains-
operated (corded) power tool or
battery-operated (cordless) power
tool.
1) Work area safety
a) Keep work area clean and
well lit. Cluttered or dark areas
invite accidents.
b) Do not operate power tools
in explosive atmospheres,
such as in the presence of
ammable liquids, gases or
dust. Power tools create sparks
which may ignite the dust or
fumes.
c) Keep children and
bystanders away while
operating a power tool.
Distractions can cause you to
lose control.
2) Electrical safety
a) Power tool plugs must match
the outlet. Never modify
the plug in any way. Do not
use any adapter plugs with
earthed (grounded) power
tools. Unmodied plugs and
matching outlets will reduce risk
of electric shock.
b) Avoid body contact with

4
EN
earthed or grounded surfaces,
such as pipes, radiators,
ranges and refrigerators.
There is an increased risk of
electric shock if your body is
earthed or grounded.
c) Do not expose power tools
to rain or wet conditions.
Water entering a power tool
will increase the risk of electric
shock.
d) Do not abuse the cord. Never
use the cord for carrying,
pulling or unplugging the
power tool. Keep cord away
from heat, oil, sharp edges or
moving parts. Damaged
or entangled cords increase the
risk of electric shock.
e) When operating a power tool
outdoors, use an extension
cord suitable for outdoor
use. Use of a cord suitable for
outdoor use reduces the risk of
electric shock.
f) If operating a power tool in a
damp location is unavoidable,
use a residual current device
(RCD) protected supply. Use
of an RCD reduces the risk of
electric shock.
3) Personal safety
a) Stay alert, watch what you
are doing and use common
sense when operating a
power tool. Do not use a
power tool while you are tired
or under the inuence of
drugs, alcohol or medication.
A moment of inattention while
operating power tools may result
in serious personal injury.
b) Use personal protective
equipment. Always wear
eye protection. Protective
equipment such as a dust mask,
non-skid safety shoes, hard
hat or hearing protection used
for appropriate conditions will
reduce personal injuries.
c) Prevent unintentional
starting. Ensure the switch
is in the o-position before
connecting to power source
and/or battery pack, picking
up or carrying the tool.
Carrying power tools with
your nger on the switch or
energising power tools that have
the switch on invites accidents.
d) Remove any adjusting key
or wrench before turning the
power tool on. A wrench or a
key left attached to a rotating
part of the power tool may result
in personal injury.
e) Do not overreach. Keep
proper footing and balance at
all times. This enables better
control of the power tool in
unexpected situations.

5
EN
f) Dress properly. Do not wear
loose clothing or jewellery.
Keep your hair and clothing
away from moving parts.
Loose clothes, jewellery or long
hair can be caught in moving
parts.
g) If devices are provided
for the connection of dust
extraction and collection
facilities, ensure these are
connected and properly used.
Use of dust collection can
reduce dust-related hazards.
4) Power tool use and care
a) Do not force the power tool.
Use the correct power tool for
your application. The correct
power tool will do the job better
and safer at the rate for which it
was designed.
b)Do not use the power tool
if the switch does not turn it
on and o. Any power tool that
cannot be controlled with the
switch is dangerous and must
be repaired.
c) Disconnect the plug from
the power source and/or
remove the battery pack, if
detachable, from the power
tool before making any
adjustments, changing
accessories, or storing
power tools. Such preventive
safety measures reduce the
risk of starting the power tool
accidentally.
d) Store idle power tools out of
the reach of children and do
not allow persons unfamiliar
with the power tool or these
instructions to operate the
power tool.Power tools are
dangerous in the hands of
untrained users.
e) Maintain power tools and
accessories. Check for
misalignment or binding of
moving parts, breakage of
parts and any other condition
that may aect the power
tool’s operation. If damaged,
have the power tool repaired
before use.Many accidents are
caused by poorly maintained
power tools.
f) Keep cutting tools sharp and
clean. Properly maintained
cutting tools with sharp cutting
edges are less likely to bind and
are easier to control.
g) Use the power tool,
accessories and tool bits etc.
in accordance with these
instructions, taking into
account the working
conditions and the work to be
performed. Use of the power
tool for operations dierent from
those intended could result in a
6
EN
Intended use
This product is suitable for drilling grooving, chiseling and other operations on concrete, rock, brick wall and
other similar under general environmental conditions.
Instructions for putting into use
Setting-up or xing power tools in a stable position as appropriate for power tools which can be mounted on a
support or xed to a bench or the oor.
hazardous situation.
5) Service
a) Have your power tool
serviced by a qualied repair
person using only identical
replacement parts. This will
ensure that the safety of the
power tool is maintained.
Hammer safety warnings
a) Wear ear protectors. Exposure
to noise can cause hearing loss.
b) Use auxiliary handle(s), if
supplied with the tool. Loss
of control can cause personal
injury.
c) Hold the power tool by
insulated gripping surfaces,
when performing an
operation where the cutting
accessory may contact hidden
wiring or its own cord. Cutting
accessory contacting a "live"
wire may make exposed metal
parts of the power tool "live"
and could give the operator an
electric shock.
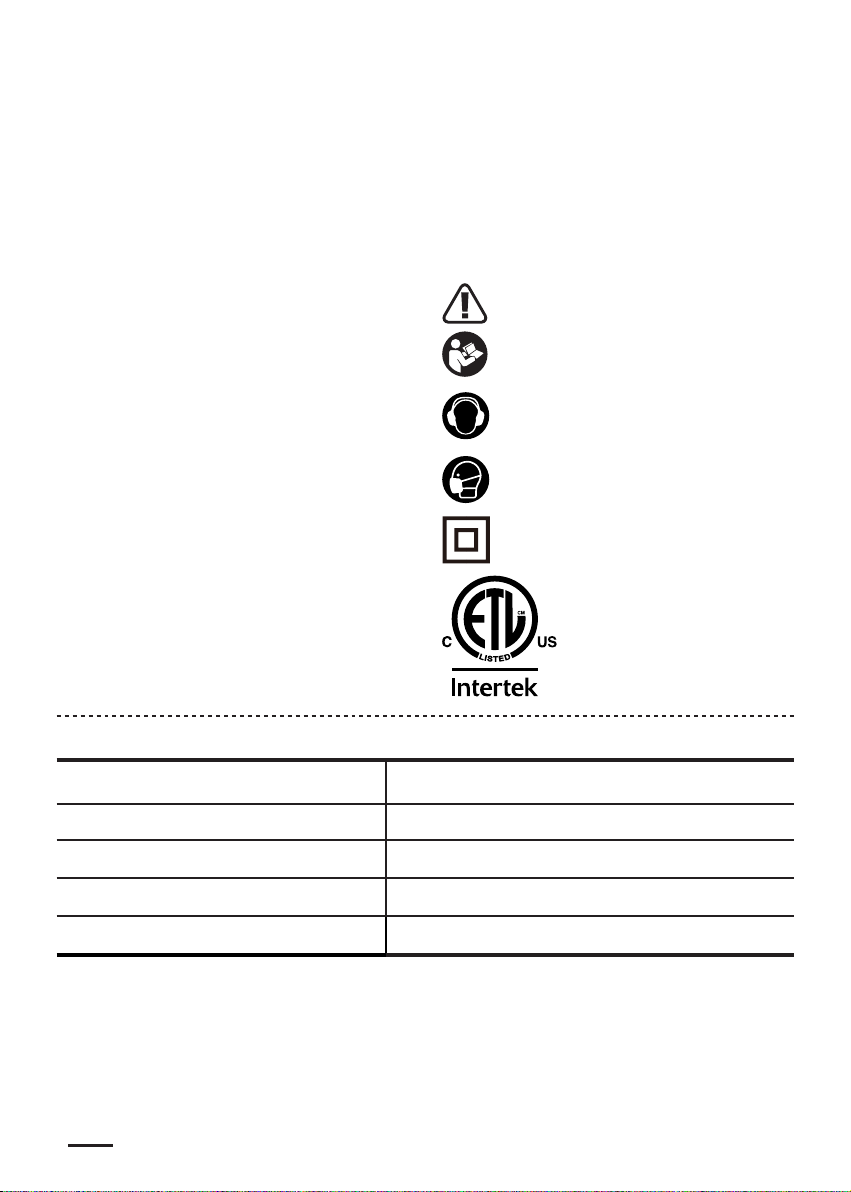
Wear dust mask
Symbol
To reduce the risk of injury, user must read
instruction manual
WARNING
Conformity of US and CANADA
Wear ear protection
Class II tool
Technical data
Model DZC05-26B/AZC05-26B/KZC05-26B(The letter “ZC”
means Hammer Drill)
Rated Voltage 120V~
Rated Frequency 60Hz
Rated Current 6.7A
Net Weight Of The Machine 6.4 lb(2.9kg)
7
EN
● Installing SDS-plus Hammer Drill Bit
SDS-plus hammer drill bit can be used when
drilling on the steel, wood or plastic.Screw the drill
chuck in the connecting rod and tighten the lock
screw. Then insert the connecting rod into the
collect in the same way as installing SDS-plus
hammer drill bit.SDS-plus hammer drill bit and drill
chuck are optional accessories.
1.Drill Chuck
2.Lock Screw
3.Connecting
Rod
1
23
● Installing /Removing Drill Bit
CAUTION:
● Always be sure that the tool is switched OFF and
unplugged before installing or removing the drill
bit.
● The SDS-plus drill bit will be o-center when
rotating with no-load, but it will align with the
center automatically during operation and its
precision won’t be aected.
Clean the bit shank and smear it with bit grease
before installation.
To install the drill bit (SDS-plus shank), fully pull
back the slide grip and insert the drill bit as far as it
will go while rotating.
1 2
1.Drill Bit
2.Slide Grip
By releasing the slide grip, the drill bit will be
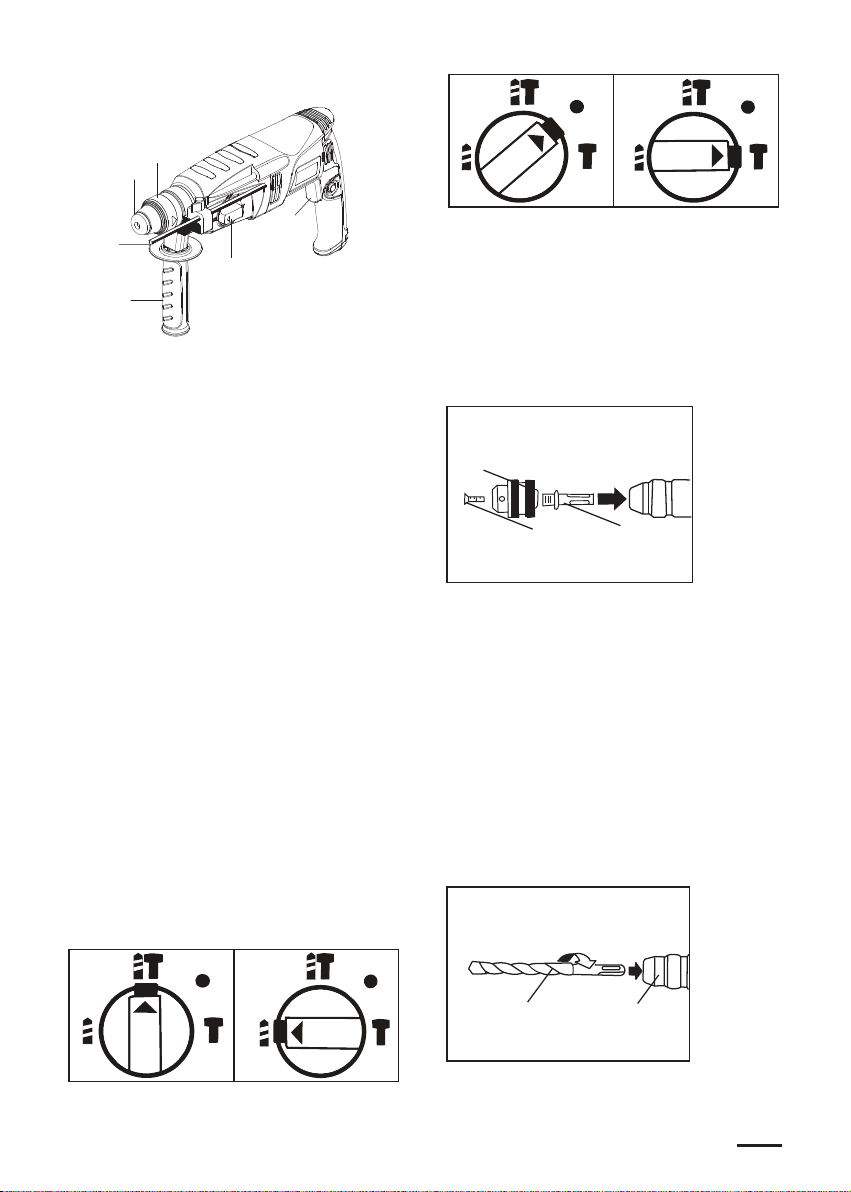
GENERAL DESCRIPTIONS
2
3
4
5
6
1
1. Locking Sleeve
2. Dust Cap
3. Depth Gauge
4. Auxiliary Handle
5. Operating Mode Selector
6. Switch
INSTRUCTIONS For
OPERATION
Setting Operating Mode
CAUTION:
● Always be sure that the tool is switched OFF
before changing the operating mode, or the
gears inside the tool maybe damaged.
● If the drill bit gets stuck by the steel hidden in
the wall during impact drilling, and the tool
rotates due to the kickback, hold the handle
and auxiliary handle firmly to avoid personal
injuries.
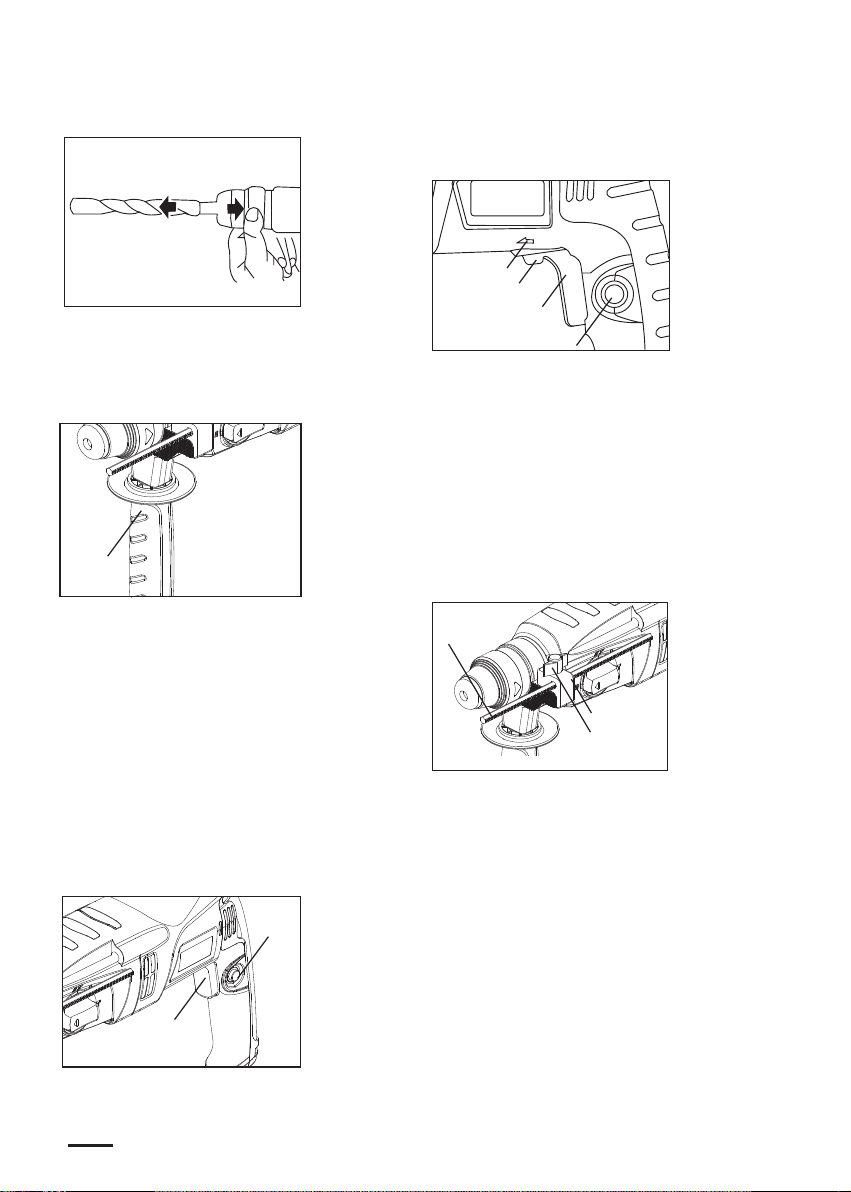
The Operating mode can be changed by turning
the operating mode selector.
Drilling Operation
When impact drilling on the concrete or stone,
turn the selector to the position as shown in the
figure.
When normally drilling on the wood, metal,
ceramics or plastic, turn the selector to the
position as shown in the figure.
8
EN
secured automatically.
To remove the SDS-plus drill bit, fully pull back
and hold the slide grip and the drill bit can be
removed.
● Auxiliary Handle
Always use the auxiliary handle ensure operating
safety. Loosen the auxiliary handle by turning it
counterclockwise, swing it to the desired position
and then tighten it by turning clockwise.
1.Auxiliary
Handle
1
●Switch Action
CAUTION:
●Before plugging in the tool, always check to see
that the trigger switch actuates properly and
returns to the “OFF” position when released.
To start the tool, simply pull the switch trigger.
Release the switch trigger to stop.
For continuous operation, pull the switch trigger
and then push in the lock lever.
To stop the tool from the locked position, pull the
switch trigger fully, and then release it. The rotating
speed of the tool becomes faster and faster until
it reaches the full speed during the process of
pressing the switch.
1.Trigger Switch
2.Lock Button
1
2
The switch of DZC05-26 is with positive and
negative going motion,which can be used to change
the tool’s direction of rotation. You can only change it
when the tool completely stops rotating, otherwise
the tool will be damaged. Set the direction of
rotation for hammer drilling, drilling and chiseling
always to right rotation.
1.Corotation
Arrow
2.Switch Lever
3.Switch Button
4.Lock Button
1
2
3
4
●Depth Gauge
CAUTION:
●The depth gauge cannot be used at the position
where he depth gauge strikes against the tool
body.
The depth gauge enables the drilling depth to be set
for convenient drilling holes of uniform depth.
Loosen the auxiliary handle, and insert the linear part
of the depth gauge into the tting hole of the clip
board.
Move the depth gauge to the desired depth and
secure it by rotating the auxiliary handle clockwise.
1.Depth Gauge
2.Wing Bolt
3.Clip Board
1
2
3
MAINTENANCE AND
INSPECTION
CAUTION:
●Always be sure that the tool is switched o and
unplugged before attempting to perform inspection or
maintenance.
●If the replacement of the supply cord is necessary,
this has to be done by the manufacturer or his agent in
order to avoid a safety hazard.
Inspecting Drill Bits
Blunt drill bit or chisel will decrease the work eciency
and causes the motor be overloaded. Exchange or
sharpen your drill bits when they become blunt.
Inspecting the Mounting Screws
Regularly inspect all mounting screws and ensure that
they are properly tightened.

9
EN
Should any of the screws be loose, retighten them
immediately. Failure to do so could result in serious
hazard.
Maintenance of the Motor
The motor unit winding is the very “heart” of the
power tool. Exercise due care to ensure the winding
does not become damaged and /or wet with oil or
water.
Inspecting and Replacing Carbon Brushes
Remove and check the carbon brushes regularly.
Replace when they wear down to the limit mark.
Keep the carbon brushes clean and free to slip in the
holders. Both carbon brushes should be replaced at
the same time. Use only identical carbon brushes.
Use a screwdriver to remove the brush holder caps.
Take out the worn carbon brushes insert the new
ones and secure the brush holder caps
Replacing Dust Cap
Replace the dust cap once it is damaged to avoid
chippings from getting into the collet.
Clean the collet regularly.
※If the replacement of the supply cord is necessary,
this has to be done by the manufacturer or his agent
in order to avoid a safety hazard.
※ To maintain product SAFETY and RELIABILITY,
repairs, any other maintenance or adjustment should
be performed by authorized centers, always using
original replacement parts.

10
EN
1 Dust Cap 31 Latch
2 Circlip For Shaft 16 32 Cylinder
3 Washer 33 Pin 2.5
4 Circlip 34 Clutch Plate
5 Locking Sleeve 35 Circlip For Cylinder Hole
6 Clamping Ring 36 Guide Sleeve
7 Steel Ball 9/32'(7.14) 37 O Ring For Damping
8 Clamping Plate 38 O Ring For Hammer
9 Compression Spring 39 Splice Sleeve
10 Retainer Sleeve 40 Circlip For Hole 25
11 O Ring 41 Striker
12 Frame Oil Seal 42 O Ring For Striker
13 Thrust Ring 43 Air Piston
14 Impact Lever 44 Washer (12×17.8×1.2)
16 Gear Housing 45 Piston Pin
17 Frame Oil Seal 46 Shaft Sleeve
18 Needle Bearing HK3012 47 Sealing Ring
19 Needle Bearing Cover 48 Bearing Retainer
20 Clamping Ring For Cylinder 49 Middle Bearing Bracket
26 Cross Recessed Pan Head Tapping
Screw ST4×37 50 O Ring (23.4×2.6)
27 Washer 51 Needle Bearing HK0709
28 Clutch Spring 52 Metal Sheet
29 Circlip For Shaft 53 Cross Recessed Pan Head Tapping Screw
ST4.2×17
30 Clutch Gear 54 Gear Shaft
Autres manuels pour DZC05-26B
1
Ce manuel convient aux modèles suivants
2
Table des matières
Langues :
Autres manuels Dongcheng Percer


