Digitroll XeedSystem Manuel utilisateur

THE
SEED MONITORING SYSTEM
ISOBUS application
USER MANUAL

Copyright information
2 |ISOBUS application – User manual for XeedSystem v1.2.3
Copyright information
© 2018 Digitroll Kft.
All rights reserved. No part of this publication may be reproduced, distributed, or transmitted
in any form or by any means, including photocopying, recording, or other electronic or
mechanical methods, without the prior written permission of the copyright owner, except in the
case of brief quotations embodied in critical reviews and certain other noncommercial uses
permitted by copyright law. For permission requests, write to the publisher, addressed
“Attention: Permissions Coordinator” at the address below.
Copyright owner:
Digitroll Ltd. Bánomkerti st. 63.
Hajdúszoboszló 4200, Hungary
E-mail:
Webpage:
www.digitroll.hu
Document:
Name: XeedSystem (v1.2.3) ISOBUS application User manual
Last modification: 2019.11.08
Printed in the EU.

Copyright information
ISOBUS application – User manual for XeedSystem v1.2.3
|3
Table of contents
Copyright information __________________________________ 2
1. System installation ________________________________ 4
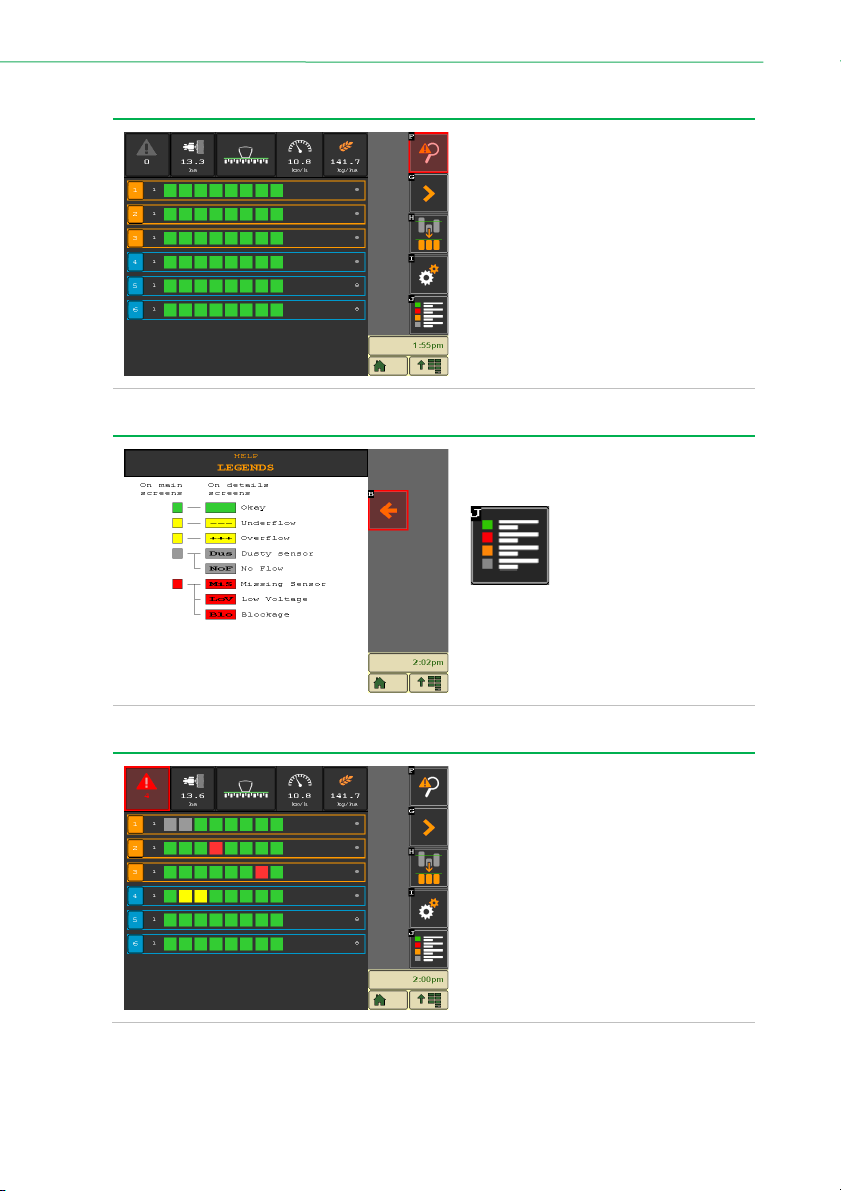
2. Main screen ______________________________________ 7
2.1 Legends __________________________________________ 7
2.2 Errors on the main screen ____________________________ 7
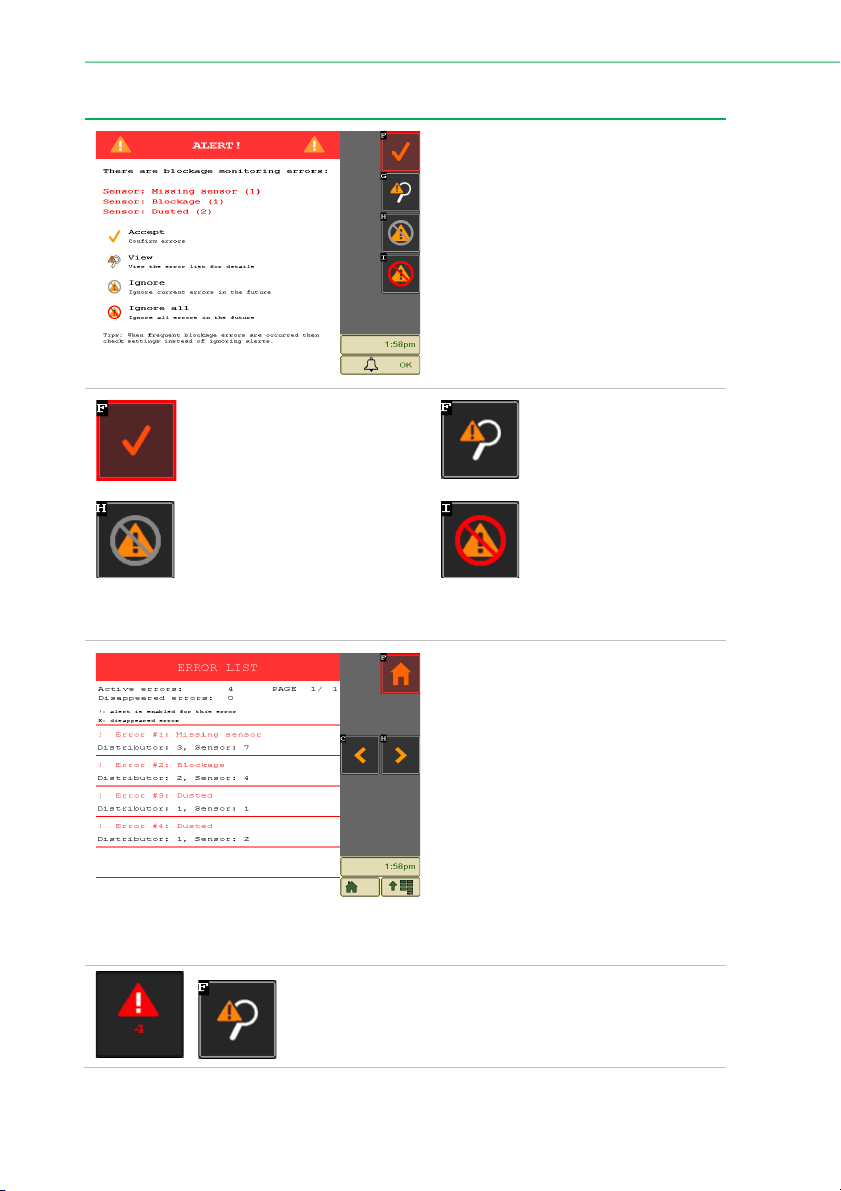
2.3 Alerts ____________________________________________ 8
2.4 Working position ___________________________________ 9
2.5 Area _____________________________________________ 9
2.6 Confirm performance _______________________________ 9
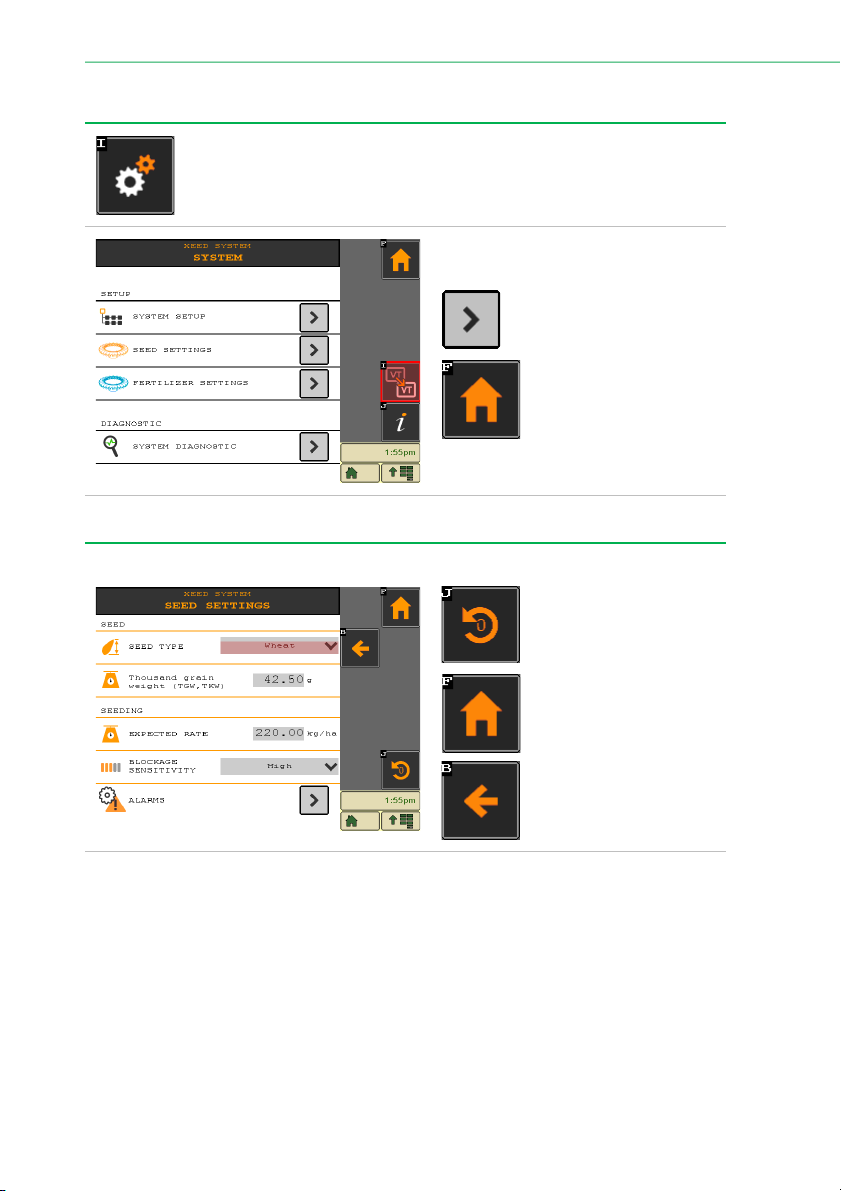
3. Settings ________________________________________ 10
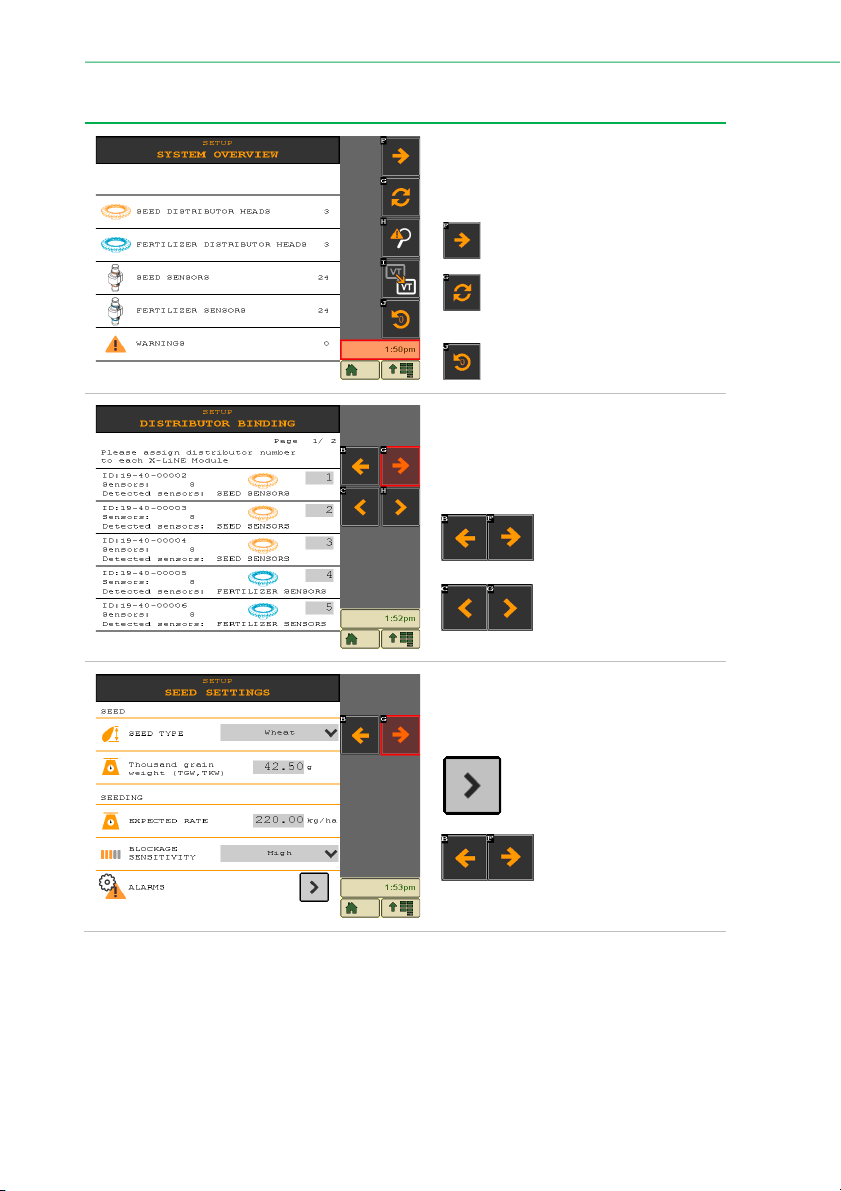
3.1 Seed settings _____________________________________ 10
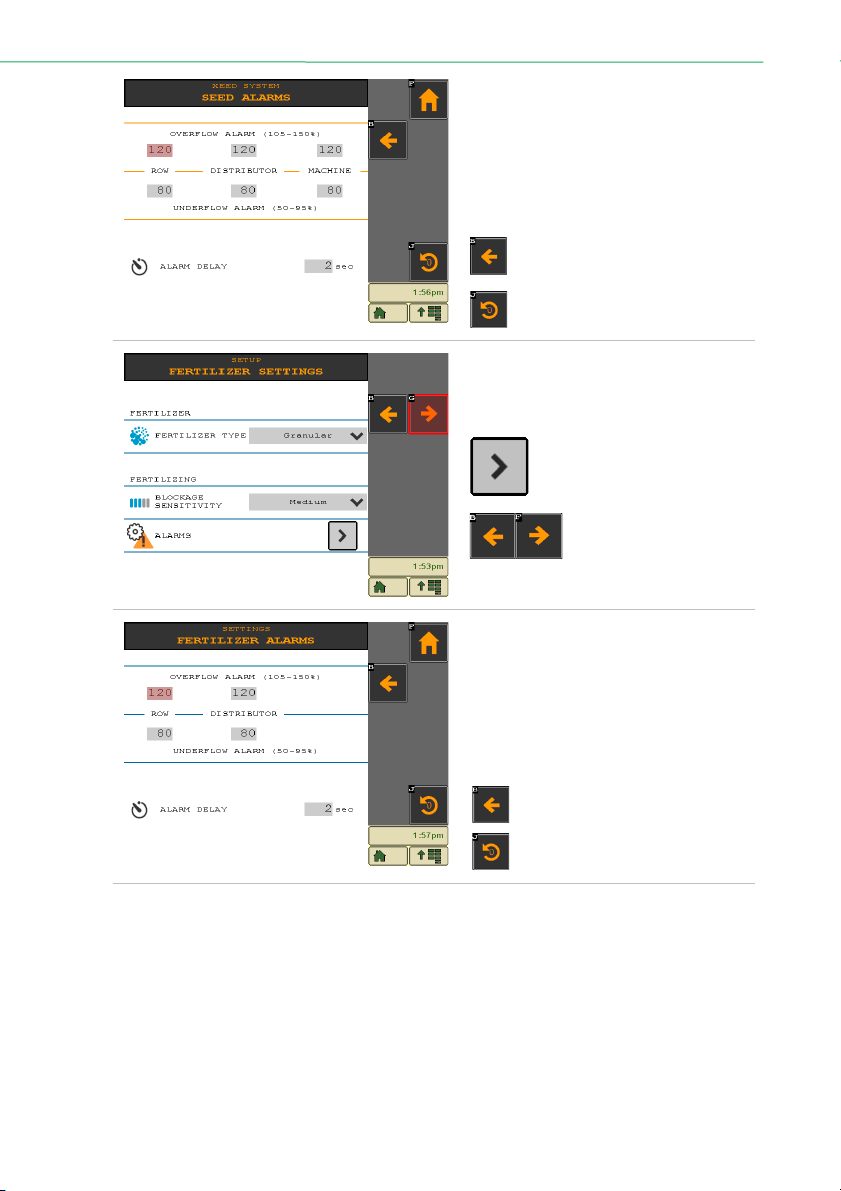
3.2 Fertilizer settings __________________________________ 11
3.3 System diagnostic _________________________________ 12
4. System settings __________________________________ 13
4.1 System overview __________________________________ 14
4.2 Machine settings __________________________________ 14
4.2.1 Speed calibration ____________________________________ 15
4.3 Distributor binding ________________________________ 15
4.4 Alarm settings ____________________________________ 16
4.4.1 Seed alarms _________________________________________ 16
4.4.2 Fertilizer alarms _____________________________________ 16
5. About __________________________________________ 17

System installation
4 |ISOBUS application – User manual for XeedSystem v1.2.3
1. System installation
The system installation’s first step.
The summary of the detected device’s
list can be seen here.
Press the
Next button
to
continue the installation.
Press the
Refresh button
to
refresh the detected device’s
list.
Press the
Reset button
to
perform a device reset.
The installation’s second step.
On this page the distributor head
numbers must be assigned to each X-
LiNE Module.
Use the
Back or Next
button
to go back or
continue the installation.
Use the paging button
to page through the
device’s list.
The installation’s third step.
The applied seed’s attributes must be
set for the best seed monitoring.
Press the Enter button to
access to the seed alarms
settings.
Use the
Back or Next
button
to go back or
continue the installation.

System installation
ISOBUS application – User manual for XeedSystem v1.2.3
|5
On the seed alarms settings the under
and overflow limits can be set.
The alarm delay can be set in seconds,
for how long the errors (blockage,
under/overflow) should persist
continuously before the system
indicates it.
Press the
Back button
to go
back to the seed settings.
Press the
Reset button
to reset
the alarm settings.
The system installation’s fourth step.
The applied fertilizer’s attributes must be
set.
Press the Enter button to
access to the seed alarms
settings.
Use the
Back or Next
button
to go back or
continue the installation.
On the fertilizer alarms settings the
under and overflow limits can be set.
The alarm delay can be set in seconds,
for how long the errors (blockage,
under/overflow) should persist
continuously before the system
indicates it.
Press the
Back button
to go
back to the fertilizer settings.
Press the
Reset button
to reset
the alarm settings.

System installation
6 |ISOBUS application – User manual for XeedSystem v1.2.3
The installation’s final step.
Press the “Start using XeedSystem” to
finish the installation and start using the
system.
Press the
Back button
to go
back to the fertilizer settings.

Main screen
ISOBUS application – User manual for XeedSystem v1.2.3
|7
2. Main screen
The ISOFLOW application’s main
screen.
Every orange rectangle represents a
seeder distributor head.
Every blue rectangle represents a
fertilizer distributor head.
The little squares inside the orange/blue
rectangles represent the sensors.
Different colors of the squares mean
different statuses. (see legend)
2.1 Legends
To access to the legends screen, press
the
Legends button
.
The legends screen helps to identify
every possible error and statuses on
the main screen.
2.2 Errors on the main screen
Every kind of error may appear on the
main screen (main screen).
To identify the different errors, check
the error list or the details screen.
By pressing the number of the
distributor heads, at the left side of the
distributor rectangle, the given
distributor head’s details screen can be
seen.

Main screen
8 |ISOBUS application – User manual for XeedSystem v1.2.3
2.3 Alerts
Every error occurrence causes an alert
screen.
The alert screen draws the operator’s
attention every time a new error occurs
in the system.
On this screen the occurred errors can
be seen in priority order, and the errors
can be managed, in terms of future
alerts.
Press the
Confirm button
to close
the alert screen.
Press the
Error list button
to see every error in a list,
and to get to know more
about the errors.
Press the
Ignore button
to ignore
the same errors on the given
sensor.
Press the
Ignore all button
to ignore every alert in the
future.
The Ignore and Ignore all buttons only ignore the alerts screen! The errors will be displayed
on the main screen and will appear in the error list as well.
On the error list the list of the errors can
be seen.
This screen’s purpose is to give more
information about the occurred errors
and from their location.
At the top of the screen a summary can
be seen about the Active and
disappeared errors.
The active errors are marked with a “!”
(exclamation mark) and sorted to the top
of the list.
The disappeared errors are marked with
an “x”.
The error screen can be accessed from the Alert screen, or
from the main screen by pressing one of the
Error list buttons.

Main screen
ISOBUS application – User manual for XeedSystem v1.2.3
|9
2.4 Working position
At the top middle of the main screen a working position icon can be seen. This
icon functions as a button as well.
If the machine is in working position but the system reports lifted working
position, with this quick button, the working position’s interpretation can be
changed.
2.5 Area
For precise area measurement it is crucial to set the working width and to
calibrate the speed properly.
These options can be set on the machine settings screen, which can be
accessed from the settings, or by pressing the area icon on the main screen.
By holding the area button (at least for 2 secs), the sowed area can be set to zero.
Press the
Back button
to
return to the main screen.
Press the “Go to Machine Settings” to
access the machine settings screen.
2.6 Confirm performance
In practice it might occur that the machine’s performance – application rate by
rows – is not consistent, there can be bigger differences between the rows.
If the operator is aware of this characteristic of the machine and wants to ignore
these bigger differences between, it can be done with the „
Confirm
performance” button
. Therefore, the actual machine performance will be accepted as
consistent.
To cancel the performance confirm, press the
Confirm performance button
again.

Settings
10 |ISOBUS application – User manual for XeedSystem v1.2.3
3. Settings
The settings can be accessed by pressing the
Settings button
on the main
screen.
From the settings screen various
options can be accessed.
Press the
Enter button
to
enter any of the setting’s
submenu.
Press the
Home button
to return to the main
screen.
3.1 Seed settings
The seed settings can be modified here.
Press the
Reset button
to
reset every seed option.
Press the
Home button
to return to the main
screen.
Press the
Back button
to
return to the settings
screen.
Autres manuels pour XeedSystem
1
Table des matières
Manuels Instrument de mesure populaires d'autres marques

Endress+Hauser
Endress+Hauser Proline Promag 50 Caractéristiques techniques

Siemens
Siemens SITRANS F Coriolis FCT030 Manuel de la liste des pièces

KLINGER
KLINGER CMF V Series Manuel utilisateur

EXFO
EXFO FTB-2 Manuel d'exploitation et d'entretien

Keysight
Keysight M8290A Manuel utilisateur

ADTEK
ADTEK MW-5 Manuel utilisateur


