digi-tech QP2308 Manuel utilisateur

Model:
Instruction Manual
Metal Detector
with Waterproof Coil
QP2308

Thanks for choosing our metal detector. With this metal detector, you can hunt for
coins, relics, jewelry, gold, and silver just about anywhere. The detector comes
with high sensitivity and strong ability of discrimination. It is versatile and easy
to use.
The detector’s features include:
LCD Display: Shows the probable type of metal, the depth of the target, range
of DISC, the level of SENS, and battery condition. It also has digital display for
target ID.
Three Tone Audio Discrimination: Sounds three distinctive tones (high,
medium and low) for different types of metal.
Seven Controls:
--POWER: Turns on or off the power.
--VOLUME/BACKLIGHT: Short press for adjusting volume level. Press it for about
2 seconds to turn on the backlight.
--MODE: Press it to select desired operation mode. There are four modes to be
selected from MODE indicator on LCD.
--INCREASE (+):To increase the level of volume, sensitivity and the range of
discrimination working with VOLUME, SENS and DISC.
--DECREASE (-):To decrease the level of volume, sensitivity and the range of
discrimination working with VOLUME, SENS and DISC.
--SENS: Adjusts the level of sensitivity working with “+” or “-” control button.
--PP: Pinpoints the location of the target accurately.
Headphone Jack: Lets you connect headphones of 3.5mm and operate without
trouble.
240mm Waterproof Search coil: Lets you use the detector even if you must put it
under shallow water.
Adjustable Shaft: Lets you adjust the length of shaft for comfortable use.
Power: The detector requires two 9-volt alkaline batteries (not incl.).
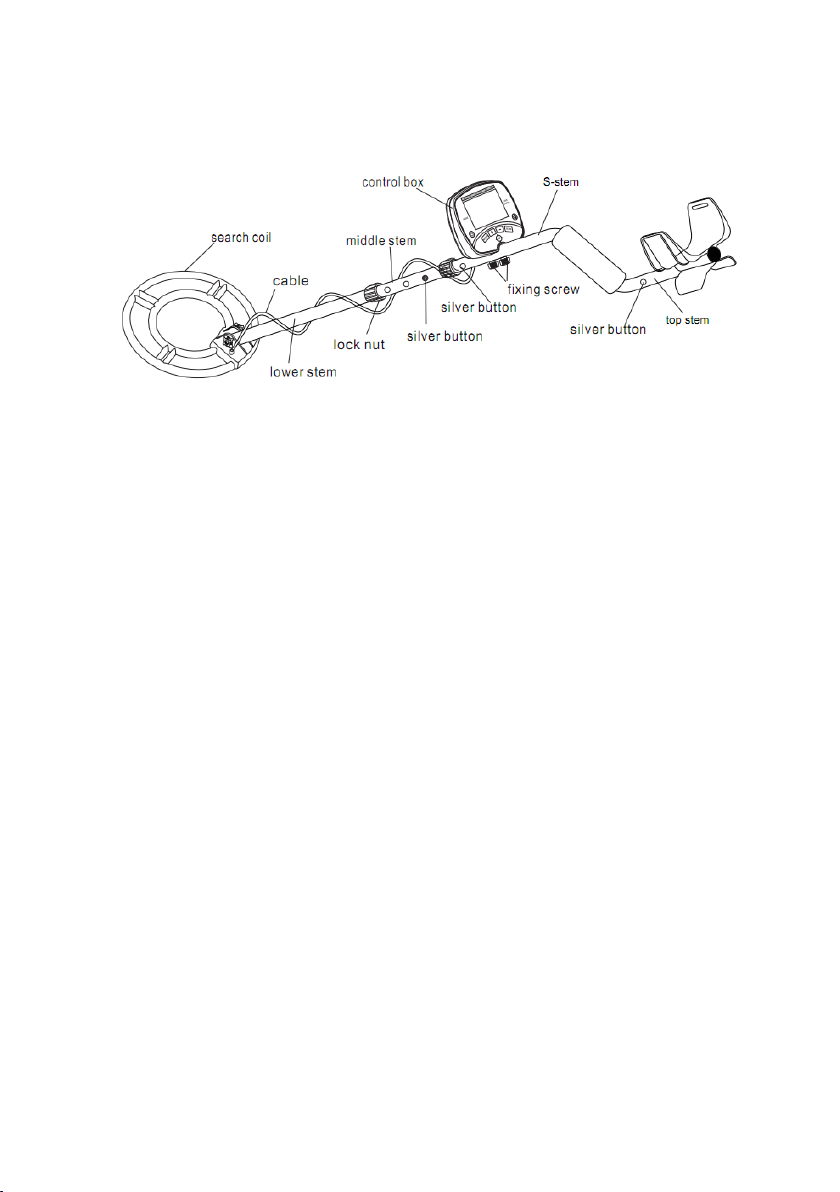
ASSEMBLING THE DETECTOR
Assembling your detector is easy and requires no special tools. Just follow these
steps:

1. Unscrew the fixing knob on the lower stem and remove the knob connector.
Place the washers into the groove of the lower stem. Then insert the stem and
align the holes on the search coil bracket and the stem. Push the connector
through the holes and tighten the knob.

2. Press the silver button in the lower stem, and slide the stem into the middle
stem.
3. Press the silver button in the middle stem, and slide the stem into the S stem.
Tighten the lock nut on the S stem.
4. Press the silver button in the top stem, and slide the top stem into the S stem.
5. Adjust the stem to a length that you feel comfortable when you stand upright with
the detector in your hand, and the search coil is level with the ground with your
arm relaxed at your side. Then counter-clockwise rotate to tighten the lock nut on
the middle stem.
6. Fix the control box on the S stem and tighten the fixing screw properly.
Wind the search coil cable around the stem. Insert the search coil’s cable plug into
the five-pin jack at the back of the control box.
Caution:
l Do not over-tighten the search coil or use tools such as pliers to tighten it.
l The search coil’s plug fits into the connector only in one way. Do not force the plug
and do not pull on the cable or you could damage it.
7. Stand and stretch your arm, holding the metal detector to make the search coil
above the ground for about 1 to 5 cm. Rotate the stem’s lock nut counterclockwise
to tighten it.
Spring clip

2. Slide the battery cover off in the direction of the arrow.
3. Place two 9V alkaline batteries into the battery compartment matching the
polarity symbols (+ and -) marked inside.
Note: The detector will maintain full performance until the batteries need to be
replaced. Replace batteries when there is no segment remaining on battery level
indicator. Alkaline batteries should be used.
Warning:
l Dispose of old batteries properly. Never bury or burn them.
Cautions:
l Use only fresh alkaline batteries of required size.
l Do not mix the old and new batteries or different types of batteries.
l If you don’t plan to use the detector for a week or more time, remove the
batteries. Batteries can leak chemicals that can destroy electronic parts.
USING HEADPHONES
1. It is recommended to choose the headphones with volume control.
2. Insert the headphones’ 3.5mm plug into the headphone jack at the bottom of
the control box. At this time the internal speaker disconnects.
INSTALLING THE BATTERIES
1. Turn off the power before installing the batteries.

CONTROL PANEL
1. LCD DISPLAY
2. CONTROL BUTTONS
POWER : Press the button to power on the detector. Press it again to
power off the detector.
VOLUME/BACKLIGHT : Short press for adjusting volume level. Press

it for about 2 seconds to turn on the backlight. Long press again to turn
off the backlight.
Note: As the backlight consumes more power, it’s better to turn off it in light
places.
MODE : There are four modes to be selected from MODE indicator on
LCD.
SENS : Used to adjust sensitivity level. Press SENS, then press + or -
button to increase or decrease the sensitivity. The level will be displayed on
the LCD.
INCREASE (+) : To increase the level of sensitivity and the range of
discrimination working with SENS and DISC.
DECREASE (-) : To decrease the level of sensitivity and the range of
discrimination working with SENS and DISC.
PP : Pinpoints the location of the target accurately.
SEARCH MODES
The detector includes four search modes: A/M (ALL METAL), DISC
(DISCRIMINATION), MEMORY, JEWELRY. Select the mode that suits the targets
you hope to find.
• A/M (ALL METAL) Mode
This mode is designed to detect all types of metal.
• DISC (DISCRIMINATION) Mode
The DISC mode can eliminate the unwanted metal targets and works with “+”.
• MEMORY
The detector is designed to detect the only memorized metal target.
• JEWELRY Mode
This does not mean that the detector will search only for jewelry while in

JEWELRY Mode. It simply indicates that the discrimination pattern is optimized
for locating most jewelry items. The JEWELRY mode will still find coins, relics and
other non-jewelry items. It ignores most nails and small iron pieces automatically.
OPERATION
Step 1. Turning on the detector
Press POWER button to turn on the detector.
After about 2 seconds the detector enters into stand-by state. LCD displays four
modes indicator, SENS level, and battery level.
Note: If no button is pressed or no target is detected within about 15 minutes,
the detector will turn off automatically.
Step 2. Testing and using the detector
To learn how the detector reacts to different metals, you should test it before
you use it the first time. You can test the detector indoors and outdoors.
Indoor Testing and Use
1. Press power button to turn on the detector.
2. Setting the operation mode
(1) A-M (ALL METAL) mode:
Press MODE to select A-M (ALL METAL) mode. A-M is displayed on LCD. This
means ALL METAL mode is selected. You can detect all kinds of metal.
(2) DISC (DISCRIMINATION) Mode

The DISC mode can eliminate the unwanted metal target(s) and works with
“+”.
a. Press MODE to select DISC. DISC is displayed on LCD. This means DISC
mode is selected.
b. Press “+” to eliminate the unwanted target(s) in sequence from left to
right. The eliminated target icon(s) will disappear on LCD. The detector
will not detect such target(s).
User can select several targets to be eliminated by using DISC mode.
But silver target such as one dollar coin or 25 cent can’t be eliminated.
Because they are valuable.
c. To pick up the eliminated target ID, simply press “–” and the recovered
target icon(s) will be displayed again on LCD.
(3) MEMORY Mode
Press MODE to select MEMORY. MEMORY is displayed on LCD. This means
MEMORY mode is selected.
This mode is designed to detect the only memorized metal target. For
example, if you want to find 1cent coin, sweep a sample of 1cent over the
search coil. The detector will memorize the target. LCD only displays the

memorized target icon and other target icons will be removed. In this case the
detector will only detect 1cent coin and will have no response to other metal
targets.
(4) JEWELRY Mode
Press MODE to select JEWELRY. JEWELRY is displayed on LCD. This means
JEWELRY mode is selected.
The JEWELRY mode is designed to find jewelry such as rings, bracelets,
necklaces. It also can find coins, relics and other non-jewelry items. It
ignores most nails and small iron pieces automatically. Iron target ID will not
appear on LCD. In this mode, the detector will not respond to iron. If you
don’t want to detect iron, you can use JEWELRY mode for detection.
Step 3. Adjusting sensitivity
Press SENS, then + or – to increase or decrease the sensitivity.
Step 4. Place the detector on a wooden or plastic table, then remove any watches,
rings, or metal jewelry you are wearing.
Step 5. Adjust the search coil so the flat part points towards the ceiling.
Note:
Never test the detector on a floor inside a building. Most buildings have
metal of some kind in the floor, which might interfere with the objects
you’re testing or mask the signal completely.
Table des matières
Autres manuels digi-tech Détecteur de métaux
Manuels Détecteur de métaux populaires d'autres marques

Steinberg Systems
Steinberg Systems SBS-MD-22 Manuel utilisateur

Zircon
Zircon MetalliScanner m60c Manuel utilisateur

nalanda
nalanda MD027 Manuel utilisateur

REV Ritter
REV Ritter CB-7005 Manuel utilisateur

Minelab
Minelab F1A4 Manuel utilisateur

Fisher Research Labs
Fisher Research Labs F70 Manuel utilisateur

Steinberg Systems
Steinberg Systems SBS-MD-12 Manuel utilisateur

GOLDEN MASK
GOLDEN MASK 5 Manuel utilisateur

Grizzly
Grizzly YM 203 Manuel utilisateur

Fisher Research Labs
Fisher Research Labs 1280-X Aquanaut Manuel utilisateur

Treasure Cove
Treasure Cove Vibra-Probe 560 Manuel utilisateur

Accurate Locators
Accurate Locators XL16 IMAGER Manuel utilisateur


