Diesel FL137AX Manuel utilisateur

DIGITAL MOVEMENT GUIDE................2
INSTRUCTION
English . . . . . . . . . . . . . . . . . . . . . . . . . . . . . . . . . . . . . . . 4
Italiano ......................................16
Deutsch .....................................29
Français .....................................42
Español .....................................55
Português....................................68
Svenska .....................................81
Русский.....................................94
日本語 .....................................107
中文 .......................................121
繁體中文 ...................................133
한국어......................................145
WARRANTY
English . . . . . . . . . . . . . . . . . . . . . . . . . . . . . . . . . . . . .157
Italiano .....................................159
Deutsch ....................................160
Français ....................................162
Español ....................................164
Português...................................167
Svenska ....................................169
Русский....................................170
日本語 .....................................172
中文 .......................................174
繁體中文 ...................................175
한국어......................................177
Service Centers .............................179
Certificate of Warranty ........................185
NOTICES ......................................187

2 3
DIGITAL MOVEMENT GUIDE / GUIDA AL MOVIMENTO
DIGITALE / DIGITALES UHRWERK – LEITFADEN / GUIDE DU
MOUVEMENT NUMÉRIQUE / GUÍA DE MOVIMIENTO DIGITAL
/ GUIA DIGITAL DE MOVIMENTO / ANVISNINGAR FÖR
ANVÄNDNING AV DIGITALA FUNKTIONER / ИНСТРУКЦИЯ ДЛЯ
ЦИФРОВЫХ МОДЕЛЕЙ / デジタルムーヴメントガイド / 数字型机芯指南 /
數位顯示機芯之說明 / 디지털 무브먼트 가이드
FL137AX, QFOX21CA
DZ7125 - DZ7127, DZ7193, DZ7194, DZ7214,
DZ7221, DZ7223, DZ7234, DZ7246, DZ7247,
DZ7250, DZ7260
(for digital display only)
MLL-045
DZ7092
QFL226
DZ7130, DZ7131, DZ7150
QFL631
DZ7164

4 5
ENGLISH
IMPORTANT TO KNOW!
• When the watch is underwater or wet, never use the pushers/bezels, or set the time. Watch cases
and metal bracelets should be rinsed thoroughly in fresh water after being in salt water.
• No hot tub/sauna. Please do not take your DIESEL watch into the hot tub/sauna. The combination of
extreme heat and water may cause your watch to lose some of its water-resistance.
• No backward hand, or date, adjustments should be made when the analog hands read between 8pm
and 3am. At these times, the gears are too close together and such a change could cause damage.
• Tighten screwlock crown completely.
• Always set the crown in the normal position.
Resistance to Water
Depth WATER-RESISTANT
3 BAR (30 M) WATER-RESISTANT
5 BAR (50 M) WATER-RESISTANT
10 BAR (100 M)
Caseback marking 3 ATM 5 ATM 10 ATM
Light spray, perspiration,
light rain, etc. OK OK OK
Bathing, etc. NO OK OK
Swimming, etc. NO NO OK
Skin diving (diving
without oxygen cylinder) NO NO OK
Water-resistant
characteristics Normal daily
water contact.
Suitable for bathing,
but cannot be worn for
swimming or diving.
Suitable for skin
diving.
Day/Date Watch 2305
DATE SETTING
1. Pull crown out to position 2.
2. Turn clockwise and set date for previous day.
DAY SETTING
With crown still in position 2, turn counter-clockwise and set
day for previous day.
TIME SETTING
1. Pull crown out to setting 3.
2. Turn counter-clockwise to advance time and continue until
day/date changes to present day.
3. Set correct time.
4. Push crown back to position 1.
2
13
DATE
DAY
Date Watch VJ22A31, 505.2-3, 515.2-3, 585.2, 2115, 2117, 2315
DATE SETTING
1. Pull crown out to position 2.
2. Turn counter-clockwise and set date for previous day.
TIME SETTING
1. Pull crown out to setting 3.
2. Turn counter-clockwise to advance time and continue until
day/date changes to present day.
3. Set correct time.
4. Push crown back to position 1.
2
13
DATE

6 7
Multifunction 6P25
DATE SETTING
1. Pull crown out to position 2.
2. Turn counter-clockwise to select date.
DAY AND TIME SETTING
1. To set time, pull crown out to position 3.
2. Turn clockwise to set hour and minute hands. The hand showing days of the week will also move
with the hour and minute hands. Keep turning until you have reached the desired day.
3. Push crown back to position 1.
2
13
DAY
DATE
2
13
DAY
DATE
Chronograph with Date FS20
TIME SETTING
1. Pull crown out to position 3. Chronograph second hand will return to zero position. Do not return
the crown to its normal position while the hands are returning to zero, or else the position the
hands are at when this is done will be recognized as the new zero position.
2. Turn to set hour, minute and 24 hour hands.
3. Return crown to position 1.
DATE SETTING
1. Pull crown out to position 2.
2. Turn clockwise to set the date.
3. Return crown to position 1.
CHRONOGRAPH OPERATION
1. Push A to start/stop the chronograph.
2. Push B to reset the chronograph.
CHRONOGRAPH ZERO RESET
1. Pull crown out to position 3.
2. Press A to set the chronograph second hand to 12:00 (zero) position. Each press advances
the chronograph second hand one mark. If A is held down for over 2 seconds, the chronograph
second hand advances continuously.
3. Return crown to position 1.
B
A
2
13
CHRONOGRAPH
SECOND HAND
CHRONOGRAPH
MINUTE HAND
24-HOUR HAND
DATE
SECOND HAND

8 9
Chronograph JS15, JS16, JS25
TIME AND DATE SETTING
1. Pull crown out to position 2.
2. Rotate crown clockwise until the previous day’s date is shown in the date window.
3. Pull crown out to position 3.
4. Rotate crown clockwise until the correct date is shown in the date window.
5. Continue to rotate crown to set correct am/pm time.
NOTE: The movement of the 24-hour hand corresponds to the hour and minute hands. When
setting the time be sure to check that the 24-hour hand is set properly.
6. Return crown to position 1.
NOTE: When the crown is in position 2, do not press the pushers. Otherwise the chronograph
hands will move.
NOTE: Do not set the date between 9:00 p.m. and 1:00 a.m. to ensure accuracy.
CHRONOGRAPH
1. Press A to start/stop the chronograph.
2. Press B to reset to zero.
CHRONOGRAPH ZERO RESET
1. If either of the chronograph hands is not at the zero (12:00) position, pull crown out to position 3.
2. Press A to move hands clockwise; press B to move hands counter-clockwise. Each press of A or
B will move the chronograph hands by one increment/decrement. Or press and hold A or B for fast
increment/decrement.
3. When both hands are in the zero position, reset time and return crown to position 1.
NOTE: Chronograph minute hand will synchronize with chronograph second hand during
chronograph zero reset.
B
A
2
13
CHRONOGRAPH
SECOND HAND
CHRONOGRAPH
MINUTE HAND
24-HOUR HAND
B
A
2
13
CHRONOGRAPH
MINUTE HAND
24-HOUR HAND
CHRONOGRAPH
SECOND HAND
Chronograph Stopwatch VD57B, VD57B1B
TIME SETTING
1. Pull crown out to position 3.
2. Set time by turning the crown clockwise.
3. Push back to position 1 to start the watch.
USING THE STOPWATCH
1. Press A to start/stop the stopwatch.
2. Press B to control the split time and reset.
STOPWATCH HAND ADJUSTMENT
1. Pull crown out to position 3.
2. Press A to reset the stopwatch 1/10 second hand to the “0” position.
3. Press B to reset the second and minute hands. The hands only move clockwise.
4. With each press of A or B, the hands move one position. They move quickly if the pushers are
held down.
NOTE: If the stopwatch hands function improperly, pull out crown and press A and B at the same
time for over 2 seconds. When the pushers are released, the stopwatch second and 1/10 second
hands will spin around and return to “0.” This will indicate that the internal circuit has been reset.
DATE SETTING (on some models only)
1. Pull crown out to position 2.
2. Turn clockwise until desired date appears in window.
3. Push crown back to position 1.
B
A
2
13
MINUTE HAND
1/10 SECOND HAND
SECOND HAND
10 11
Chronograph Stopwatch VD53, VD53B
TIME AND DATE SETTING
1. Before setting the time, make sure the chronograph is stopped and set to zero (12:00) position.
2. Pull crown out to position 2.
3. Turn crown clockwise until the previous day’s date is displayed.
4. Pull crown out to position 3 when the second hand is at the 12:00 position.
5. Turn crown to set time.
NOTE: The movement of the 24-hour hand corresponds to the hour and minute hands. When setting
the time be sure to check that the 24-hour hand is set properly.
6. Return crown to position 1.
NOTE: When the crown is in position 2, do not press the pushers. Otherwise the chronograph hands
will move.
CHRONOGRAPH
1. Press A to start/stop the chronograph.
2. Press B to reset to zero.
SPLIT TIME
1. Press B while the chronograph is running.
2. Press B again to return to the chronograph.
3. Press A to finalize timing.
4. Press B to reset.
CHRONOGRAPH ZERO RESET
1. If either of the chronograph hands is not at the zero (12:00) position, pull crown out to position 3.
2. Press A to move hands clockwise; press B to move hands counter-clockwise.
3. Return crown to position 1.
B
A
2
13
24-HOUR HAND
MINUTE HAND
SECOND HAND
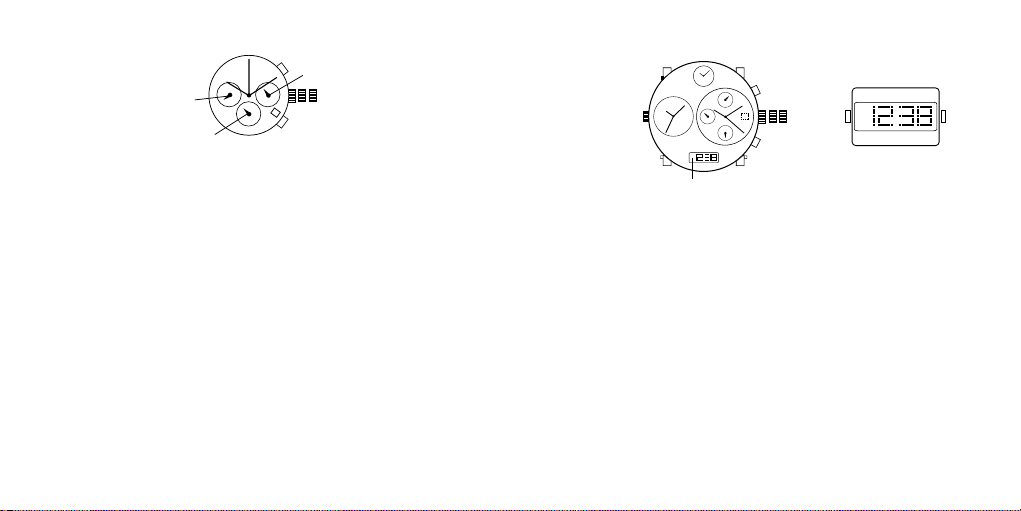
Digital FL137AX, FL137AB, QFOX21CA, QFOX21CB
NORMAL TIME DISPLAY
1. Press A to change display. Display sequence is time, calendar, seconds.
2. Press B to toggle 12/24-hour format.
TIME AND DATE SETTING
1. Press and hold B for 2 seconds to enter setting mode; year will begin flashing.
2. Press A to advance digit; press and hold A for fast advance.
3. Press B to set and advance to next setting value.
4. Setting sequence is year, month, date, hour, minute.
5. Press B to exit setting mode.
NOTE: Hour will be displayed in 24-hour format in time setting mode.
NOTE: If no pusher/button is operated for 30 seconds, all changes will be saved and the setting
will automatically return to display mode.
Digital FL137AX / QFOX21CA / QFOX21CB
Digital FL137AB
B A
BA
2
13

12 13
MODE A
SET/EL B
MODE C
START/STOP D
LAP/RESET
REAL TIME SET (hold for
2 seconds) TO
CHRONOGRAPH TOGGLE TIME1/
TIME2 KEY TONE ON/
OFF
TIME SETTING EXIT NEXT ADVANCE DECREMENT
CHRONOGRAPH MEMORY
RECALL TO TIMER START/STOP LAP/RESET
MEMORY
RECALL NEXT LAP TO TIMER TO CHRONO-
GRAPH TO
CHRONOGRAPH
TIMER SET (hold for
2 seconds) TO ALARM START/STOP RESET
TIMER SETTING EXIT NEXT ADVANCE DECREMENT
ALARM TIME SET (hold for
2 seconds) TO REAL TIME NEXT ALARM ALARM ON/OFF
ALARM SETTING EXIT NEXT ADVANCE DECREMENT
OVERVIEW
Features include DUAL TIME/DATE, CHRONO, TIMER, ALARM, and LIGHT UP EL.
LIGHT-UP EL
Press A to activate light-up function for 3 seconds.
TIME OF DAY MODE
- Press C to toggle between Time 1 and Time 2.
Alarm on
Hourly chime on
Automatic EL
Key tone
Chronograph
B
A
C
D
Count stop
Count repeat
Count up
Digital QFL226DB - Hold C for two seconds to set Time 1 or 2 as default.
- Press D to turn on/off key tone.
Time 1
- To set Time, press A until hour flashes. Press B to select the setting item. Use C and D buttons to adjust
the values up or down. Press A to exit set mode.
Time 2
- To set Time, press A until hour flashes. Press B to select the setting item. Use C and D buttons to adjust
the values up or down. Press A to exit set mode
- The range difference between Time 1 and Time 2 is 23 hours.
CHRONO MODE
- Press C to start and stop chronograph.
- Press D to Split/Reset the chronograph.
- Press A to recall the memory if Chronograph is stopped.
- Press A again to view the next lap.
- Press C or D to exit Recall mode and go back to Chronograph mode.
- There are a total of 10 lap memories.
TIMER MODE
- There are 3 different modes of timer: Count Down-Stop, Count Down-Repeat, Count Down-and Up.
- Press C to start/stop the timer counting.
- Press D to reset the counter to the preset value if timer is stopped.
- Press and hold A for 2 seconds to enter Timer Setting Mode.
Timer Setting Mode
- Press B to cycle around the setting item: timer-type, hour, minute, second and to back timer-type again.
- Press C and D to increase/decrease the setting value.
- Press A to exit the setting mode.
Timer Alarm
- Timer alarm will beep 2 times a second for 30 seconds.
ALARM MODE
- Press C to select the alarm.
- Press D to enable/disable the alarm.
- Press B to change to Time mode again.
Alarm Setting Mode
- Press and hold A for 2 seconds to enter the alarm settings mode.
- Press C and D to increase or decrease the settings value.
- Press A to exit the settings mode.

14 15
Curved LED Digital MLL-045
NORMAL TIME DISPLAY
1. Press B for time display and animation.
2. Press B again to toggle time/date mode.
3. When time or date is displayed, press and hold B for 3 seconds to
toggle horizontal/vertical display.
TIME AND DATE SETTING
1. From time display, press and hold A; 12/24 hour format will begin
flashing.
2. Press B to select 12/24 hour format.
NOTE: In 12 hour format, a small dot will be shown in the upper left
hand corner of the display to indicate p.m. time.
3. Press A to set and advance to hour.
4. Press B to advance digit.
5. Press A to set and advance to next setting value.
6. Setting sequence is: 12/24 hour format, hour, minutes, date, month.
7. Press A to save and exit setting mode.
NOTE: If no pusher is operated for 7 seconds, settings will be saved
and the display will return to normal time display.
PERSONAL MESSAGE SETTING
1. Press B to display time, press B again to display date, press and hold
A; first letter of message will begin flashing.
2. Press B to select character.
3. Press A to set and advance to the next character.
4. Repeat steps until desired message. Please note there are only ten
spaces available.
B
A
Curved LED QFL631
NORMAL TIME DISPLAY
1. Press B for time display.
2. Press B again immediately for date display.
3. After time or date display, message will scroll. Display will
automatically turn off after message scrolling is complete.
TIME AND DATE SETTING
1. Press and hold A for 2 seconds to enter setting mode; 12/24-hour
format will begin flashing.
2. Press B to select 12/24 hour format.
3. Press A to advance to hour.
4. Press B to increase digits; press and hold B for fast advance.
5. Press A to advance to next setting value.
6. Setting sequence is: 12/24-hour format, hour, minutes, year,
month, date
7. Press A to save and exit setting mode.
NOTE: If no pusher is operated for 7 seconds, settings will be
saved and the display will automatically turn off.
MESSAGE SETTING
1. In calendar mode, press and hold A for 2 seconds to enter setting
mode; first character will begin flashing.
2. Press B to change the character.
3. Press A to advance to next character.
NOTE: Maximum message length is 10 characters.
B
A

16 17
Orologio con Giorno/Data Movimento 2305
IMPOSTAZIONE DELLA DATA
1. Estrarre la corona fino alla posizione 2.
2. Girare in senso orario e impostare la data al giorno precedente.
IMPOSTAZIONE DEL GIORNO
Mantenendo la corona in posizione 2, girare in senso antiorario e
impostare il giorno al giorno precedente.
IMPOSTAZIONE DELL’ORA
1. Estrarre la corona fino alla posizione 3.
2. Girare in senso antiorario per avanzare l’ora; continuare fino a
quando la data/giorno si aggiorneranno alla data attuale.
3. Fissare l’ora esatta.
4. Spingere la corona fino alla posizione 1.
ITALIANO
INFORMAZIONI IMPORTANTI!
• Quando l’orologio è sott’acqua o bagnato non utilizzare mai pulsanti /corone né impostare l’ora. Si
consiglia di sciacquare con acqua di rubinetto cassa e bracciale dell’orologio nel caso in cui siano
stati immersi in acqua salata.
• Evitare bagni caldi/sauna. Non indossate il vostro orologio DIESEL in bagni caldi o sauna. La
combinazione di calore elevato e acqua potrebbe causare al vostro orologio perdita di capacità di
impermeabilità.
• Non effettuare impostazioni all’inverso, né modifiche di data quando le lancette si trovano fra le
ore 20:00 e le 03:00. Durante queste ore gli ingranaggi sono troppo vicini e tale cambiamento
d’impostazioni potrebbe causare danni.
• Chiudere completamente la corona a vite.
• Riposizionare sempre la corona in posizione normale.
Resistenza all’acqua
Profondità
RESISTENTE
ALL’ACQUA
3 atmosfere (30 M)
RESISTENTE
ALL’ACQUA
5 atmosfere (50 M)
RESISTENTE
ALL’ACQUA
10 atmosfere (100 M)
Indicazioni sul fondello 3 ATM 5 ATM 10 ATM
Pioggia leggera,
traspirazione, spray, ecc. OK OK OK
Bagno, doccia, ecc. NO OK OK
Nuoto, ecc. NO NO OK
Apnea (immersioni
senza bombole) NO NO OK
Caratteristiche
impermeabilità
Utilizzo giornaliero
dell’orologio a
contatto con acqua.
Utilizzabile per
fare il bagno, ma
non utilizzabile
per nuotare o fare
immersioni.
Adatto alle
immersioni.
Data Movimento VJ22A31, 505.2-3, 515.1-3, 515.2-3, 585.2, 715-2, 2115, 2117, 2315
IMPOSTAZIONE DELLA DATA
1. Estrarre la corona fino alla posizione 2.
2. Girare in senso antiorario e fissare la data al giorno precedente.
IMPOSTAZIONE DELL’ORA
1. Estrarre la corona fino alla posizione 3.
2. Girare in senso antiorario per far avanzare l’ora e continuare così
fino a che la data/giorno cambiano al giorno attuale.
3. Fissare l’ora corretta.
4. Spingere la corona fino alla posizione 1.
2
13
DATA
2
13
DATA
GIORNO

18 19
Multifunzione a due settori 6P25
IMPOSTAZIONE DELLA DATA
1. Tirare in fuori la corona portandola nella posizione 2.
2. Ruotarla in senso antiorario per selezionare la data.
IMPOSTAZIONE DEL GIORNO E DELL’ORA
1. Per impostare l’ora, tirare in fuori la corona portandola nella posizione 3.
2. Ruotare la corona in senso orario per impostare le lancette dell’ora e dei minuti. La lancetta indicante
il giorno della settimana si sposterà insieme alle lancette delle ore e dei minuti. Continuare a ruotare
la corona fino a quando non si raggiunge il giorno desiderato.
3. Premere indentro la corona per riportarla nella posizione 1.
2
13
GIORNO
DATA
2
13
GIORNO
DATA
Cronografo con Data FS20
IMPOSTAZIONE DELL’ORARIO
1. Estrarre la corona e portarla in posizione 3. La lancetta dei secondi del cronografo tornerà
in posizione zero. Non riportare la corona nella posizione normale mentre le lancette tornano
nella posizione zero. In caso contrario, la posizione in cui si trovano le lancette durante questa
operazione, verrà riconosciuta come la nuova posizione zero.
2. Ruotare la corona per impostare le lancette delle ore, dei minuti e delle 24 ore.
3. Riportare la corona in posizione 1.
IMPOSTAZIONE DELLA DATA
1. Estrarre la corona e portarla in posizione 2.
2. Ruotarla in senso orario per impostare la data.
3. Riportare la corona in posizione 1.
FUNZIONAMENTO DEL CRONOGRAFO
1. Premere A per avviare/arrestare il cronografo.
2. Premere B per azzerare il cronografo.
AZZERAMENTO DEL CRONOGRAFO
1. Estrarre la corona e portarla in posizione 3.
2. Premere A per impostare la lancetta dei secondi del cronografo alle 12:00 (posizione zero). Ad
ogni pressione la lancetta dei secondi del cronografo avanza di una posizione. Se il tasto A viene
tenuto premuto per oltre 2 secondi, la lancetta dei secondi del cronografo avanza continuamente.
3. Riportare la corona in posizione 1.
B
A
2
13
LANCETTA DEI SECONDI
CRONOGRAFO
LANCETTA DEI MINUTI
CRONOGRAFO
LANCETTA 24 ORE
DATA
LANCETTA DEI SECONDI
Ce manuel convient aux modèles suivants
21
Table des matières
Langues :
Autres manuels Diesel Montre


