Dewey DCS1A Manuel utilisateur

DCS1A_DCS2A - Version B - 10 June 2014 - Copernicus Educational Products Inc.
Please Recycle
Assembly Guide
DCS1A_DCS2A_2014_B
Check out our other products online at
www.copernicused.com
?This product is meant to be assembled by an adult.
?In its unassembled state, small parts present a hazard.
?To be used under direct supervision of an adult.
WARNING
For assistance, please contact us:
1-800-267-8494
Email [email protected]
Have your packing slip ready for reference
Check out some of our
other great products!
Need Tech Support?
Have a Question?
Email our Tech Support Service
www.copernicused.com
iPad® not included.
the Document Camera Stand - Assembly Guide
DCS1A
DCS2A
Document Camera Function
only works with iPad mini™,
iPad 2™ & Newer.
Patent Pending
1
Magnetic LED Light is
ONLY included with
DCS2A

DCS1A_DCS2A - Version B - 10 June 2014 - Copernicus Educational Products Inc.
Warning! Hazard Risks!
Please read the warnings below for important safety information regarding your product.
Failure to read these warnings or to follow the instructions below could result in personal
injury or damage to your product that could void your warranty.
This product is to be used under the supervision of an adult.
Adult
Supervision
Indoor Use
Only
This product is intended for indoor use only. To reduce the risk of fire or electric shock, do not
expose this product to rain or moisture. The internal components are not sealed from the
environment.
Read your powerbar’s electrical specifications. Only plug in devices that are approved for use
with this powerbar. Connect the supplied power bar directly to a wall outlet. Do not connect to
another power bar or use an extension cord. Unplug when not in use.
Powerbar
Specifications
Do not install or use the electrical components of this unit during a lightening storm.
Electrical Shock
In its unassembled state, this product contains parts that can be hazardous to small children. This
product should be assembled by an adult.
Small
Parts
Ensure that any cables extending across the floor to your product are properly bundled and
marked to avoid tripping or falling which may lead to personal injury.
Cable Trip
Hazard
Climb Hazard
Do not climb on, hang from or suspend objects from any components of your product unless
otherwise specified.
Read the electrical specifications of any electronic equipment you are using with your Copernicus
products. Failure to read these specifications and follow their instructions could result in damage
to your equipment or personal injury.
Electronic
Equipment
2

DCS1A_DCS2A - Version B - 10 June 2014 - Copernicus Educational Products Inc.
lThis symbol denotes a 2 Person Task. For safety, please ensure that there are two people
working on steps displaying this symbol
lWatch for this symbol throughout the Assembly Instructions. Wherever you see it, pay close
attention. The symbol denotes a step needing extra attention to ensure it is done correctly.
lThe Star symbol highlights an advisory note
Tips for Assembly
2 Person
Watch for These Helpful Symbols
Before You Begin
As You Assemble the Unit
Layout and identify all of the included parts
l
The hardware has been packed by step
l
Read the assembly instructions over once to familiarize yourself with them
l
Please note that in its unassembled state, this product contains parts that can be a hazard
l
to small children; it should be assembled by an adult.
lFollow the steps in sequence
lBefore beginning each step, find the part(s) that you need for that step
lPay attention to the labeling on the parts, they are there to help direct you at certain stages
lThe title of each step states what you will be doing. Review the text and the pictures as you
build the unit.
“The beautiful thing about learning is that no one can take it away from you.” - B. B. King
To validate your warranty submit the ON-LINE form at www.copernicused.com
Validate Your Warranty On-Line
1
Year
Frame
Warranty
DCS1A
DCS2A
3

DCS1A_DCS2A - Version B - 10 June 2014 - Copernicus Educational Products Inc.
Please note that in its unassembled state, this product contains parts
that can be hazardous to small children. This product should be
assembled by an adult.
!
WARNING
Dewey the Document Camera Stand - Assembly Guide
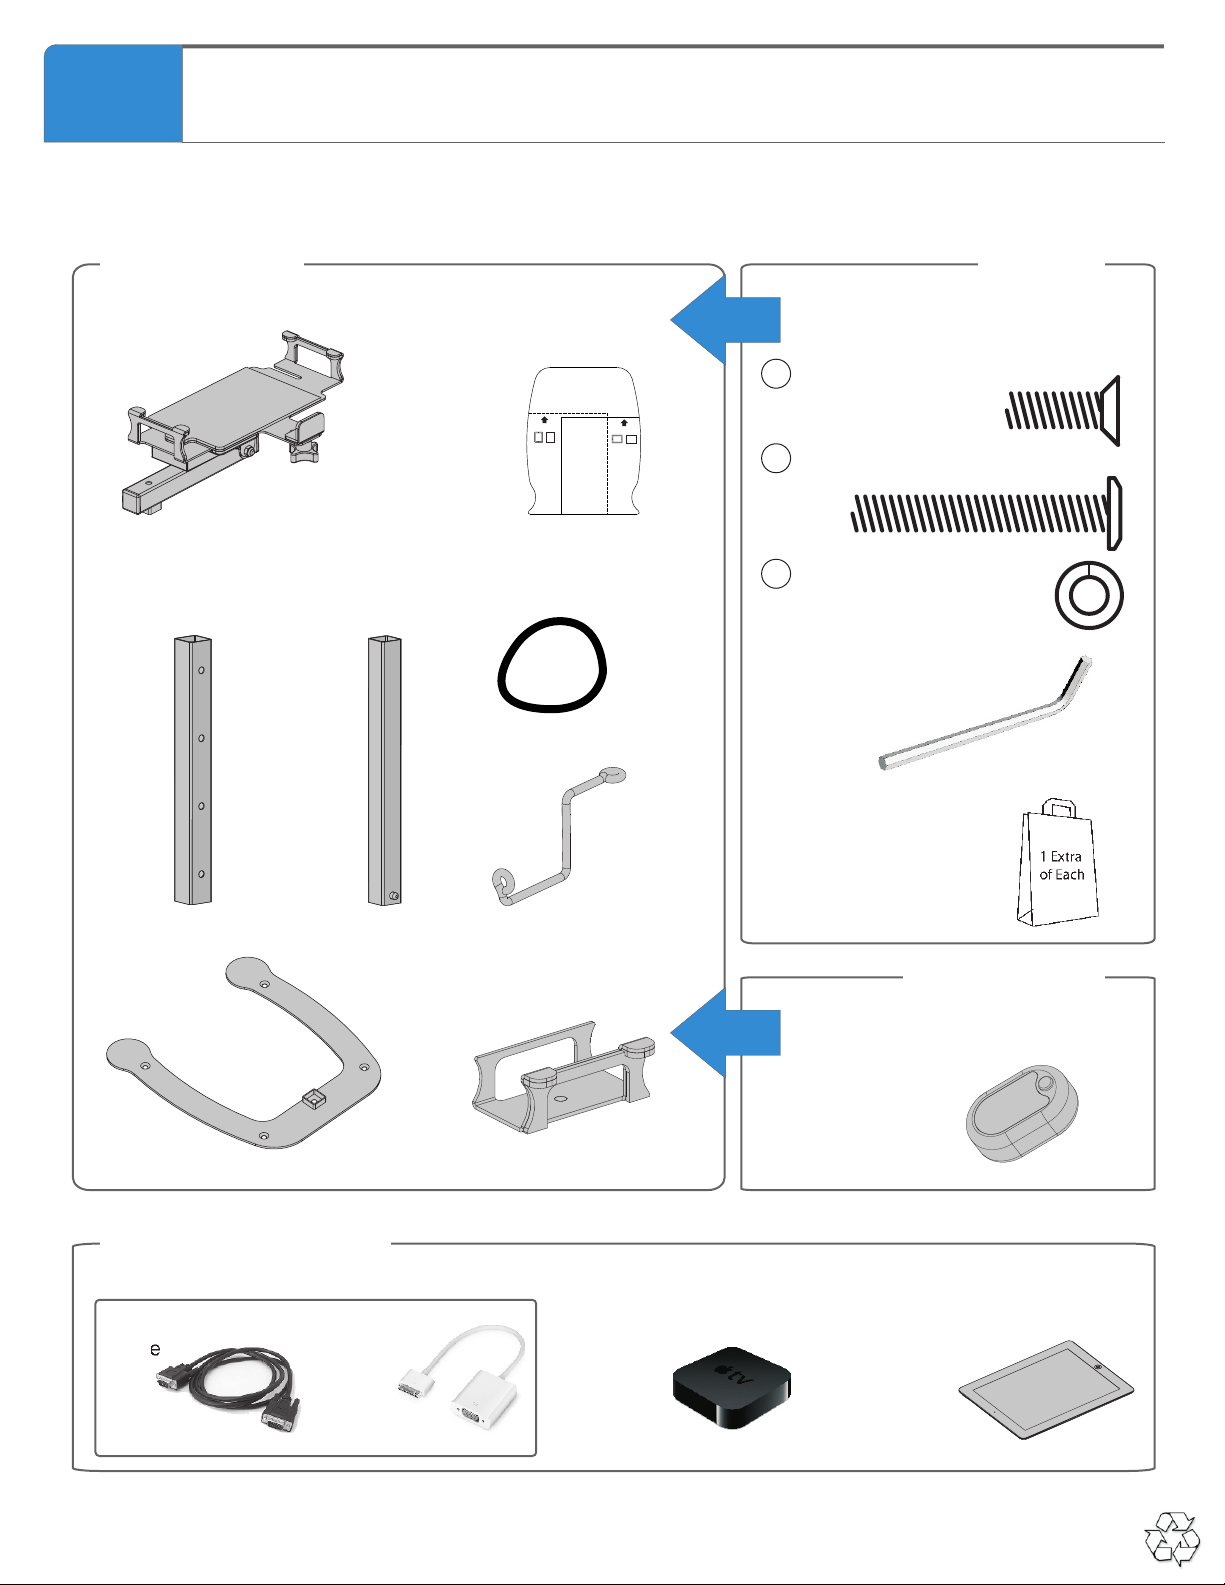
Base (1)
iPad mini™ Spacer (1)
Inner Tube Pre-Assembly (1)
Top Arm Pre-Assembly (1)
Outer Tube (1)
Headphone
Hanger (1)
DCS1A
DCS2A
4
Magnetic LED Light
(DCS2A) (1)
DCS1A_DCS2A - Version B - 10 June 2014 - Copernicus Educational Products Inc.
Additional Items Needed
Not Included
Hardware
Actual Size
In Box 1
Allen Key
(Not to Scale)
1x
Bag of extra hardware
1x
Contents - Box 1
Top Arm
1x
Before beginning, you should have:
Inner Tube
1x
Outer Tube
1x
Base
1x
Elastic Straps
2x
Dewey - Parts
M6 x 45mm
1x
B
AM6 x 20mm
1x
M6 Lock Washer
1x
C
VGA
Cable
1x
Apple® VGA
Adapter
1x
iPad mini™, iPad 2™
or Newer
1x
Landscape Position
for 8.5” x 11” Paper
iPad & Paper
iPad & Paper
Portrait Position
for 8.5” x 11” Paper
Positioning
Template
1x
iPad mini™ Spacer
1x
Headphone Holder
2x
DCS1A
DCS2A
Apple TV®
1x
OR
Content - Box1
Comes with DCS2A
In Box 1
Magnetic LED Light
1x
5

DCS1A_DCS2A - Version B - 10 June 2014 - Copernicus Educational Products Inc.
1
You will need: (Not to Scale)
Actual Size:
2
Place the Inner Tube inside the Outer Tube
You will need: (Not to Scale)
Actual Size:
Outer Tube
1x
Base
1x
Pay close attention to the
orientation of the Valco
Double-End Snap Buttons.
Inner Tube
1x
Make sure the stop hole is
facing inwards and is placed
on top.
Assemble the Outer Tube to the Base
A
AM6 x 20mm
1x
6

DCS1A_DCS2A - Version B - 10 June 2014 - Copernicus Educational Products Inc.
C
B
3
Assemble the Top Arm & Headphone Holder
You will need: (Not to Scale)
Actual Size:
To easily assemble the Top
Arm, adjust the height to the
lowest position then assemble
the pieces together.
Top Arm
1x
M6 x 45mm
1x
BM6 Lock Washer
1x
C
Headphone Holder
1x
The headphone holder holds
up to two headphones.
7

DCS1A_DCS2A - Version B - 10 June 2014 - Copernicus Educational Products Inc.
4
Position the Paper Template (OPTIONAL)
You will need: (Not to Scale)
Actual Size:
Positioning Template
1x
Landscape Position
for 8.5” x 11” Paper
iPad & Paper
iPad & Paper
Portrait Position
for 8.5” x 11” Paper
Landscape Position
for 8.5” x 11” Paper
iPad® & Paper
Pay close attention to the orientation of
iPad and 8.5”x11” paper. Then match the
edge of the paper with the indicated line
that the arrow points at. This helps to
position your paper in the middle of
your projection.
5
Use Elastic Straps to Hold Apple VGA Adapter in Place (OPTIONAL)
You will need: (Not to Scale)
Actual Size:
Elastic Straps
1x
Apple® VGA
Adapter
1x
iPad mini™, iPad®2
or Newer
1x
To hold the VGA cable in
place use provided elastic straps
Tie the elastic around the adapter cable
and then loop over the edge of the top
mechanism.
8

DCS1A_DCS2A - Version B - 10 June 2014 - Copernicus Educational Products Inc.
6
Positioning the Magnetic LED Light (OPTIONAL)
You will need: (Not to Scale)
Actual Size:
Magnetic LED Light
1x
OPTIONAL -
FOR DCS2A
Use the magnet on the
LED to attach it
anywhere on Dewey’s
Neck.
Suggested spots to mount the
Magnetic LED Light without getting
hot spots.
9

DCS1A_DCS2A - Version B - 10 June 2014 - Copernicus Educational Products Inc.
Holding onto top Mechanism - tilt between Document Camera Position and Stand Position
the Document Camera Stand - Tips for Use
Changing from Document Camera to Stand Position
Holding onto top mechanism - turn iPad® 90 degrees
NOTE: Sometimes when you rotate the iPad® your projected image does not rotate, in that case you need to tilt down
the top mechanism to allow the iPad® to adjust
To Change Projected Image
If folding tension ever
needs to be tighter,
tighten this bolt with
10mm wrench and the
provided allen key.
If swivel tension ever
needs to be tighter,
tighten this bolt with
10mm wrench.
Landscape PositionPortrait Position
10
Ce manuel convient aux modèles suivants
1
Table des matières
Autres manuels Dewey Accessoires pour appareils photo


