DESi Utopic2 Series Manuel utilisateur

Utopic2 Smart Lock
USER MANUAL

!
GENERAL INFORMATIONS and WARNINGS
- We recommend you to put the keys to an accessible place (like car, bag etc.) in an emergancy
condition.
- If there is any problem with door or locking mechanism, first of all, those problems need to be
solved. Door's mechanical parts and locking mechanism should be working properly.
- Replace the batteries, if there is a battery warning. RECYCLE EMPTY BATTERIES!
- All the system need to be protected from water, direct sunlight and shocks.
- Place the batteries after installation of the system to the door. If the batteries are placed before
the installation, auto-rotating parts may cause injuries. WATCH YOUR FINGERS!
-For some doors, even if you remove cylinder screw, you cannot remove cylinder due to cramped
installation of defender. If this is the situation, follow the instructions below:
a- Untighten screws of cylinder defender (don’t remove the screws)
b- Remove cylinder screw and take out the old cylinder.
c- Install the device after disassemble the motozied part from the cylinder. (see p. 4 and 5)
2

3
Controlling Options and Compatible Accessories
Wireless Fingerprint Readers
Wireless Keypad
Wireless Auto-Locking Module
Wireless Home Automation Interface
Remote Controllers
Remote Access Module
BOX CONTENT
(May vary according to model number)
1x Smart Lock (with keys)
5x Alkaline Batteries
1x Installation screw and Hex key
1. FEATURES OF THE DEVICE
Structure
Engraved Aluminum, ABS Plastic, Zamak
Cylinder Length
(outside) 31 mm x 37 mm (inside)
Inside part can extensile up to 43 mm
(Different cylinder lengths are available)
Batteries and Battery Life
5x AA size 1,5 V Alkaline or Lithium Batteries
On a 2 turns lock, with 10 operations per day;
300 days (if RF or Bluetooth is enabled)
200 days (if RF and Bluetooth are enabled)
Communication Capability
Bluetooth Low Energy
ISM RF 434 Mhz

4
2. PARTS OF DEVICE and INSTALLATION
Cylinder
Handle
Handle Screw
Hex Screw The hole
for hex key
DEMOUNTING OF MOTOR AND CYLINDER
- Open “handle screw” and remove the handle by pulling.
- Remove the batteries.
- Rotate “hex screw” to counter-clock wise by using the
hex key out of the box. You will see the cylinder will be
disassembled from the motorized part.
To assemble two parts, combine cylinder and motorized
part in a proper way and rotate hex screw to clock wise.
Metal Extending Parts
(used if needed)
Plastic Cover Cover Spring

5
Up to 6 mm
EXTENDING INSIDE PART OF THE CYLINDER (if needed)
If the door thickness is not suitable to the cylinder of the device, inside part of the
cylinder may be extended up to 6 mm by 2 mm steps.
To extend the cylinder’s inside part, follow the instructions below:
- Open “handle screw” and remove the handle by pulling.
- Remove the batteries.
- Rotate “hex screw” to counter-clock wise by using the hex key out of the box till the
motorized part is disassembled from the cylinder.
- Add 2 mm metal extending parts as needed.
- Assemble cylinder and motorized part and rotate hex screw to clock wise direction.
- Install the batteries and check the device if it is working properly or not.
26 10 32
26 10 38
1.STEP
Remove
existing
cylinder.
2. STEP
Install
smart
lock and
tighten
the
screw.
That’s
it!
INSTALLATION OF MOTORIZED CYLINDER

6
MOBILE APPLICATION
If you enroll your smart phone as first controller, it will be master controller of your smart
lock.
Both master and user controllers can lock/unlock the smart lock. Besides, only the master
controller can change settings of smart lock.
Before using your smart lock, you should adjust it properly by setting “locking way” and
then “number of rotation” according to your lock.
If you want to change the master controller of smart lock, check
“HOW TO RESET SMART LOCK” topic on page 18 or please click on the link to watch
how to reset video https://youtu.be/Z2caq6RQ8-U
To use all available features of your device, we highly recommend you to use a
smartphone as master controller.
NOTE: For Android phones, when you are instaling the app, it will ask permissions. You need to approve all the permissions asked.
Otherwise, the application will not work properly. If you deny permissions, you will need to delete the application and install it
again.

7
3.1. ENROLLING A MOBILE PHONE AS MASTER CONTROLLER
1. Search “Desi Utopic” on stores. Download, install and run the application.
2. Choose language and confirm.
3. Press and hold “set/reset button” on smart lock until you hear a long and short warning tone and then
release button.
4. Touch “+” on the top left corner to see the list of Utopic smart locks around.
5. Touch to UTOPIC line and enter a name for your device and touch to green tick.
6. If the matching is successful, you will hear 2 short tones from motorized cylinder and your device will be
master controller of motorized cylinder.
Set / Reset
Button
Please watch video for details https://youtu.be/7iKNoLvnvN8

8
3.2. APPLICATION SETTINGS
If you touch to menu button on the top right corner when it is not connected to smart lock, you will reach to
settings menu of application. Related menu items are as follows:
Menu
Button
PASSWORD: You can disable, enable or change the password of application.
Also you can enable biometric login or face ID from that menu.
LANGUAGES: You can change language of the application.
SIRI SETTINGS: You can open your lock with voice commands (Only for
Iphone)
APPLICATION INFO: You can see the version of installed application.
VIDEOS: You can see videos about usage of smart lock.
FAQ: You can see questions and answers about usage.
9
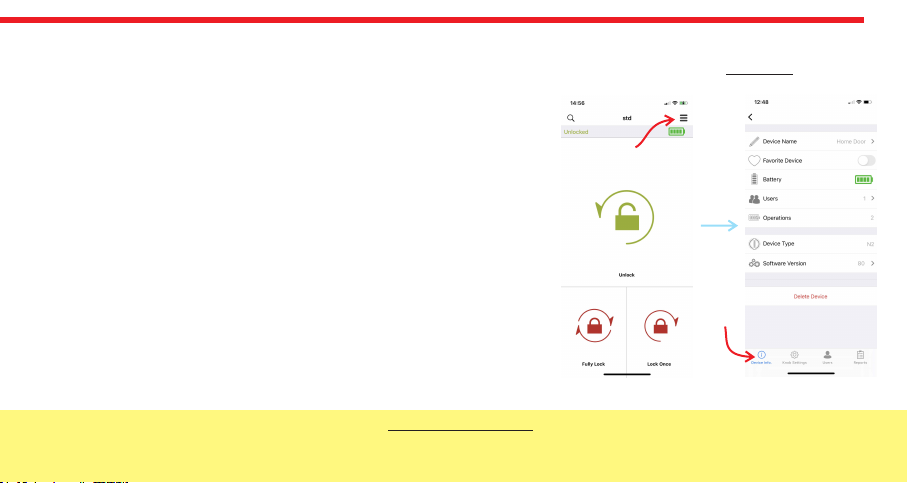
3.3. SMART LOCK SETTINGS / ADMINISTRATION MENU
If you touch the menu button in the top right corner when the application is connected to smart lock as master controller, you
will reach to settings menu of connected smart lock. You can change settings of your smart lock and perform administrative
activities via this menu.
If you want to delete connected device from your mobile application, touch the “Delete Device” button in this menu.
Related menu has 4 tabs: Device Info, Knob Settings, Users, Reports.
5.3.1. DEVICE INFO TAB
In this tab, you can see following information:
Device Name
Favorite Device
Battery Level
Users - (Number of Enrolled Controllers)
Operations- (Number of Locking or unlocking)
Device Type
Software version
Button Mode
NOTE 1: Blue colored menus and menu items are available for master phone only.
NOTE 2:
Your device’s firmware can be updated via master
phone. For
details check page 26.
(Only N2 devices with firmware 80)
TIP: To access settings without problem wait until the lock status (top left), battery status (top right) appear on the home screen.
Menu
Button
Device
Info Tab

10
3.3.2. KNOB SETTINGS TAB
In this tab, there are following menu items:
NIGHT MODE AVAILABILITY: Night mode is a security option which
temporarily disables all controllers of motorized cylinder. In this way,
the door can only be opened by knob or the key. If this feature is enabled,
when you rotate your motorized cylinder through locking way 2 times, the
device will shift to night mode till you rotate the know or key through
unlocking way. For shifting to night mode, Semi-Automatic Mode should
be enabled.
SEMI-AUTOMATIC MODE: Your device has a semi-automatic feature
which senses the knob / key rotation and continue to rotate automatically.
On this menu item, you can enable / disable this feature.
AUTO LOCK*: Your device has an automatic locking feature which let the
device locks itself -either one turn or full turns- automatically in 15, 30, 45
or 60 seconds after it is unlocked. If you enable auto-locking, you will see
DAY MODE setting which gives flexiable options for office use. If DAY
MODE is enabled, you can define 1 or 2 periods for selected days, which
Auto-Locking will not work.
Please watch video for details https://www.youtube.com/watch?
v=IiVxwj-7yyI
Knob Settings
Tab
Menu
Button
NOTE: Auto Lock feature is only available
for device type N2 and firmware version
is 87 or higher.
Autres manuels pour Utopic2 Series
1
Table des matières
Autres manuels DESi Verrouillage


