Delta-T SLM4 Manuel utilisateur

8VHU0DQXDOIRUWKH
6HOI/HYHOOLQJ0RXQW
W\SH 6/0
'HOWD7'HYLFHV/WG
SLM4-UM-1.0

1RWLFHV
&RS\ULJKW
All rights reserved. Under the copyright laws, this manual may not be
copied, in whole or in part, without the written consent of Delta-T Devices
Ltd. Under the law, copying includes translation into another language.
Copyright © 2000, 2003 Delta-T Devices Limited
'HVLJQFKDQJHV
Delta-T Devices Ltd reserves the right to change the designs and
specifications of its products at any time without prior notice.
$XWKRUV
John Wood, Edmund Potter.
8VHU0DQXDO9HUVLRQ -DQ
'HOWD7'HYLFHV/WG
7HO
/RZ5RDG%XUZHOO
)D[
&$0%5,'*(&%(-
HPDLOsales@delta-t.co.uk
8.
ZZZ http://www.delta-t.co.uk

6/08VHU0DQXDOY &RQWHQWV z
&RQWHQWV
6HOI/HYHOOLQJ0RXQW7\SH6/0
)HDWXUHV
$VVHPEO\,QVWUXFWLRQV
,QVWUXFWLRQVIRU8VH
To operate 10
Image alignment in HemiView 10
8VLQJWKH1LNRQ&RROSL[&DPHUD
7DNLQJ+HPLSKRWRV
Image size and compression 11
Camera settings 11
Exposure 12
Taking the Picture 13
'RZQORDGLQJLPDJHVWRD3&
:DUUDQW\DQG6HUYLFH
7HUPVDQG&RQGLWLRQVRI6DOH
6HUYLFHDQG6SDUHV
7HFKQLFDO6XSSRUW
Contact details 15

z&RQWHQWV 6/08VHU0DQXDOY
6HOI/HYHOOLQJ0RXQW7\SH6/0
)HDWXUHV
The self levelling mount (SLM4) is intended for use with either a tripod or
a monopod, and is designed to help keep a camera and fisheye lens
aligned to the horizon and North. This is necessary for taking hemiphots
for use with Delta-T’s HemiView canopy analysis software.
The SLM4 is designed for use with the Nikon Coolpix 4500 digital camera
with hemispherical lens attachment.
For ease of use, the mount is equipped with the following features:-
·Bubble level with adjustable levelling weights
·Compass for North/South alignment, viewable from above or below
·Markers used to align Hemiphots in HemiView, illuminated by
camera flashgun
·Lens protective cover
6/08VHU0DQXDOY &RQWHQWV z
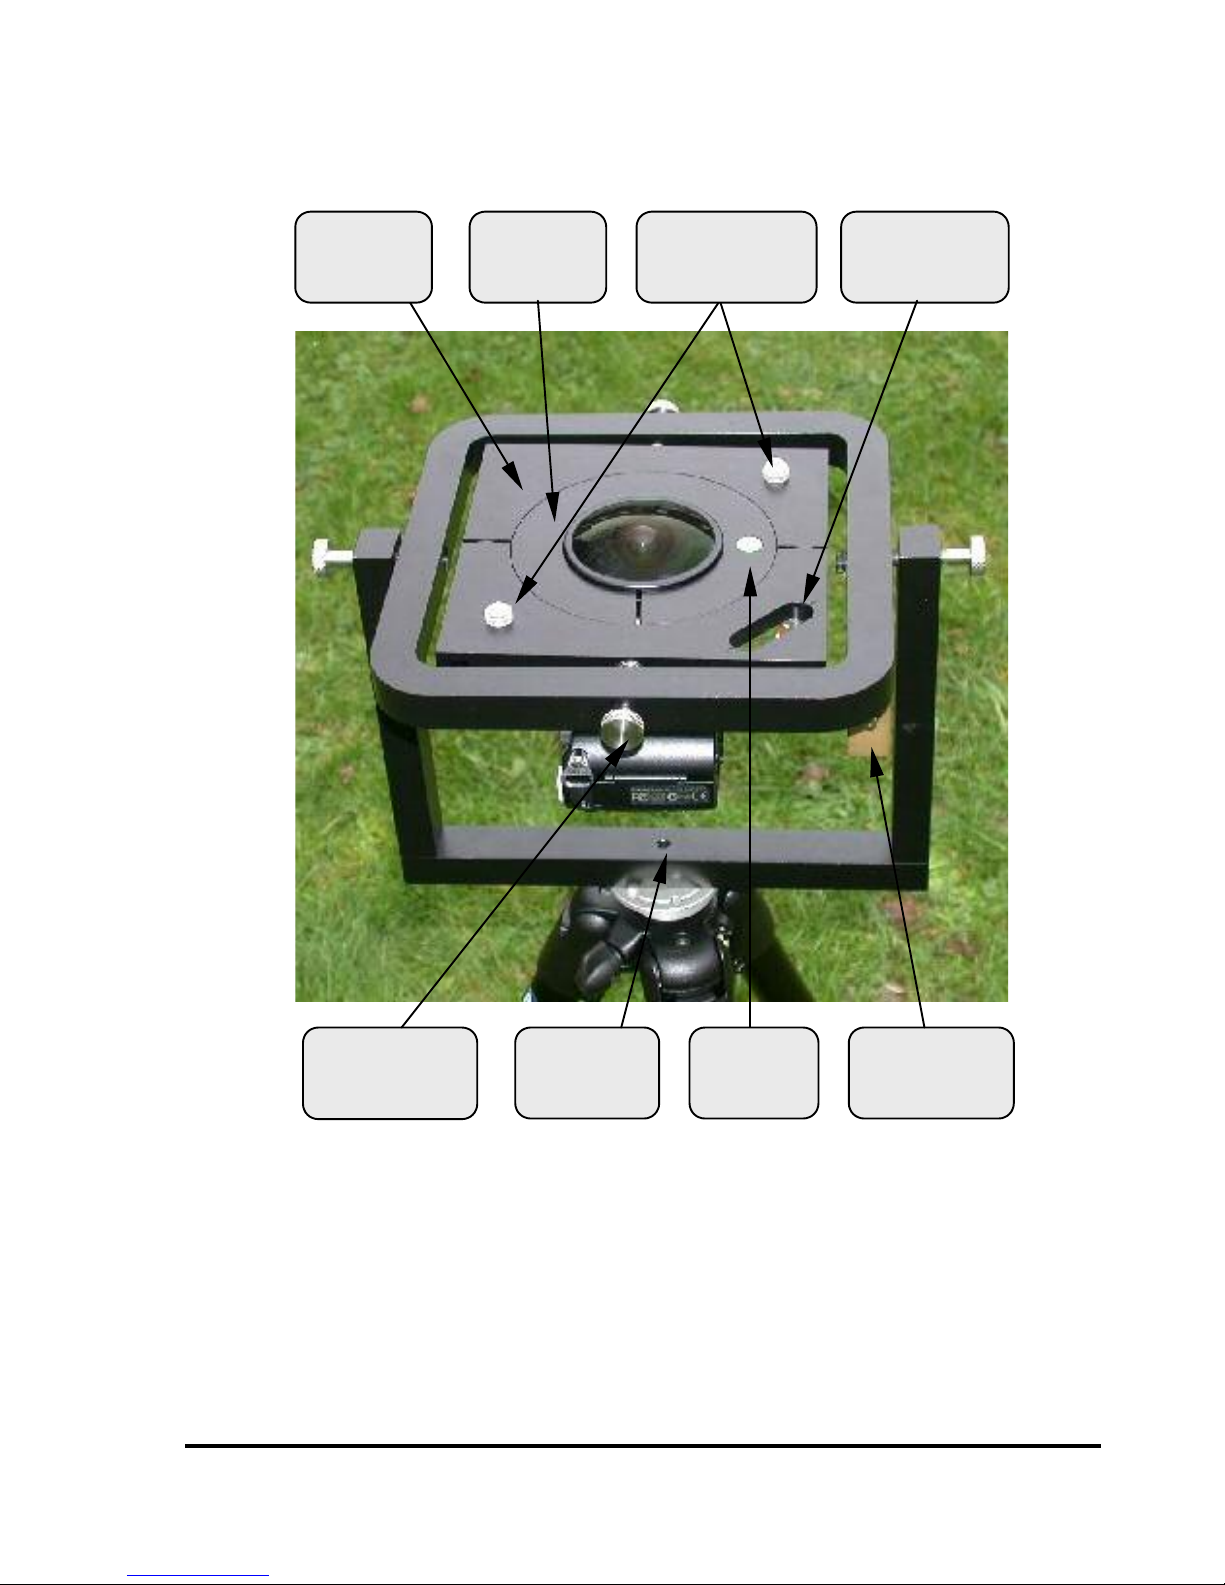
Fig 1. SLM4 with lens cover removed
7ULSRG
VRFNHW
&RPSDVV
$OLJQPHQW
PDUNHUV
,QQHUSLYRW
VFUHZ
*LPEDO
SODWH
%XEEOH
OHYHO
%DODQFH
ZHLJKW
&ROODU

z&RQWHQWV 6/08VHU0DQXDOY
$VVHPEO\,QVWUXFWLRQV
·Fix the SLM4 to a tripod for stability, using tripod socket in its base
(Fig 1).
·Fit the lens into the collar. Tighten the clamping screw using the
4mm hex driver supplied (Fig. 2). (If the lens has been supplied as
part of a HemiView system it will already have been fitted to the
collar).
·Undo the inner pivot screws a few turns (Fig. 1). 'RQRW unscrew
them completely.
·Tip the gimbal plate slightly (Fig 4) and slacken both the screws
which clamp it together.
·Fit the lens and collar assembly into the gimbal plate. 'RQRWtighten
it yet.
·Screw the camera onto the threaded end of the lens, by holding the
camera steady and rotating the lens and collar (Fig 3).
·Check that the lens edge is 2mm below the alignment marker
shoulders (Fig 7), and the camera is positioned as in Fig 5.
·Clamp the assembly by tipping the gimbal plate and tightening the
two clamping screws (Fig 4).
·Tighten the inner pivot screws (Fig 1) until the assembly swings
freely but comes to rest quickly. 'RQRWovertighten the pivot screws.
·Fit the alignment marker clip onto the camera flash unit (Fig. 6). The
flash unit will pop up if the camera is set to ‘anytime flash’ and you
press the shutter release halfway. 'RQRWtry to force it up.
·Move the balance weights so that the bubble is within the central
circle of the bubble level. Use the large weights for coarse
adjustment, and the small weights for the final fine adjustment.
·Check the mount is level whenever you move the camera, or change
battery or flashcard.

6/08VHU0DQXDOY &RQWHQWV z
Fig. 2 Fitting the lens to the collar
Fig. 3 Fitting the camera to the lens

z&RQWHQWV 6/08VHU0DQXDOY
Fig. 4 Clamping the collar to the gimbal plate
Fig. 5 Orientation of camera

6/08VHU0DQXDOY &RQWHQWV z
Fig. 6 Fitting the alignment marker clip to the flash unit
Fig. 7 Checking the lens alignment

z&RQWHQWV 6/08VHU0DQXDOY
,QVWUXFWLRQVIRU8VH
7RRSHUDWH
Remove the lens cover.
Level the mount using the balance weights and bubble level.
Rotate the mount so that the red end of the compass needle is between
the marks on the compass housing. If you are using the mount above
your head, make sure you know roughly which way North is, as the two
ends of the needle look the same from below.
Select an appropriate exposure setting.
Set the camera self-timer, press the shutter release and put the mount at
the required height. Keep the mount as level as possible, otherwise parts
of the mount may be visible in the picture.
Replace the lens cover to protect the lens from dirt or damage.
,PDJHDOLJQPHQWLQ+HPL9LHZ
Align the horizon circle to the shoulders of the two alignment markers,
with the pointed marker at the magnetic north point, as shown below.
Autres manuels Delta-T Accessoires pour appareils photo


