Dell EMC NX4 Series Manuel utilisateur

This document describes how to replace a standby power supply (SPS) in the storage system in
an NX4 system.
Note: The storage system in an NX4 system is an AX4-5F8.
Summary of tasks for replacing an SPS................................................................................................................2
Handling field replaceable units (FRUs)..............................................................................................................3
Disabling CallHome or ConnectHome and Email notifications......................................................................5
Shutting down power and removing the cables.................................................................................................7
Unlocking and removing the SPS front bezel.....................................................................................................8
Removing the front plate........................................................................................................................................9
Removing a standby power supply....................................................................................................................10
Installing a standby power supply.....................................................................................................................11
Reconnecting Cables and Powering up the SPS................................................................................................12
Installing the front plate.......................................................................................................................................13
Installing and locking the SPS front bezel.........................................................................................................14
Verifying the operation of a new or replacement part.....................................................................................15
Restoring trespassed virtual disks or LUNs using the CLI ............................................................................17
Checking system status........................................................................................................................................18
Enabling CallHome or ConnectHome and Email notifications......................................................................19
Returning the failed part......................................................................................................................................23
EMC®AX4-5F8 Architecture for NX4 Series
Replacing a Standby Power Supply

Summary of tasks for replacing an SPS
To replace an SPS you must complete the tasks below in the order in which they appear.
This document provides instructions for completing each task.
1. Disable CallHome or ConnectHome.
2. Shut down the failed SPS and remove all cables.
3. Unlock and remove the bezel.
4. Remove the front plate.
5. Remove the failed SPS.
6. Install the replacement SPS.
7. Reinstall the front plate.
8. Reconnect cables and power up the replacement SPS.
9. Reinstall the front plate.
10. Reinstall and lock the bezel.
11. Verify the operation of the replacement SPS.
12. Restore any trespassed virtual disks or LUNs.
13. Check system status.
14. Enable CallHome or ConnectHome.
2Replacing a Standby Power Supply
Summary of tasks for replacing an SPS

Handling field replaceable units (FRUs)
This section describes the precautions that you must take and the general procedures that
you must follow when removing, installing, and storing any field replaceable unit (FRU).
Power issues and FRUs
Your storage system is designed to be powered on continuously. Most components are hot
swappable; that is, you can replace or install these components while the storage system is
running. Front bezels should always be attached and each compartment should contain a
FRU or filler panel to ensure EMI compliance and proper air flow over the FRUs.
You should not remove a faulty FRU until you have a replacement available.
When you replace or install FRUs, you can inadvertently damage the sensitive electronic
circuits in the equipment by simply touching them. Electrostatic charge (ESD) that has
accumulated on your body discharges through the circuits. If the air in the work area is very
dry, running a humidifier in the work area will help decrease the risk of ESD damage. Follow
the procedures below to prevent damage to the equipment.
Read and understand the following instructions:
◆Provide enough room to work on the equipment. Clear the work site of any unnecessary
materials or materials that naturally build up electrostatic charge, such as foam packaging,
foam cups, cellophane wrappers, and similar items.
◆Do not remove replacement or upgrade FRUs from their antistatic packaging until you
are ready to install them.
◆Before you service a storage system, gather together the ESD kit and all other materials
you will need. Once servicing begins, avoid moving away from the work site; otherwise,
you may build up an electrostatic charge.
◆An ESD wristband is supplied with your storage system. To use it, attach the clip of the
ESD wristband (strap) to any bare (unpainted) metal on the storage system; then put the
wristband around your wrist with the metal button against your skin.
◆Use the ESD kit when handling any FRU. If an emergency arises and the ESD kit is not
available, follow the procedures in the Emergency procedures (without an ESD kit) on
page 3.
Emergency procedures (without an ESD kit)
In an emergency when an ESD kit is not available, use the procedures below to reduce the
possibility of an electrostatic discharge by ensuring that your body and the subassembly
are at the same electrostatic potential. These procedures are not a substitute for the use of
an ESD kit. Follow them only in the event of an emergency.
Handling field replaceable units (FRUs) 3
Handling field replaceable units (FRUs)

◆Before touching any FRU, touch a bare (unpainted) metal surface of the cabinet or storage
system.
◆Before removing any FRU from its antistatic bag, place one hand firmly on a bare metal
surface of the storage system, and at the same time, pick up the FRU while it is still sealed
in the antistatic bac. Once you have done this do not move around the room or touch
other furnishings, personnel, or surfaces until you have installed the FRU.
◆When you remove a FRU from the antistatic bag, avoid touching any electronic
components and circuits on it.
◆If you must move around the room or touch other surfaces before installing a FRU, first
place the FRU back in the antistatic bag. When you are ready again to install the FRU,
repeat these procedures.
4Replacing a Standby Power Supply
Handling field replaceable units (FRUs)

Disabling CallHome or ConnectHome and Email notifications
Open a HyperTerminal session with the Celerra system and then use procedure in the section
that follows for your EMCNAS version to disable CallHome or ConnectHome and Email
notification.
Opening a HyperTerminal session with the system
1. At the rear of the cabinet, connect the null modem cable (P/N 038-003-458) from the serial
port on the service laptop to the primary Control Station (Figure 1 on page 5).
Serial port
Figure 1. Control station serial connection
2. Open the HyperTerminal session using the following settings:
19200Bits per second:
8Data bits:
NoneParity:
1Stop bits:
NoneFlow control:
Auto DetectEmulation:
ANSITelnet terminal ID:
Note: If you cannot connect to the HyperTerminal session, reboot the Control Station, log in, and
repeat this step.
3. Login as nasadmin:
login:nasadmin
4. Become the root user:
$ su root
Password:
Disabling CallHome or ConnectHome and Email notifications 5
Disabling CallHome or ConnectHome and Email notifications

For EMCNAS 5.6 or later
Use a HyperTerminal session to disable ConnectHome:
1. From the root directory, disable CallHome:
/nas/sbin/nas_connecthome stop
2. Disable the Email notification service:
/nas/bin/nas_emailuser -modify -enabled
Sample output:
OK
3. Verify that the Email notification service has stopped (is not enabled):
/nas/bin/nas_emailuser-info
Sample output:
Service Enabled = No
Carbon Copy Address(es) =
Email Server = emcmail.lss.emc.com
Subject Prefix = Celerra Notification -NDU through NST Sender Address =
ConnectHome and Email notifications are now disabled. You are now ready to replace the
part. After completing the part replacement procedure, be sure to enable ConnectHome and
Email notifications.
6Replacing a Standby Power Supply
Disabling CallHome or ConnectHome and Email notifications

Shutting down power and removing the cables
1. Shut down power on the SPS that you are replacing by pressing the left side of the SPS
power switch (Figure 2 on page 7).
Figure 2. Off position for the SPS power switch (SPS A shown)
2. Disconnect the SPS cables:
Note: Label the cables for reinstallation later.
a. Unplug the SPS power cord from the site power source and then from the SPS.
b. From the SPS, unplug the sense cable and the power cord connecting the SPS to the
SP directly above it.
Shutting down power and removing the cables 7
Shutting down power and removing the cables

Unlocking and removing the SPS front bezel
1. Unlock the front bezel by turning the key at the front of the enclosure counterclockwise.
2. Press the buttons on the front of the bezel and pull the bezel toward you to release it.
3. Save the bezel for reinstallation later.
Figure 3. Unlocking and removing the front bezel
8Replacing a Standby Power Supply
Unlocking and removing the SPS front bezel
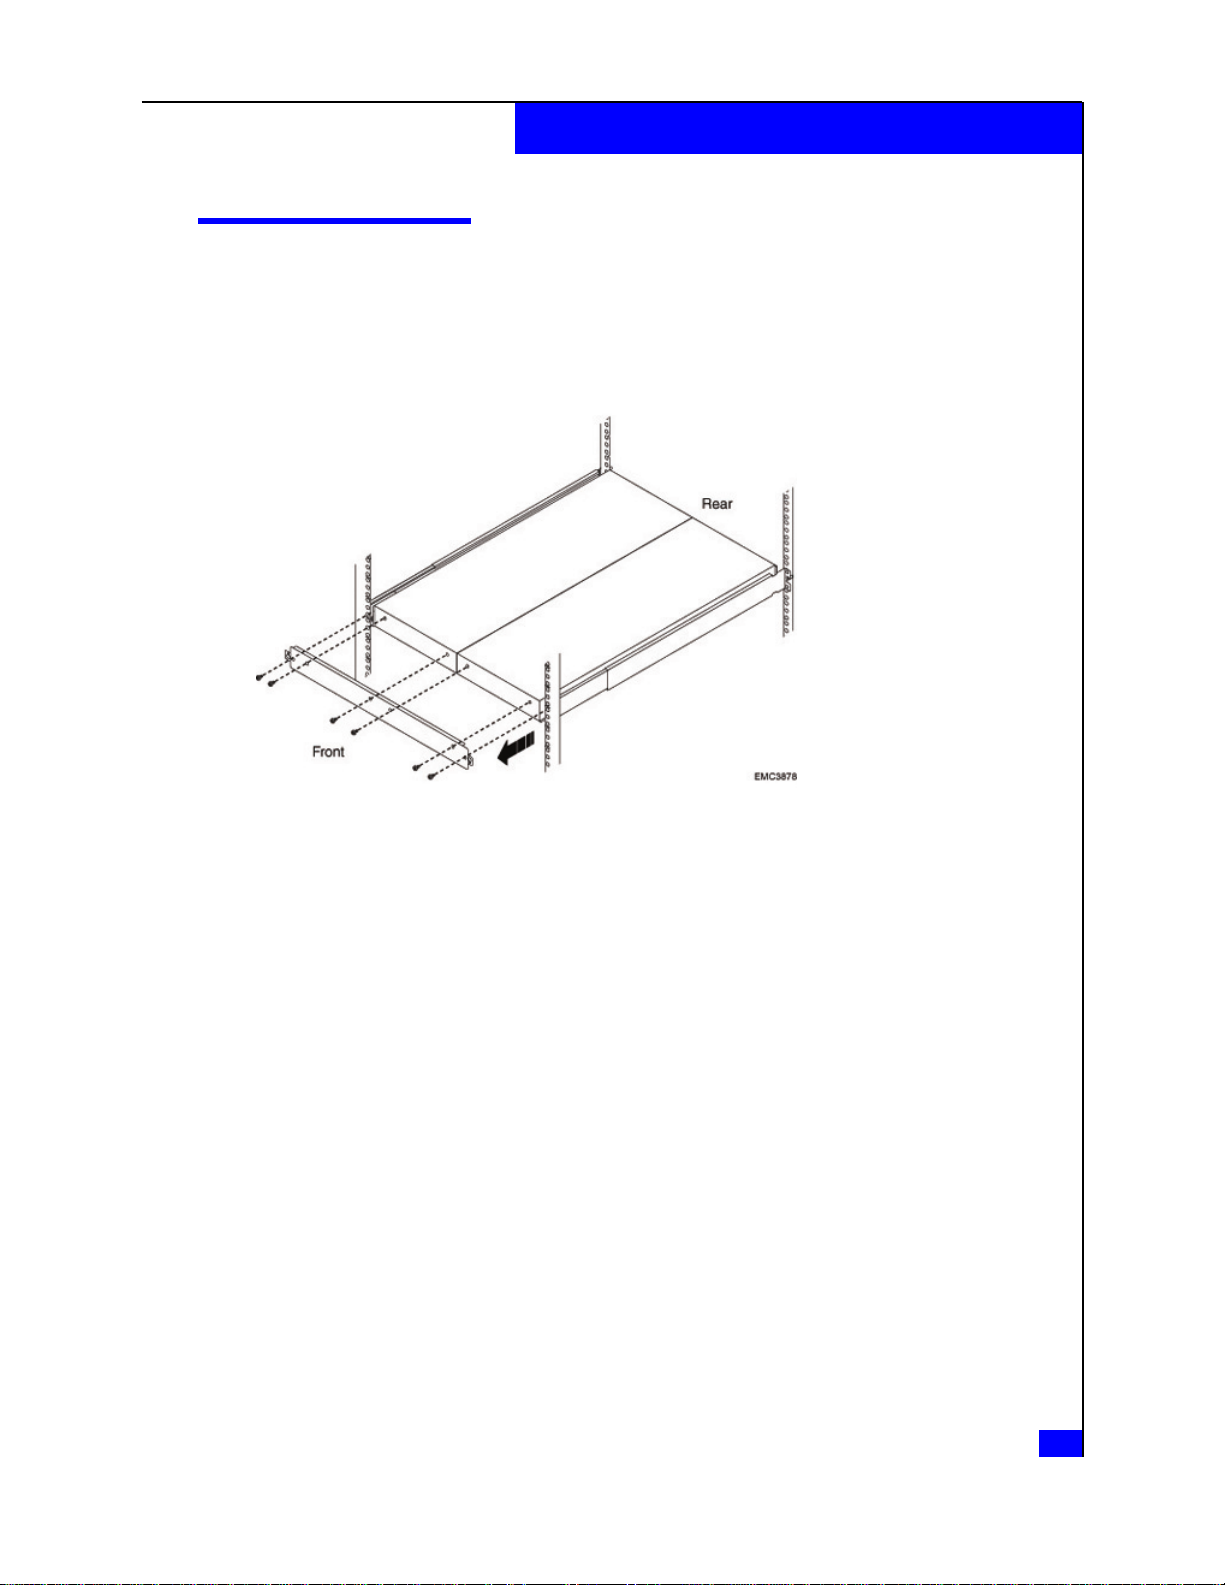
Removing the front plate
The front plate covers the front of the SPS tray. You must remove it to replace either SPS.
1. Remove the four or six screws on the front plate and remove the front plate (Figure 4 on
page 9).
Figure 4. Removing the front plate
2. Save the front plate and screws for reinstallation later.
Removing the front plate 9
Removing the front plate

Ce manuel convient aux modèles suivants
1
Table des matières
Autres manuels Dell Système de disques


Manuels Système de disques populaires d'autres marques

Fujitsu
Fujitsu ETERNUS DX60 S2 Manuel utilisateur

Accom
Accom WSD/2XTREME Manuel utilisateur

HP
HP Compaq Presario,Presario 4400 Instructions d'utilisation

ATTO Technology
ATTO Technology Diamond Storage Array V-Class Manuel utilisateur

National Instruments
National Instruments RMX-8268 Manuel utilisateur

Overland Tandberg
Overland Tandberg SnapServer DX1 Manuel utilisateur


