DaytonAudio Matrix88 Manuel utilisateur

Model: Matrix88 User Manual
8-SOURCE 8-ZONE
DISTRIBUTED WHOLE
HOUSE AUDIO SYSTEM

2
Table of Contents
Safety.............................................................................................................................................3
Overview........................................................................................................................................4
Installation...................................................................................................................................13
Before you Start..............................................................................................................13
Zone/AmplierConnection ..........................................................................................15
InputsConnection ..........................................................................................................17
Keypads...........................................................................................................................19
Networking ......................................................................................................................21
Triggers............................................................................................................................25
Additional Notes .............................................................................................................26
App Control - Matrio™ Control .................................................................................................27
Demo Mode .....................................................................................................................28
MultipleDeviceSupport.................................................................................................29
Zone Control ...................................................................................................................30
Group Control .................................................................................................................31
DeviceSetup ...................................................................................................................32
Wireless Audio Streaming .........................................................................................................33
FactoryReset..............................................................................................................................35
Standby Control..........................................................................................................................37
DeviceSpecications.................................................................................................................38
RS232AutomationandControl ................................................................................................39
Troubleshooting ......................................................................................................................... 42

3
WARNING! TO REDUCE THE RISK OF FIRE OR ELECTRIC SHOCK,
DO NOT EXPOSE THIS APPLIANCE TO RAIN OR MOISTURE.
CAUTION! TO REDUCE THE RISK OF SHOCK, DO NOT REMOVE
THE COVER, NO USER SERVICABLE PARTS INSIDE. REFER
SERVICE TO A DAYTON AUDIO AUTHORIZED DEALER.
IMPORTANTSAFETYINSTRUCTIONS
• Read and keep these instructions.
• Heed all warnings and follow all instructions contained within
this manual.
• Do not use this unit near water.
• Clean only with dry cloth.
• Do not block any ventilation openings. Install in accordance
with the manufacturer’s instructions.
• Do not install near any heat sources such as radiators, heat
registers, stoves, or other apparatus (including ampliers)
that produce heat.
• Do not defeat the safety purpose of the polarized or grounding-type plug. A polarized plug has two blades with one wider than
the other. A grounding type plug has two blades and a third grounding prong. The wide blade or the third prong are provided for
your safety. If the provided plug does not t into your outlet, consult an electrician for replacement of the obsolete outlet.
• Protect the power cord from being walked on or pinched particularly at plugs, convenience receptacles, and the point where
they exit from the unit.
• Only use attachments/accessories specied by the manufacturer.
• Unplug this unit during lightning storms or when unused for long periods of time.
• Refer all servicing to qualied service personnel. Servicing is required when the unit has been damaged in any way, such as
when the power-supply cord or plug is damaged, liquid has been spilled, or objects have fallen into the unit, the unit has been
exposed to rain or moisture, does not operate normally, or has been dropped.
• Operate the unit only with the voltage specied on the rear. Fire and/or electric shock may result if a higher voltage is used.
• Do not modify, kink, or cut the power cord. Do not place the power cord in close proximity to heaters and do not place heavy
objects on the power cord and/or the unit itself, doing so may result in re or electrical shock.
• Do not touch the speaker terminals as electric shock may result.
• Ensure that the safety ground terminal is connected to a proper ground. Never connect the ground to a gas pipe, as a severe
explosion and/or re may result.
• Be sure the installation of this product is stable, avoid unlevel surfaces as the product may fall and cause injury, property
damage, electrocution and/or re.
• Note that when the unit is turned off, it is not completely disconnected from the AC power outlet. Do not open the cover.
Safety
FCCCOMPLIANCESTATEMENT: This device complies with Part 15 of the FCC rules. Operation is subjected to the following
two conditions: (1) this device may not cause harmful interference, and (2) this device must accept any interference received,
including interference that may cause undesired operation.
Changes or modications not expressly approved by the party responsible for compliance could void your authority to operate the
equipment.
This equipment complies with FCC radiation exposure limits set forth for an uncontrolled environment.
The distance between user and products should be no less than 20cm.
This equipment has been tested and found to comply with the limits for a Class B digital device, pursuant to Part 15 of the FCC
Rules. These limits are designed to provide reasonable protection against harmful interference in a residential installation.
This equipment generates, uses and can radiate radio frequency energy and, if not installed and used in accordance with the
instructions, may cause harmful interference to radio communications. However, there is no guarantee that interference will not
occur in a particular installation. If this equipment does cause harmful interference to radio or television reception, which can be
determined by turning the equipment off and on, the user is encouraged to try to correct the interference by one or more of the
following measures:
-- Reorient or relocate the receiving antenna.
-- Increase the separation between the equipment and receiver.
-- Connect the equipment into an outlet on a circuit different from that to which the receiver is connected.
-- Consult the dealer or an experienced radio/TV technician for help.

4
Overview
System Overview
The Matrix88 is an app controlled 8 source, 8 zone audio matrix perfect for creating a custom
distributed audio system, or for retrotting an existing multichannel amplier to have app control.
The Matrix88 offers an extensive list of features for both commercial and residential installations,
making it both easy to set up for the installer, and easy to use for the end user. Line level zone
outputs offer the exibility of using the ampliers or powered speakers that are most appropriate
for each zone, even allowing usage of existing equipment. A variety of audio inputs and wireless
audio streaming support make listening to your favorite music or audio programs a breeze. The
Matrio Control app offers total control over the system, and also allows full customization of zone
and input names for simple usage by the end user after setup.
TheMatrix88Kitincludesthefollowingcomponents:
• 1 x Matrix88 Master Controller/Amplier
• 1 x Rack Mounting Kit
• 1 x Ethernet Cable
• 1 x RS232 (serial) to USB Cable
• 1 x Quick Start Guide
The following optional accessories are available and can be purchased separately.
• DAX88KP – Wall Mountable Keypads that will allow control of all basic functions for each
zone, such as volume, source selection, and bass/treble adjustment
• DAX88IR– IR Remote Control for operating Matrix88 Keypad functions

5
Overview – App Control
Dayton Audio Matrio Control Mobile App
The Dayton Audio Matrio Control app allows for complete control of all of the Matrix88 or DAX88
units on your network. The Zone Control menu allows for individual control over each zone of
your system, and the Group Control menu is an advanced feature that lets you send commands
to many or all zones at once, even zones that are on separate units. The settings menu has
controls for custom naming your inputs, zones, and even the device name. All customization is
stored on the Matrix88 or DAX88 itself, which means that end users can open the app can use
the system without any knowledge about how the system is wired.
For more detailed information about Matrio Control, see the dedicated Matrio Control section of
this guide (p.27) and also download the free app from the iOS or Android app store. The app can
be fully explored and experienced in demo mode even without a Matrix88 unit.

6
Overview – Front Panel
Matrix88 Front Panel
1. ZoneSignalLED – If the input that is assigned to the corresponding zone has audio playing,
the LED will be BLUE. The LED will be OFF if the input is not currently playing audio, or the
wrong input is selected for the Zone.
2. ZoneStatusLED–Displays RED if the device’s power is on, but the corresponding zone is
OFF. This LED displays BLUE if the zone is enabled. Zones can be turned on and off via the
Matrio Control app, keypads, inputs triggers or RS232 Control.
3. PowerLED–Indicates the power status of the Matrix88. The LED displays RED if the
DAX88 is connected to power and the device is switched on, otherwise the LED is off.
4. Power On/Off – Toggles the DAX88 ON and OFF.

7
Overview–RearPanel
Matrix88 Rear Panel
1. Zone Preamp Outputs 1-6 – Zones 1 through 6 on the Matrix88 are preamplied, analog
line level audio zones in the form of stereo RCA jacks. These outputs can be connected to
external ampliers.
2. Zone Preamp Outputs 7-8 – Like the previous Zones, Zones 7 and 8 have preamplied,
analog line level RCA connections for connecting external ampliers. These zones also have
Optical Toslink outputs for connecting external equipment with a digital Toslink connection.
3. StereoRCAInputs–Inputs 1-4 have stereo RCA jacks for connecting any analog input
source like TV’s, DVD players, Streamers, CD players, etc.
4. Stereo 3.5mm Inputs – Every input 1-7 has a stereo 3.5mm jack for connecting analog input
sources such as cell phones, tablets, laptops, wireless receivers, etc.
5. OpticalToslinkInputs–Inputs 5 and 6 feature optical Toslink inputs, which are useful for
attaching digital audio sources, such as from a TV, DVD player or wireless streamer. The
output of your audio source must be manually set to Stereo PCM if automatic settings do not
work.
6. Wi-Fi Antenna –
Allows the Matrix88 to be connected to your network wirelessly. Dayton Audio
recommends to always use a wired ethernet connection instead of Wi-Fi whenever possible.

8
Overview–RearPanel
7. AC Input – This unit comes with an IEC jack that permits the removal of the AC power cord.
This allows exibility of changing thew power cord for different countries. The IEC socket also
houses the main fuse holder. Plug the power cord supplied with the amplier into this socket
and to a wall socket or appropriate surge protector.
8. KeypadConnections–These RJ45 jacks allow you to connect optional DAX88KP Keypads,
which allow per zone control without the use of the mobile app. Note: These ports are labeled
1-8, however the dipswitches on the back of the keypad need congured so they control the
correct zone (p.19).
9. 12VDC Trigger Outputs – Useful for automation systems, each zone has a corresponding
12V trigger that will output 12V when the zone is on, and 0V when the zone is off. This can
be useful to trigger the power state of other equipment like external ampliers, video screens,
or anything else with a 12V input trigger that corresponds with that zone (p.25).
10. 12VDC Trigger Inputs – Applying 12V to the Mute Trigger will mute all zones, and will
unmute all zones if the signal is removed (0V). Applying 12V to the Power On Trigger will turn
on all zones. The Zones will remain on even when the 12V signal is removed. The power on
trigger can be even more useful when combined with the automatic standby function (p.25).
11. SerialPortforRS232ControlandDeviceUpdates–This port allows RS232 commands
to be sent to and from the DAX88, which can be useful for automation systems. This port can
also be used to upgrade the rmware on the Matrix88. See the “RS232 Control” section for
more details.
12. USB Power Outputs – Useful for powering or charging external devices such as streamers,
tablets, etc, these USB ports are for power only and will not transmit any data. The ports are
capable of 5V, 1A of output each.
13. NetworkLANConnection–This RJ45 jack allows the DAX88 to be connected to your
network via a standard ethernet patch cable.
9
Overview – Keypads
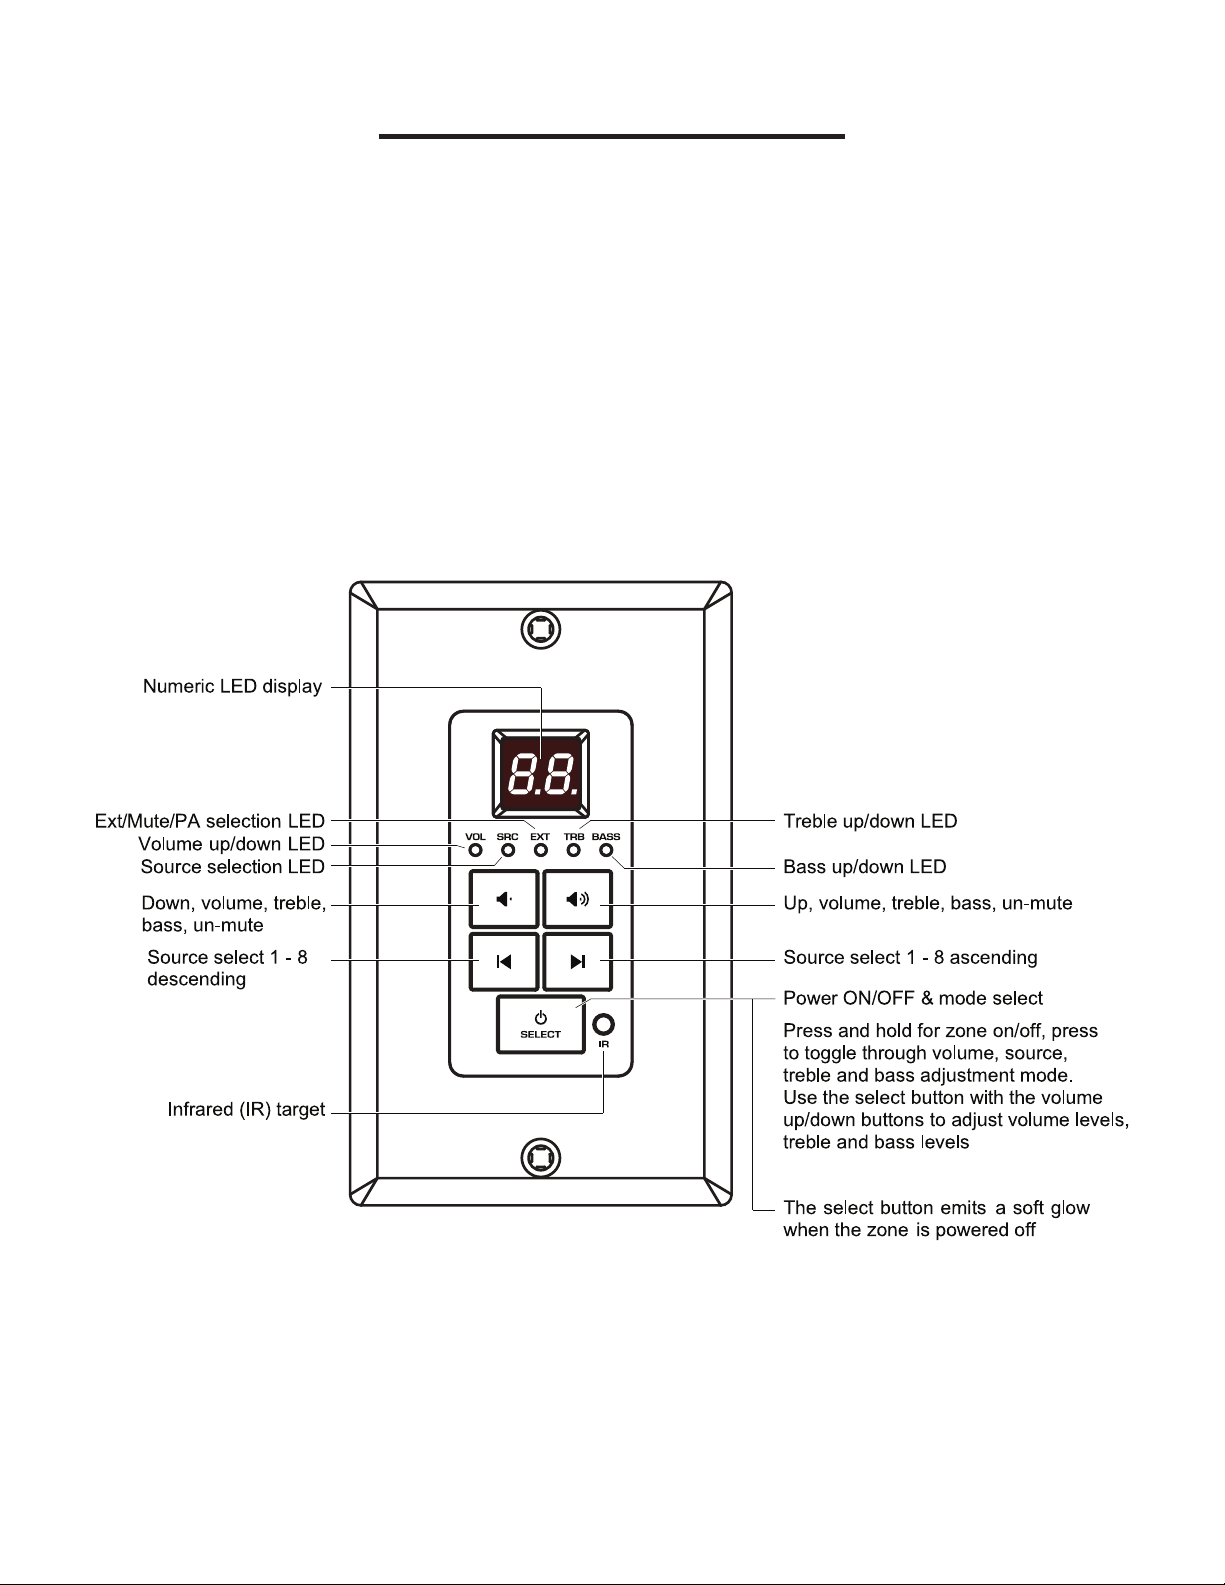
DAX88KP – Keypads (Oponal)
The DAX88KP Keypad is designed for ease of use with accessible controls over the
corresponding Matrix88 zone. Soft-touch backlit buttons and a backlit LED display provide
convenient control of the zone’s power status (ON/OFF), source selection, volume, treble, and
bass controls. A built-in IR target or external IR target connected to the EXT-IR terminals on the
rear of the keypad, relay commands to the Matrix88 main unit through your DAX88IR IR Remote.
A DAX88KP will control one zone at a time, which is congurable with dip switches on the back of
the keypad.
Five LEDs on the keypad face indicate the operational function of the keypad. The EXT LED
indicates that the system is receiving a trigger command from an external IR target.

10
Overview–IRRemote
DAX88IR – IR Remote for Keypads (Oponal)
The DAX88IR Infrared Remote Control provides complete zone control through the built-in IR
receiver on the Matrix88’s keypads. All keypad functions can be accessed using the DAX88IR.
In addition to the keypad functions, the DAX88IR has a mute button to temporarily mute audio
in the corresponding zone. Once the mute function is activated the keypad’s LED display will
ash, indicating the mute status is active. To deactivate mute, press the mute button again on the
DAX88IR Remote, or disable mute with the Matrio mobile app.
Table des matières


