Concord Camera DV2020 Manuel utilisateur

Digital Video Camera

E1
English
Digital Video Camera
Microphone
Strobe
Lens
Self-Timer Indicator
Photo Sensor
Battery Cover
Menu Button
ENTER
Selector Dial
Shutter Button
Power Switch
Voice
Playback
Power / Strobe Indicator
Quick Start Guide
Still
Wrist Strap Eyelet
Set Up
MP3
Mode Dial
Motion

E2
Battery Cover
Tripod Screw Hole
Card Cover
LCD Monitor
(270° Rotation)
Reset Button
DC IN
USB Terminal
AV Out / Earphone
Battery and AC Adapter
Loading the battery
Use 3.7V Rechargeable Lithium-ion
Battery.
1. Open the battery cover by sliding it
in the direction shown on the battery
cover.
2. Load the battery and close the
battery cover.
Using the AC Adapter
1. Connect the power cord to the AC Adapter.
2. Connect the AC Adapter cable to the DC IN jack of the DV, and insert
the power plug into a power outlet.

E3
English
Storage Media
This DV uses internal memory and Secure Digital Memory Card as stor-
age media to record data. It is not necessary to choose internal memory
or memory card to record data, because if you insert a memory card to
DV, the memory card will take priority.
Note : If you want to use Internal Memory, you must take away the
Memory Card from the card slot first.
Internal Memory : The size of the internal memory is 16MB.
Secure Digital Memory Card (SD Card)
Insert the SD Card
1. Check that the DV is turned off.
2. Gently flip open the monitor, then open
the card compartment cover.
3. Insert the card (position it with the
metalic slots facing towards the card
cover and the cut-corner being
near the side of the wrist-strap eyelet).
4. Close the card cover.
Remove the SD Card
1. Check that the DV is turned off.
2. Gently lift up the monitor, then open
the card compartment cover.
3. Press the edge of the card so that a
small part of it slides out.
4. Carefully pull out the card and close
the card compartment cover.

E4
Setting the date and time
Date format can be set to: Y / M / D, M / D / Y, and D / M / Y.
Time is displayed in the 24-hour clock format.
Setting is possible from [2003/01/01 00:00] to [2099/12/31 23:59].
1. Turn on the DV and set the Mode Dial to
[ SET ].
2. Slide Selector Dial ( ) to select
[ CLOCK ] and press ENTER.
3. Slide Selector Dial ( ) to select
Year, Month, Day, Time, or Date Format,
then press ENTER.
After select an item, press [ : +1 ] /
[ : -1 ] to adjust the item. If you keep
pressing or , the number will
advance or recede continuously.
Each time you set an item you must press ENTER to confirm the
setting.
If you want to return to menu screen, press MENU.
Recording
This section includes Motion Picture, Still Picture, and Voice recording.
Motion Picture Recording
The possible recording time is displayed according to the remaining
space in the recording destination.
1. Turn on the DV and set the Mode Dial to [ ].
2. Check the position of the subject on the LCD monitor.
E5
English
3. Press Shutter button and the recording time will display.
Shooting will start.
Press Shutter button again to stop
shooting.
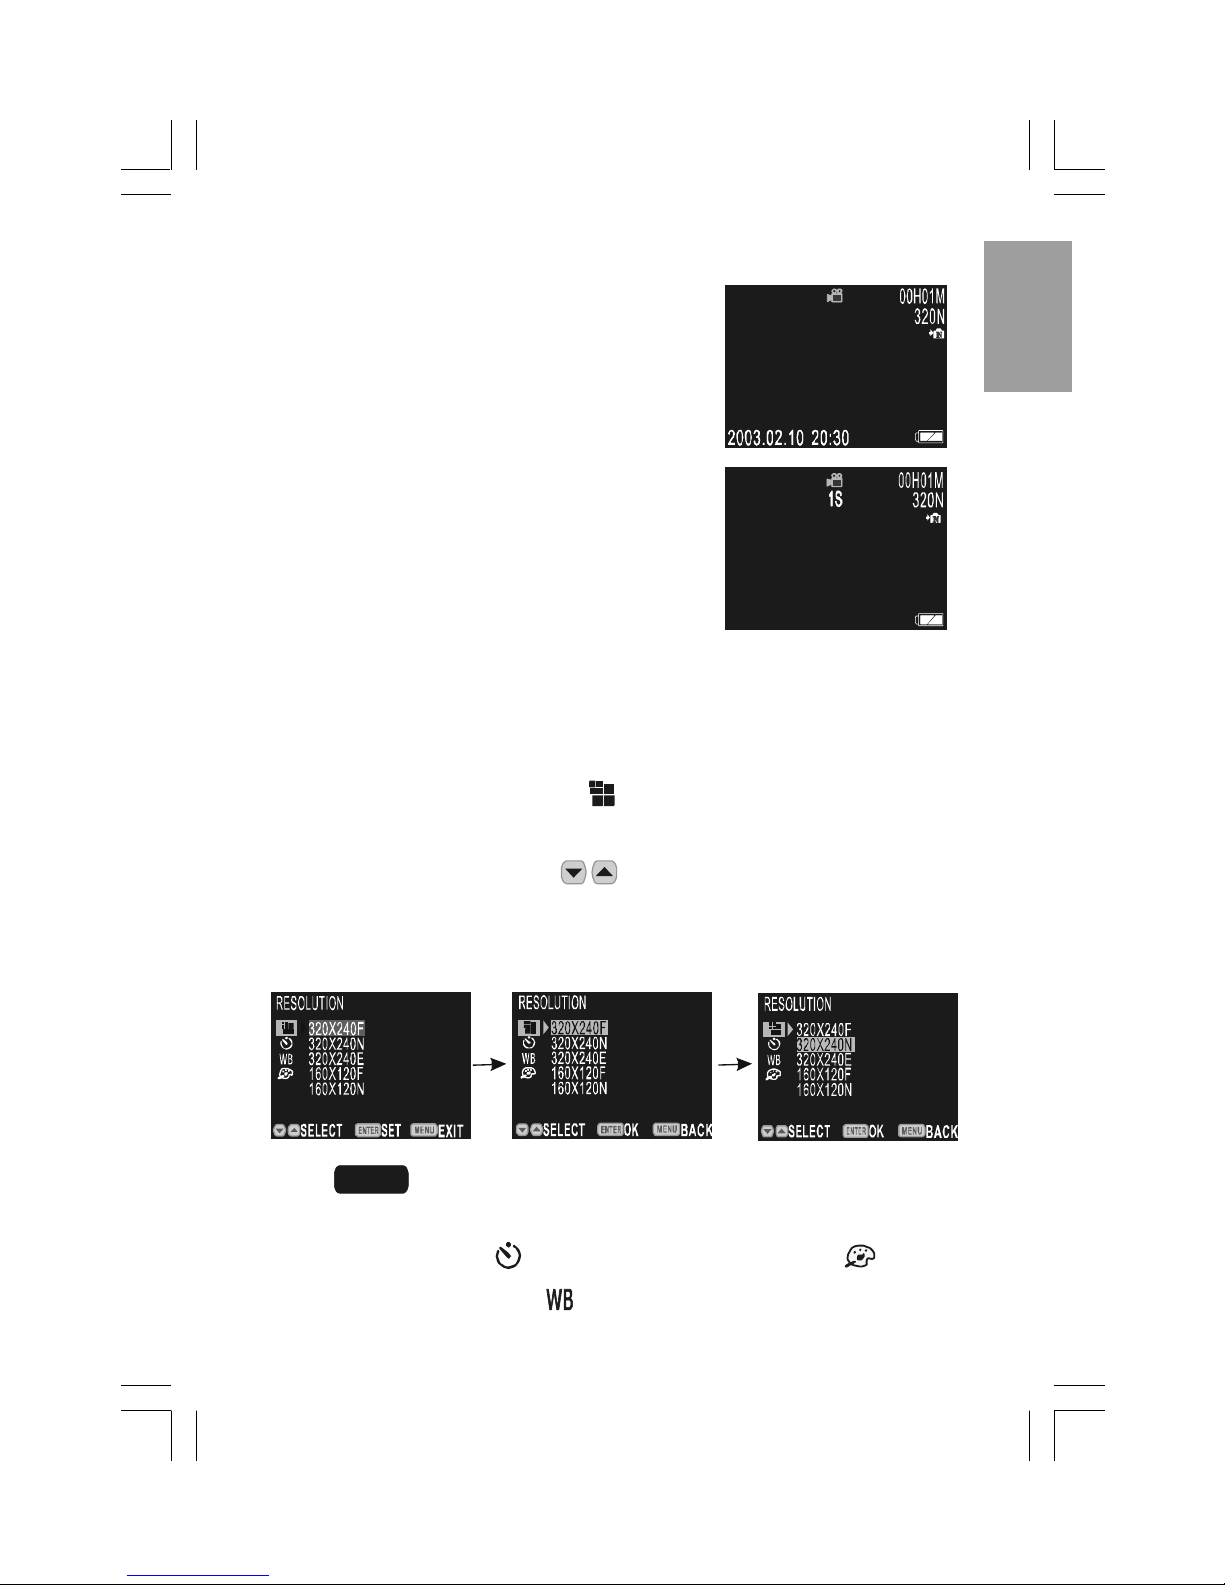
Menu and Selector Dial function in Motion Picture Mode
xHow to use MENU
Press MENU in preview mode to enter into the menu (see picture 1)
and set as follows:
Select the RESOLUTION , as an example.
1. Press ENTER (see picture 2).
2. Slide Selector Dial ( ) to select an image quality mode.
3. Press ENTER (see picture 3) again to confirm the selection
and return to the preview mode.
Note : The following features can be set according to the above
operational steps.
zSELF TIMER zEFFECT
zWHITE BALANCE
12
3

E6
xHow to use Selector Dial
Use the Selector Dial in the preview mode.
Slide Selector Dial ( ) to perform digital zoom function.
The digital zoom is 4X at maximum in motion mode.
Press ENTER, then slide Selector Dial ( ) to select a
scene mode.
Still Picture Recording
1. Turn on the DV and set the Mode Dial to
[ ].
2. Check the position of the subject on the
LCD monitor.
3. Press Shutter button to record image.
Menu and Selector Dial function in Still Picture Mode
xHow to use MENU
Press MENU in the preview mode to enter into the menu (see picture 1)
and as follows:
Set the RESOLUTION , for example:
1. Press ENTER (see picture 2).
2. Slide Selector Dial ( ) to select an image quality mode.
3. Press ENTER (see picture 3) again to confirm the selection
and return to the preview mode.
Note : The following features can be set according to the
above operational steps.
zSELF TIMER zEFFECT
zWHITE BALANCE zSTROBE
23
1

E7
English
How to use Selector Dial
Use the Selector Dial in the preview mode.
Slide Selector Dial ( ) to perform digital zoom function.
digital zoom is 2X in still picture mode. Digital Zoom does not
work in 2048X1536.
Press ENTER, then slide Selector Dial ( ) to select a
scene mode.
Voice Recording
Follow the procedures below to record sound. The possible recording
time is displayed according to the remaining space in the recording
destination.
1. Turn on the DV and set the Mode Dial to [ ].
2. Press Shutter button to start recording and the recording time will
display (see picture 2).
3. Press Shutter button again to stop recording.
Playback
Files, including Motion Picture, Voice File, and Still Picture, can be played.
Motion File / Voice File Playback
1. Turn on the DV and set the Mode Dial to [ ].
4. Press Shutter button to start playing motion picture file/ Voice File
While playing,press MENU, then slide Selector Dial ( )
to adjust the volume.
To pause, press ENTER during playback; to resume, press ENTER
again.
When playing back Motion Picture File or Voice File, press to
fast forward, press again to return to normal speed.
12
2. Plug the supplied earphone to the AV Out terminal located
on the camera. (page 2)
3. Press ENTER button to select " EARPHONE" displayed on the LCD.

E8
When playing back Motion Picture File or Voice File, press
to rewind , press again to return to normal speed.
Still Single File Playback
1. Turn on the DV and set the Mode Dial to [ ].
2. Slide Selector Dial to display previous file, slide Selector Dial
to display next file.
Thumbnail Playback (Index Screen)
1. Turn on the DV and set the Mode Dial to
[ ].
2. Press ENTER to display files in thumbnail
style.
Display 9-file at one time.
3. Slide Selector Dial ( ) to select file you want to play.
Press to move to previous file, press to move to next file.
After a file has been selected, you may press ENTER again to
return it to single display.
Delete
1. Turn on the DV and set the Mode Dial to [ ].
2. Press MENU, then slide Selector Dial ( ) to select
[ DELETE ] and press ENTER.
3. Slide Selector Dial ( ) to select [ ONE FILE ] and press ENTER.
When the message ìDELETE?î displays, you may press ENTER
to confirm the deletion of current displayed file.
When the message ìDELETE?î displays, you may slide Selector
Dial ( ) to select the image you want to delete.

E9
English
MP3
1. Turn on the DV and set the Mode Dial to [MP3].
2. Slide Selector Dial ( ) to select
the music you want to play.
5. Press Shutter button.
The LCD monitor will close in 30 seconds and you can turn it on
by pressing any button.
Slide Selector Dial ( ) to adjust the volume.
Software Installation/Files Transferring to
Computer/Web Mode
Notes for Software Installation:
1. For any of required operating systems including Windows (98SE/
ME/2000/XP) and Mac (Mac OS 9.X), you must install the
camera drivers first from the supplied CD-ROM, and do not connect
the camera to your computer via the supplied USB cable BEFORE
successfully installing the camera drivers.
2. For any of required operating systems, you must install Div X player
from the supplied CD-ROM so as to view video clips downloaded
from the DV2020 camera.
3. When the camera is connected to your computer for the first time
after the installation of the camera drivers from the supplied CD-
ROM, and the Mode Dial is set to the [ ] position, the computer
will recognize and install the camera onto the computer, during the
installation, messages prompting you to select may occur under
Windows 2000 and Windows XP operating systems. For more infor
mation about it, see page 55 in the UserísGuide.
4. For details about the installation of the camera drivers and the other
software applications from the supplied CD-ROM, please refer to the
Installation Guide section on page 51 in the Userís Guide.
3. Plug the supplied earphone to the AV
Out terminal located on the camera. (page 2)
4. Press ENTER button to select
"EARPHONE" displayed on the LCD.
Autres manuels pour DV2020
1
Table des matières
Langues :
Autres manuels Concord Camera caméscope

Manuels caméscope populaires d'autres marques


Panasonic
Panasonic AG-HMC152EN Manuel utilisateur

Insignia
Insignia NS-DCC5HB09 - Camcorder - 720p Manuel utilisateur

MYDLINK
MYDLINK DCS-6100LH Manuel utilisateur

Sony
Sony video Hi8 Handycam CCD-TR555 Manuel utilisateur

SECURECOM
SECURECOM V-5014B Manuel utilisateur

Panasonic
Panasonic HDC-SD100 Manuel utilisateur


