Cocraft JS-FB14BD Manuel utilisateur

ENGLISHSVENSKANORSKSUOMIDEUTSCH
Important!
Read the entire instruction manual
carefully and make sure that you fully
understand it before you use the
equipment. Keep the manual for future
reference.
Viktig information:
Läs hela bruksanvisningen noggrant och
försäkra dig om att du har förstått den
innan du använder utrustningen. Spara
bruksanvisningen för framtida bruk.
Viktig informasjon:
Les disse anvisningene nøye og forsikre
deg om at du forstår dem, før du tar
produktet i bruk. Ta vare på anvisningene
for seinere bruk.
Tärkeää tietoa:
Lue nämä ohjeet huolellisesti ja varmista
että olet ymmärtänyt ne, ennen kuin
alat käyttää laitetta. Säilytä ohjeet
myöhempää tarvetta varten.
Wichtiger Hinweis:
Vor Inbetriebnahme die komplette
Bedienungsanleitung sorgfältig
durchlesen und aufbewahren.
HS 950-H
HIGH VOLUME LOW PRESSURE
950 W
18-3608 ∙41-1011
HVLP SPRAY GUN
FÄRGSPRUTA HVLP HVLP MALERSPRØYTE
MAALIRUISKU HVLP HVLP-SPRITZPISTOLE
Ver. 20160513
Original instructions
Bruksanvisning i original
Originalbruksanvisning
Alkuperäinen käyttöohje
Original Bedienungsanleitung
Art.no Model
18-3608 JS-FB14BD
41-1011 JS-FB14BD

ENGLISH
2
HVLP Spray Gun
Art.no 18-3608 Model JS-FB14BD
41-1011 JS-FB14BD
Please read theentire instruction manual before using theproduct and then save it for
future reference. We reserve theright for any errors in text or images and any necessary
changes made to technical data. In theevent of technical problems or other queries,
please contact our Customer Services (see address details on theback).
Safety
General safety instructions for power tools
Warning: Read all theinstructions.
Failure to adhere to thefollowing instructions may lead to electric shock, fires or
serious injuries.
SAVE THESE INSTRUCTIONS.
Theterm “power tool” in thefollowing text refers to your handheld mains operated or
battery operated tool.
1) Work area safety
a) Keep thework area clean and well illuminated. Cluttered and poorly lit areas
invite accidents.
b) Do not use power tools in explosive environments, such as in thepresence
of flammable liquids, gases or dust. Power tools create sparks which may ignite
dust or fumes.
c) Keep children and other bystanders away from thearea where you are using
thepower tool. Distractions can cause you to lose concentration and control of
thetool.
2) Electrical safety
a) Theplug of thepower tool must fit correctly into thewall socket. Never modify
theplug in any way. Never use anadaptor plug together with earthed power
tools. Unmodified plugs and matching outlets will reduce therisk of electric shocks.
b) Avoid physical contact with earthed objects such as pipes, radiators, ovens
and refrigerators. There is anincreased risk of electric shock if your body is earthed.

ENGLISH
3
c) Do not expose thepower tool to rain or other wet conditions. Water entering
apower tool will increase therisk of electric shock.
d) Do not abuse themains lead. Never use thelead for carrying, pulling or
unplugging thepower tool. Keep thelead away from heat, oil, sharp edges
and moving parts. Damaged or tangled leads increase therisk of electric shock.
e) When using power tools outdoors, use anextension lead that is suitable for
this purpose. Theuse of anextension lead designed for outdoor use decreases
therisk of electric shocks.
f) If theuse of thepower tool in awet environment is unavoidable, awall
socket equipped with aresidual current device (RCD) should be used.
Use of anRCD significantly reduces therisk of electric shock.
3) Personal safety
a) Pay attention to what you are doing and use common sense when using
power tools. Never use power tools if you are tired or under theinfluence of
drugs, alcohol or medication. One moment of inattention while using apower
tool may result in aserious injury.
b) Wear protective clothing. Always wear safety glasses. Using protective
clothing such as dust masks, non-slip safety shoes, helmets and ear defenders
reduces therisk of injury.
c) Avoid accidental starts. Make sure that thepower switch is set to OFF before
plugging thepower tool into awall socket, fitting thebattery or picking up/
carrying thepower tool. Never carry apower tool with your finger on thetrigger
and never connect thepower tool to awall socket when theswitch is set to ON,
since it may result in injury.
d) Remove all service tools/keys before switching on thepower tool. Aservice
tool left on arotating part of thepower tool may result in personal injury.
e) Do not overreach. Keep proper footing and balance at all times. This enables
better control of thepower tool in unexpected situations.
f) Wear suitable clothing. Do not wear loose-fitting clothing or jewellery.
Keep hair, clothes and gloves away from moving parts. Loose-fitting clothes,
jewellery or long hair could become caught in moving parts.
g) If equipment for theextraction and collection of dust is available, make sure
it is connected and used properly. Use of dust collection equipment can reduce
dust related hazards.

ENGLISH
4
4) Use and maintenance of the power tool
a) Do not force thepower tool. Use thecorrect power tool for your application.
Thecorrect power tool will do thejob better and safer if used at therate for which
it was designed.
b) Never use thepower tool if thepower switch does not switch thetool on
and off properly. Any power tool that cannot be controlled by thepower switch is
dangerous and must be repaired.
c) Unplug thelead from thewall socket or remove thebattery before making
any adjustments, changing accessories or storing thepower tool. These
precautions reduce therisk of thepower tool starting unexpectedly.
d) Store power tools that are not being used out of children’s reach. Do not
allow people who are unfamiliar with thetool or these instructions to operate
thetool. Power tools are dangerous in thehands of untrained users.
e) Properly maintain your power tools. Check for misalignment, binding of
moving parts, broken parts or anything else which might affect theoperation
of thepower tool. If damaged, have thepower tool repaired before use. Many
accidents are caused by poorly maintained power tools.
f) Keep cutting tools sharp and clean. Properly maintained cutting tools with sharp
cutting edges are less likely to bind and are easier to control.
g) Use thepower tool, and any accessories in accordance with these
instructions, taking into account theworking conditions and thework to
be performed. Using thepower tool for apurpose other than that for which it is
intended could result in adangerous situation.
5) Service
a) Repairs and service should only be performed by qualified tradesmen, and
only with original spare parts. This guarantees that thesafety of thepower tool
is maintained.
Safety instructions specic to spray guns
• Thespray gun must not be used close to sources of ignition such as open fires,
cigarettes, sparks, electrical appliances and hot objects.
• Only use coating materials and solvents with aflashpoint above 21 °C.
• Be aware of potential hazards caused by thecoating material. Follow
theinstructions on thepackaging of thecoating material. Follow all instructions
regarding personal safety equipment.
• Use thespray gun in awell-ventilated area suited for thepurpose.
• Warning: Never use thespray gun with any flammable liquid.

ENGLISH
5
• If themains lead is damaged it should only be replaced by themanufacturer or
aqualified service technician. This is to avoid hazards.
• Warning: Risk of personal injury! Never point thespray gun at yourself, other
persons or animals.
• ALWAYS use suitable safety goggles, gloves, breathing masks, etc. to prevent
paint, solvents and poisonous fumes from coming into contact with eyes and skin.
• Always follow theinstructions given by themanufacturer of thepaint or coating
material to be used in thespray gun.
• Do not dismantle thespray gun or try to repair it yourself.
• Make sure that no solvent fumes are sucked into thespray gun.
• When using thespray gun outdoors, think about thewind direction. Thecoating
material from thespray gun could land on surfaces where it is not wanted close to
thework area.
• When using thespray gun indoors, make sure that theroom is well ventilated.
• Thespray gun is only intended for normal domestic use and only in themanner
described in this instruction manual.
• Never lay thespray gun on its side during use.
• Never let children play with thespray gun.
Safety symbol guide
Read theentire instruction manual before use and save it for future reference.
Always use ear protection, safety glasses or avisor and wear adust mask.
ENGLISH
6
1
2
3
4
1098 11 12 13 14
16
15
5 76
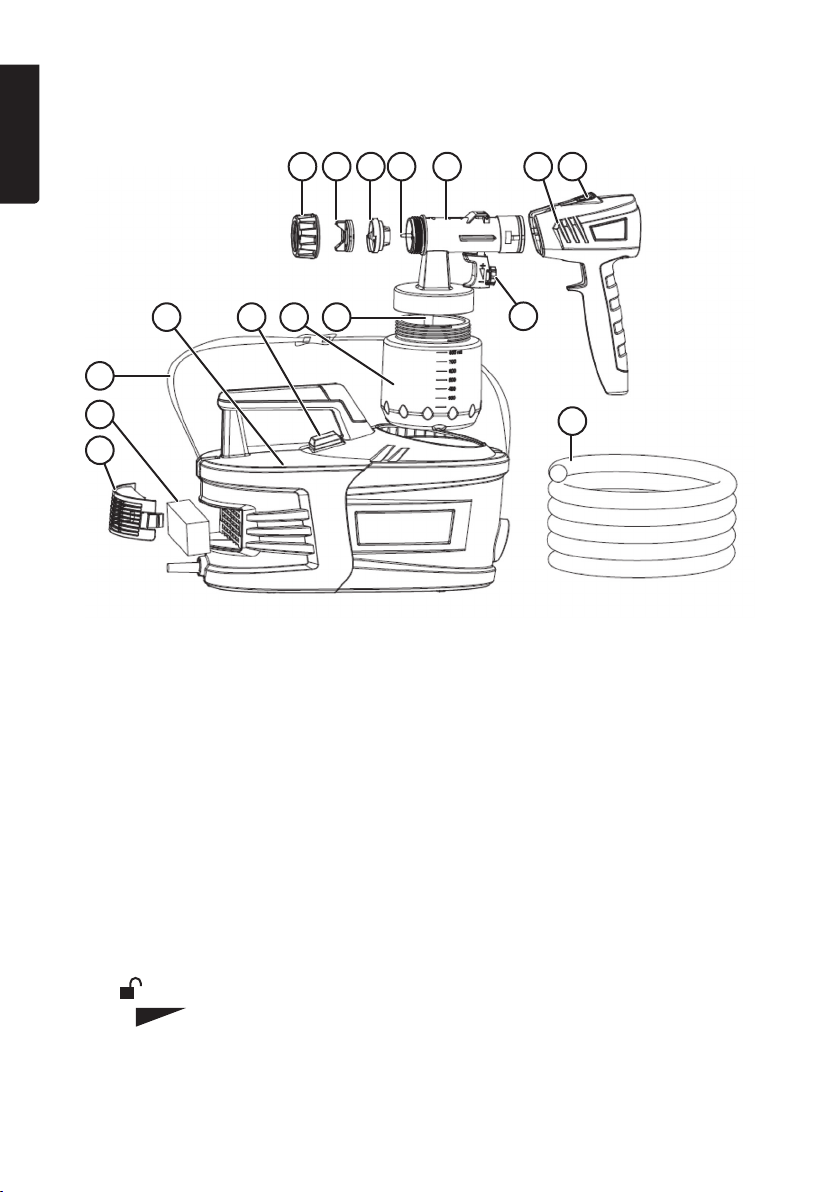
Product description
1. Air filter cover
2. Filter
3. Shoulder strap
4. Air compressor
5. [0/l ] Power switch
6. Container
7. Pickup tube
8. Retaining ring, keeps theair cap and paint nozzle in place
9. Air cap
10. Paint nozzle
11. Paint needle
12. Spray gun body
13. Pistol grip
14. [ ] Quick release button to separate thepistol grip from thespray gun body
15. [+ – ] Trigger and paint flow adjuster
16. Air hose
ENGLISH
7
Operating instructions
Preparations
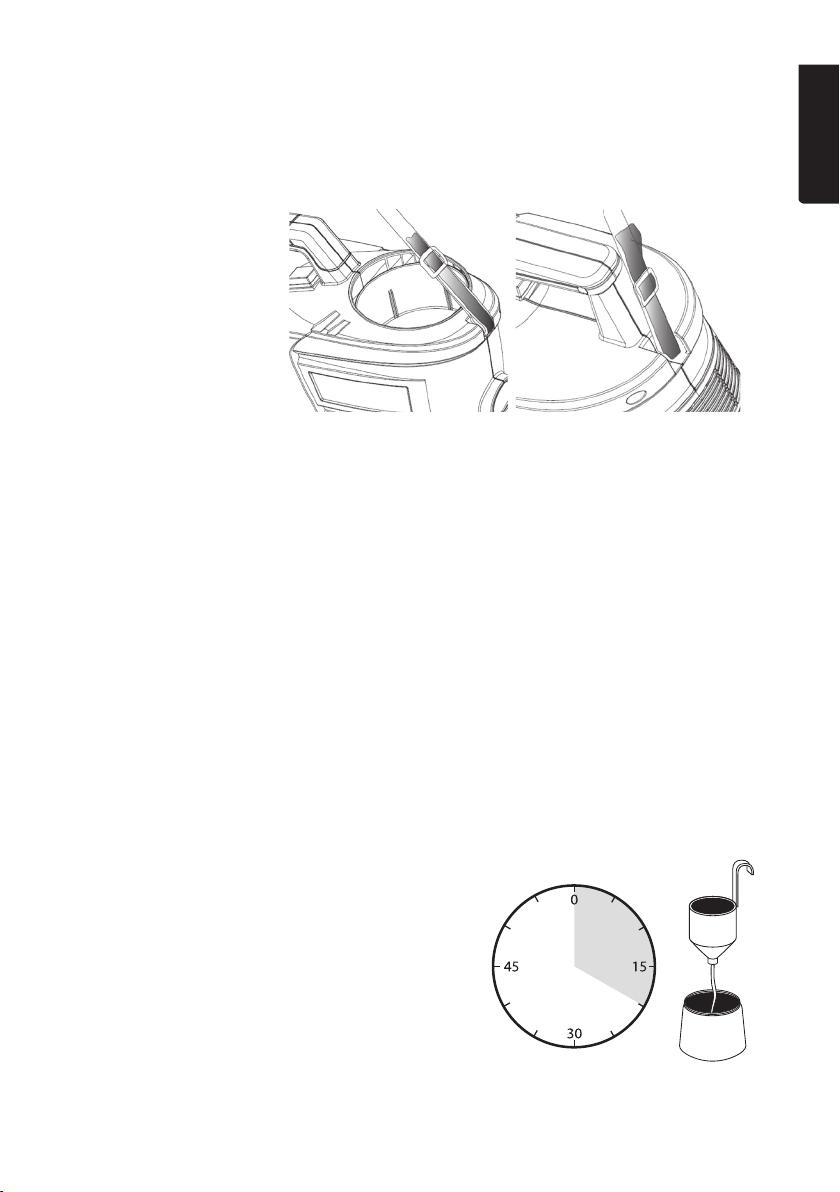
Attaching the shoulder strap
Suitable coating materials
Water- and solvent-based paints, 2-component paints, primers, clear finishes, vehicle
finishes, glazes, wood preservatives (sealants, oils, etc), wood stains, insecticides and
certain flour paints such as Falu Vapen.
Unsuitable coating materials
Emulsion paints, alkaline paints, calcimine paints (whitewash), materials with
aflashpoint below 21 °C.
Preparing the coating material (thinning)
Thoroughly shake thecan of coating material before opening it. Coatings such as paints
normally need to be diluted/thinned before spraying. Test asmall amount of thecoating
before diluting it all. Follow themanufacturer’s advice for thinning thecoating you are
using. Ask your local paint shop for advice if you are unsure, explain that you are using
aHVLP (high volume, low pressure) type spray gun. Thethickness of apaint is denoted
by its viscosity and is measured by letting acertain amount of paint run through ahole
of acertain diameter. Thelonger it takes for thepaint to run through thehole, thehigher
theviscosity. Viscosity is measured in seconds.
Warning: Only use coating materials and solvents with aflashpoint above 21 °C.
Fasten theshoulder
strap to thehousing of
theair compressor and
adjust thelength.
Measuring theviscosity:
1. Shake thecontainer of paint before
performing aviscosity test.
2. Dip theentire viscosity cup into thecoating
material so that it fills completely.
3. Hold up theviscosity cup and measure how
long it takes for thepaint to run through thehole.
4. Dilute thepaint if it is too thick and measure
it again.
ENGLISH
8
Example viscosities of various coating materials
Spray coating Viscosity in DIN-seconds
Primer containing solvent 25–40
Varnish containing solvent 15–40
Water-soluble primer 25–40
Water-soluble varnish 20–35
Wood preservative, paint remover, oil Undiluted
Disinfectant, insecticide Undiluted
Vehicle paint/lacquer 20–35
Preparation of the workpiece to be coated
• Thequality of thefinish will depend on how clean and smooth thesurface is before
it is sprayed. Sand and fill rough or cracked surfaces if required. Remove all dust
from thework area before starting to spray, vacuum clean if possible.
• Cover all surfaces and objects that should not be sprayed with masking tape and
dust sheets or remove them from thework area.
• Cover all hinges, screw threads, etc.
Spray painting
Operating instructions
Note: Begin by test-spraying on apiece of card to set thecorrect spray pattern and
feed rate before starting to spray theobject to be coated.
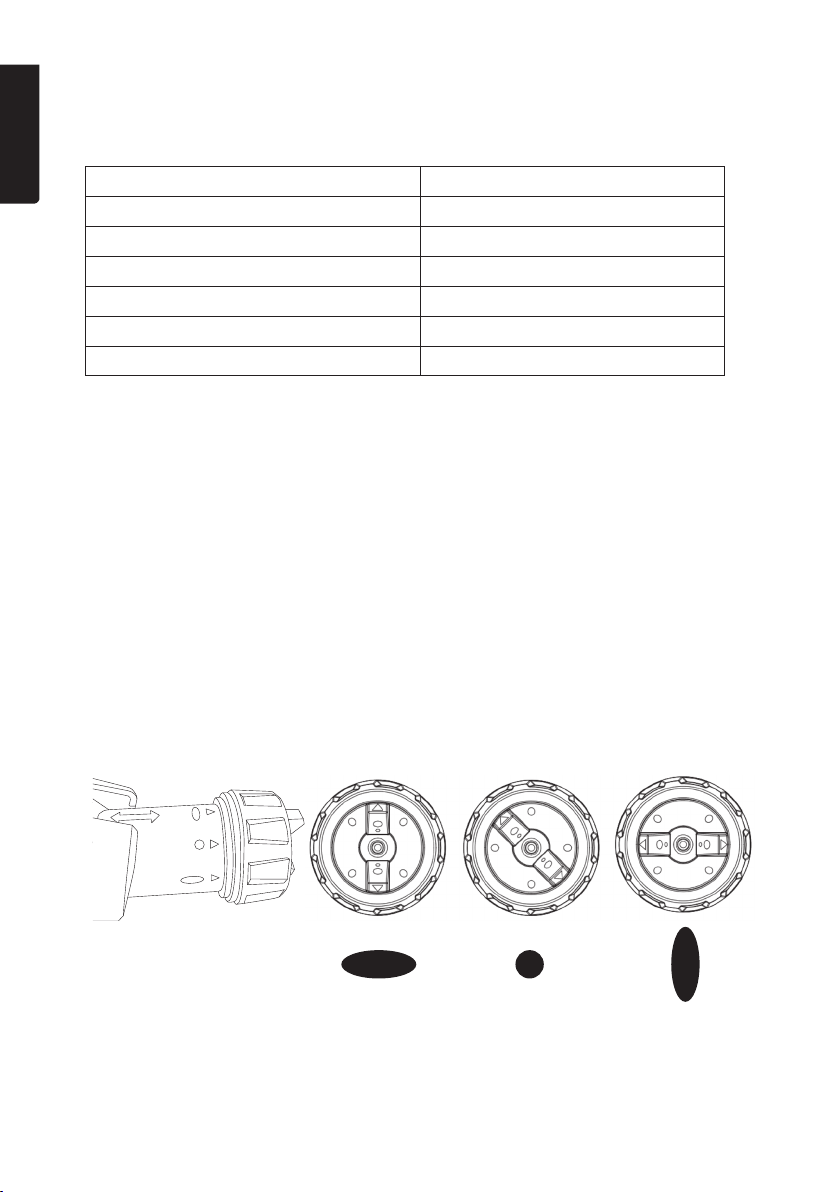
Setting the spray pattern
Theair cap can be set to one of three positions for different spray patterns.
Vertical
For large
vertical
surfaces
Horizontal
For large
horizontal
surfaces
Round
For corners and
small surfaces
ENGLISH
9
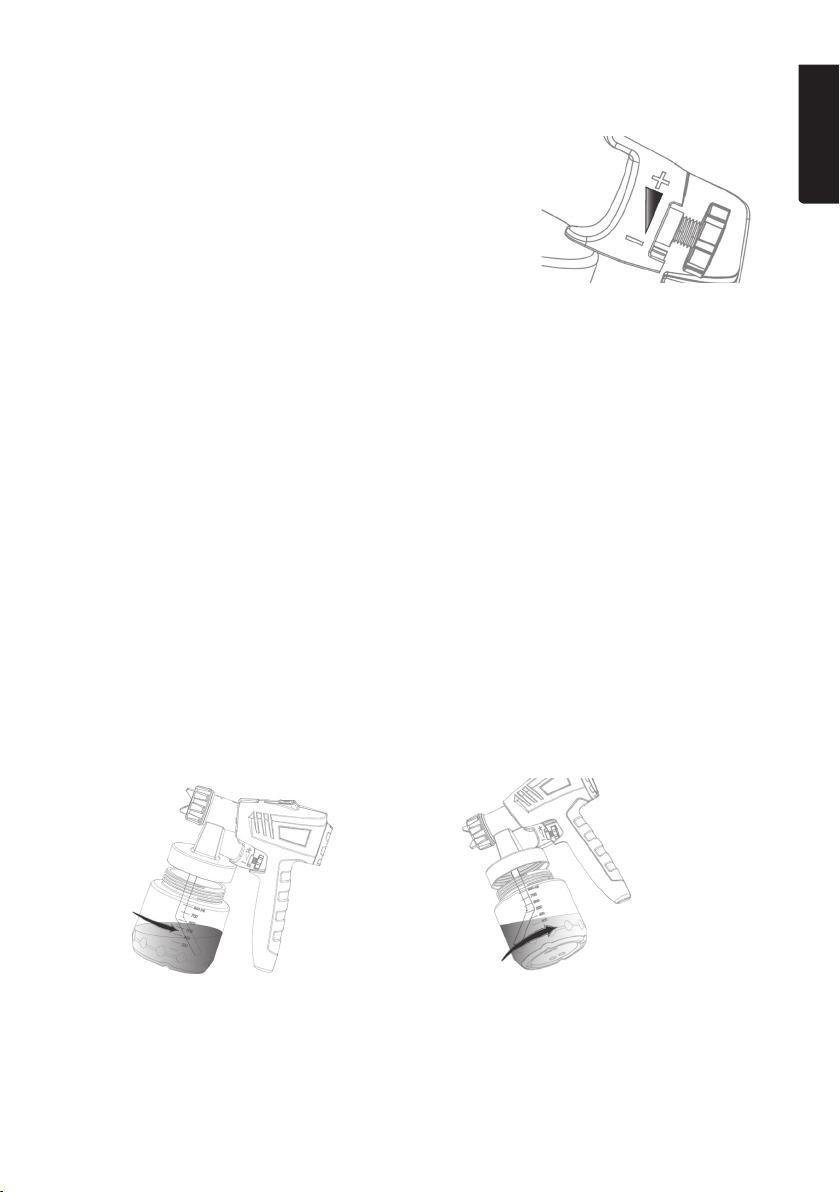
Adjusting the paint volume
Adjust theamount of paint using thescrew on
theback of thetrigger.
• When working outdoors, pay attention to thewind direction.
• Hold thespray gun perpendicular to thesurface to be painted and at adistance of
10–30 cm.
• Begin spraying outside thetarget area and move your arm in asmooth motion
from side to side or up and down.
• Move thespray gun evenly cross-wise or up-and-down, depending on thespray
pattern setting.
• Let each pass of thespray jet overlap by 4–5 cm.
• Do not interrupt thespraying action once inside thetarget area.
• Aneven movement of thespray gun results in aneven surface quality.
• Varying thedistance or spraying angle will lead to theformation of paint mist,
resulting in anuneven coating.
• Finish thespraying motion outside thetarget area.
• Do not operate thespray gun until thefluid container is completely empty. If
thespray gun can no longer feed paint to thenozzle during operation, there will be
aninterruption in thespraying resulting in anuneven finish.
• If either thepaint nozzle or air cap are soiled, they should be cleaned with
theappropriate thinning agent.
1. Fill thecontainer with theready-mixed coating material.
2. Attach thecontainer and adjust thepickup tube as directed below:
If thespray gun needs to be pointed
downwards for painting; turn thetube
so that it points forwards and then
screw thecontainer on.
If thespray gun needs to be pointed
upwards for painting; turn thetube so
that it points backwards and then screw
thecontainer on.
ENGLISH
10
Switching the spray gun on
1. Connect themains lead to a220–240V, 50Hz power socket.
2. Turn on thecompressor using thepower switch (5).
3. Pull thetrigger (15) until paint comes out.
Switching the spray gun off
1. Release thetrigger.
2. Turn off thecompressor using thepower switch (5).
3. Unplug themains lead from thewall socket.
Changing the paint nozzle
Thespray gun comes with 2 paint nozzles, 1.8 mm and 2.6 mm. Thesmaller nozzle is
suitable for most purposes. Thelarger nozzle should be used if ahigh volume of paint
needs to be applied.
1. Remove theretaining ring (8).
2. Remove theair cap and paint nozzle and separate them.
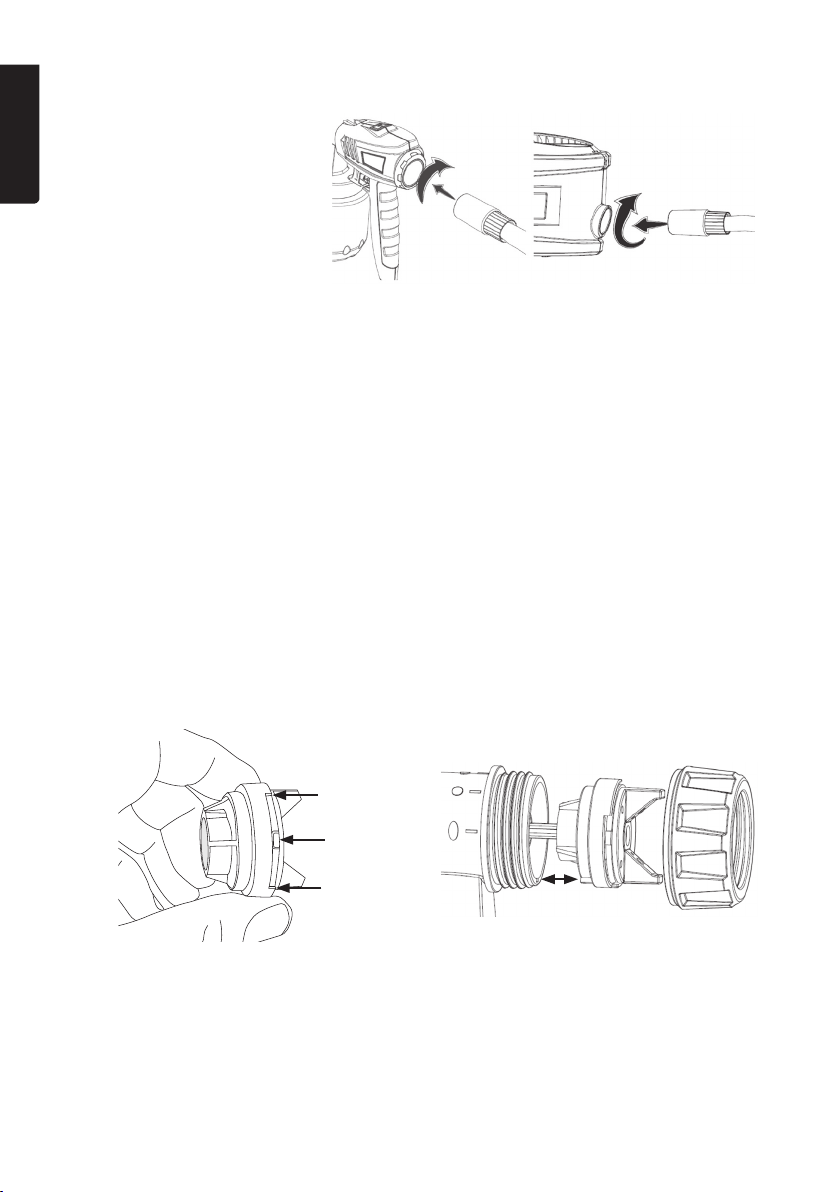
3. Connect theair hose to
both theair compressor
and thespray gun.
3. Change thepaint nozzle and
reassemble it with theair cap. Make
sure that thelugs on theair cap slot
into thenotches on thepaint nozzle.
4. Refit theparts onto thespray gun, making
sure that thelugs on thepaint nozzle fit
into thenotches on thespray gun.
5. Fasten thenozzles in place using
theretaining ring.
Ce manuel convient aux modèles suivants
1
Table des matières
Langues :


