ClockReports C2 Manuel utilisateur

C2 Fingerprint & Card
Time Attendance and Access Control System
User Guide(V1.5)
www.clockreports.com
Subject to change without notice

1
1 Product Introduction
1.1 Fingerprint Identification Device Instruction
C2 is a fingerprint attendance device specially designed for large and medium-sized
enterprises. It integrates colorful LCD, keyboard and the optical fingerprint sensor
together. 3 cm ultra-thin design make it much classy and elegant. Fashionable 3 inches
real colorful wider LCD can display different languages. Unique function keys can meet
complex self-defined work types and special attendance status, which provide great
convenience for the users. Standard USB communication and power supply combination
make it plug and play. No need additional adapter.
C2 fingerprint and card device
1.2 Function and Feature
Ultra-thin and exquisite appearance design make C2 looks much classy and
elegant.
The design of the exterior of the ultra-thin delicate and elegance
3 inch high definition real colorful wider TFT LCD can display the realistic words
and images.
Friendly and graphical human-computer interaction interface and high quality
human voice prompt make C2 operate easily and enjoyable.
South Korea low power consumption and high speed processor ensure the high

2
speed calculation.
New generation fully enclosed, waterproof, dustproof optical fingerprint sensor
and long life
Anviz BioNANO V10 core algorithm makes the fingerprint verification fast and
accurate.
Standard MINI USB, USB Pen Driver communication, TCP/IP connection. It can
transmit the data in different environments.
Wiegand signal input/output and relay signal output. With great expansibility (such
as access control and ring output)
Optional built in RFID card or Mifare card reader module. It is the perfect
combination of fingerprints and RFID technology.
Multiple verifying methods combination of Fingerprints/ password/ card can
guarantee the attendance data complete and safe.
Support 1-6 digital work code, 16 user-defined attendance status and short
message function.
Employee can check the attendance records from the device directly.
Fingerprint Capacity: 3000
Record Capacity: 50000
1.3 Technical Parameters
Item Description
Processor South Korea low power consumption and high
speed processor
Algorithm Anviz BioNANO V10 Core Algorithm
Fingerprint Sensor AFOS optics sensor
Scan Area 22mm×18mm
Resolution 500DPI
LCD 3 inch high definition real colorful wider TFT LCD
Fingerprint Capacity 3000
Record Capacity 50000

3
Verifying Method FP, Card, ID+FP, ID+PW, Card+PW , Card+PW,
FP+PW.
Verifying Time <0.5 second
FRR 0.001%
FAR 0.00001%
Communication Port Mini USB ,TCP/IP
Card Reader Module Optional 125KHz RFID or 13.56 MHz Mifare card
Name Display Yes
Fingerprint Image Display Yes
Attendance Status IN, OUT
User-defined Attendance
Status Yes
Attendance Status Switch
Automatically Yes
Work Code 1-6 digital

5
2
.Operation Guide
2.1 Structure Instruction
C2 fingerprint and card device structure is as following.
Introduce as following.
1 LCD Display 7 Fn/Work Code
2 Digital Number Key 8 Fingerprint Sensor
3 Status /direction key 9 Menu / EXIT
4 Card Read Area 10 Confirm Key
5 LED Indicator 11 Delete Key
6 Speaker

6
2.2 Product Power On
After connecting the power supply to the device, the device will start
automatically. The interface is as following.
In the main interface, you can make the attendance records. You can also input
administrator password to enter the system management menu.
2.3 Menu Management
In the main interface, input “0” and press【OK】, the system will prompt : “Please
input password”. Input the default password “12345”.
Press【OK】to enter the 【main menu】.
In【main menu】, press number keys or 【IN/】、【OUT/】key to select and
operate 【Manage User】, 【Comm. Setup】, 【Pen Driver】, 【Clock Setup】,
【Clock Information】and【Search Record】options.
2.3.1 User Management

7
Select 【Manage User】option , press【OK】to enter the 【Manage User】
interface.
In【Manage User】interface, you can add ,modify or delete users.
2.3.1.1 Add User
Press number keys or 【IN/】、【OUT/】direction key to select 【Add
User】,press【OK】to enter editing user interface.
【User ID】User ID number, 1-12 digital number valid.
【Password】:Register user password, 1-6 numbers valid. The user who
registered password can make attendance by password.
【User Name】:Can be uploaded user name by attendance software.
【Card No.】:Register user card. The user who registered card can make
attendance by card.
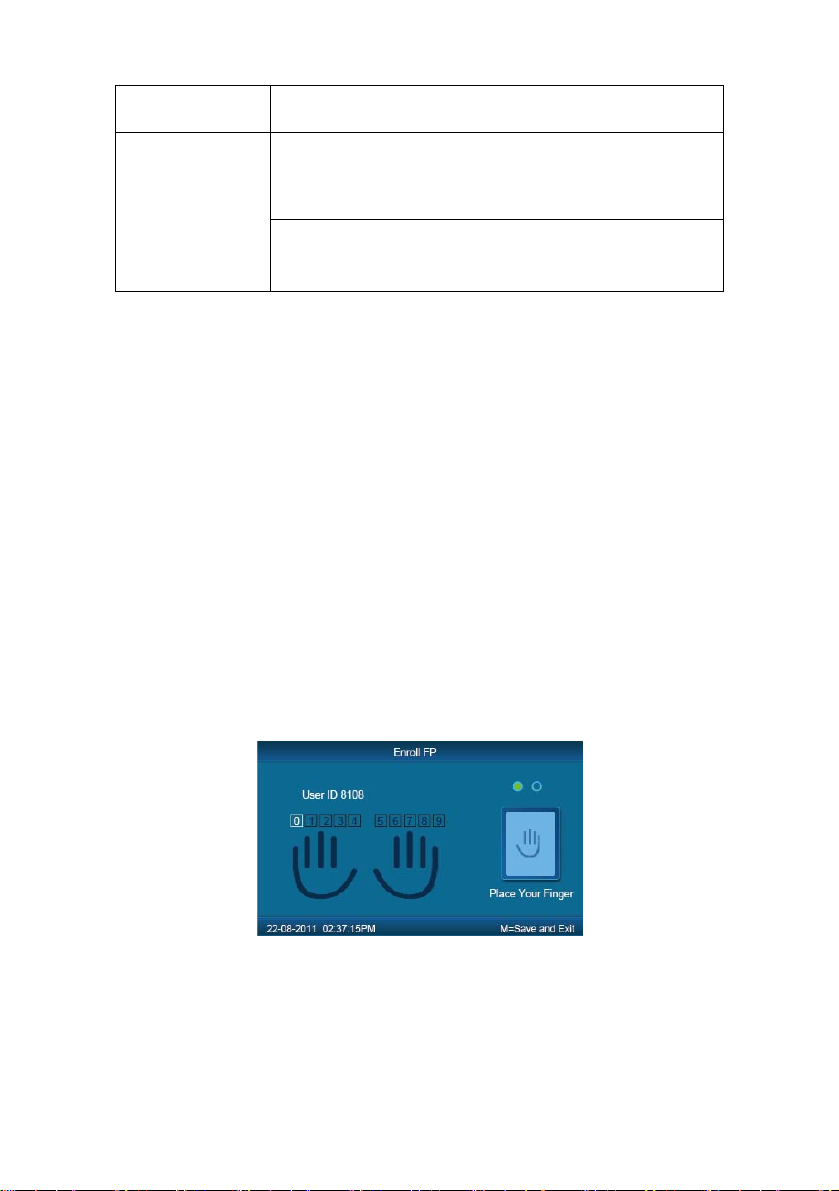
【Register FP】:Register user fingerprint, max 10 fingerprints for each user. The
user who registered fingerprint can be attendance by fingerprint.
【Admin】:Set the user privilege of operating device. ”No” as a normal user
can only make daily attendance.
8
Normal User Only make daily attendance.
Super Admin: have all privilege of operating
device. Default ID is ‘0’ and Password is”12345”.(Set
in “Clock setup”-“Advanced Setup”-“Admin level”)
Admin
Admin: have 4 levels,Every level have different
privileges(Please refer to 2.3.4.3.4 Admin level);
【Match Mode】:1. The system default verify method: Set the user verify
method as the system default verify method.
2、Personal verify method: Set user verifies method.
After setting, press【M】to save and exit.
Example: add new user according to the process as following.
Input user ID:
Input user ID from keypad. Press the【C】to delete and re-enter, press【OK】
to confirm.
Register Password:
Press 【IN/】、【OUT/】key to fix the cursor in “password” field, input the
password , and press【OK】.
Register card:
Swipe RFID card on Card Read Area
Register Fingerprint:
The default fingerprint registering order: 0、1、2、3、4、5、6、7、8、9.
Select one finger to register by pressing number keys or 【IN/ 】、【OUT/ 】
key , then press the same finger 2 times in correct way following the prompt voice.
Admin Setup:
Press 【IN/】、【OUT/】key to fix the cursor in “admin” field, set the user as

9
administrator or not.
Match Mode:
Press【IN/】、【OUT/】key to set the verify method as default method or other
personal method.
Save/Exit user registration: Confirm the registered information is correct , then
press【M】to save and exit.
2.3.1.2 Modify User
Press number keys or 【IN/】、【OUT/】key to select【Modify User】, press
【OK】to enter【Modify User】interface.
Input the user ID to modify, and press【OK】to confirm. The user information will
display automatically, and now you can modify user information .Press【M】to save .
2.3.1.3 Delete User.
Press number keys or 【IN/】、【OUT/】key to select【Delete User】,press
【OK】to enter【Delete User】interface.
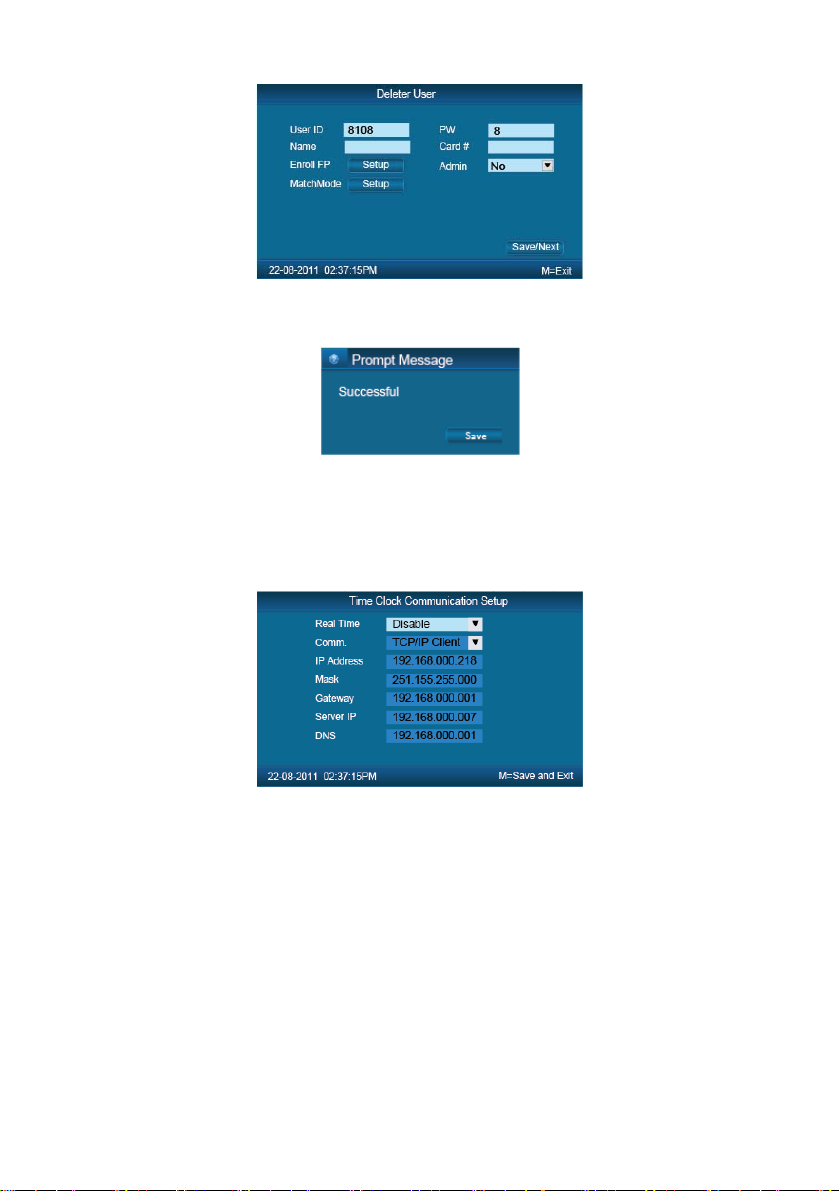
10
Input the user ID to delete and press【OK】to confirm, the system display as
following.
Press【OK】to confirm deletion.
2.3.2 Communications Setup
In main menu, select【Comm. Setup】and press【OK】to enter【Comm. Setup】
interface.
【Real Time】: “Disable”, inactivate the Real Time Monitor function. “Enable”,
the device will upload the attendance data to the server on real time.
【Comm.】:Set the T&A device communications method.
Server Mode: Normal TCP/IP mode.
Client Mode: There is one computer which works as the server for this T&A
device. Set the server IP in T&Adevice first, then this device can only connect to the
computer with TCP/IP mode.
【IP address】:The T&A device IP address for TCPIP communication mode.
【Mask】:Submask
【Gateway】:The default gateway for the LAN.
Table des matières


