CHEMetrics V-2000 Manuel utilisateur
OPERATOR’S MANUAL
V-2000 Photometer
CHEMetrics, Inc.
4295 Catlett Road
Calverton, Virginia 20138
Toll Free 1-800-356-3072
Phone: 540-788-9026
Fax: 540-788-4856
Web: www.chemetrics.com Sept. 09, Rev. 13

Table of Contents
Chapter 1 - Introduction
1-1 BatteryInstallation .................................. 1
1-2 Sample Cell Adapters ................................ 1
1-3 LCDDisplay ....................................... 2
1-4 Keypad ........................................... 3
1-5 Program Number Designation ......................... 4
Chapter 2 - Setup Menu Functions
2-1 Blank............................................. 5
2-2 Verify ............................................ 5
2-3 Digits............................................. 5
2-4 Clock............................................. 6
2-5 SetBaud.......................................... 6
2-6 Print ............................................. 6
2-7 AutoPrint ......................................... 7
2-8 AutoLog .......................................... 7
2-9 Self-Test .......................................... 7
2-10 Upload ........................................... 7
Chapter 3 - Setup and Measurement Procedures
3-1 General Operating Instructions ......................... 8
3-2 Procedure A - Zeroing, Program Selection and Measuring . . . 8
3-3 Procedure B - Zeroing, Program Selection, Setting Reagent Blank
and Measuring ................................... 9

Chapter 4 - Data Logging
4-1 Logging Data Manually ............................... 10
4-2 Logging Data Automatically ........................... 10
4-3 DisplayingtheLog .................................. 10
4-4 ClearingtheLog .................................... 10
Chapter 5 - Use with Printers and Computers
5-1 Printing Logged Data Directly to a Printer ................. 11
5-2 Downloading Logged Data to a Computer ................ 11
5-3 Uploading Method Revisions .......................... 12
Chapter 6 - Error Messages .................................. 14
Chapter 7 - Custom User Programs
7-1 CreatingaCustomUserProgram ...................... 15
7-2 CalibratingaCustomUserProgram..................... 15
7-3 ReplacingorReviewingaCustomUserProgram .......... 16
Chapter 8 - Specifications & Features ......................... 17
Chapter 9 - Product Information
9-1 Instrument&Accessories ............................. 18
9-2 WarrantyInformation ................................ 18
9-3 European Union’s WEEE Directive 2002/96/EC ............ 18
9-4 List of Supported Parameters .......................... 19

1
Chapter 1
Introduction
1-1 Battery Installation
The V-2000 requires 4 AA alkaline or lithium batteries. With alkaline batteries, the expected life
is 2,500 hours of operation. With lithium batteries, the expected life is 10,000 hours of operation.
The V-2000 has a battery saving auto-shutoff feature that turns the instrument off after 20
minutes of non-use. Remove batteries when photometer is not in use.
To install batteries, carefully loosen the 2 captive screws on the battery cover (back of
instrument). Remove the cover, and insert the batteries with the correct orientation as illustrated
in the battery compartment. Replace the battery cover and replace the captive screws.
1-2 Sample Cell Adapters
The V-2000 comes with 2 sample cell adapters: 13 mm adapter for Vacu-vials; 16 mm adapter
for COD Vials. The adapters ensure correct alignment of the ampoule or vial being used. If the
ampoule or vial is not aligned correctly (i.e. wrong adapter or no adapter is used), measurement
errors will occur.
To insert an adapter, the male tabs on the adapter (left and right sides) should be matched up
with the alignment slots to the left and right of the sample cell compartment. Insert the adapter
with the correct alignment and push down firmly until it snaps into place.
Important Note: Above the sample cell compartment, the instrument says
“cuvette adapter =lock-unlock <”. Disregard this message!
There is no lock, unlock feature to the current cell adapters.
They go straight in and out. DO NOT attempt to turn the
adapter from left to right when inserting it or removing it.
2
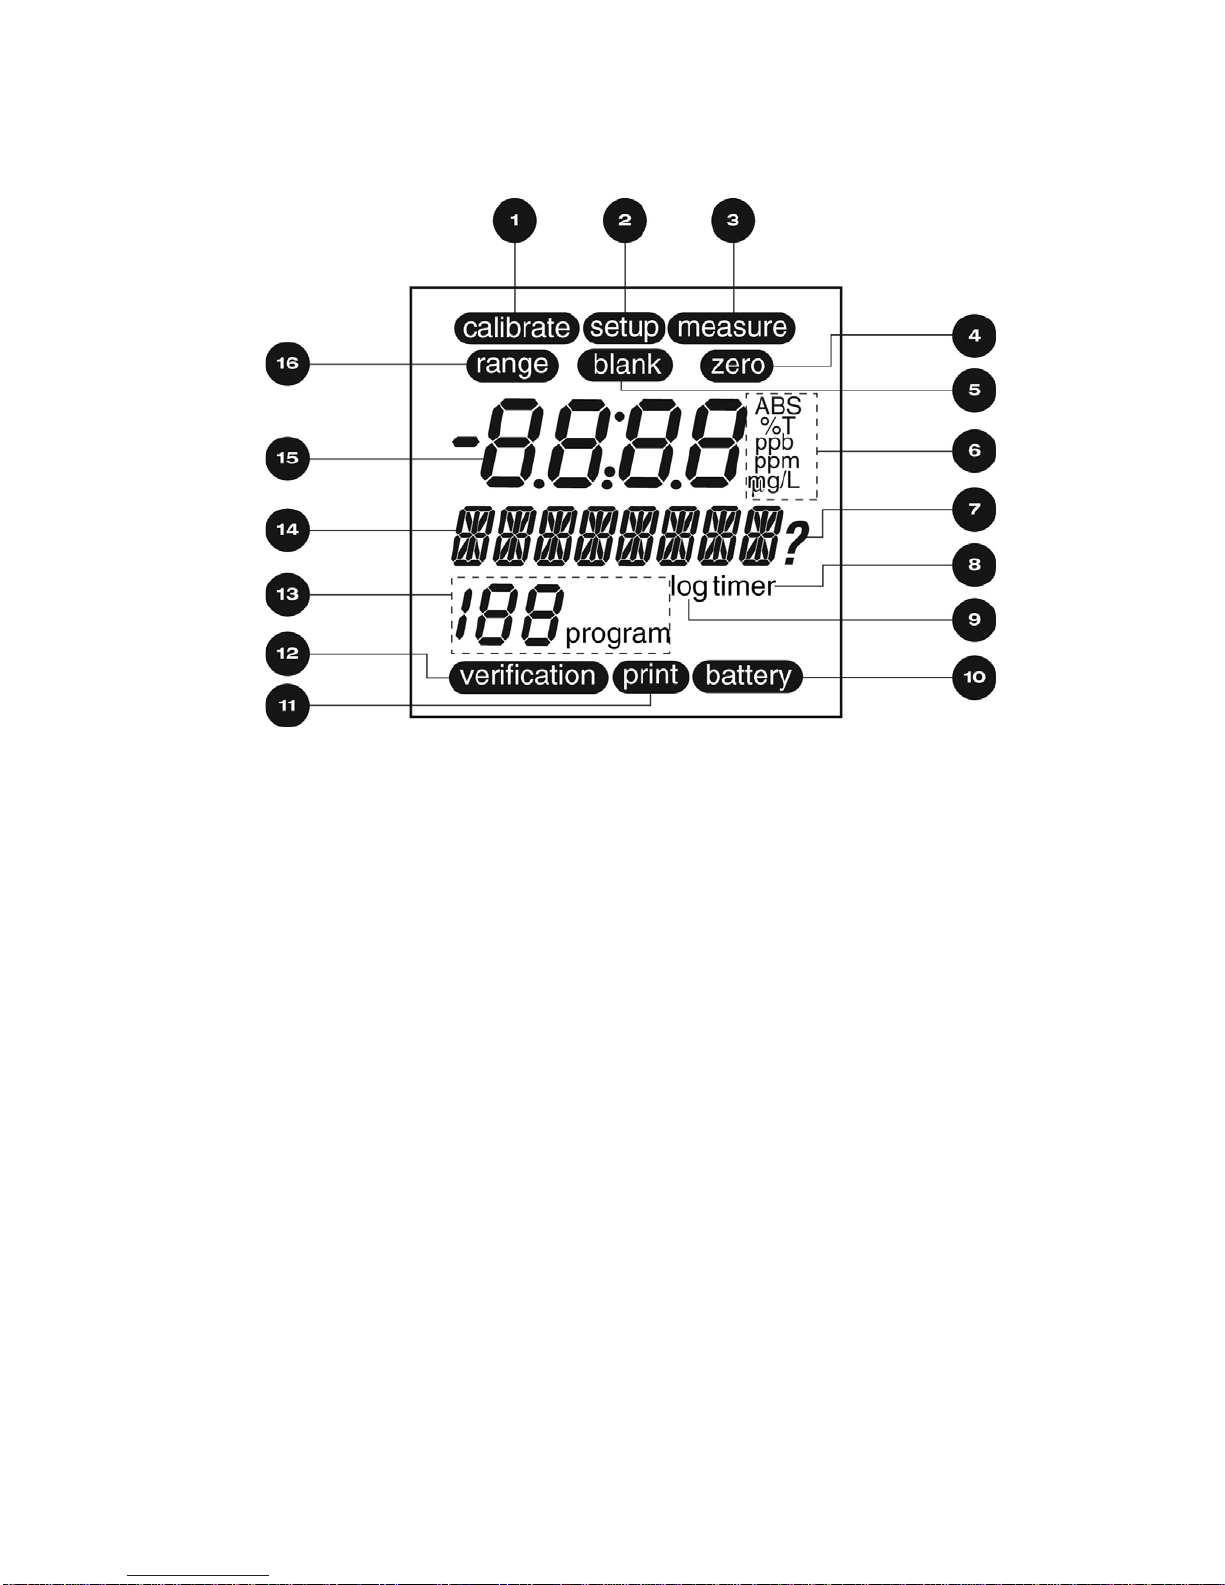
1-3 LCD Display
1calibrate Displays when the instrument is in the calibration mode
2setup Displays when the instrument is in the setup mode
3measure Displays when the instrument is taking a measurement
4zero Displays when the instrument is zeroing
5blank Displays when a blank is active for a selected method
6units Displays the chosen unit of measure
7?Displays when the instrument is prompting the user for a response
8timer Displays when the timer is active
9log Displays if data is stored in the log
10 battery Displays if battery is low
11 print Displays when the instrument is printing (or downloading)
12 verification Displays when the instrument is in the verification mode
13 XXX program Displays the active program number
14 ÇÇÇÇÇÇÇÇ Alphanumeric display
15 -8.8:8.8 Numeric display
16 range Displays to indicate over range condition
3
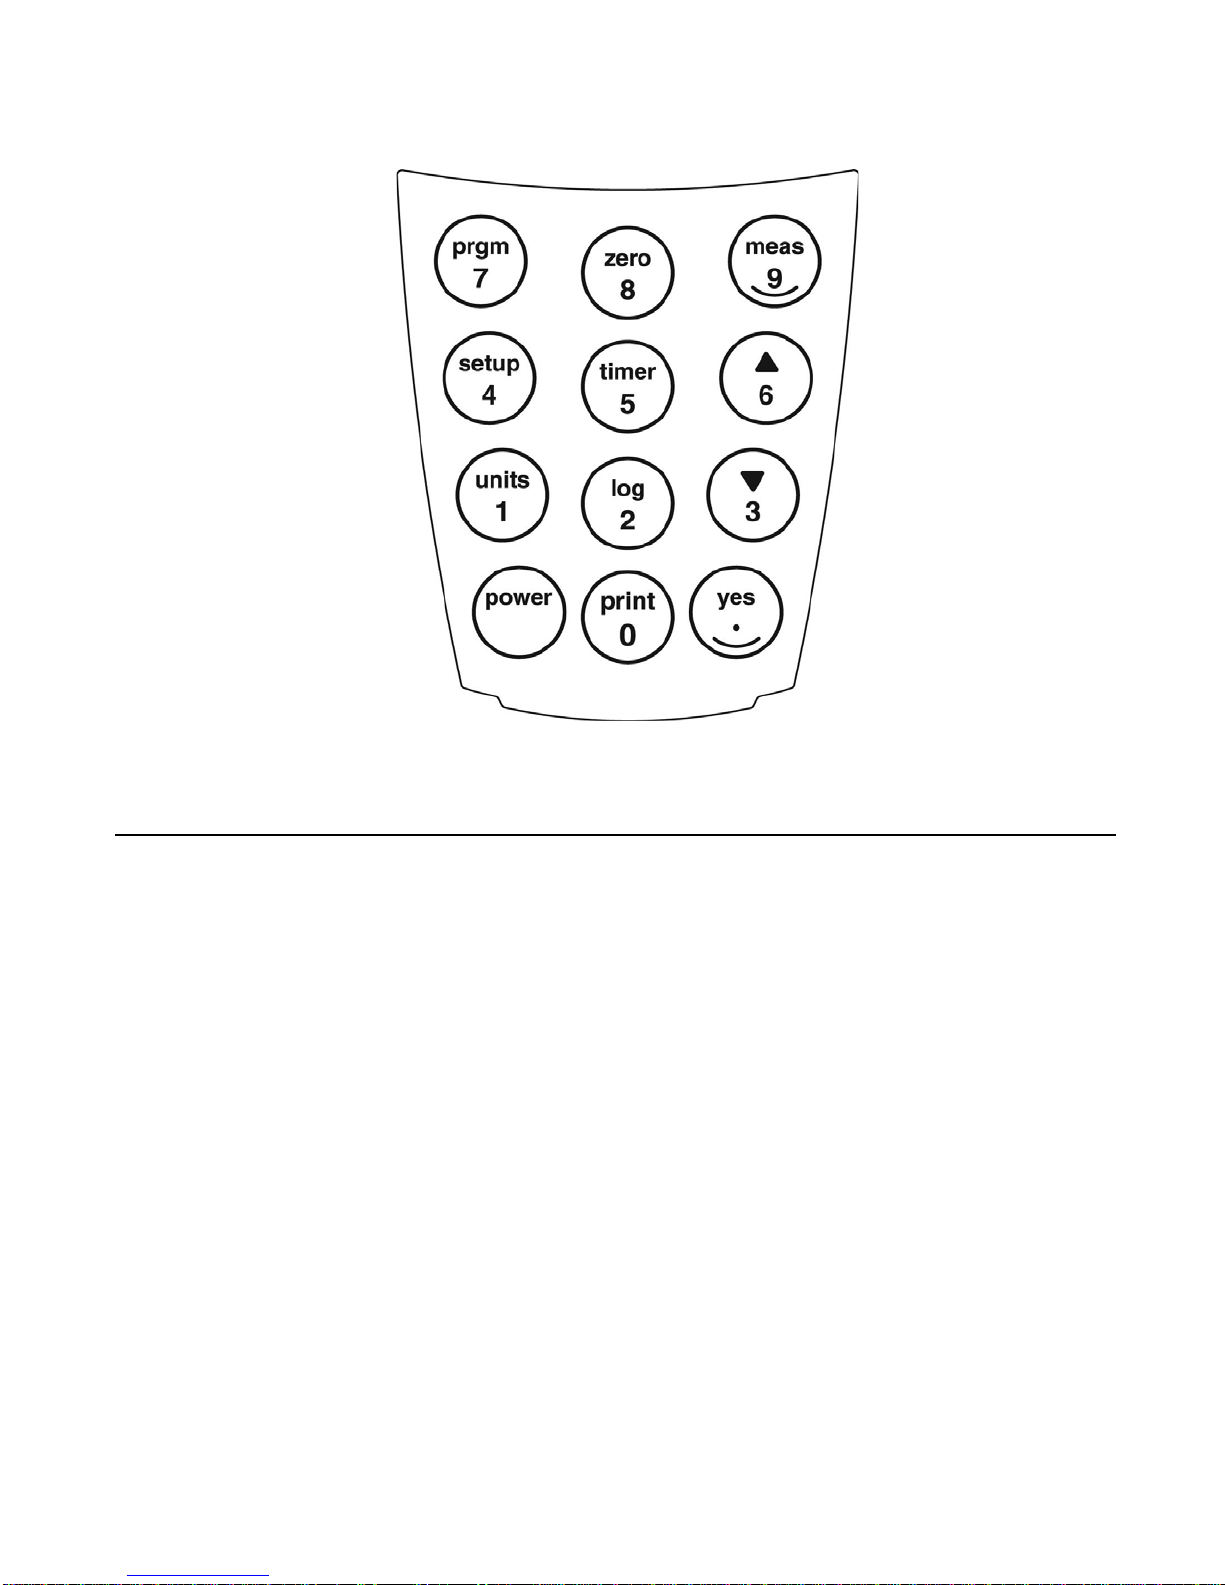
1-4 Keypad
KEY FUNCTION
power Turns the instrument on or off
print / 0 Initiates print mode or inputs a 0
yes / . Confirms a selection, functions as Enter key, or inputs a decimal point
units / 1 Allows selection of unit of measure or inputs a 1
log / 2 Initiates data log mode or inputs a 2
?/ 3 Scroll down or inputs a 3
setup / 4 Allows access to user selectable functions (Blank, Verify, Digits, Clock, Set
Baud, Print, AutoPrint, Auto Log, Self-Test, Upload, User Prgm, Cal User) or
inputs a 4
timer / 5 Initiates timer, allows access to time/date and stopwatch or inputs a 5
>/ 6 Scroll up or inputs a 6
prgm / 7 Initiates program number input or inputs a 7
zero / 8 Initiates a zero measurement or inputs an 8
meas / 9 Initiates a measurement or inputs a 9

4
1-5 Program Number Designation
The V-2000 offers the user access to approximately 50 pre-programmed water analysis methods
for use in conjunction with Vacu-vials ampoules and COD Vials (program numbers 5 -189
reserved for this function). For these pre-programmed methods, the instrument gives direct
readout test results.
The V-2000 also offers the user the option of taking readings in absorbance or % Transmittance
at each of the 4 available wavelengths (program numbers 1 - 4). Absorbance readings can then
be used to generate a user specific calibration equation. A scientific calculator or software
package with a linear regression function can be used to convert absorbance units to
concentration values.
Finally, the V-2000 offers the user the ability to store up 10 user specific custom methods.
Program Number Designation
0 manual zeroing; equivalent to using the zero key
1 420 nm absorbance or % Transmittance
2 520 nm absorbance or % Transmittance
3 580 nm absorbance or % Transmittance
4 610 nm absorbance or % Transmittance
5-189 pre-programmed water analysis methods
190-199 user generated custom methods

5
Chapter 2
Setup Menu Functions
To view the Setup menu functions, press the setup key and use the •or –keys to scroll through
the list of functions.
2-1 Blank
The blank function is employed for specific methods that require the generation and use of a
reagent blank ampoule or vial. The following methods require the use of this function: Aluminum,
Chloride, COD, Fluoride, Hydrazine, Ozone 2 (K-7413). The procedure for using the blank
function is found in Chapter 3, Section 3-3 Procedure B - Zeroing, Program Selection, Setting
Reagent Blank and Measuring.
If the blank is accidentally set (blank icon appears on the LCD display for a method other than
one of the 5 listed above), it is important to clear the blank before running the method.
To Clear Blank:
1. Press the setup key and use the •or –keys until “BLANK” is displayed, then press the yes
key.
2. “SET BLNK?” will be displayed.
3. Use the •or –keys to toggle from “SET BLNK?” to “CLR BLNK”. When “CLR BLNK” is
displayed, press the yes key.
4. “CLEARED” will be displayed.
5. Press the meas key to exit the setup menu.
2-2 Verify
Disregard this function. It offers no added value to the instrument user.
2-3 Digits
The digits function allows the user to select the resolution of the reading (the number of significant
digits in the displayed test result): 0.000, 0.00, 0.0, and 0. The default setting for this function is
0.000, however the test range on the parameter specific test kit instructions and in the List of
Supported Parameters in Chapter 9 of this manual is displayed with the suggested number of
significant digits for each particular method.
NOTE: The digits resolution setting on the V-2000 is not method specific, and therefore must be
reset as needed when moving from one preprogrammed method to another.

6
1. Press the setup key and use the •or –keys until “DIGITS” is displayed, then press the yes
key.
2. Use the •or –keys until the desired resolution is displayed, then press the yes key.
3. Press the meas key to exit the setup menu.
2-4 Clock
The clock function allows the user to set the time and date.
1. Press the setup key and use the •or –keys until “CLOCK” is displayed, then press the yes
key.
2. “20__” will be displayed. Enter the year.
3. “__Month” will be displayed. Enter the month.
4. “__Day” will be displayed. Enter the day.
5. “__:__ (24) hour” will be displayed. Enter the time.
6. Press the meas key to exit the setup menu.
2-5 Set Baud
The set baud function allows the user to select the baud rate:1200, 2400, 4800, and 9600. The
default setting for this function is 1200.
1. Press the setup key and use the •or –keys until “SET BAUD” is displayed, then press the
yes key.
2. Use the •or –keys until the desired baud rate is displayed, then press the yes key.
3. Press the meas key to exit the setup menu.
2-6 Print
The print function allows the user to select the printout format. The user can select between a
standard printout (used if printing directly to a printer) and a comma delimited format (used for
importing data into a spreadsheet).
1. Press the setup key and use the •or –keys until “PRINT” is displayed, then press the yes
key.
2. Use the •or –keys to toggle between “STND PRN” and “CMA DELM”. When the desired
printout format is displayed, press the yes key.
3. Press the meas key to exit the setup menu.

7
2-7 Auto Print
The auto print function allows the user to automatically send readings to a printer.
1. Press the setup key and use the •or –keys until “AUTO PRT” is displayed, then press the
yes key.
2. Use the •or –keys to toggle between “AUTO OFF” and “AUTO ON”. When the desired
printing function is displayed, press the yes key.
3. Press the meas key to exit the setup menu.
2-8 Auto Log
The auto log function allows the user to automatically save up to 100 test results in the
photometer’s memory. The procedure for using the auto log function is found in Chapter 4,
Section 4-2 Logging Data Automatically.
2-9 Self-Test
The self-test function puts the photometer into self-diagnostic mode. It is not recommended as
a routine test, but rather as a troubleshooting tool to be used if the unit gives an error message,
produces a suspect test result or in any way malfunctions. If an instrument fails any portion of
the self-test, contact CHEMetrics Technical Services Department.
1. Before initiating the self-test, the sample cell adapter must be removed and the light shield
must be in place.
2. Press the setup key and use the •or –keys until “SELFTEST” is displayed, then press the
yes key.
3. The instrument will display “KBD TEST”. Then it will prompt the user to press each of the
keys beginning with the 7 key.
4. When the test is complete, the instrument should display “UNIT OK”.
5. Press any key to view the complete LCD display capabilities. Compare the instrument display
to the display graphic in Chapter 1, Section 1-3 LCD Display.
6. Press any key to exit the self-test.
7. Press the meas key to exit the setup menu.
2-10 Upload
The upload function allows the user to update the V-2000 to the most current method program
revision. The V-2000 is updated by logging on to the CHEMetrics website, www.chemetrics.com
and clicking on the V-2000 Upload New Methods link. To ensure that the most current method
calibrations are being used, it is recommended that every V-2000 user check the CHEMetrics
website frequently. For more information, see Chapter 5, Section 5-3 Uploading Method
Revisions.
Table des matières
Autres manuels CHEMetrics Instrument de mesure


Manuels Instrument de mesure populaires d'autres marques


Endress+Hauser
Endress+Hauser Proline Promag 50 Caractéristiques techniques

Siemens
Siemens SITRANS F Coriolis FCT030 Manuel de la liste des pièces

KLINGER
KLINGER CMF V Series Manuel utilisateur

EXFO
EXFO FTB-2 Manuel d'exploitation et d'entretien

Keysight
Keysight M8290A Manuel utilisateur

ADTEK
ADTEK MW-5 Manuel utilisateur