Casals FC14 Manuel utilisateur

FC14
HINGE ROUTER
FRESADORA
FRAISEUSE
FRESATRICE
FRÄSE
FRESADORA

2
3
A
L
C
R
L
K
N
B
Fig. 1

4
C
Fig. 2 Fig. 3
D
E
GF E
J
J
I
I
H
P

5
K
Fig. 4
Fig. 5
Fig. 6 M
N
Q
L
G
L
L

6
Fig. 7
S
O
Fig. 8
30
20
10
P
Fig. 9
Fig. 10

7
Hinge Router
FC14
Dear Customer,
Many thanks for trusting to Casals Professional.
Thanks to its continuous effort, our innovation and the
strictest quality controls, Casals Professional develops
electric Power Tools for the toughest jobs.
General Power Tools Safety Warning
WARNING Read all safety warnings and
all instructions. Failure to follow the warnings and
instructions may result in electric shock, re and/or
serious injury
Save all warnings and instructions for future
reference
The term “power tool” in the warnings refers to your
mains-operated (corded) power tool or battery-
operated (cordless) power tool
Work Area Safety
-Keep work area clean and well lit. Cluttered or
dark areas invite accidents
- Do not operate power tools in explosive
atmospheres, such as in the presence of
ammable liquids, gases or dust. Power tools
create sparks which may ignite the dust or fumes
- Keep children and bystanders away while
operating a power tool. Distractions can cause you
to lose control
- Ensure that neither the air access nor exit become
either totally or partially covered by drapery, clothing,
Electrical safety
- Power tool plugs must match the outlet. Never
modify the plug in any way. Do not use any
adapter plugs with earthed (grounded) power
tools. Unmodied plugs and matching outlets will
reduce risk of electric shock
- Avoid body contact with earthed or grounded
surfaces, such as pipes, radiators, ranges or
refrigerators. There is an increased risk of electric
shock if your body is earthed or grounded
- Do not expose power tools to rain or wet
conditions. Water entering a power tool will increase
the risk of electric shock
- Do not abuse the cord. Never use the cord for
carrying, pulling or unplugging the power tool.
Keep cord away from heat, oil, sharp edges or
moving parts. Damaged or entangled cords increase
the risk of electric shock
- When operating the power tool outdoors, use
an extension cord suitable for outdoor use. Use
a cord suitable for outdoor use reduces the risk of
electric shock
- If operating a power tool in a damp location is
unavoidable, use a residual current device (RCD)
protected supply. Use of an RCD reduces the risk of
electric shock
- If any of the appliance casings breaks, immediately
disconnect the appliance from the mains to prevent
the possibility of an electric shock.
there are visible signs of damage or if it has a leak.
- Do not use the appliance with damp hands or feet, or
when barefooted.
- Do not use the appliance if the cable or plug is
damaged.
- Ensure that the voltage indicated on the rating label
matches the mains voltage before plugging in the
appliance.
- Do not touch the plug with wet hands.
Personal safety
- Stay alert, Watch you are doing and use common
sense when operating a power tool. Do not use
a power tool while you are tired or under the
inuence of drugs, alcohol or medication. A
moment of inattention while operating power tools
may result in serious personal injury
- Use personal protective equipment. Always wear
eye protection. Protective equipment such as dust
mask, non-skid safety shoes, hard hat, or hearing
protection used for appropriated conditions will reduce
personal injuries
- Prevent unintentional starting. Ensure the
switch is in the off-position before connecting
the power source and/or battery pack, picking up
or carrying the tool. Carrying power tools with your
nger on the switch or energizing power tools that
have the switch on invites accidents
- Remove any adjusting key or wrench before
turning the power tool on. A wrench or a key left
attached to a rotating part of the power tool may result
in personal injury
- Do not overreach. Keep proper footing and
balance at all times. This enables better control of
the power tool in unexpected situations
- Dress properly. Do not wear loose clothing or
jewellery. Keep your hair, clothing and gloves
away from moving parts. Loose clothes, jewellery or
long hair can be caught in moving parts
- If devices are provided for the connection of dust
English ORIGINAL instructions

8
extraction and collection facilities, ensure these
are connected and properly used. Use of dust
collection can reduce dust-related hazards
- Ensure that the resulting sparks not become
dangerous, for example, that they don’t reach people
- Do not touch any of the appliance’s moving parts
while it is operating.
- Do not touch the router bit or the workpiece
immediately after operation. They might be extremely
hot and burn you.
- Protect yourself from contact with and the inhalation
of dust created by sanding wood and metal surfaces
and surfaces coated with lead paint. Use protective
equipment that complies with the appropriate health
and safety regulations.
-Exercise precaution after employing the stop
operation on the appliance as the tool will continue
moving from the effect of its own mechanical inertia.
Power tool use and care
- Do not force the power tool. Use the correct
power tool for your application. The correct power
tool will do the job better and safer at the rate for
which it was designed
- Do not use the power tool if the switch does
not turn it on and off. Any power tool that cannot
be controlled with the switch is dangerous and must
be repaired
Disconnect the plug from the power source and/
or battery pack from the power tool before making
any adjustments, changing accessories, or storing
power tools. Such preventive safety measures
reduce the risk of starting the power tool accidentally
- Store idle power tool out of the reach of children
and do not allow persons unfamiliar with the
power tool or these instructions to operate the
power tool. Power tools are dangerous in the hands
of untrained users
-Maintain power tools. Check for misalignment
or binding of moving parts, breakage of parts and
any other condition that may affect the power
tool’s operation. If damaged, have the power tool
repaired before use. Many accidents are caused by
poorly maintained power tools
- Keep cutting tools sharp and clean. Properly
maintained cutting tools with sharp cutting edges are
less likely to bind and are easier to control
-Use the power tool, accessories and tool bits etc
in accordance with these instructions, taking into
account the working conditions and the work to
be performed. Use of the power tool for operations
different from those intended could result in a
hazardous situation.
- CAUTION: In order to prevent overheating do not
cover the appliance.
- CAUTION: Maintain the appliance dry.
- This appliance is for professional use only, not for
household or domestic use.
- Do not expose the appliance to extreme
temperatures
-Let the appliance running with no load for 30
seconds in a safe position. If you notice serious
vibration or other defects stop the appliance
immediately. Then check the problem and /or proceed
as we describe on Anomalies and Repair clause.
- Always check the workpiece before operation and
remove any obstructions such as nails, staples,
screws, string, rags, cloths and other debris.
- Check the position of power cables before
commencing work ensuring they are well away from
the work area.
- Keep hands and other body parts well away from the
work area whist the tool is in use.
Service
- Have your power tool serviced by a qualied
repair person using only identical replacement
parts. This will ensure that the safety of the power
tool is maintained
- Any misuse or failure to follow the instructions for
use renders the guarantee and the manufacturer’s
liability null and void.
Safety Warnings for Routers
- Hold power tool by insulated gripping surfaces,
because the cutter may contact its own cord.
Cutting a “live” wire may make exposed metal parts of
the power tool “live” and shock the operator
- Use clamps or another practical way to secure
and support the workpiece to a stable platform.
Holding the work by your hand or against the body
leaves it unstable and may lead to loss of control
Product description and Specications
Description
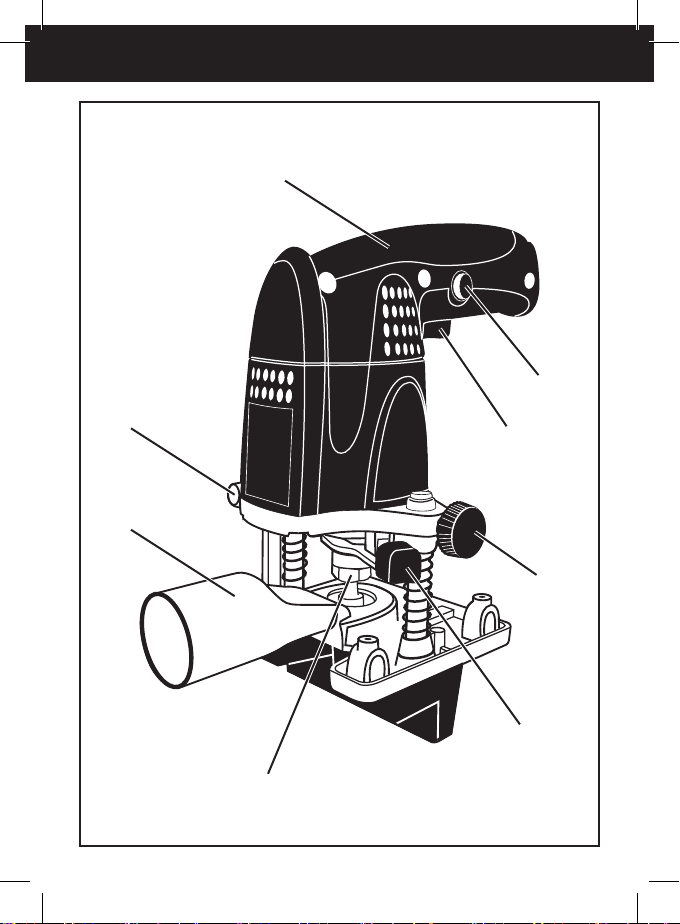
ASwitch
BSwitch locking button
CShaft locking button
DSpanner
ENut
F Collet
GRouter bit
HMoving Base
IFixing knob.

9
JFixing bolt
KDust suction adapter
LDepth adjustment wing nuts
MDepth adjustment wing nut
NDepth adjustment rule
OMoving base unlocking wing nut
PAdjustment wheel
QFixed base
RHandle
SMovement reference
Assembly
Always be sure that the tool is switched off and
unplugged before carrying out any work on the tool.
1 Assembly of the router bit (Fig 2)
- The router is supplied with a 6 mm collet for working
with 6 mm router shank.
- Press the locking button (C) and turn the shaft until
it locks.
- With the spanner (D) loosen the nut by turning it
anticlockwise.
- Insert the cutter (G) into the nut +collet (E+F)
- Completely insert the cutter shaft inside the shaft of
the machine.
- Press the locking button and turn the shaft until it
locks.
- With the spanner (D) tighten the nut by turning it
clockwise until the router bit is completely .
2 Removing the moving guide (Fig 3)
- Loosen and remove the knob (I) by turning it
anticlockwise
- Push the bolt of the base (J) until it is
completely removed.
- Pull the moving base (H) until it is completely
removed.
- Insert the bolt of the base (J) into the hole of
the adjustment wing nut (P)
- Screw the knob (I) into the thread of the
bolt (J).
3 Connecting the dust suction adaptor (Fig 4)
- Remove the moving base (H) of the router.
- Position the holes of the dust adapter (K) in the
threaded lugs of the base.
- Screw the dust suction adapter (K) into the base by
turning the bolts in the bottom of the base.
- Connect the adapter nozzle to the dust suction
adapter (K)
Operating
Before use:
- Make sure that all the product’s packaging has been
removed.
- Unplug the appliance from the mains.
- Prepare the appliance according to the function you
wish to use:
4 Adjustment of depth
Option 1 (Fig 5)
- Loosen the wing nuts (L).
- Use a hinge or any object which has the desired
cutting depth and position it supported on the moving
base (H).
- Push the base in such a way that the columns move
until the router bit is on exactly the same plane as
the hinge.
- Tighten the wing nuts (L).
Option 2 (Fig 6)
- Loosen the wing nuts (L).
- Position the machine on the surface to be cut and
push the handle (R) until the cutter comes into contact
with the surface to be cut.
- Tighten the wing nuts (L) to lock the router in the
cutting start position.
- Loosen the wing nut on the depth rule (M).
- Move the depth rule (N) until it abuts with the lug of
the base
- Move the depth rule (N) upwards. The millimetres
moved are the equivalent of the cutting depth.
- Once the cutting depth is , tighten the wing nut
on the depth rule (M).
5 Adjusting the moving base (Fig. 7)
- Loosen the wing nut (O) to unlock the movement of
the moving base (H).
- Use the adjusting wheel (P) to adjust the transverse
movement of the moving base (H).
- To adjust the moving base (H) there is a scale in
millimetres on both sides of the base.
- Use the end of the base (S) as a movement
reference (S).
- Once you have completed the adjustment, tighten
the wing nut (O).
Use:
- Before connecting the power cord to the mains
power supply ensure the switch is in the off position.
- Connect the appliance to the mains.
- Turn the appliance on, by using the on/off switch (A)

10
Locking button:
- To activate this function press button (B) while
holding down the start-up switch (A).
- To deactivate this function press the start-up (A)
switch right down.
Fitting the hinges (Fig 8)
- Choose a cutter with the same diameter as the width
of the hinge.
- Locate the hinge in the doorframe exactly in the
position where you wish to it.
- Mark the ends of the hinge and the intermediate
as shown in the 8
- Graduate the depth as indicated in Section 4 of the
instructions for use.
- Graduate the moving base as indicated in Section 5
of the instructions for use.
- Penetrate the cutter frontally through one of the ends
of the hinge you have previously marked.
- Supporting the moving base well (H) on the frame,
slide the cutter towards the other end in a single pass.
- To make the intermediate , tilt the router using
one of the ends of the moving base as a pivot.
- Move the router sideways over one of the ends
towards the area of the intermediate .
- Cut the area of the intermediate .
Use as a shaping tool (Fig 9)
The router can also be used as a conventional
shaping tool. To work with it as a shaping tool, you
must remove the moving base (H) as shown in
Section 2 of the instructions for use.
Use as an edge router for Formica (Fig 10)
The router with a moving base is ideal for removing
the excess from Formica sheets glued onto panels.
To do this, you need a conical cutter with hard metal
inserts.
- Any improper use or use not according to the
instructions for use may be dangerous, and invalidate
the guarantee and the manufacturer’s responsibility.
Once you have nished using the appliance:
- Stop the appliance by releasing the on/off switch.
Cleaning
-Disconnect the appliance from the mains and allow it
to cool before undertaking any cleaning task.
- Clean the electrical equipment and the mains
connection with a damp cloth and dry. DO NOT
IMMERSE IN WATER OR ANY OTHER LIQUID.
- Clean the equipment with a damp cloth with a few
drops of washing-up liquid and then dry.
- Do not use solvents, or products with an acid or base
pH such as bleach, or abrasive products, for cleaning
the appliance.
- Do not let water or any other liquid get into the
air vents to avoid damage to the inner parts of the
appliance.
- Never submerge the appliance in water or any other
liquid or place it under running water.
- If the appliance is not in good condition of
cleanliness, its surface may degrade and inexorably
affect the duration of the appliance’s useful life and
could become unsafe to use.
Supplies
- Always use original supplies, designed
for your appliance model.
- These supplies are available in specialist shops.
Anomalies and repair
(Maintenance and servicing)
- Take the appliance to an authorised technical
support service if a product damage or other problems
arise. Do not try to dismantle or repair without
assistance, as this may be dangerous.
- If the connection to the mains has been damaged,
it must be replaced and you should proceed as you
would in the case of damage.
Specications: FC14
- Rated Power: 430W
- Rated Voltage: 230V
- No load Speed 26.000 rpm
- Clamp for milling cutters 6mm
- Maximum Longitudinal shift 30mm
- Cross slide shift 28mm
- Weight: 1.8 Kg
- Sound Pressure level (LpA): 83.0 dB(A), KpA = 3 dB(A)
- Sound Power level (LwA): 94.0 dB(A), KwA = 3 dB(A)
- Vibration: 7.7 m/s2, K= 1.5 m/s2
NB: These are subject to change
without notice of purpose of improvement.
- Measured sound level determined according
EN60745
- The vibration emission level given in this information
sheet has been measured according EN60745 and
may be used to compare one tool with other. It may be
used for a preliminary assessment of exposure
- The vibration value during actual use of the power
Table des matières
Langues :
Autres manuels Casals Outils électriques

Casals
Casals V@MTLI108 Manuel utilisateur

Casals
Casals SA400 Manuel utilisateur

Casals
Casals SA650PEL Manuel utilisateur

Casals
Casals VNC50 Manuel utilisateur

Casals
Casals CT2200VCE Manuel utilisateur

Casals
Casals CSG3620 Manuel utilisateur

Casals
Casals HAG2000A Manuel utilisateur

Casals
Casals MT300EK Manuel utilisateur

Casals
Casals CDW710 Manuel utilisateur

Casals
Casals VD2000M Manuel utilisateur


