Carrier Zone Manager Manuel utilisateur

NEW
Zone Manager
OWNER’S MANUAL
•
L
L
O
Y
D
'
S
R
E
G
I
S
T
E
R
Q
U
A
L
I
T
Y
A
S
S
U
R
A
N
C
E
I
S
O
9
0
0
1
40KMC---N
42HMC---N
42VMC---N
40SMC---N

ZoneManager
GB - 1
ENGLISH
Owner's manual
This control system only operates with indoor units of the following models:
42HMC---N Hi-Wall, 42VMC---N Console & Underceiling, 40SMC---N Satellite and 40KMC---N Cassette.
For installation instructions of this unit, refer to the relevant manuals.
Contents Page
General information.................................................................................... 2
Characteristics............................................................................................ 2/3
Switching on................................................................................................ 3
Day and hour settings................................................................................. 4
Normal operation ........................................................................................ 5/6
System programming ................................................................................. 7/10
Example of general programming .............................................................. 11
System override.......................................................................................... 12/14
Zone programming tables........................................................................... 15
Table I: Example of general programming
PERIOD 1 PERIOD 2 PERIOD 3 PERIOD 4
Time / Setpoint / Mode Time / Setpoint / Mode Time / Setpoint / Mode Time / Setpoint / Mode
Monday 7,30 => 22°ON 10,45 => 19°ON 12,00 => 20°ON 20,30 => 18°SB
Tuesday 6,30 => 21°SB 10,00 => 20°ON 13,30 => 18°ON 22,00 => OFF
Wednesday 7,30 => 22°ON 10,30 => 19°ON 13,30 => 18°ON 18,00 => OFF
Thursday 5,00 => 20°SB 10,30 => 19°ON 12,30 => 20°ON 20,00 => 20°SB
Friday 7,30 => 22°ON 10,15 => 21°ON 15,00 => OFF
Saturday 11,00 => 18°ON 14,00 => 22°ON
Sunday 3,00 => OFF
Programming example for one week using the four periods provided.

GB - 2
Zone Manager
"up" and "down" buttons
Buttons for raising or lowering the temperature and adjusting
the time selected on the display.
Function buttons
Open panel 1: the internal keyboard has 9 buttons 8 of which
have double functions.
• Normal function buttons
blue writing with no background
• Function buttons for programming:
writing on a grey background usable only when the "PROGRAM"
button has been pressed.
NORMAL FUNCTION BUTTONS
PROGRAM
Programming mode entry button.
ZONE ALL
Programming extension button
shown on display for all zones (maximum 8).
LOUVER
Operating mode choice button for air flow regulation louvers.
FAN
Fan speed regulation button.
MODE
Operating mode choice button.
HOLD
Temperature regulation button overriding the programming set.
General information and characteristics
Zone Manager is a control system that permits the connection
of up to 32 different internal units (Cassette, Console, Hi-Wall)
divided into a maximum of eight different zones.
Each of the seven programmable days per zone are divided
into four time periods.
In case of mains power supply failure, autonomous operation is
maintained for up to 20 hours.
IMPORTANT:
Read this manual carefully before using the appliance.
• Pay special attention to maintaining a comfortable room
temperature above all for children and elderly or handicapped
persons.
• For correct use the conditioner must only operate at the
temperatures indicated in the "Operating Limits" table in the
installation manuals of the external and internal units.
If the unit is made to operate beyond these limits faults or
water leaks may occur.
• Make sure the Zone Manager control unit has not been
damaged in transport; if the opposite is true file an immediate
claim with the shipping company.
• Only use the appliance for the purpose it was designed.
• Dispose of packaging material in accordance with local
requirements.
• Do not open the appliance otherwise it may suffer damage.
In case of malfunctioning, contact a qualified service
engineer.
1
up
down
down
ZONE 1
ZONE ....
ZONE 8
Zone
Manager
Remote
control
up
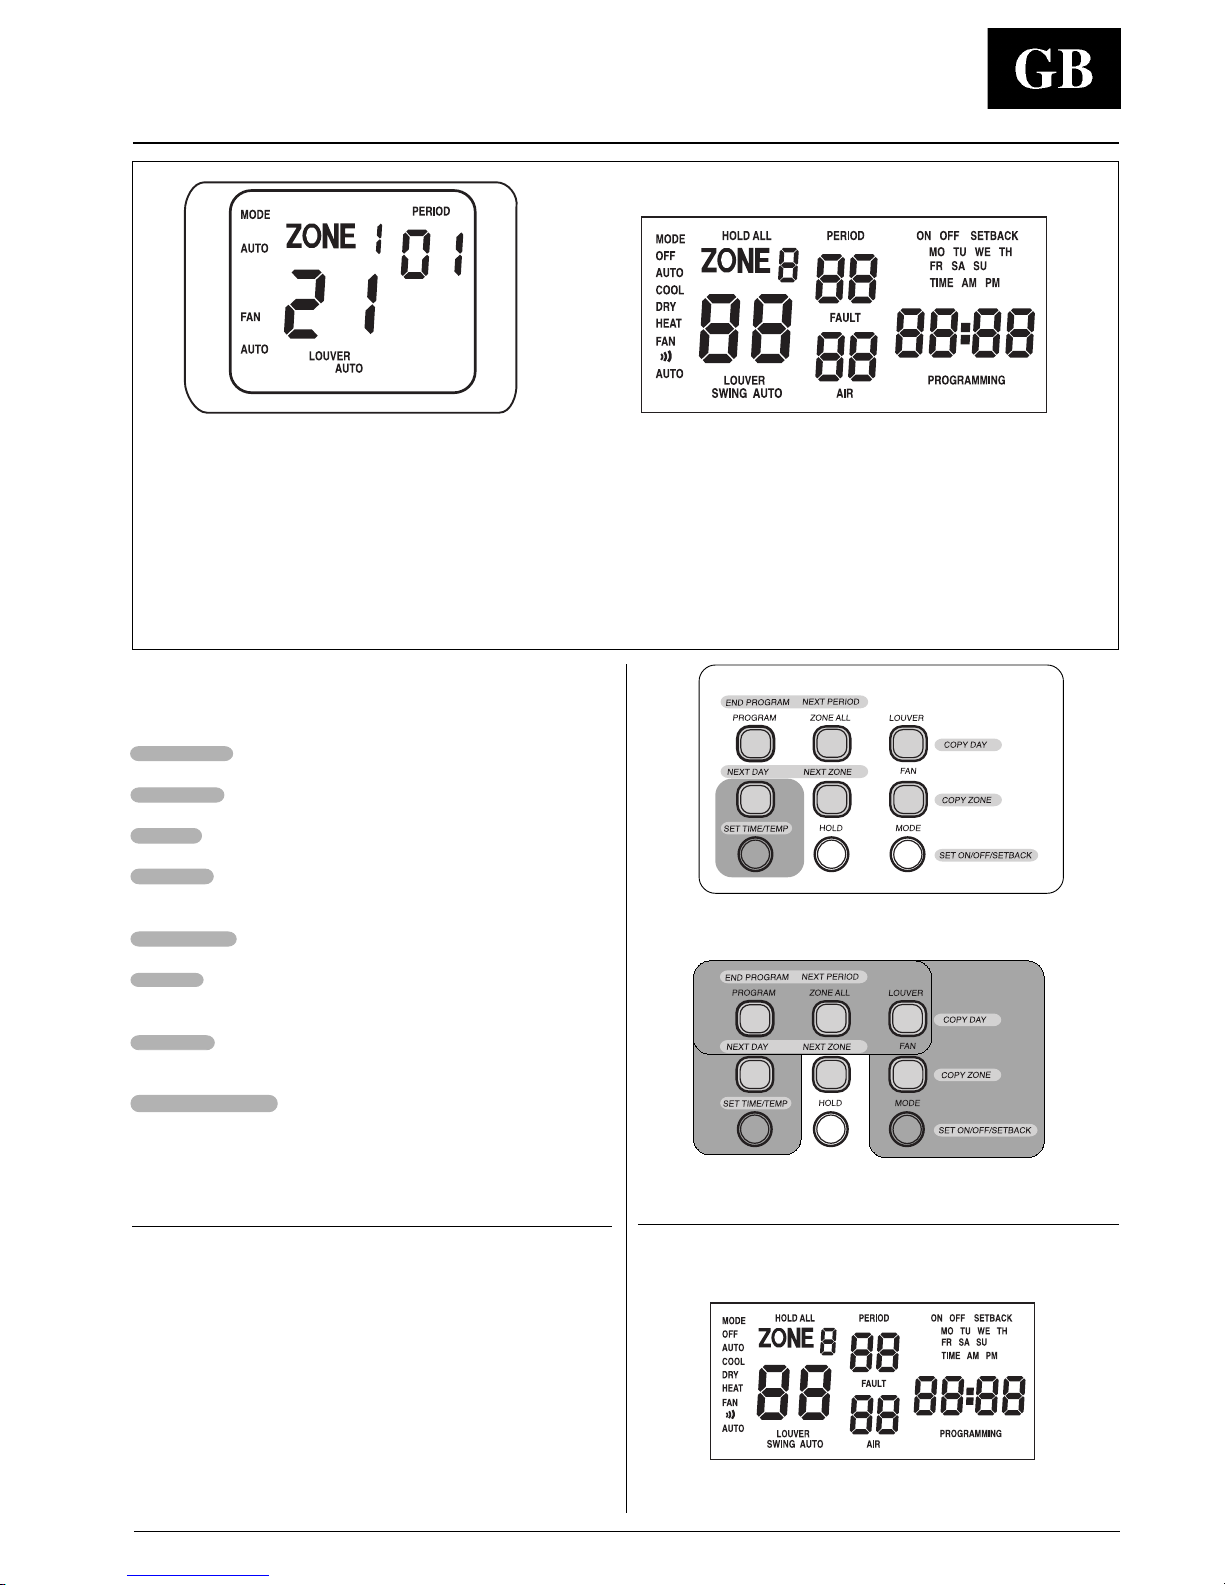
Normal function buttons
GB - 3
Zone Manager
ENGLISH
Programming buttons
Example of normal operating Control display with panel open
Key to abbreviations of the days of the week
MO = Mondey
TU = Tuesday
WE = Wednesday
TH = Thursday
FR = Friday
SA = Saturday
SU = Sunday
Characteristics and switching on
Day regulation buttons
Function buttons for programming
Press the "PROGRAM" button to enter programming mode.
When this button is pressed the buttons described below work.
END PROGRAM
End programming button.
NEXT PERIOD
Button for passage to the next period of the selected zone.
NEXT DAY
Button for selecting the day after the one shown on the display.
NEXT ZONE
Button for passing to the zone after the one shown on the
display
SET TIME/TEMP
Time or temperature selection button for a given period.
COPY DAY
Copies the programming of the previous day onto the current
day for that zone.
COPY ZONE
Copies the programming of the previous zone onto the one
shown on the display.
SET ON/OFF/SETBACK
Button for selecting the operating mode for each period.
Switching on
When switched on the unit is illuminated with a yellow colour
and a control display appears with all the symbols of the
various functions lighted.
The illuminated display switches itself off after around 30".
To switch it on again, press once of the two "up" or "down"
buttons or any function button inside panel 1.
By opening cover 1, the display is uncovered completely to
show time and other functions.

Zone Manager
GB - 4
Switching on and day and hour settings
Setting the current time
•Press the "SET TIME/TEMP" button.
The "TIME"word blinks on the display for 15".
•Press the "up" or "down" button. The time will be displayed in
one of the following modes (consult the Zone Manager
installation manual):
- 12 hours with AM = morning, PM = Afternoon
- 24 hours
The time goes forwards or backwards by one minute at a time.
Holding the button down gives fast advance.
•Press the "SET TIME/TEMP" button again to exit "SET TIME" mode
.
The word "TIME"disappears from the display.
Setting the current day
•Press the "SET TIME/TEMP" button.
The word "TIME"blinks for 15 seconds.
•Press the "NEXT DAY" button and stop on the desired day.
Successive days of the week are indicated on the display with
each press of the button.
•Press the "SET TIME/TEMP" button again to exit "SET TIME" mode.
The word "TIME"disappears from the display.
NOTE:
If you choose not press the "SET TIME/TEMP" button, "SET TIME"
mode will automatically shut off after 10 seconds.
EXAMPLE:
To set Tuesday, time 15.32 (3.32 PM).
• Press "SET TIME/TEMP" to enter day/time programming.
up
down
up
dow
n
•Press "up" or "down" to set the time until "3:32 PM" appears
on the display.
•Press "NEXT DAY" to set the day until "TU" appears on the
display.
•Press "SET TIME/TEMP" to exit day/time programming.

Zone Manager
GB - 5
ENGLISH
Setting mode operation
•Press the "MODE" button.
On the display readout, the words "OFF", "AUTO", "COOL", "DRY"
and "FAN ONLY"will rotate as the "MODE" button is pressed.
OFF All the units in the displayed (selected) zone are
switched off.
The temperature, fan speed and louver operating mode
indications disappear from the display.
NOTE:
If the temperature sensor in the Zone Manager is "ON", the
room air temperature will be displayed and the Setpoint
disappear from the display.
AUTO Your system will heat or cool as needed to reach your
desired temperature.
COOL Cooling operation
DRY Drying operation
HEAT Heating operation
fan only Ventilation operation only
The temperature indication disappears from the display.
NOTE:
The operating mode setting applies to the zone selected on the
display.
Normal operation

Zone Manager
GB - 6
Button to display the operating modes of each zone
• Press the "NEXT ZONE" button.
The successive zone is selected on the display with the
relative operating parameters.
EXAMPLE:
Zone 1:
- MODE: OFF
Zone 2:
- MODE: COOL
- FAN: ) ) )
- LOUVER: SWING
• Set the mode, ventilation and air flow direction using the
various function buttons.
Air flow adjustment
• Use the "LOUVER" button to set the desired air flow direction.
AUTO Automatic louver positioning to the best position for the
selected operating mode.
SWING Louvers swing continuously.
NOTE:
The air flow setting applies to the zone selected on the display.
To select the next zone press "NEXT ZONE".
Setting the fan
• Press the "FAN" button.
The display indicates four possible speed settings:
)Low
)) Medium
))) Maximum
AUTO The fan runs at the optimum speed to maintain your desired
indoor temperature.
NOTE:
The speed setting applies to the zone selected on the display.
To select the next zone press "NEXT ZONE".
Normal operation

Zone Manager
GB - 7
ENGLISH
System programming
Access to programming
IMPORTANT:
Before you program your Zone Manager, take a moment to
plan you temperature schedule.
Each day of the week is divided into four time periods: 1, 2,
3, and 4. For each time period, enter a start time and a
setpoint in the appropriate block.
•Press the "PROGRAM" button.
The word "PROGRAMMING" appears on the display confirming
access to the programming mode and the time blinks.
•Perform the desired operations.
•Press the "END PROGRAM" button to exit programming.
Choosing the day to program
•Press the "PROGRAM" button.
•Press the "NEXT DAY" button.
Each time the button is pressed a successive day of the week
is displayed.
•To exit programming mode press the "END PROGRAM" button.
Choosing the zones to program:
•Press the "PROGRAM" button.
•Press the "NEXT ZONE" button.
The chosen zone appears on the display.
•To exit programming mode press the "END PROGRAM" button.

Zone Manager
GB - 8
Programming zone periods
WARNING:
Each zone can have a maximum of 4 periods.
•Press the "PROGRAM" button.
"ZONE 1" and "PERIOD 1" are first displayed for the current day.
The current time programmed for that period will flash
indicating a change can be mode if desired.
1st period programming zone 1:
•Press "up" or "down" buttons to set the time according to
your personalized schedule.
•Premere il tasto "SET TIME/TEMP".
Sul display lampeggia il valore della temperatura.
•Press "up" or "down" buttons to adjust the temperature
setting to match your personalized schedule.
2nd, 3rd, and 4th period programming:
•Press "NEXT PERIOD".
The next period appears on the display (PERIOD 2).
•Repeat the operations for the first period to program the time
and temperature.
•Do the same for periods 3 and 4.
•If a period is not needed select the time as shown that can be
reached after 23:45.
•Press the "END PROGRAM" button to exit programming.
System programming
up
down
up
down

Zone Manager
GB - 9
ENGLISH
Operation mode programming
•Press the "PROGRAM" button.
•Press the "NEXT DAY" button to select the day to program.
•Press the "MODE" button.
Each press changes the programming mode.
ON The selected zone units are switched on.
OFF The selected zone units are switched off.
SETBACK The selected zone units are in "energy saving" mode.
EXAMPLE:
Setpoint: 12,00 with "SETBACK" function inserted.
WARNING:
The "SETBACK" function can only be selected if "AUTO"
operation is selected (see "Setting mode operation").
•Continue programming selecting the zone and periods for
setpoint definition.
Copying a zoning schedule
To assist in creating schedules for all your zones, the Zoning
System Manager includes a "COPY ZONE" button.
When programming, this eliminates the need to re-enter
identical information for each zone.
•Press the "PROGRAM" button. Program a zone schedule.
•Press the "NEXT ZONE" button to move to the next zone.
•Press the "COPY ZONE" button.
The previous zone's schedule will be copied into the zone.
Continue copying the programming for the other zones of
interest.
•Press the "END PROGRAM" button to exit programming.
NOTE:
This function copies all the days of the previous zone into the
current zone.
System programming
Autres manuels pour Zone Manager
2
Table des matières
Autres manuels Carrier Système de contrôle

Carrier
Carrier SmartView Manuel utilisateur

Carrier
Carrier SmartVu control Manuel d'utilisation et d'entretien

Carrier
Carrier AQUASNAP 30RA/RH Mode d’emploi

Carrier
Carrier i-Vu CCN Pro 4.2 Manuel utilisateur

Carrier
Carrier 3V VVT 33ZCVVTZC-01 Instructions et recettes

Carrier
Carrier SYSTXCCSMS01-A Manuel utilisateur

Carrier
Carrier Infinity SYSTXCCITC-01SI Manuel utilisateur

Carrier
Carrier Zone Manager Manuel utilisateur

Carrier
Carrier Fireye PMSTR-4000 Manuel utilisateur

Carrier
Carrier ZONECC3ZAC01 Manuel utilisateur


